IOS實現左右兩個TableView聯動效果
編輯:IOS開發綜合
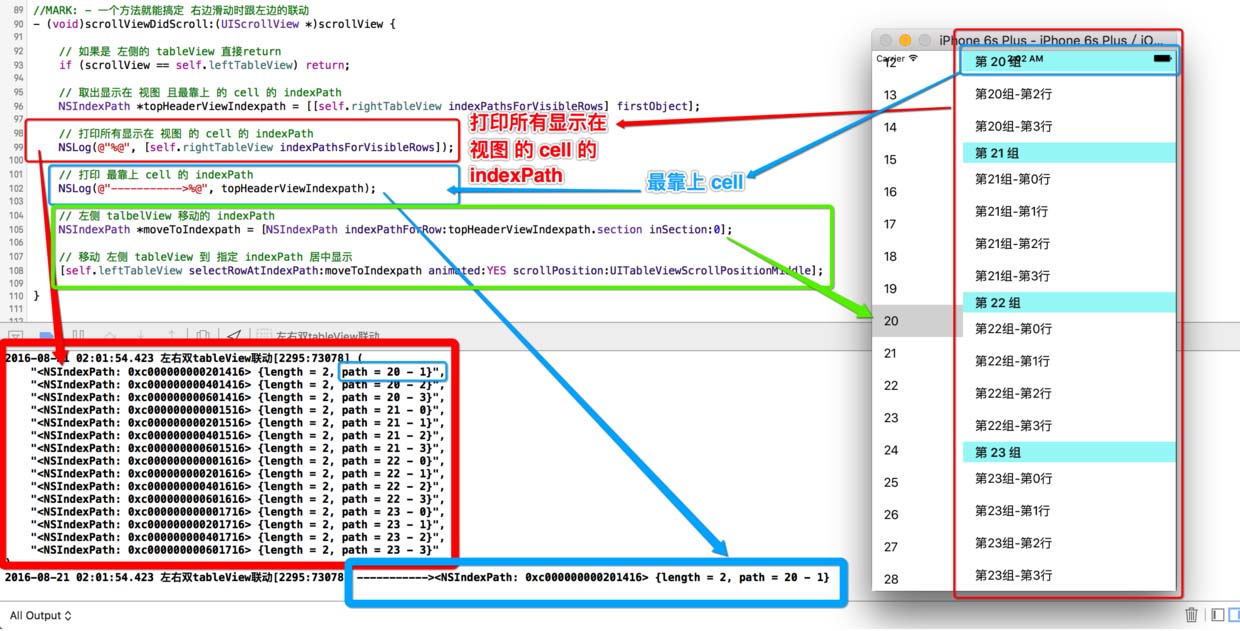
一、先來看看要實現的效果圖

二、小解析,可以先看看後面的!

三、實現 tableView聯動 主要分兩種狀況
1、點擊 左側 cell 讓右側 tableView 滾到對應位置
2、滑動 右側 tableView 讓左側 tableView 滾到對應位置
1.先實現簡單的:點擊 左側 cell 讓右側 tableView 滾到對應位置
//MARK: - 點擊 cell 的代理方法
- (void)tableView:(UITableView *)tableView didSelectRowAtIndexPath:(NSIndexPath *)indexPath {

 // 判斷是否為 左側 的 tableView
 if (tableView == self.leftTableView) {

  // 計算出 右側 tableView 將要 滾動的 位置
  NSIndexPath *moveToIndexPath = [NSIndexPath indexPathForRow:0 inSection:indexPath.row];

  // 將右側 tableView 移動到指定位置
  [self.rightTableView selectRowAtIndexPath:moveToIndexPath animated:YES scrollPosition:UITableViewScrollPositionTop];

  // 取消選中效果
  [self.rightTableView deselectRowAtIndexPath:moveToIndexPath animated:YES];
 }
}
左側 按鈕點擊的聯動 搞定!
2.滑動 右側 tableView 讓左側 tableView 滾到對應位置
[self.rightTableView indexPathsForVisibleRows] 返回 所有顯示在界面的 cell 的 indexPath
//MARK: - 一個方法就能搞定 右邊滑動時跟左邊的聯動
- (void)scrollViewDidScroll:(UIScrollView *)scrollView {

 // 如果是 左側的 tableView 直接return
 if (scrollView == self.leftTableView) return;

 // 取出顯示在 視圖 且最靠上 的 cell 的 indexPath
 NSIndexPath *topHeaderViewIndexpath = [[self.rightTableView indexPathsForVisibleRows] firstObject];

 // 左側 talbelView 移動到的位置 indexPath
 NSIndexPath *moveToIndexpath = [NSIndexPath indexPathForRow:topHeaderViewIndexpath.section inSection:0];

 // 移動 左側 tableView 到 指定 indexPath 居中顯示
 [self.leftTableView selectRowAtIndexPath:moveToIndexpath animated:YES scrollPosition:UITableViewScrollPositionMiddle];

}
第二步 右側 滑動 跟左側 的聯動 搞定! 對的 就是這麼簡單!!!
四、警告
看到別人通過這兩個方法判斷!!! 勿用!!!
會導致 tableView 的聯動 不准確
#pragma mark - UITableViewDelegate 代理方法 -
- (void)tableView:(UITableView *)tableView willDisplayHeaderView:(UIView *)view forSection:(NSInteger)section {
//
// headerView 將要顯示
// 這兩個方法都不准確
}
- (void)tableView:(UITableView *)tableView didEndDisplayingHeaderView:(UIView *)view forSection:(NSInteger)section {
//
// headerView 已經顯示
// 這兩個方法都不准確
}
五、以下是所有示例代碼
//
// ViewController.m
// 左右雙tableView聯動
//
// Created by 阿酷 on 16/8/20.
// Copyright © 2016年 AkuApp. All rights reserved.
//

#import "ViewController.h"

#define leftTableWidth [UIScreen mainScreen].bounds.size.width * 0.3
#define rightTableWidth [UIScreen mainScreen].bounds.size.width * 0.7
#define ScreenWidth  [UIScreen mainScreen].bounds.size.width
#define ScreenHeight [UIScreen mainScreen].bounds.size.height

#define leftCellIdentifier @"leftCellIdentifier"
#define rightCellIdentifier @"rightCellIdentifier"

@interface ViewController () <UITableViewDataSource, UITableViewDelegate>

@property (nonatomic, weak) UITableView *leftTableView;

@property (nonatomic, weak) UITableView *rightTableView;

@end

@implementation ViewController

- (void)viewDidLoad {
 [super viewDidLoad];

 [self.view addSubview:self.leftTableView];
 [self.view addSubview:self.rightTableView];
}


#pragma mark - tableView 數據源代理方法 -
- (NSInteger)tableView:(UITableView *)tableView numberOfRowsInSection:(NSInteger)section {

 if (tableView == self.leftTableView) return 40;
 return 8;
}

- (NSInteger)numberOfSectionsInTableView:(UITableView *)tableView {

 if (tableView == self.leftTableView) return 1;
 return 40;
}

- (UITableViewCell *)tableView:(UITableView *)tableView cellForRowAtIndexPath:(NSIndexPath *)indexPath {

 UITableViewCell *cell;

 // 左邊的 view
 if (tableView == self.leftTableView) {

  cell = [tableView dequeueReusableCellWithIdentifier:leftCellIdentifier forIndexPath:indexPath];
  cell.textLabel.text = [NSString stringWithFormat:@"%ld", indexPath.row];

  // 右邊的 view
 } else {

  cell = [tableView dequeueReusableCellWithIdentifier:rightCellIdentifier forIndexPath:indexPath];
  cell.textLabel.text = [NSString stringWithFormat:@"第%ld組-第%ld行", indexPath.section, indexPath.row];
 }

 return cell;
}

- (NSString *)tableView:(UITableView *)tableView titleForHeaderInSection:(NSInteger)section {

 if (tableView == self.rightTableView) return [NSString stringWithFormat:@"第 %ld 組", section];

 return nil;
}


#pragma mark - UITableViewDelegate 代理方法 -
//- (void)tableView:(UITableView *)tableView didEndDisplayingHeaderView:(UIView *)view forSection:(NSInteger)section {
//
// 這兩個方法都不准確
//}
//
//- (void)tableView:(UITableView *)tableView willDisplayHeaderView:(UIView *)view forSection:(NSInteger)section {
//
// 這兩個方法都不准確
//}

//MARK: - 一個方法就能搞定 右邊滑動時跟左邊的聯動
- (void)scrollViewDidScroll:(UIScrollView *)scrollView {

 // 如果是 左側的 tableView 直接return
 if (scrollView == self.leftTableView) return;

 // 取出顯示在 視圖 且最靠上 的 cell 的 indexPath
 NSIndexPath *topHeaderViewIndexpath = [[self.rightTableView indexPathsForVisibleRows] firstObject];

 // 左側 talbelView 移動的 indexPath
 NSIndexPath *moveToIndexpath = [NSIndexPath indexPathForRow:topHeaderViewIndexpath.section inSection:0];

 // 移動 左側 tableView 到 指定 indexPath 居中顯示
 [self.leftTableView selectRowAtIndexPath:moveToIndexpath animated:YES scrollPosition:UITableViewScrollPositionMiddle];

}

//MARK: - 點擊 cell 的代理方法
- (void)tableView:(UITableView *)tableView didSelectRowAtIndexPath:(NSIndexPath *)indexPath {

 // 選中 左側 的 tableView
 if (tableView == self.leftTableView) {

  NSIndexPath *moveToIndexPath = [NSIndexPath indexPathForRow:0 inSection:indexPath.row];

  // 將右側 tableView 移動到指定位置
  [self.rightTableView selectRowAtIndexPath:moveToIndexPath animated:YES scrollPosition:UITableViewScrollPositionTop];

  // 取消選中效果
  [self.rightTableView deselectRowAtIndexPath:moveToIndexPath animated:YES];
 }
}

#pragma mark - 懶加載 tableView -
// MARK: - 左邊的 tableView
- (UITableView *)leftTableView {

 if (!_leftTableView) {

  UITableView *tableView = [[UITableView alloc] initWithFrame:CGRectMake(0, 0, leftTableWidth, ScreenHeight)];

  [self.view addSubview:tableView];

  _leftTableView = tableView;

  tableView.dataSource = self;
  tableView.delegate = self;

  [tableView registerClass:[UITableViewCell class] forCellReuseIdentifier:leftCellIdentifier];
  tableView.backgroundColor = [UIColor redColor];
  tableView.tableFooterView = [[UIView alloc] init];

 }
 return _leftTableView;
}

// MARK: - 右邊的 tableView
- (UITableView *)rightTableView {

 if (!_rightTableView) {

  UITableView *tableView = [[UITableView alloc] initWithFrame:CGRectMake(leftTableWidth, 0, rightTableWidth, ScreenHeight)];

  [self.view addSubview:tableView];

  _rightTableView = tableView;

  tableView.dataSource = self;
  tableView.delegate = self;

  [tableView registerClass:[UITableViewCell class] forCellReuseIdentifier:rightCellIdentifier];
  tableView.backgroundColor = [UIColor cyanColor];
  tableView.tableFooterView = [[UIView alloc] init];

 }
 return _rightTableView;
}
@end
六、總結
IOS實現左右兩個TableView聯動效果的內容到這就結束了,這種的效果在我們平常的時候還是挺常見的,感興趣的朋友們可以自己動手操作起來,希望對大家的學習工作能有所幫助。
- 上一頁:IOS實現圓形圖片效果的兩種方法
- 下一頁:總結IOS中隱藏軟鍵盤的三種方式
相關文章
+


