iOS開發之表視圖詳解
本文詳細介紹了表視圖的用法。具體如下:
概述
表視圖組成
表視圖是iOS開發中最重要的視圖,它以列表的形式展示數據。表視圖又一下部分組成:
-
表頭視圖:表視圖最上邊的視圖
-
表腳視圖:表視圖最下邊的視圖
-
單元格(cell):表視圖中每一行的視圖
-
節(section):由多個單元格組成,應用於分組列表
-
節頭
-
節腳
-
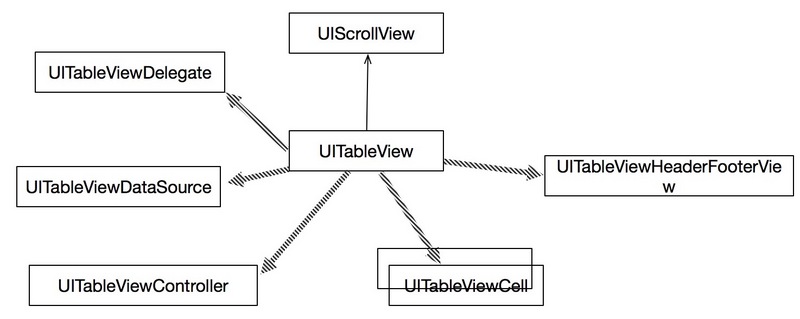
表視圖的相關類
UITableView繼承自UIScrollView,且有兩個協議:UITableViewDelegate和UITableViewDataSource。此外UITableViewCell類時單元格類,UITableViewController類時UITableView的控制器,UITableViewHeaderFooterView用於為節頭和節腳提供視圖。
表視圖分類
- 普通表視圖:主要用於動態表,而動態表一般在單元格數目未知的情況下使用
- 分組表視圖:一般用於靜態表,用來進行界面布局
單元格的組成和樣式
單元格由圖標、主標題、副標題、擴展視圖組成,可以根據需要進行選擇,其中內置的擴展視圖在枚舉類型
Swift枚舉成員
Objective-C枚舉成員
說明
none
ITableViewCellAccessoryNone
沒有擴展圖標
disclosureIndicator
UITableViewCellAccessoryDisclosureIndicator
擴展指示器,為箭頭+問號
detailDisclosureButton
UITableViewCellAccessoryDetailDisclosureButton
細節展示圖,為問號
checkmark
UITableViewCellAccessoryCheckmark
選中標志,圖標為勾
detailButton
UITableViewCellAccessoryDetailButton
細節詳情展示,圖標為問號
內置的單元格樣式在枚舉類型UITableViewCellStyle中定義:
數據源協議與委托協議
UITableViewDataSource
數據源協議主要為表視圖提供數據,主要方法如下
方法
返回類型
說明
func tableView(UITableView, cellForRowAt: IndexPath)
UITableViewCell
為表視圖單元格提供數據,必須實現
tableView(UITableView, numberOfRowsInSection: Int)
Int
返回某個節中的行數,必須實現
tableView(UITableView, titleForHeaderInSection: Int)
String
返回節頭的標題
tableView(UITableView, titleForFooterInSection: Int)
String
返回節腳的標題
numberOfSections(in: UITableView)
Int
返回節的個數
sectionIndexTitles(for: UITableView)
[String]?
返回表示圖節索引標題
UITableViewDelegate
委托協議主要主要用來設定表視圖中節頭和節腳的標題,以及一些動作事件,主要方法如下
簡單表視圖
UIViewController根視圖控制器實現表視圖
步驟
- 創建一個iOS工程
- 從對象庫中拖入一個TableView到storyboard文件中,並將TableView覆蓋整個View
- 打開Table View的屬性檢查器,將PrototypeCells的值設為1,注意不要添加多個,否則會發生錯誤;此時Table View會添加一個Table View Cell。
- 打開Table View Cell的屬性檢查器,設置Identifier屬性。
- 注冊UITableViewDataSource和UITableViewDelegate協議
- 編寫代碼實現功能
實現
//
// ViewController.swift
// TableViewDemo
//
// Created by Michael on 2016/10/26.
// Copyright © 2016年 Michael. All rights reserved.
//

import UIKit

class ViewController: UIViewController,UITableViewDataSource,UITableViewDelegate {

 //全部數據
 var listItems: NSArray!

 override func viewDidLoad() {
  super.viewDidLoad()

  //讀取資源文件數據
  let listPath = Bundle.main.path(forResource: "team", ofType: "plist")
  self.listItems = NSArray(contentsOfFile: listPath!)
 }

 override func didReceiveMemoryWarning() {
  super.didReceiveMemoryWarning()
  // Dispose of any resources that can be recreated.
 }

 //返回列表每行的視圖
 func tableView(_ tableView: UITableView, cellForRowAt indexPath: IndexPath) -> UITableViewCell {
 //根據Identifier找到Cell
  let cell = tableView.dequeueReusableCell(withIdentifier: "CustomId", for: indexPath)
  let row = indexPath.row

  let rowDict = self.listItems[row] as! NSDictionary
  cell.textLabel?.text = rowDict["name"] as? String
  cell.detailTextLabel?.text = "123"

  let imagePath = String(format: "%@.png", rowDict["image"] as! String)
  cell.imageView?.image = UIImage(named: imagePath)
  cell.accessoryType = UITableViewCellAccessoryType.disclosureIndicator
  return cell
 }

 //返回條目數目
 func tableView(_ tableView: UITableView, numberOfRowsInSection section: Int) -> Int {
  return self.listItems.count
 }

 //響應條目點擊事件
 func tableView(_ tableView: UITableView, didSelectRowAt indexPath: IndexPath) {
  print("點擊事件")
 }

}
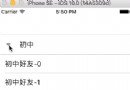
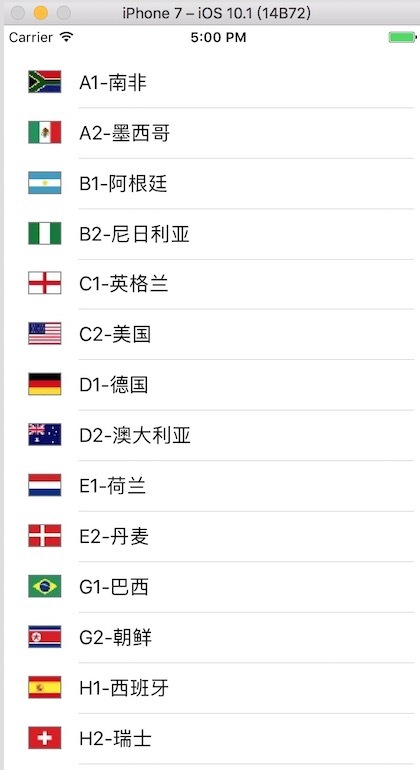
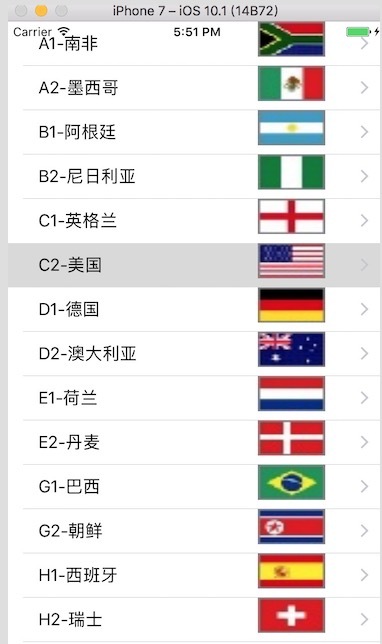
示例圖
none模式
disclosureIndicator
UITableViewController根視圖控制器實現表視圖
步驟
- 創建一個iOS工程
- 刪除storyboard中View Controller Scene 中的View Controller,再從對象庫拖入一個Table View Controller到設計界面
- 打開Table View Controller屬性檢查器,勾選Is Initial View Controller選項,否則應用啟動後是黑屏
- 將ViewController類的父類由UIViewController改為UITableViewController
- 打開View Controller的屬性選擇器在Class列表中選擇ViewController
- UITableViewController默認以注冊UITableViewDataSource和UITableViewDelegate協議,不需要再注冊
實現
import UIKit

class ViewController: UITableViewController {

 //全部數據
 var listItems: NSArray!

 override func viewDidLoad() {
  super.viewDidLoad()

  //讀取資源文件數據
  let listPath = Bundle.main.path(forResource: "team", ofType: "plist")
  self.listItems = NSArray(contentsOfFile: listPath!)
 }

 override func didReceiveMemoryWarning() {
  super.didReceiveMemoryWarning()
  // Dispose of any resources that can be recreated.
 }

 //返回列表每行的視圖
 func tableView(_ tableView: UITableView, cellForRowAt indexPath: IndexPath) -> UITableViewCell {
  let cell = tableView.dequeueReusableCell(withIdentifier: "CustomId", for: indexPath)
  let row = indexPath.row

  let rowDict = self.listItems[row] as! NSDictionary
  cell.textLabel?.text = rowDict["name"] as? String
  cell.detailTextLabel?.text = "123"

  let imagePath = String(format: "%@.png", rowDict["image"] as! String)
  cell.imageView?.image = UIImage(named: imagePath)
  cell.accessoryType = UITableViewCellAccessoryType.disclosureIndicator
  return cell
 }

 //返回條目數目
 func tableView(_ tableView: UITableView, numberOfRowsInSection section: Int) -> Int {
  return self.listItems.count
 }

 //響應條目點擊事件
 func tableView(_ tableView: UITableView, didSelectRowAt indexPath: IndexPath) {
  print("點擊事件")
 }

}
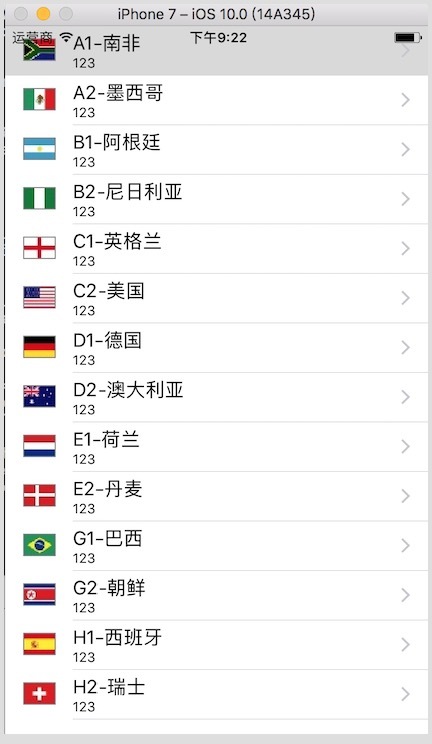
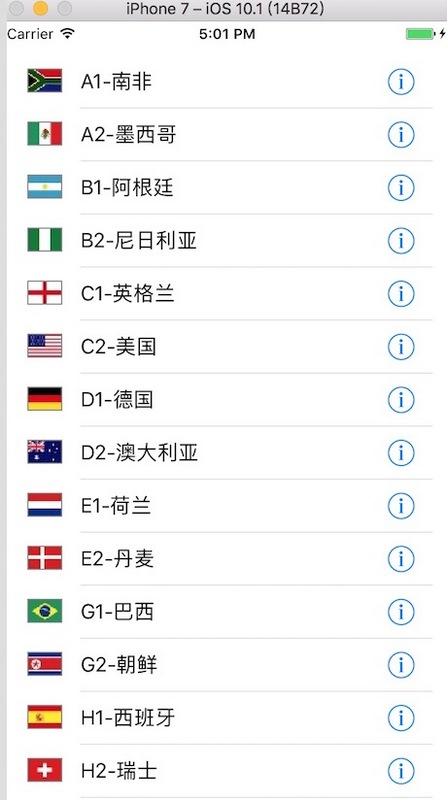
示例圖
detailButton模式
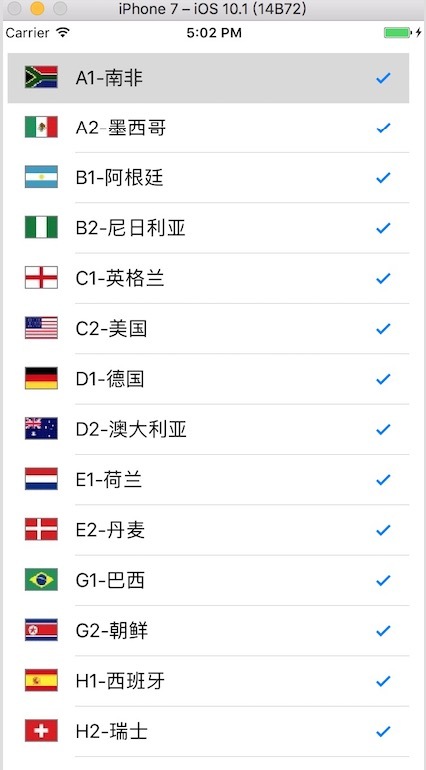
checkmark模式
自定義單元格
步驟
- 創建一個表視圖工程
- 修改根視圖控制器為表視圖控制器UITableViewController,參照上節的步驟
- 從對象庫中拖入控件到單元格內部,比如Lable和ImageView
- 創建自定義單元格類CustomCell文件,並繼承UITableViewCell類
- 在設計界面中選擇View Controller Scene中的Table View Cell,並打開屬性檢查器,將Class設為CustomCell類,並設置單元格的Identifier
- 為單元格中的控件Label和ImageView控件連接輸出接口,將控件綁定到CustomCell類中
- 打開ViewController類,編寫代碼實現
實現
CustomCell類
//
// CustomCell.swift
// CustomCell
//
// Created by Michael on 2016/10/25.
// Copyright © 2016年 Michael. All rights reserved.
//

import UIKit

class CustomCell: UITableViewCell {

 @IBOutlet weak var mImage: UIImageView!
 @IBOutlet weak var mLabel: UILabel!
 override func awakeFromNib() {
  super.awakeFromNib()
  // Initialization code
 }

 override func setSelected(_ selected: Bool, animated: Bool) {
  super.setSelected(selected, animated: animated)

  // Configure the view for the selected state
 }

}
ViewController類
//
// ViewController.swift
// SimpleTableView
//
// Created by Michael on 2016/10/24.
// Copyright © 2016年 Michael. All rights reserved.
//

import UIKit

class ViewController: UITableViewController {

 var listItems: NSArray!

 override func viewDidLoad() {
  super.viewDidLoad()
  // Do any additional setup after loading the view, typically from a nib.
  let listPath = Bundle.main.path(forResource: "team", ofType: "plist")
  self.listItems = NSArray(contentsOfFile: listPath!)
 }

 override func didReceiveMemoryWarning() {
  super.didReceiveMemoryWarning()
  // Dispose of any resources that can be recreated.
 }


 override func tableView(_ tableView: UITableView, numberOfRowsInSection section: Int) -> Int {
  return self.listItems.count
 }


 override func tableView(_ tableView: UITableView, cellForRowAt indexPath: IndexPath) -> UITableViewCell {
 //找到自定義單元格
  let cell:CustomCell! = tableView.dequeueReusableCell(withIdentifier: "CustomCellId", for: indexPath) as? CustomCell
  //let cell = UITableViewCell(style: .value1, reuseIdentifier: "CellIdentifier")
  let row = indexPath.row

  let rowDict = self.listItems[row] as! NSDictionary
  //設置控件屬性
  cell.mLabel.text = rowDict["name"] as? String

  let imagePath = String(format: "%@.png", rowDict["image"] as! String)
  cell.mImage.image = UIImage(named: imagePath)
  cell.accessoryType = .disclosureIndicator
  return cell

 }
}
示例圖
以上就是本文的全部內容,希望對大家的學習有所幫助,也希望大家多多支持本站。
- 上一頁:如何自定義iOS通訊錄
- 下一頁:iOS實現類似格瓦拉電影的轉場動畫