iOS實現手指點擊出現波紋的效果
編輯:IOS開發綜合
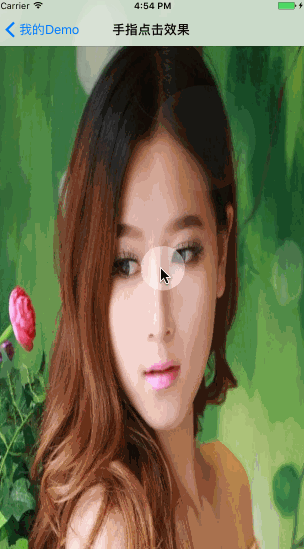
實現來看看模擬器上效果:
具體的實現代碼如下
首先監聽控制器view的Tap事件
UITapGestureRecognizer *tap = [[UITapGestureRecognizer alloc] initWithTarget:self action:@selector(onTap:)];
 [self.view addGestureRecognizer:tap];
- (void)onTap:(UITapGestureRecognizer*)sender {
 CGPoint center = [sender locationInView:sender.view];
 [FingerWaveView showInView:self.view center:center];
}
FingerWaveView.h
#import <UIKit/UIKit.h>
@interface FingerWaveView : UIView
+ (instancetype)showInView:(UIView *)view center:(CGPoint)center;
@end
FingerWaveView.m
#import "FingerWaveView.h"
@interface FingerWaveView () <CAAnimationDelegate>
{
 CGSize waveSize;
 NSTimeInterval duration;
}
@end
@implementation FingerWaveView
- (instancetype)initWithFrame:(CGRect)frame{
 self=[super initWithFrame:frame];
 if (self) {
  waveSize = CGSizeMake(150, 150);
  duration = 1.0;
 }
 return self;
}
+ (instancetype)showInView:(UIView *)view center:(CGPoint)center {
 FingerWaveView *waveView = [FingerWaveView new];
 [waveView setframeWithCenter:center];
 [view addSubview:waveView];
 return waveView;
}
- (void)didMoveToSuperview{
 CAShapeLayer *waveLayer = [CAShapeLayer new];
 waveLayer.backgroundColor = [UIColor clearColor].CGColor;
 waveLayer.opacity = 0.6;
 waveLayer.fillColor = [UIColor whiteColor].CGColor;
 [self.layer addSublayer:waveLayer];

 [self startAnimationInLayer:waveLayer];
}
- (void)startAnimationInLayer:(CALayer *)layer{
 UIBezierPath *beginPath = [UIBezierPath bezierPathWithArcCenter:[self pathCenter] radius:[self animationBeginRadius] startAngle:0 endAngle:M_PI*2 clockwise:YES];
 UIBezierPath *endPath = [UIBezierPath bezierPathWithArcCenter:[self pathCenter] radius:[self animationEndRadius] startAngle:0 endAngle:M_PI*2 clockwise:YES];

 CABasicAnimation *rippleAnimation = [CABasicAnimation animationWithKeyPath:@"path"];
 rippleAnimation.delegate = self;
 rippleAnimation.fromValue = (__bridge id _Nullable)(beginPath.CGPath);
 rippleAnimation.toValue = (__bridge id _Nullable)(endPath.CGPath);
 rippleAnimation.duration = duration;

 CABasicAnimation *opacityAnimation = [CABasicAnimation animationWithKeyPath:@"opacity"];
 opacityAnimation.delegate = self;
 opacityAnimation.fromValue = [NSNumber numberWithFloat:0.6];
 opacityAnimation.toValue = [NSNumber numberWithFloat:0.0];
 opacityAnimation.duration = duration;

 [layer addAnimation:rippleAnimation forKey:@"rippleAnimation"];
 [layer addAnimation:opacityAnimation forKey:@"opacityAnimation"];
}
- (void)setframeWithCenter:(CGPoint)center{
 CGRect frame = CGRectMake(center.x-waveSize.width*0.5, center.y-waveSize.height*0.5, waveSize.width, waveSize.height);
 self.frame = frame;;
}
- (CGFloat)animationBeginRadius{
 return waveSize.width*0.5*0.2;
}
- (CGFloat)animationEndRadius{
 return waveSize.width*0.5;
}
- (CGPoint)pathCenter{
 return CGPointMake(waveSize.width*0.5, waveSize.height*0.5);
}
#pragma mark - CAAnimationDelegate
- (void)animationDidStop:(CAAnimation *)anim finished:(BOOL)flag{
 if (flag) {
  [self removeFromSuperview];
 }
}
@end
總結
大家也可以DIY我的代碼,做出很多其他的效果,比如改成其他的波紋顏色。以上就是這篇文章的全部內容了,希望本文的內容ui各位iOS開發者們能有所幫助,如果有疑問大家可以留言交流。
相關文章
+