iPhone開發學習筆記004——自定義背景透明非全屏彈出窗口,子類化UIWindow
編輯:IOS開發綜合
下面說說具體過程。
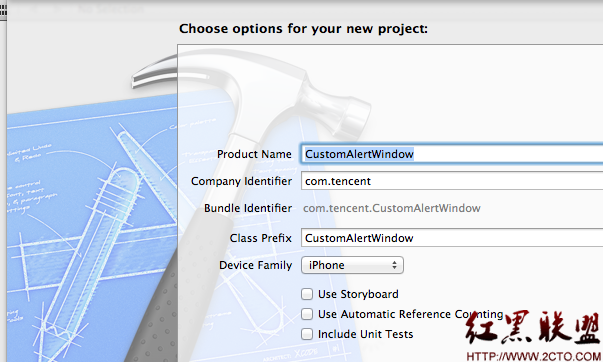
一、新建一個single view application工程,並且添加相關的控件並拖拽連接:
如下圖: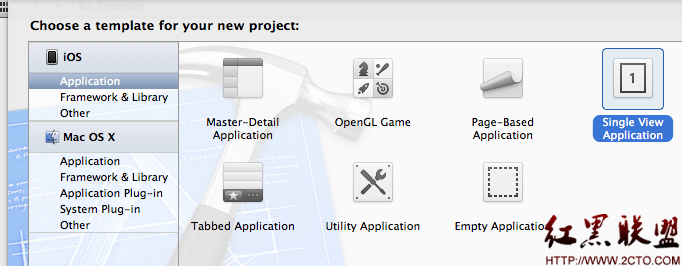
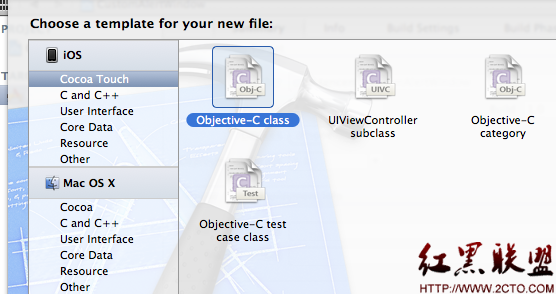
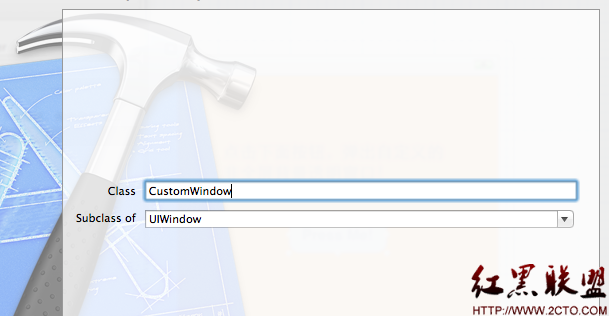
新建一個OC類,繼承自UIWindow,如下圖:
CustomWindow.h:
#import <UIKit/UIKit.h>
@interface CustomWindow :UIWindow {
UIView *superView;
UIView *backgroundView;
UIImageView *backgroundImage;
UIView *contentView;
BOOL closed;
}
@property (nonatomic,retain)UIView *superView;
@property (nonatomic,retain)UIView *backgroundView;
@property (nonatomic,retain)UIImageView *backgroundImage;
@property (nonatomic,retain)UIView *contentView;
-(CustomWindow *)initWithView:(UIView *)aView;
-(void)show;
-(void)close;
@end
CustomWindow.m:
#import "CustomWindow.h"
@implementation CustomWindow
@synthesize superView;
@synthesize backgroundView;
@synthesize backgroundImage;
@synthesize contentView;
-(UIImage *) pngWithPath:(NSString *)path
{
NSString *fileLocation = [[NSBundlemainBundle]pathForResource:path ofType:@"png"];
NSData *imageData = [NSDatadataWithContentsOfFile:fileLocation];
UIImage *img=[UIImageimageWithData:imageData];
return img;
}
-(CustomWindow *)initWithView:(UIView *)aView
{
if (self=[superinit]) {
//內容view
self.contentView = aView;
//初始化主屏幕
[selfsetFrame:[[UIScreenmainScreen]bounds]];
self.windowLevel =UIWindowLevelStatusBar;
self.backgroundColor = [UIColorcolorWithRed:0green:0blue:0 alpha:0.1];
//添加根view,並且將背景設為透明.
UIView *rv = [[UIViewalloc]initWithFrame:[selfbounds]];
self.superView = rv;
[superViewsetAlpha:0.0f];
[self addSubview:superView];
[rv release];
//設置background view.
CGFloat offset = -6.0f;
UIView *bv = [[UIViewalloc]initWithFrame:CGRectInset(CGRectMake(0,0,self.contentView.bounds.size.width,self.contentView.bounds.size.height), offset, offset)];
self.backgroundView = bv;
[bv release];
//用圓角png圖片設為彈出窗口背景.
UIImageView *bi = [[UIImageViewalloc]initWithImage:[[selfpngWithPath:@"alert_window_bg"]stretchableImageWithLeftCapWidth:13.0topCapHeight:9.0]];
self.backgroundImage = bi;
[backgroundImagesetFrame:[backgroundViewbounds]];
[backgroundViewinsertSubview:backgroundImageatIndex:0];
[backgroundViewsetCenter:CGPointMake(superView.bounds.size.width/2,superView.bounds.size.height/2)];
[superViewaddSubview:backgroundView];
CGRect frame =CGRectInset([backgroundViewbounds], -1 * offset, -1 * offset);
//顯示內容view
[backgroundViewaddSubview:self.contentView];
[self.contentViewsetFrame:frame];
closed =NO;
}
returnself;
}
//顯示彈出窗口
-(void)show
{
[selfmakeKeyAndVisible];
[superView setAlpha:1.0f];
}
-(void)dialogIsRemoved
{
closed = YES;
[contentViewremoveFromSuperview];
contentView =nil;
[backgroundViewremoveFromSuperview];
backgroundView =nil;
[superViewremoveFromSuperview];
superView =nil;
[self setAlpha:0.0f];
[selfremoveFromSuperview];
self = nil;
// NSLog(@"===> %s, %s, %d", __FUNCTION__, __FILE__, __LINE__);
}
-(void)close
{
[UIViewsetAnimationDidStopSelector:@selector(dialogIsRemoved)];
[superView setAlpha:0.0f];
// NSLog(@"===> %s, %s, %d", __FUNCTION__, __FILE__, __LINE__);
}
接下來,在CustomAlertWindowViewController中添加該自定義CustomWindow對象成員,並添加一個button屬性與XIB界面上的Press Me!按鈕相連接,如下圖:
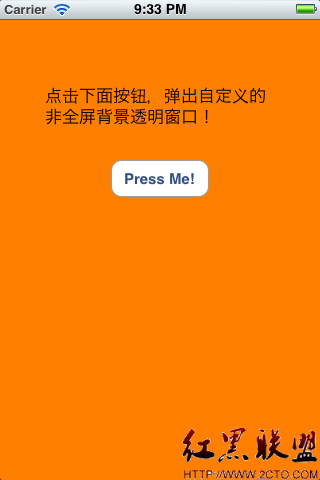
至此,CMD+R運行一下,是第一張圖的效果,占擊按鈕沒有反應,那是因為我們沒有為該按鈕添加相應的行為,接下來我們實現點擊按鈕彈出一個窗口,該窗口即由CustomAlertWindowViewController中的自定義窗口customWindow來呈現。看customWindow中的代碼,需要添加一張圓角PNG圖片做為背景,該PNG圖片不一定要和該內容視圖contentView大小一模一樣,只需要四個角是圓角,中間是純色即可,使用到一個經常用的函數CG_EXTERNCGRect CGRectInset(CGRect rect,CGFloat dx,CGFloat dy),該方法可以實現四個角落不變,中間拉抻,具體該函數的解釋請參考APPLE的官方文檔,不多解釋!將alert_window_bg.png添加至工程的Supporting Files下即可。
仔細讀一下CustomWindow.m的代碼,不難看出該CustomWindow需要傳入一個view做為contentView,其實這部分代碼是從網上一個“水的右邊”的博客上看到的,裡面的代碼只做稍稍改動,沒有多大變化。具體可以看看那篇博客。
好了,廢話不多說,下面新建一個view這個view我們用一個xib來實現,即ContentView.xib,依次如下圖:
其它的不用注意什麼,需要注意的一點是ContentView.xib的根view的background需要設為clear color,即透明。下面,我們要在CustomAlertWindowViewController中用到這個,將該xib中的view做參數初始化為customWindow的contentView,首先需要動態加載一下xib文件,具體使用的代碼如下:
- (void)viewDidLoad
{
[superviewDidLoad];
// Do any additional setup after loading the view, typically from a nib.
[buttonaddTarget:selfaction:@selector(buttonAction:)forControlEvents:UIControlEventTouchUpInside];
}
- (void)buttonAction:(id)sender {
NSLog (@"+++ doAction executing. +++");
NSArray *nib = [[NSBundlemainBundle]loadNibNamed:@"ContentView"owner:selfoptions:nil];
UIView *tmpContentView = [nibobjectAtIndex:0];
UIButton *tmpButton = (UIButton *)[tmpContentViewviewWithTag:2];
[tmpButton addTarget:selfaction:@selector(okAction:)forControlEvents:UIControlEventTouchUpInside];
customWindow = [[CustomWindowalloc]initWithView:tmpContentView]; //將剛加載進來的xib中的view作為參數傳遞給CustomWindow的contentView。
[customWindowshow];
}
- (void)okAction:(id)sender{
NSLog (@"+++ okAction executing. +++");
[customWindowclose];
customWindow.hidden =true;
}
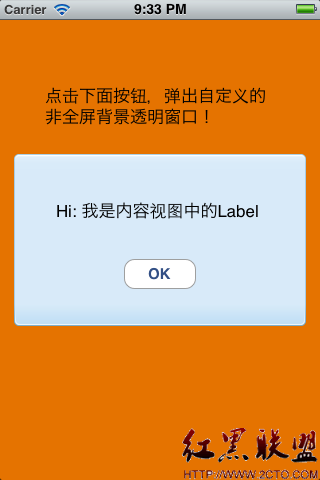
最後運行一下,效果即為第二張圖的樣子。
因為時間的原因,介紹的不太詳細,但是關鍵點都介紹到了,裡面最核心的就是CustomWindow的實現,這裡只是做為以後自我參考,留個記錄,搞應用開發和搞底層開發一個很大的不同就是搞應用的知識點很多,很零碎,需要不斷的積累,怕忘記,所以這裡記錄一下!
Demo下載地址:http://up.2cto.com/2012/0225/20120225115002326.rar
摘自Code Heaven
- 上一頁:iPhone開發學習筆記005——使用XIB自定義一個UIView,然後將這個view添加到controller的view
- 下一頁:iPhone開發學習筆記003——UITableViewCell內容自適應高度

相關文章
+- iOS獲得以後裝備型號等信息(全)包括iPhone7和iPhone7P
- xcode8提交ipa掉敗沒法構建版本成績的處理計劃
- Objective-C 代碼與Javascript 代碼互相挪用實例
- iOS開辟之UIPickerView完成城市選擇器的步調詳解
- iPhone/iPad開辟經由過程LocalNotification完成iOS准時當地推送功效
- iOS法式開辟之應用PlaceholderImageView完成優雅的圖片加載後果
- iOS Runntime 靜態添加類辦法並挪用-class_addMethod
- iOS開辟之用javascript挪用oc辦法而非url
- iOS App中挪用iPhone各類感應器的辦法總結
- 實例講授iOS中的UIPageViewController翻頁視圖掌握器
- IOS代碼筆記UIView的placeholder的後果
- iOS中應用JSPatch框架使Objective-C與JavaScript代碼交互
- iOS中治理剪切板的UIPasteboard粘貼板類用法詳解
- iOS App開辟中的UIPageControl分頁控件應用小結
- 詳解iOS App中UIPickerView轉動選擇欄的添加辦法