iPhone開發學習筆記007——Xcode4.2下iPhone多視圖開發(自已創建MainWindow.xib和不用MainWindow.xib兩種實現)
使用Xcode4以前的版本進行iPhone開發,新建Window-based Application類型的工程時,都會自動生成MainWindow.xib,並且都至少包含一個UIApplicationDelegate和一個UIWindow對象。
但是Xcode4以後,新建工程時,工程template這一塊有很大改動,沒有Window-based Application這一項了,但是有個Empty Application(iOS->Application下),現在描述以這種方式新建工程,然後自已創建MainWindow.xib並使用,和不用MainWindow.xib兩種實現。
另外多視圖實現采用三個UIViewController來實現,一個FirstViewController使用FirstView.xib設計界面,上面一個按鈕點後切找到SecondViewController的界面,一個SecondViewController使用SecondView.xib設計界面,上面也有一個按鈕點後切換到FirstViewController,一個SwitchViewController負責這兩個controller的界面的切換,SwitchViewController作為rootViewController,如果一個應用沒有rootViewController啟動就會報錯“Applications are expected to have a root view controller at the end of application launch”,其實上面兩種方式就是:
第一種:創建MainWindow.xib,默認有window,需要手動添加delegate指定所屬類為MVTestAppDelegate,添加UIViewController,指定所屬類為SwitchViewController,然後在委托MVTestAppDelegate代碼中[windowaddSubview:viewController.view];將該controller的view添加到window。不需要再使用代碼來創建和初始化應用委托的window和controller的view了,這些都通過MainWindow.xib來做了。下面第二種方式就是這部分不通過MainWindow.xib來做,而是通過代碼實現就用delegate的window和controller的創建和初始化
第二種:即上面第一種方式中MainWindow.xib實現的工作通過Delegate中代碼來實現。詳細如下:
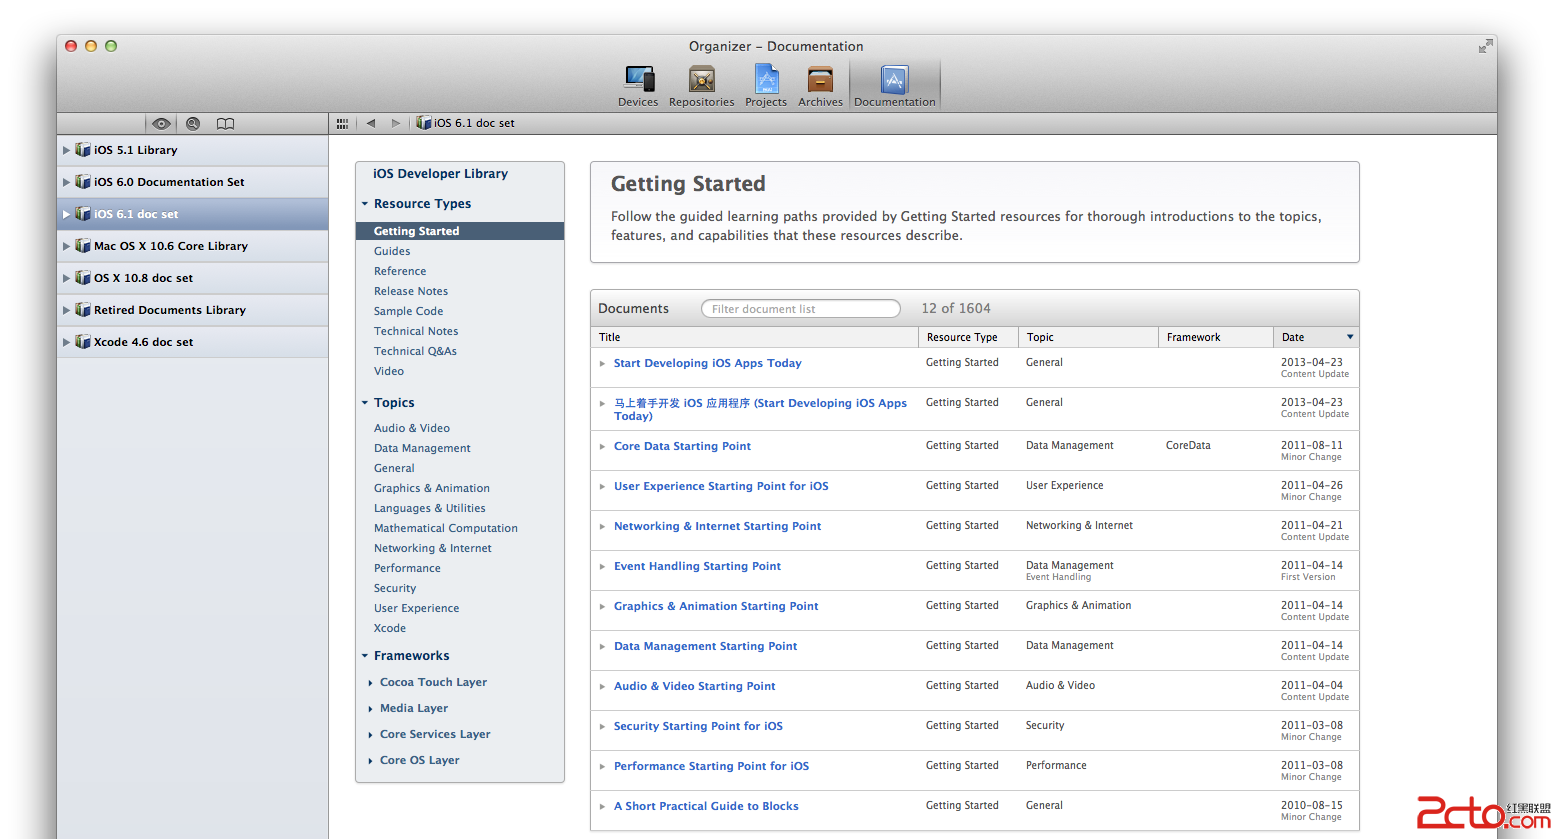
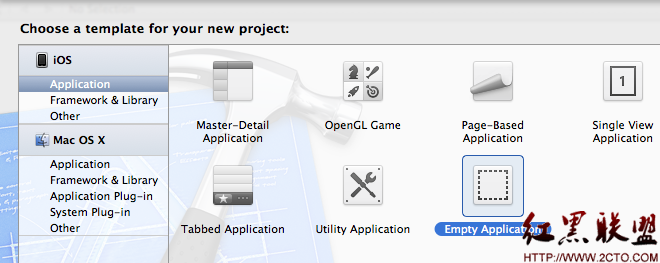
CMD+SHIFT+N打開新建工程窗口,選擇Empty Application這一項(會默認提供一個delegate和一個window),取名為MVTest。如下圖:
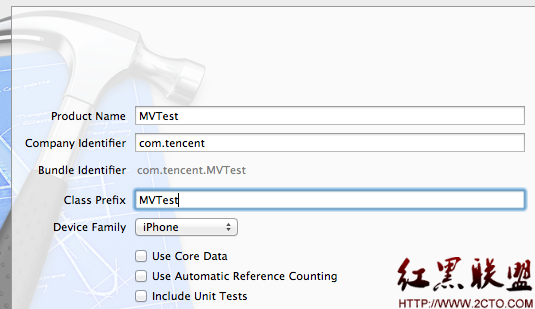
新建SwitchViewController繼承UIViewController,去掉with XIB for user interface,
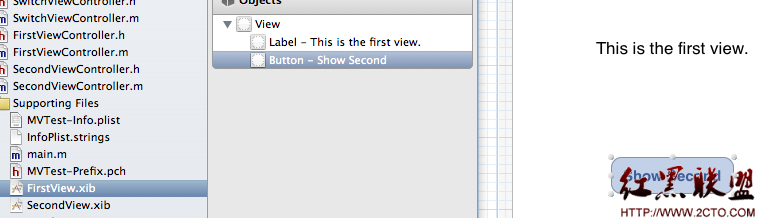
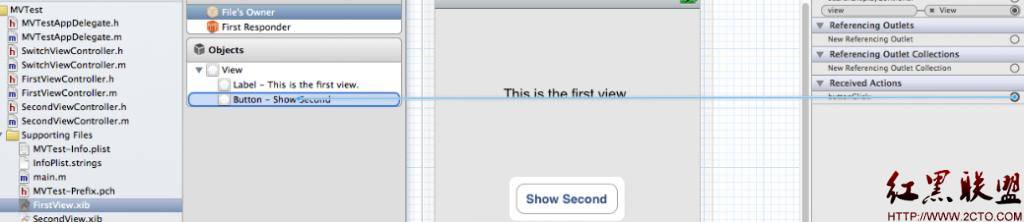
同SwitchViewController一樣,新建FirstViewController,和SecondViewController,然後新建FirstView.xib和Second.xib,如下圖:
兩個xib上面分別都添加一個label和一個button,如下圖:
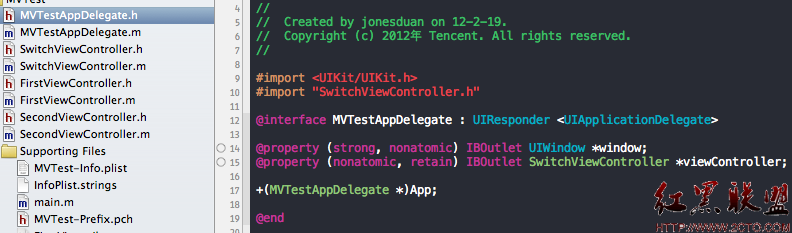
接下來在MVTestAppDelegate頭文件中添加:
@property (nonatomic, retain)SwitchViewController *viewController;// 注意:window和viewController前面的IBOutlet
+(MVTestAppDelegate *)App;
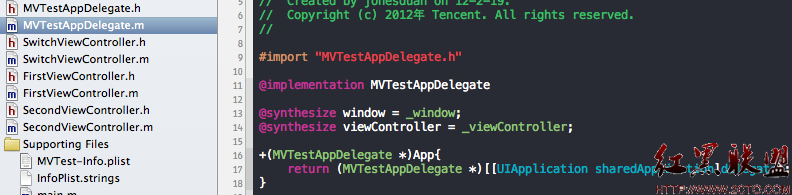
並且在*.m文件中實現,如下圖:
另外,SwitchViewController.h:
#import <UIKit/UIKit.h>
@classFirstViewController;
@classSecondViewController;
@interface SwitchViewController :UIViewController {
FirstViewController* firstviewcontroller;
SecondViewController* secondviewcontroller;
}
@property (nonatomic,retain)FirstViewController* firstviewcontroller;
@property (nonatomic,retain)SecondViewController* secondviewcontroller;
-(void)initView;
-(void)showFirstView;
-(void)showSecondView;
-(void)removeAllView;
@end
SwitchViewController.m:
#import "SwitchViewController.h"
#import "FirstViewController.h"
#import "SecondViewController.h"
@implementation SwitchViewController
@synthesize firstviewcontroller;
@synthesize secondviewcontroller;
-(void)initView{
NSLog(@"ttt");
if(self.firstviewcontroller ==nil){
self.firstviewcontroller = [[FirstViewControlleralloc]initWithNibName:@"FirstView"bundle:nil];
}
[selfremoveAllView];
[self.viewinsertSubview:self.firstviewcontroller.viewatIndex:0];
}
-(void)showFirstView{
if(self.firstviewcontroller ==nil){
self.firstviewcontroller = [[FirstViewControlleralloc]initWithNibName:@"FirstView"bundle:nil];
}
[selfremoveAllView];
[self.viewinsertSubview:self.firstviewcontroller.viewatIndex:0];
}
-(void)showSecondView{
if(self.secondviewcontroller ==nil){
self.secondviewcontroller = [[SecondViewControlleralloc]initWithNibName:@"SecondView"bundle:nil];
}
[selfremoveAllView];
[self.viewinsertSubview:self.secondviewcontroller.viewatIndex:0];
}
-(void)removeAllView{
for(NSInteger i=0;i<[self.view.subviewscount];i++){
[[self.view.subviewsobjectAtIndex:i]removeFromSuperview];
}
}
@end
在這兩個controller,FirstViewController和SecondViewController裡面,均分別添加-(IBAction)buttonClick:(id)sender;,並實現:
-(IBAction)buttonClick:(id)sender{
[[MVTestAppDelegateApp].viewControllershowSecondView]; //FirstViewController調用這個showSecondView,SecondViewController裡面調用showFirstView.
}
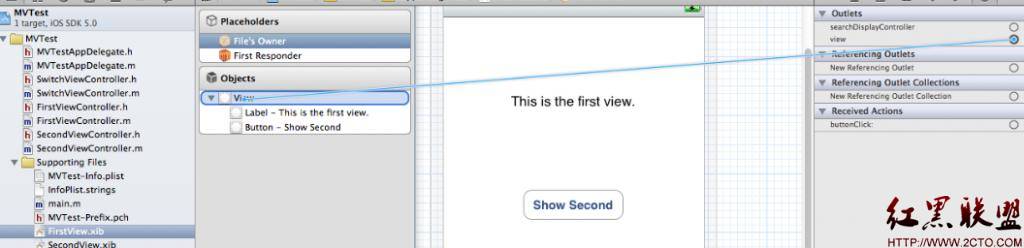
然後分別指定FirstView.xib的File's Owner所屬類為FirstViewController,SecondView.xib的所屬類為SecondViewController,並將xib界面上的按鈕與IBAction連接,同時將Outlets下面的view與界面的view連接。如下圖:
接下來涉及到MainWindow.xib了:
一、不用MainWindow.xib
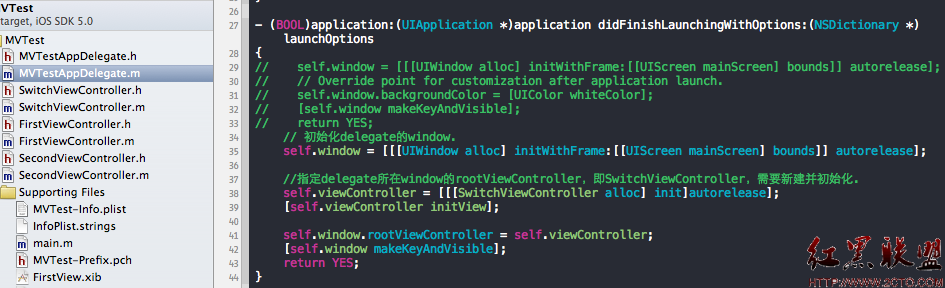
(1) 初始化delegate的window.
self.window = [[[UIWindowalloc]initWithFrame:[[UIScreenmainScreen]bounds]]autorelease];
(2) 指定delegate所在window的rootViewController,即SwitchViewController,需要新建並初始化.
self.viewController = [[[SwitchViewControlleralloc]init]autorelease];
[self.viewControllerinitView];
self.window.rootViewController =self.viewController;
如下圖:
二、自已創建MainWindow.xib並使用
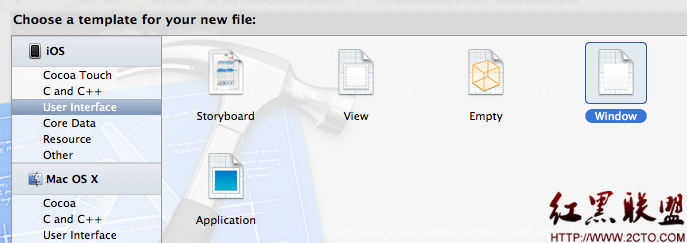
新建一個window類型的xib命名為MainWindow.xib。如下圖:
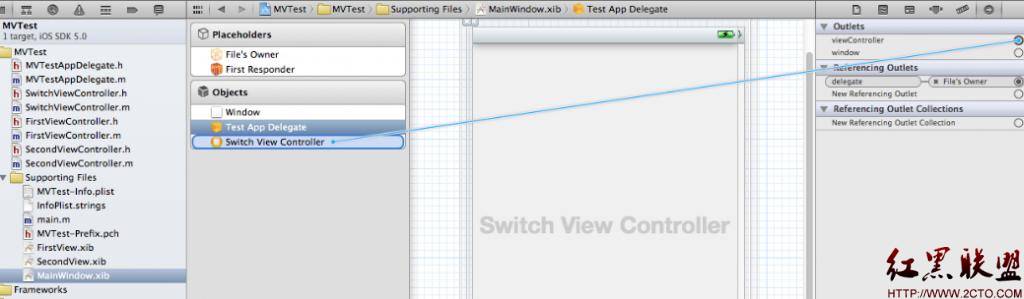
,新建好後,從Library中拖一個Object到界面上,指定其所屬類為MVTestAppDelegate,

然後拖一個View Controller到界面上,並且指定所屬類為SwitchViewController。
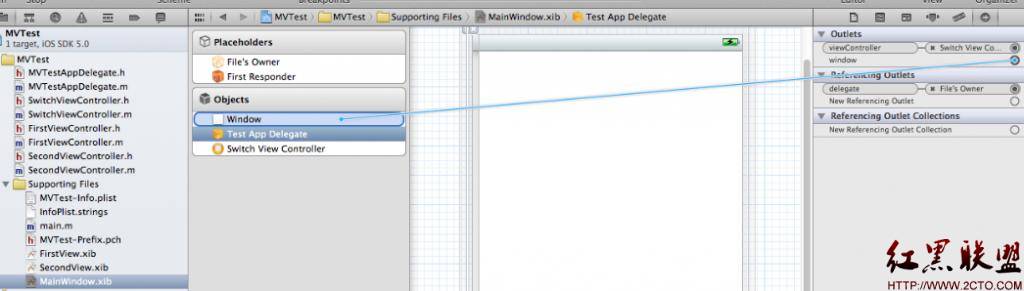
指定MainWindow.xib的File's Owner的所屬類為UIApplication,並將其delegate與MVTestAppDelegate相連接:
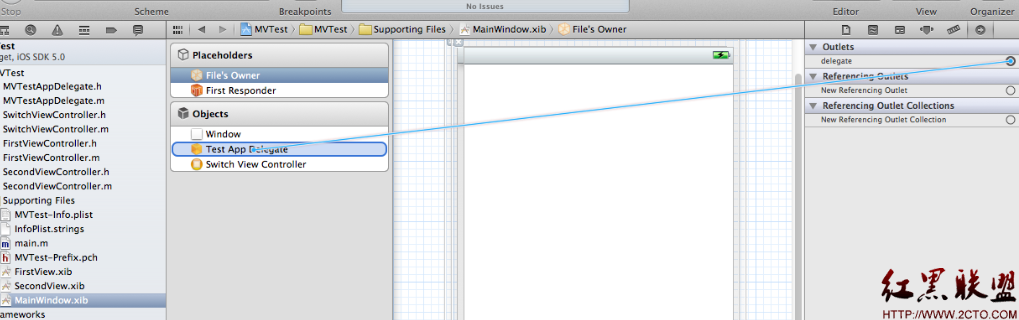
接下來選中Test App Delegate,即MVTestAppDelegate,將viewController與界面上的Switch View Controller相連,window與window相連,
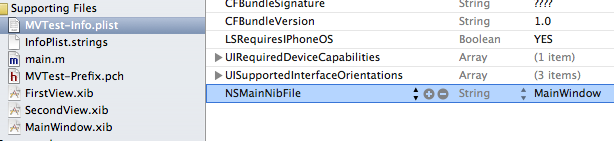
至此連完後,有個很重要的地方需要設置一下,那就是Info.plist,因為MainWindow.xib是自已創建的,所以需要指定NSMainNibFile為MainWindow。
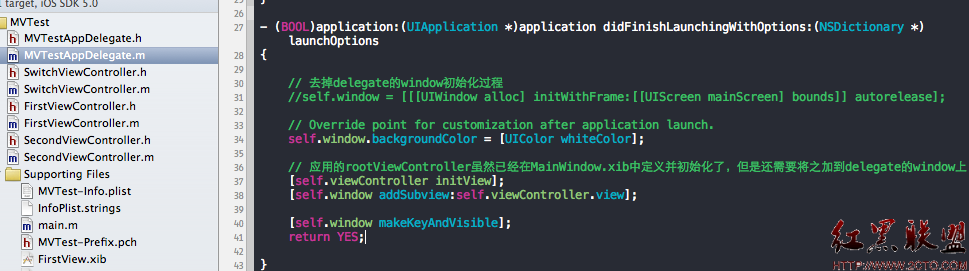
然後運行一下,發現不行,會報錯“Applications are expected to have a root view controller at the end of application launch”,那是因為沒有在delegate啟動時將rootViewController的view添加到delegate 的window中。雖然rootViewController(即MainWindow.xib中的Switch View Controller)已經在MainWindow.xib中指定並初始化了,但是並沒有明確將該ViewController的view添加進來。另外還需要注意的一點是delegate的window已經在MainWindow.xib中初始化了。所以也不需要再通過
self.window = [[[UIWindowalloc]initWithFrame:[[UIScreenmainScreen]bounds]]autorelease];
來初始化了,此條不再需要,否則會發現rootViewController 的view被該新建的白色window擋住了,點back鍵可以看到退出動畫時rootViewController 的view瞬間閃現。
即:
(1) 去掉delegate的window初始化過程:
//self.window = [[[UIWindow alloc] initWithFrame:[[UIScreen mainScreen] bounds]] autorelease];
(2) 添加rootViewController的view到delegate的window:
// 應用的rootViewController雖然已經在MainWindow.xib中定義並初始化了,但是還需要將之加到delegate的window上
[self.viewControllerinitView];
[self.windowaddSubview:self.viewController.view];
如下圖:
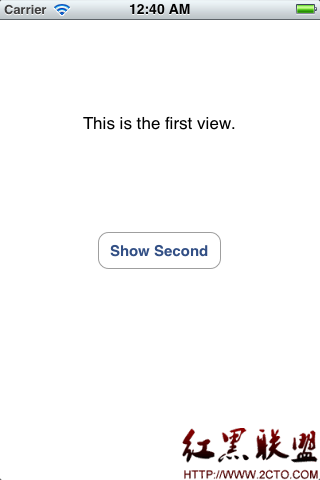
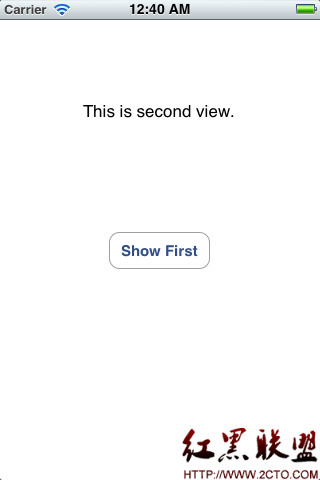
附:最終運行效果,即剛啟動顯示FirstViewController的view,點擊Show Second,切換到SecondViewController的view,點上面的Show First 則切換回來,如下圖:
總結:
不使用MainWindow.xib時,需要通過代碼實現delegate的window的初始化,同時還需要初始化一個ViewController並且指定為 delegate的window的rootViewController.
使用MainWindow.xib時,Xcode4及以後的版本需要自已創建,並且添加delegate和rootViewController,同時注意File's Owner(所屬類UIApplication)的delegate與添加的delegate連接,以及指定添加的Delegate的window和viewController與界面上window和添加的具體viewController連接。同時還需要在info.plist中指定NSMainNibFile鍵值。最後在delegate的啟動完成接口中將MainWindow.xib中的rootViewController的view添加到delegate的window,並且去掉delegate的window的默認初始化過程.
++++++++++++++++++++++++++++++++++++++++++++++++++++++++++++++++++++++++
(補充):
(1)沒有MainWindow.xib時,需要指定應用Delegate的self.window和self.window.rootViewController,window和rootViewController都需要自已來定義、分配空間、初始化,在沒有使用ARC的情況下,還需要控制內存回收。
(2)有MainWindow.xib時,並且在info.plist中指定了NSMainNibFile鍵值為MainWindow,則默認delegate的window即為MainWindow.xib中的window已經被定義和初始化了,內存回收什麼的都不用我們管,並且在MainWindow.xib中若指定有UIViewController,則這個UIViewController也是定義並初始化了同window一樣不用我們來管理內存回收。即,我們直接用裡面的window和UIViewController即可。唯一需要注意的就是:MainWindow.xib中的UIViewController雖然不再需要我們來定義並初始化,但是這個UIViewController還沒有被添加到self.window,所以我們唯一需要做的就是將這個UIViewController的view添加到self.window,或者使用這個UIViewController來初始化一個UINavigationController,然後將這個UINavigationController的view添加到self.window即可。
注:MainWindow.xib中不一定非得添加和指定View Controller,若在MainWindow.xib中添加了使用時也不一定就非得作為rootViewController,來添加到self.window,換句話說就是也可以做為rootViewController的子view controller被添加,只是在MainWindow.xib中添加了它的話使用它時不需要定義和初始化罷了(前提是需要在應用delegate頭文件裡面添加該viewController的IBOutlet,並且在MainWindow.xib界面中選中該delegate,然後將這個delegate中剛添加的IBOutlet與界面上的viewController相關聯即可)。若沒有在MainWindow.xib中添加那在存在xViewController.h、xViewController.m、xViewController.xib的情況下,使用前使用alloc init autorelease(若使用的地方沒有retain則不要使用autorelease)進行一下定義和初始化並適當控制內存回收即可.
(注:後來發現self.window.rootViewController = self.myNavController ;和[self.window addSubview:self.myNavController.view];二者等價.)
通過這些可以猜想也可以在MainWindow.xib中添加多個view controller,然後在應用delegate裡面添加對應view controller 的 IBOutlet,並且在MainWindow.xib中選中這個應用delegate將其添加的IBOutlet與界面上的view controller對應關聯,然後就可以在應用delegate裡面直接用這些在MainWindow.xib中添加的view controller了,不再需要關心空間分配、初始化及內存回收管理等工作。
另外,新建UIViewController的時候,可以選中With XIB for user interface,那麼這個UIViewController的界面可以直接在對應的xib文件中通過Interface Builder進行設計,也可以直接在對應*.m中的viewDidLoad中進行代碼設計。具體在xib中設計,又想在代碼中關聯並使用那就是添加IBOutlet和IBAction進行拖拽連接的問題了,前面“iPhone開發學習筆記001——Xib界面上的控件與代碼的相互關聯方法”中有介紹.
++++++++++++++++++++++++++++++++++++++++++++++++++++++++++++++++++++++++
文章其中部分內容來源於網上看到的一位大牛“漫步的空間”的博客,主要是SwitchViewController的定義和實現!作個記錄,以免時間長了忘記了!本人涉足iPhone開發不久,好多地方可能描述有錯誤,請大牛遇到幫忙指教,小弟非常感謝!
摘自 Code Heaven
- iOS獲得以後裝備型號等信息(全)包括iPhone7和iPhone7P
- xcode8提交ipa掉敗沒法構建版本成績的處理計劃
- Objective-C 代碼與Javascript 代碼互相挪用實例
- iOS開辟之UIPickerView完成城市選擇器的步調詳解
- iPhone/iPad開辟經由過程LocalNotification完成iOS准時當地推送功效
- iOS法式開辟之應用PlaceholderImageView完成優雅的圖片加載後果
- iOS Runntime 靜態添加類辦法並挪用-class_addMethod
- iOS開辟之用javascript挪用oc辦法而非url
- iOS App中挪用iPhone各類感應器的辦法總結
- 實例講授iOS中的UIPageViewController翻頁視圖掌握器
- IOS代碼筆記UIView的placeholder的後果
- iOS中應用JSPatch框架使Objective-C與JavaScript代碼交互
- iOS中治理剪切板的UIPasteboard粘貼板類用法詳解
- iOS App開辟中的UIPageControl分頁控件應用小結
- 詳解iOS App中UIPickerView轉動選擇欄的添加辦法