
iOS動畫效果和實現
編輯:IOS開發綜合
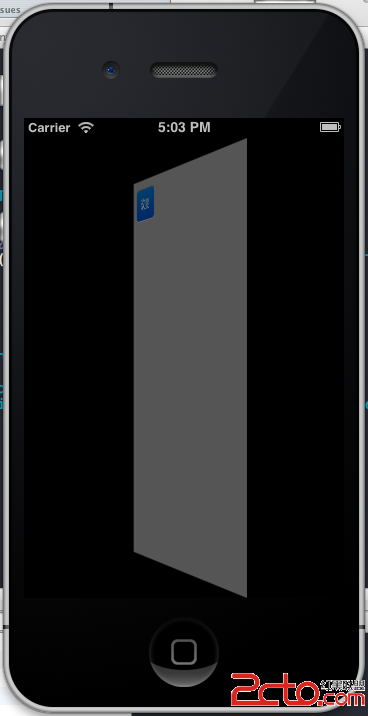
 動畫的常量有一下四種
[cpp]
UIViewAnimationTransitionNone,
UIViewAnimationTransitionFlipFromLeft,
UIViewAnimationTransitionFlipFromRight,
UIViewAnimationTransitionCurlUp,
UIViewAnimationTransitionCurlDown,
1.2 交換本視圖控制器中2個view位置
[self.view exchangeSubviewAtIndex:1 withSubviewAtIndex:0];
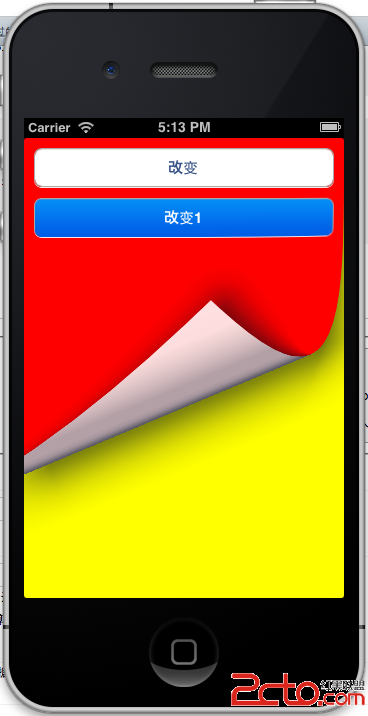
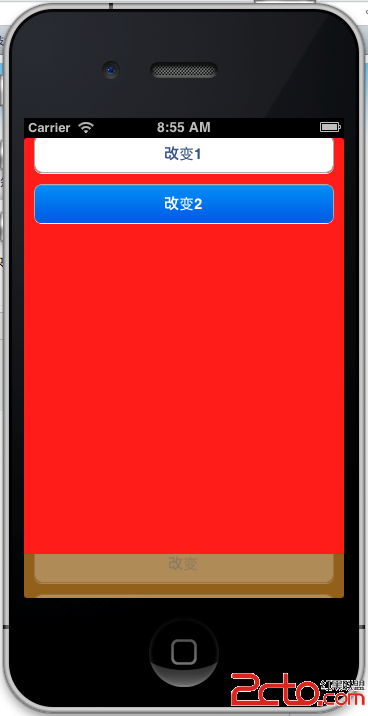
先添加兩個view ,一個r view plaincopy
- (void)viewDidLoad
{
[super viewDidLoad];
UIView *redView = [[UIView alloc] initWithFrame:[[UIScreen mainScreen] bounds]];
redView.backgroundColor = [UIColor redColor];
[self.view addSubview:redView];
UIView *yellowView = [[UIView alloc] initWithFrame:[[UIScreen mainScreen] bounds]];
yellowView.backgroundColor = [UIColor yellowColor];
[self.view addSubview:yellowView];
UIButton *button = [UIButton buttonWithType:UIButtonTypeRoundedRect];
[button setTitle:@"改變" forState:UIControlStateNormal];
button.frame = CGRectMake(10, 10, 300, 40);
[button addTarget:self action:@selector(changeUIView) forControlEvents:UIControlEventTouchUpInside];
[self.view addSubview:button];
UIButton *button1 = [UIButton buttonWithType:UIButtonTypeRoundedRect];
[button1 setTitle:@"改變1" forState:UIControlStateNormal];
button1.frame = CGRectMake(10, 60, 300, 40);
[button1 addTarget:self action:@selector(changeUIView1) forControlEvents:UIControlEventTouchUpInside];
[self.view addSubview:button1];
}
[cpp]
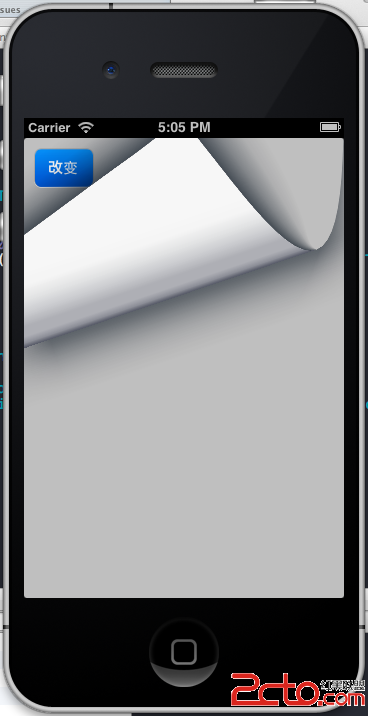
- (void)changeUIView1{
[UIView beginAnimations:@"animation" context:nil];
[UIView setAnimationDuration:1.0f];
[UIView setAnimationCurve:UIViewAnimationCurveEaseInOut];
[UIView setAnimationTransition:UIViewAnimationTransitionCurlDown forView:self.view cache:YES];
// 交換本視圖控制器中2個view位置
[self.view exchangeSubviewAtIndex:1 withSubviewAtIndex:0];
[UIView commitAnimations];
}
動畫的常量有一下四種
[cpp]
UIViewAnimationTransitionNone,
UIViewAnimationTransitionFlipFromLeft,
UIViewAnimationTransitionFlipFromRight,
UIViewAnimationTransitionCurlUp,
UIViewAnimationTransitionCurlDown,
1.2 交換本視圖控制器中2個view位置
[self.view exchangeSubviewAtIndex:1 withSubviewAtIndex:0];
先添加兩個view ,一個r view plaincopy
- (void)viewDidLoad
{
[super viewDidLoad];
UIView *redView = [[UIView alloc] initWithFrame:[[UIScreen mainScreen] bounds]];
redView.backgroundColor = [UIColor redColor];
[self.view addSubview:redView];
UIView *yellowView = [[UIView alloc] initWithFrame:[[UIScreen mainScreen] bounds]];
yellowView.backgroundColor = [UIColor yellowColor];
[self.view addSubview:yellowView];
UIButton *button = [UIButton buttonWithType:UIButtonTypeRoundedRect];
[button setTitle:@"改變" forState:UIControlStateNormal];
button.frame = CGRectMake(10, 10, 300, 40);
[button addTarget:self action:@selector(changeUIView) forControlEvents:UIControlEventTouchUpInside];
[self.view addSubview:button];
UIButton *button1 = [UIButton buttonWithType:UIButtonTypeRoundedRect];
[button1 setTitle:@"改變1" forState:UIControlStateNormal];
button1.frame = CGRectMake(10, 60, 300, 40);
[button1 addTarget:self action:@selector(changeUIView1) forControlEvents:UIControlEventTouchUpInside];
[self.view addSubview:button1];
}
[cpp]
- (void)changeUIView1{
[UIView beginAnimations:@"animation" context:nil];
[UIView setAnimationDuration:1.0f];
[UIView setAnimationCurve:UIViewAnimationCurveEaseInOut];
[UIView setAnimationTransition:UIViewAnimationTransitionCurlDown forView:self.view cache:YES];
// 交換本視圖控制器中2個view位置
[self.view exchangeSubviewAtIndex:1 withSubviewAtIndex:0];
[UIView commitAnimations];
}
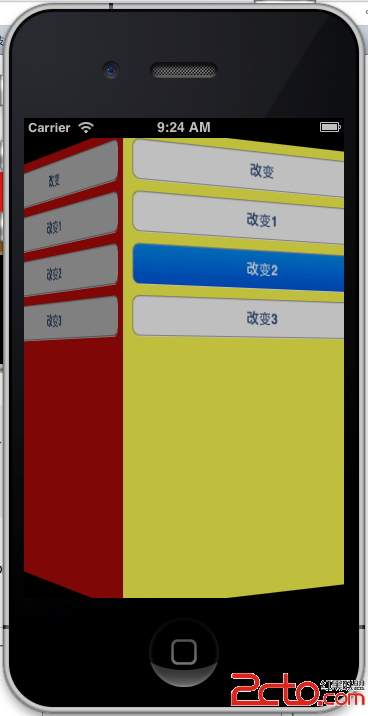
 這樣看起來就像兩頁一樣了。
1.3 、 [UIView setAnimationDidStopSelector:@selector(animationFinish:)];
在commitAnimations消息之前,可以設置動畫完成後的回調,設置方法是:
[UIView setAnimationDidStopSelector:@selector(animationFinish:)];
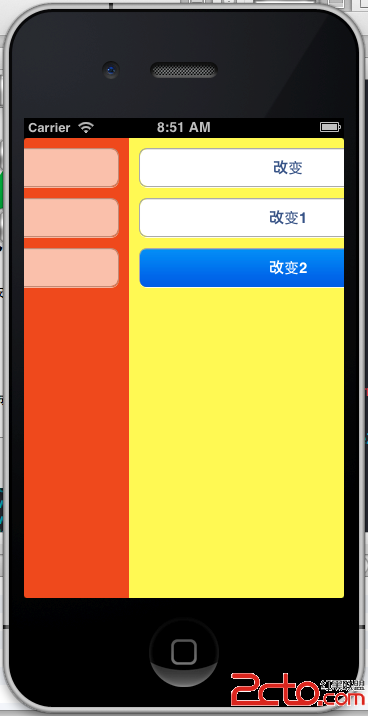
2、使用:CATransition
[cpp]
- (void)changeUIView2{
CATransition *transition = [CATransition animation];
transition.duration = 2.0f;
transition.type = kCATransitionPush;
transition.subtype = kCATransitionFromTop;
[self.view exchangeSubviewAtIndex:1 withSubviewAtIndex:0];
[self.view.layer addAnimation:transition forKey:@"animation"];
}
transition.type 的類型可以有
淡化、推擠、揭開、覆蓋
NSString * const kCATransitionFade;
NSString * const kCATransitionMoveIn;
NSString * const kCATransitionPush;
NSString * const kCATransitionReveal;
這四種,
transition.subtype
也有四種
NSString * const kCATransitionFromRight;
NSString * const kCATransitionFromLeft;
NSString * const kCATransitionFromTop;
NSString * const kCATransitionFromBottom;
這樣看起來就像兩頁一樣了。
1.3 、 [UIView setAnimationDidStopSelector:@selector(animationFinish:)];
在commitAnimations消息之前,可以設置動畫完成後的回調,設置方法是:
[UIView setAnimationDidStopSelector:@selector(animationFinish:)];
2、使用:CATransition
[cpp]
- (void)changeUIView2{
CATransition *transition = [CATransition animation];
transition.duration = 2.0f;
transition.type = kCATransitionPush;
transition.subtype = kCATransitionFromTop;
[self.view exchangeSubviewAtIndex:1 withSubviewAtIndex:0];
[self.view.layer addAnimation:transition forKey:@"animation"];
}
transition.type 的類型可以有
淡化、推擠、揭開、覆蓋
NSString * const kCATransitionFade;
NSString * const kCATransitionMoveIn;
NSString * const kCATransitionPush;
NSString * const kCATransitionReveal;
這四種,
transition.subtype
也有四種
NSString * const kCATransitionFromRight;
NSString * const kCATransitionFromLeft;
NSString * const kCATransitionFromTop;
NSString * const kCATransitionFromBottom;
 2.2 私有的類型的動畫類型:
立方體、吸收、翻轉、波紋、翻頁、反翻頁、鏡頭開、鏡頭關
[cpp]
animation.type = @"cube"
animation.type = @"suckEffect";
animation.type = @"oglFlip";//不管subType is "fromLeft" or "fromRight",official只有一種效果
animation.type = @"rippleEffect";
animation.type = @"pageCurl";
animation.type = @"pageUnCurl"
animation.type = @"cameraIrisHollowOpen ";
animation.type = @"cameraIrisHollowClose ";
下圖是第一個cube立方體的效果:
2.2 私有的類型的動畫類型:
立方體、吸收、翻轉、波紋、翻頁、反翻頁、鏡頭開、鏡頭關
[cpp]
animation.type = @"cube"
animation.type = @"suckEffect";
animation.type = @"oglFlip";//不管subType is "fromLeft" or "fromRight",official只有一種效果
animation.type = @"rippleEffect";
animation.type = @"pageCurl";
animation.type = @"pageUnCurl"
animation.type = @"cameraIrisHollowOpen ";
animation.type = @"cameraIrisHollowClose ";
下圖是第一個cube立方體的效果:
 2.3 CATransition的 startProgress endProgress屬性
這兩個屬性是float類型的。
可以控制動畫進行的過程,可以讓動畫停留在某個動畫點上,值在0.0到1.0之間。endProgress要大於等於startProgress。
比如上面的立方體轉到,可以設置endProgress= 0.5,讓動畫停留在轉動一般的位置。
上面這些私有的動畫效果,在實際應用中要謹慎使用。因為在app store審核時可能會以為這些動畫效果而拒絕通過。
3、UIView的 + (void)animateWithDuration
:(NSTimeInterval)duration animations:(void (^)(void))animations completion:(void (^)(BOOL finished))completion
方法。
這個方法是在iOS4.0之後才支持的。
比 1 裡的UIView的方法簡潔方便使用。
DidView裡添加moveView。
[cpp]
moveView = [[UIView alloc] initWithFrame:CGRectMake(10, 180, 200, 40)];
moveView.backgroundColor = [UIColor blackColor];
[self.view addSubview:moveView];
[cpp]
- (void)changeUIView3{
[UIView animateWithDuration:3 animations:^(void){
moveView.frame = CGRectMake(10, 270, 200, 40);
}completion:^(BOOL finished){
UILabel *label = [[UILabel alloc] initWithFrame:CGRectMake(20, 20, 40, 40)];
label.backgroundColor = [UIColor blackColor];
[self.view addSubview:label];
}];
}
然後用UIView animateWithDuration動畫移動,移動動畫完畢後添加一個Label。
3.2、 animateWithDuration的嵌套使用
[cpp]
- (void)changeUIView3{
[UIView animateWithDuration:2
delay:0
options:UIViewAnimationOptionCurveEaseOut animations:^(void){
moveView.alpha = 0.0;
}completion:^(BOOL finished){
[UIView animateWithDuration:1
delay:1.0
options:UIViewAnimationOptionAutoreverse | UIViewAnimationOptionRepeat
animations:^(void){
[UIView setAnimationRepeatCount:2.5];
moveView.alpha = 1.0;
}completion:^(BOOL finished){
}];
}];
}
這個嵌套的效果是先把view變成透明,在從透明變成不透明,重復2.5次透明到不透明的效果。
2.3 CATransition的 startProgress endProgress屬性
這兩個屬性是float類型的。
可以控制動畫進行的過程,可以讓動畫停留在某個動畫點上,值在0.0到1.0之間。endProgress要大於等於startProgress。
比如上面的立方體轉到,可以設置endProgress= 0.5,讓動畫停留在轉動一般的位置。
上面這些私有的動畫效果,在實際應用中要謹慎使用。因為在app store審核時可能會以為這些動畫效果而拒絕通過。
3、UIView的 + (void)animateWithDuration
:(NSTimeInterval)duration animations:(void (^)(void))animations completion:(void (^)(BOOL finished))completion
方法。
這個方法是在iOS4.0之後才支持的。
比 1 裡的UIView的方法簡潔方便使用。
DidView裡添加moveView。
[cpp]
moveView = [[UIView alloc] initWithFrame:CGRectMake(10, 180, 200, 40)];
moveView.backgroundColor = [UIColor blackColor];
[self.view addSubview:moveView];
[cpp]
- (void)changeUIView3{
[UIView animateWithDuration:3 animations:^(void){
moveView.frame = CGRectMake(10, 270, 200, 40);
}completion:^(BOOL finished){
UILabel *label = [[UILabel alloc] initWithFrame:CGRectMake(20, 20, 40, 40)];
label.backgroundColor = [UIColor blackColor];
[self.view addSubview:label];
}];
}
然後用UIView animateWithDuration動畫移動,移動動畫完畢後添加一個Label。
3.2、 animateWithDuration的嵌套使用
[cpp]
- (void)changeUIView3{
[UIView animateWithDuration:2
delay:0
options:UIViewAnimationOptionCurveEaseOut animations:^(void){
moveView.alpha = 0.0;
}completion:^(BOOL finished){
[UIView animateWithDuration:1
delay:1.0
options:UIViewAnimationOptionAutoreverse | UIViewAnimationOptionRepeat
animations:^(void){
[UIView setAnimationRepeatCount:2.5];
moveView.alpha = 1.0;
}completion:^(BOOL finished){
}];
}];
}
這個嵌套的效果是先把view變成透明,在從透明變成不透明,重復2.5次透明到不透明的效果。
- 上一頁:iOS中scrollview自動滾動的實現
- 下一頁:IOS學習基礎知識


相關文章
+