
iOS開發那些事-平鋪導航–基於分屏導航及案例實現
編輯:IOS開發綜合
 基於分屏導航實現
基於分屏導航是平鋪導航模式的主要實現方式,主要涉及的控件有:分屏控件(UIPageControl)和ScrollView,分屏控件是iOS標准控件。
基於分屏導航的手勢有兩種,一個是點擊小點的左邊(上邊)或右邊(下邊)實現翻屏,另一個是用手在屏幕上滑動實現翻屏。屏幕的總數應該限制在20個 以內,超過20個分屏控件的小點就會溢出。事實上,如果一個應用超過10屏,此時使用基於分屏導航的平鋪導航模式已經不是很方便了。
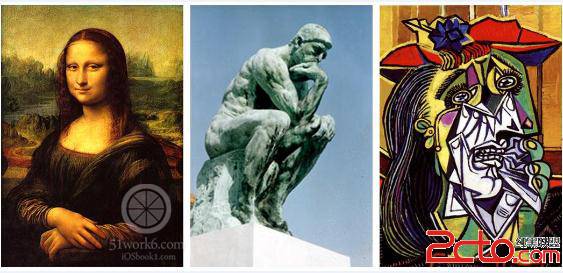
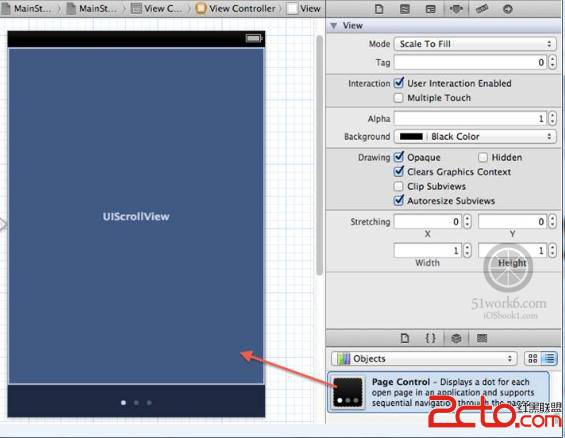
下面我們采用基於分屏導航模式實現“畫廊”應用。使用Single View Application模板創建一個名為PageControlNavigation的工程。將ScrollView和PageControl控件拖曳到 設計界面,將其擺放到合適的位置,通過屬性將視圖背景設置為黑色。
基於分屏導航實現
基於分屏導航是平鋪導航模式的主要實現方式,主要涉及的控件有:分屏控件(UIPageControl)和ScrollView,分屏控件是iOS標准控件。
基於分屏導航的手勢有兩種,一個是點擊小點的左邊(上邊)或右邊(下邊)實現翻屏,另一個是用手在屏幕上滑動實現翻屏。屏幕的總數應該限制在20個 以內,超過20個分屏控件的小點就會溢出。事實上,如果一個應用超過10屏,此時使用基於分屏導航的平鋪導航模式已經不是很方便了。
下面我們采用基於分屏導航模式實現“畫廊”應用。使用Single View Application模板創建一個名為PageControlNavigation的工程。將ScrollView和PageControl控件拖曳到 設計界面,將其擺放到合適的位置,通過屬性將視圖背景設置為黑色。
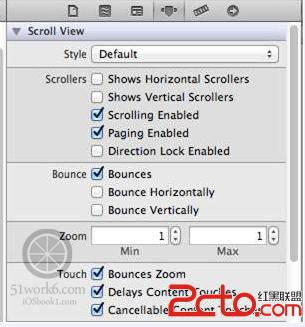
 在Interface Builder中選中ScrollView控件,打開其屬性檢查器,設置Scrollers中的屬性,此時該ScrollView控件不顯示水平和垂直滾動條,但可以滾動也可以分屏。
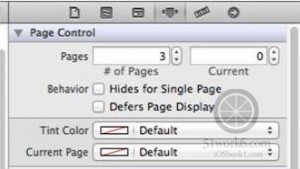
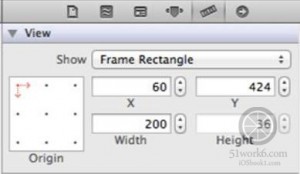
 在Interface Builder中選中PageControl控件,打開其屬性檢查器,設置Pages中“# of Pages”(總屏數)屬性為3,Current(當前屏)屬性為0。再打開尺寸檢查器,修改Width(寬度)屬性為200,將這個屬性設置大一些是為 了便於手指點擊。
 最後,還需要為這兩個控件定義輸出口並連線,而且要為分屏控件控件定義響應屏幕變化事件的方法changePage:並連線。
完成之後,ViewController.h文件中增加的代碼如下:
[cpp]
@property (weak, nonatomic) IBOutlet UIScrollView *scrollView;
@property (weak, nonatomic) IBOutlet UIPageControl *pageControl;
- (IBAction)changePage:(id)sender;
@property (weak, nonatomic) IBOutlet UIScrollView *scrollView;
@property (weak, nonatomic) IBOutlet UIPageControl *pageControl;
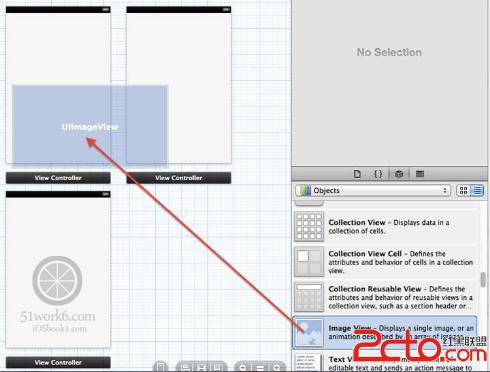
- (IBAction)changePage:(id)sender;下面設計3個視圖,將3個View Controller視圖控制器拖曳到MainStoryboard.storyboard的設計界面中,然後再並分別拖曳3個ImageView到3個不同視圖上。
最後,還需要為這兩個控件定義輸出口並連線,而且要為分屏控件控件定義響應屏幕變化事件的方法changePage:並連線。
完成之後,ViewController.h文件中增加的代碼如下:
[cpp]
@property (weak, nonatomic) IBOutlet UIScrollView *scrollView;
@property (weak, nonatomic) IBOutlet UIPageControl *pageControl;
- (IBAction)changePage:(id)sender;
@property (weak, nonatomic) IBOutlet UIScrollView *scrollView;
@property (weak, nonatomic) IBOutlet UIPageControl *pageControl;
- (IBAction)changePage:(id)sender;下面設計3個視圖,將3個View Controller視圖控制器拖曳到MainStoryboard.storyboard的設計界面中,然後再並分別拖曳3個ImageView到3個不同視圖上。
 然後再分別修改3個ImageView的Image屬性為名畫的文件名。
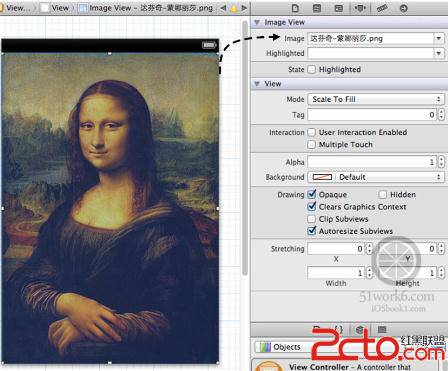 設置完成ImageView的Image屬性後,再依次選中視圖控制器,將Storyboard ID分別修改為page1、page2、page3。與模態視圖的例子不同,我們不需要再創建視圖控制器的子類。就本例而言,我們只需展示一些圖片。如果 需要處理動作事件,則需要自定義視圖控制器的子類。
設計完成後,我們看看程序代碼ViewController.h:
[cpp]
#import <UIKit/UIKit.h>
@interface ViewController : UIViewController <UIScrollViewDelegate>
@property (strong, nonatomic) UIView *page1;
@property (strong, nonatomic) UIView *page2;
@property (strong, nonatomic) UIView *page3;
@property (weak, nonatomic) IBOutlet UIScrollView *scrollView;
@property (weak, nonatomic) IBOutlet UIPageControl *pageControl;
- (IBAction)changePage:(id)sender;
@end
#import <UIKit/UIKit.h>
@interface ViewController : UIViewController <UIScrollViewDelegate>
@property (strong, nonatomic) UIView *page1;
@property (strong, nonatomic) UIView *page2;
@property (strong, nonatomic) UIView *page3;
@property (weak, nonatomic) IBOutlet UIScrollView *scrollView;
@property (weak, nonatomic) IBOutlet UIPageControl *pageControl;
- (IBAction)changePage:(id)sender;
@end由於需要響應UIScrollView的事件,我們在ViewController中實現了UIScrollViewDelegate協議。
下面我們看看ViewController.m中viewDidLoad方法的代碼:
[cpp]
- (void)viewDidLoad
{
[super viewDidLoad];
// Do any additional setup after loading the view, typically from a nib.
self.scrollView.contentSize = CGSizeMake(self.view.frame.size.width*3, self.scrollView.frame.size.height);
self.scrollView.frame = self.view.frame;
UIStoryboard *mainStoryboard = [UIStoryboard storyboardWithName:@"MainStoryboard" bundle:nil];
UIViewController* page1ViewController = [mainStoryboard instantiateViewControllerWithIdentifier:@"page1"];
self.page1 = page1ViewController.view;
self.page1.frame = CGRectMake(0.0f, 0.0f, 320.0f, 420.0f);
UIViewController* page2ViewController = [mainStoryboard instantiateViewControllerWithIdentifier:@"page2"];
self.page2 = page2ViewController.view;
self.page2.frame = CGRectMake(320.0f, 0.0f, 320.0f, 420.0f);
UIViewController* page3ViewController = [mainStoryboard instantiateViewControllerWithIdentifier:@"page3"];
self.page3 = page3ViewController.view;
self.page3.frame = CGRectMake(2 * 320.0f, 0.0f, 320.0f, 420.0f);
self.scrollView.delegate = self;
[self.scrollView addSubview:self.page1];
[self.scrollView addSubview:self.page2];
[self.scrollView addSubview:self.page3];
}
該方法主要進行控件初始化,由於需要計算各個控件的位置,代碼比較多,但是基本上沒什麼難點。self.scrollView.delegate = self是把當前視圖控制(UIScrollViewDelegate實現對象)分配給ScrollView控件,以便響應事件處理,其他事件是 scrollViewDidScroll:,其代碼如下:
[cpp]
- (void) scrollViewDidScroll: (UIScrollView *) aScrollView
{
CGPoint offset = aScrollView.contentOffset;
self.pageControl.currentPage = offset.x / 320.0f;
}
- (void) scrollViewDidScroll: (UIScrollView *) aScrollView
{
CGPoint offset = aScrollView.contentOffset;
self.pageControl.currentPage = offset.x / 320.0f;
}
當左右滑動屏幕,ScrollView控件滾動完成的時候,要計算和設定分屏控件的當前屏currentPage。當點擊分屏控件時屏幕發生變化,此時觸發changePage:方法,其代碼如下:
[cpp]
- (IBAction)changePage:(id)sender
{
[UIView animateWithDuration:0.3f animations:^{
int whichPage = self.pageControl.currentPage;
self.scrollView.contentOffset = CGPointMake(320.0f * whichPage, 0.0f);
}];
}
- (IBAction)changePage:(id)sender
{
[UIView animateWithDuration:0.3f animations:^{
int whichPage = self.pageControl.currentPage;
self.scrollView.contentOffset = CGPointMake(320.0f * whichPage, 0.0f);
}];
}
在上述代碼中,我們根據分屏控件當前屏幕屬性(currentPage)重新調整了ScrollView控件的偏移量,而且為了使屏幕變化產生動畫 效果,使用了[UIView animateWithDuration:0.3f animations:^{ …}]代碼,重新調整ScrollView控件偏移量。
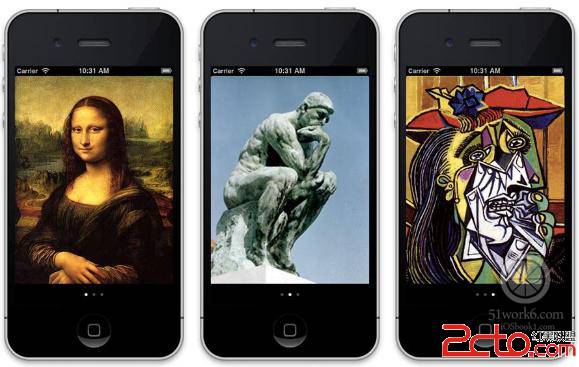
運行代碼,得到的效果
設置完成ImageView的Image屬性後,再依次選中視圖控制器,將Storyboard ID分別修改為page1、page2、page3。與模態視圖的例子不同,我們不需要再創建視圖控制器的子類。就本例而言,我們只需展示一些圖片。如果 需要處理動作事件,則需要自定義視圖控制器的子類。
設計完成後,我們看看程序代碼ViewController.h:
[cpp]
#import <UIKit/UIKit.h>
@interface ViewController : UIViewController <UIScrollViewDelegate>
@property (strong, nonatomic) UIView *page1;
@property (strong, nonatomic) UIView *page2;
@property (strong, nonatomic) UIView *page3;
@property (weak, nonatomic) IBOutlet UIScrollView *scrollView;
@property (weak, nonatomic) IBOutlet UIPageControl *pageControl;
- (IBAction)changePage:(id)sender;
@end
#import <UIKit/UIKit.h>
@interface ViewController : UIViewController <UIScrollViewDelegate>
@property (strong, nonatomic) UIView *page1;
@property (strong, nonatomic) UIView *page2;
@property (strong, nonatomic) UIView *page3;
@property (weak, nonatomic) IBOutlet UIScrollView *scrollView;
@property (weak, nonatomic) IBOutlet UIPageControl *pageControl;
- (IBAction)changePage:(id)sender;
@end由於需要響應UIScrollView的事件,我們在ViewController中實現了UIScrollViewDelegate協議。
下面我們看看ViewController.m中viewDidLoad方法的代碼:
[cpp]
- (void)viewDidLoad
{
[super viewDidLoad];
// Do any additional setup after loading the view, typically from a nib.
self.scrollView.contentSize = CGSizeMake(self.view.frame.size.width*3, self.scrollView.frame.size.height);
self.scrollView.frame = self.view.frame;
UIStoryboard *mainStoryboard = [UIStoryboard storyboardWithName:@"MainStoryboard" bundle:nil];
UIViewController* page1ViewController = [mainStoryboard instantiateViewControllerWithIdentifier:@"page1"];
self.page1 = page1ViewController.view;
self.page1.frame = CGRectMake(0.0f, 0.0f, 320.0f, 420.0f);
UIViewController* page2ViewController = [mainStoryboard instantiateViewControllerWithIdentifier:@"page2"];
self.page2 = page2ViewController.view;
self.page2.frame = CGRectMake(320.0f, 0.0f, 320.0f, 420.0f);
UIViewController* page3ViewController = [mainStoryboard instantiateViewControllerWithIdentifier:@"page3"];
self.page3 = page3ViewController.view;
self.page3.frame = CGRectMake(2 * 320.0f, 0.0f, 320.0f, 420.0f);
self.scrollView.delegate = self;
[self.scrollView addSubview:self.page1];
[self.scrollView addSubview:self.page2];
[self.scrollView addSubview:self.page3];
}
- (void)viewDidLoad
{
[super viewDidLoad];
// Do any additional setup after loading the view, typically from a nib.
self.scrollView.contentSize = CGSizeMake(self.view.frame.size.width*3, self.scrollView.frame.size.height);
self.scrollView.frame = self.view.frame;
UIStoryboard *mainStoryboard = [UIStoryboard storyboardWithName:@"MainStoryboard" bundle:nil];
UIViewController* page1ViewController = [mainStoryboard instantiateViewControllerWithIdentifier:@"page1"];
self.page1 = page1ViewController.view;
self.page1.frame = CGRectMake(0.0f, 0.0f, 320.0f, 420.0f);
UIViewController* page2ViewController = [mainStoryboard instantiateViewControllerWithIdentifier:@"page2"];
self.page2 = page2ViewController.view;
self.page2.frame = CGRectMake(320.0f, 0.0f, 320.0f, 420.0f);
UIViewController* page3ViewController = [mainStoryboard instantiateViewControllerWithIdentifier:@"page3"];
self.page3 = page3ViewController.view;
self.page3.frame = CGRectMake(2 * 320.0f, 0.0f, 320.0f, 420.0f);
self.scrollView.delegate = self;
[self.scrollView addSubview:self.page1];
[self.scrollView addSubview:self.page2];
[self.scrollView addSubview:self.page3];
}
該方法主要進行控件初始化,由於需要計算各個控件的位置,代碼比較多,但是基本上沒什麼難點。self.scrollView.delegate = self是把當前視圖控制(UIScrollViewDelegate實現對象)分配給ScrollView控件,以便響應事件處理,其他事件是 scrollViewDidScroll:,其代碼如下:
[cpp]
- (void) scrollViewDidScroll: (UIScrollView *) aScrollView
{
CGPoint offset = aScrollView.contentOffset;
self.pageControl.currentPage = offset.x / 320.0f;
}
- (void) scrollViewDidScroll: (UIScrollView *) aScrollView
{
CGPoint offset = aScrollView.contentOffset;
self.pageControl.currentPage = offset.x / 320.0f;
}
當左右滑動屏幕,ScrollView控件滾動完成的時候,要計算和設定分屏控件的當前屏currentPage。當點擊分屏控件時屏幕發生變化,此時觸發changePage:方法,其代碼如下:
[cpp]
- (IBAction)changePage:(id)sender
{
[UIView animateWithDuration:0.3f animations:^{
int whichPage = self.pageControl.currentPage;
self.scrollView.contentOffset = CGPointMake(320.0f * whichPage, 0.0f);
}];
}
- (IBAction)changePage:(id)sender
{
[UIView animateWithDuration:0.3f animations:^{
int whichPage = self.pageControl.currentPage;
self.scrollView.contentOffset = CGPointMake(320.0f * whichPage, 0.0f);
}];
}
在上述代碼中,我們根據分屏控件當前屏幕屬性(currentPage)重新調整了ScrollView控件的偏移量,而且為了使屏幕變化產生動畫 效果,使用了[UIView animateWithDuration:0.3f animations:^{ …}]代碼,重新調整ScrollView控件偏移量。
運行代碼,得到的效果
- 上一頁:ACM在線練習-括號配對問題
- 下一頁:超過指定時間後數據無效


相關文章
+