
iOS10的推送框架UserNotifications
iOS10發布以來,相信各位開發者能踩的坑也應該踩得差不多了;但也許正是因為每次蘋果都會更新比較多的東西,才會覺得搞iOS很有意思吧。(不知道大家會不會覺得樓主這種想法有點坑?)
推送是iOS10系統變動比較大的一個地方,對於這種大變動不瞅瞅一下著實不符合樓主的性格,那麼樓主就在求知欲的推動下(畢竟還得給自己的項目進行適配不是..)就花了點時間對UserNotifications這個框架進行了一個整體的了解,希望在這裡記錄一下,希望能夠幫助對這個框架有興趣的小伙伴。
如果大家的項目中推送是使用了極光、友盟等第三方推送,那麼請根據他們的官方文檔以及最新的SDK對iOS10進行適配即可,跟著文檔一步一步走也比較簡單。但是如果想要真實的了解原框架的流程,建議還是使用原生推送吧,樓主本文博客下使用的就是原生推送。
如何配置原生推送,推薦有夢想的蝸牛 一步一步教你做ios推送,這位博主寫的很詳細,雖然開發者界面已經不是那樣子了,但實質的東西還是沒有變化的。如果按照推薦博文的配置(!一定要確認所有的配置都沒有問題!),但依舊收不到遠程推送,那麼估計就和樓主一樣“中獎”了,可能是PHP端交互出問題了,這個時候推薦大家使用PushMeBody來完成遠程推送。(使用PushMesBody中的device token直接復制打印的device token即可,不需要去掉空格)
為了能夠區分它與之前用法的異同,樓主還是盡可能的想通過比較的方法實現推送的相關功能。
所有coding都在 RITL/RITLPushNoticationDemo(如果有幫助,請Star表示支持一下,感謝)。
如果有什麼問題,也請及時指出,共同進步,感謝。
推送的注冊
注冊的位置沒有任何的變化,是在Appdelegate中的-application: didFinishLaunchingWithOptions:方法裡面進行注冊,樓主為了簡化它的代碼,將注冊功能封裝成了一個RITLNotificationManager類,所以該方法下只需一句話即可:
- (BOOL)application:(UIApplication *)application didFinishLaunchingWithOptions:(NSDictionary *)launchOptions {
    // Override point for customization after application launch.

    //初始化個數
    [UIApplication sharedApplication].applicationIconBadgeNumber = 0;

    //注冊所有的推送
    [[RITLNotificationManager sharedInstance]registerRemoteNotificationsApplication:self];

    return YES;
}
注冊具體代碼實現
RITLNotificationManager的聲明(樓主在聲明文件中使用了預編譯進行方法的聲明,實際的開發中建議不要這麼寫,將方法分開便是,不同的版本使用不同的方法即可)以及實現方法如下:
//RITLNotificationManager.h(實際Demo中它在"RITLOriginPushAppDelegate+RITLNotificationManager.h"文件下)

/// 注冊遠程推送
#ifdef __IPHONE_10_0
- (void)registerRemoteNotificationsApplication:(id)application;
#else
- (void)registerRemoteNotificationsApplication:(id)application;
#endif
//RITLOriginPushAppDelegate+RITLNotificationManager.m

#ifdef __IPHONE_10_0
-(void)registerRemoteNotificationsApplication:(id)application
#else
- (void)registerRemoteNotificationsApplication:(id)application
#endif
{
#ifdef __IPHONE_10_0

    //設置代理對象
    [UNUserNotificationCenter currentNotificationCenter].delegate = application;

    // 請求權限
    [[UNUserNotificationCenter currentNotificationCenter] requestAuthorizationWithOptions:UNAuthorizationOptionBadge|UNAuthorizationOptionSound|UNAuthorizationOptionAlert completionHandler:^(BOOL granted, NSError * _Nullable error) {

        if (granted == true)//如果准許,注冊推送
        {
            [[UIApplication sharedApplication]registerForRemoteNotifications];
        }
    }];

#else

#ifdef __IPHONE_8_0 //適配iOS 8
    [[UIApplication sharedApplication] registerUserNotificationSettings:[UIUserNotificationSettings settingsForTypes:UIUserNotificationTypeBadge|UIUserNotificationTypeSound|UIUserNotificationTypeAlert categories:nil]];

    [[UIApplication sharedApplication]registerForRemoteNotifications];

#else //適配iOS7

    [[UIApplication sharedApplication] registerForRemoteNotificationTypes:UIRemoteNotificationTypeBadge | UIRemoteNotificationTypeSound | UIRemoteNotificationTypeAlert];
#endif

#endif
}
注冊完畢進行的回調
這一部分iOS10沒有發生變化,還是和之前一樣,分為注冊成功以及注冊失敗兩個協議方法,方法就在類別RITLOriginPushAppDelegate+RITLNotificationManager:
// 注冊推送成功
-(void)application:(UIApplication *)application didRegisterForRemoteNotificationsWithDeviceToken:(NSData *)deviceToken
{
    //    NSLog(@"token = %@",deviceToken);
    // 將返回的token發送給服務器
}

// 注冊推送失敗
-(void)application:(UIApplication *)application didFailToRegisterForRemoteNotificationsWithError:(NSError *)error
{
    NSLog(@"remoteNotice failture = %@",error.localizedDescription);
}
UserNotifications以前接收推送消息
在Demo中對AppDelegate新建了一個類別"RITLOriginPushAppDelegate+RITLOldNotification"來完成對之前推送消息的接收以及處理:
//通過點擊遠程推送進入App執行的方法,不管是應用被殺死還是位於後台
-(void)application:(UIApplication *)application didReceiveRemoteNotification:(NSDictionary *)userInfo
{
    //收到的信息
    NSLog(@"%@",[[userInfo valueForKey:@"aps"] valueForKey:@"alert"]);

    [self performSelector:NSSelectorFromString(@"__showAlert:") withObject:@"通過點擊推送進入App" afterDelay:0];
}
// 在前台收到遠程推送執行的方法,如果實現了iOS10的協議方法,該方法不執行,雖然沒有標明廢棄
- (void)application:(UIApplication *)application didReceiveRemoteNotification:(NSDictionary *)userInfo fetchCompletionHandler:(void (^)(UIBackgroundFetchResult result))completionHandler
{
    //這個時候不會彈出推送,通常,在此處進行一次本地推送,進行通知
    //coding..

    //回調
    completionHandler(UIBackgroundFetchResultNewData);
}
// 收到本地推送
- (void)application:(UIApplication *)application didReceiveLocalNotification:(UILocalNotification *)notification
{
    //coding to handle local notification
    NSLog(@"本地推送啦!");

    //獲得文本與詳細內容
    NSString * content = [NSString stringWithFormat:@"本地通知:title = %@, subTitle = %@",notification.alertBody,notification.alertTitle];

    [self performSelector:NSSelectorFromString(@"__showAlert:") withObject:content afterDelay:1];
}
UserNotifications下的接收推送消息
由於UserNotifications不再對遠程推送以及本地推送進行區分,所以只需實現UNUserNotificationCenterDelegate協議下的兩個協議方法即可,樓主是將該方法寫在了AppDelegate的另一類別中RITLOriginPushAppDelegate+RITLUserNotifications:
#pragma mark -// 在前台收到通知時,將要彈出通知的時候觸發 - (void)userNotificationCenter:(UNUserNotificationCenter *)center willPresentNotification:(UNNotification *)notification withCompletionHandler:(void (^)(UNNotificationPresentationOptions options))completionHandler { //比如如果App實在前台,就不需要Badge了 if([UIApplication sharedApplication].applicationState == UIApplicationStateActive) { completionHandler(UNNotificationPresentationOptionSound | UNNotificationPresentationOptionAlert); } else//如果是後台或者不活躍狀態,需要badge { //需要三種彈出形式,如果存在Alert,那麼App在前台也是可以從上面彈出的 completionHandler(UNNotificationPresentationOptionBadge | UNNotificationPresentationOptionSound | UNNotificationPresentationOptionAlert); } }
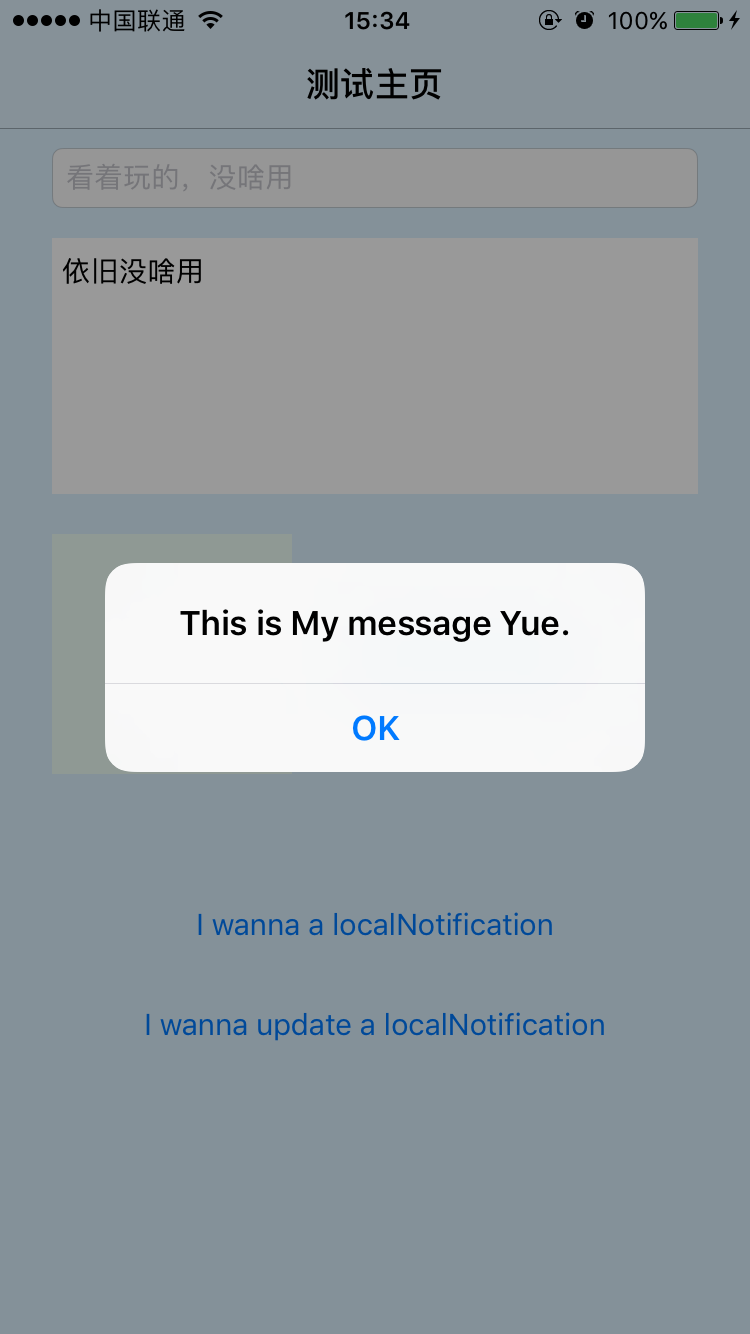
// 已經收到通知響應的處理方法,不管是什麼通知,當通過點擊推送進入或者回到App的時候觸發
- (void)userNotificationCenter:(UNUserNotificationCenter *)center didReceiveNotificationResponse:(UNNotificationResponse *)response withCompletionHandler:(void(^)())completionHandler
{
    //獲得響應對象
    UNNotification * notification = response.notification;

    //獲得響應時間
//    NSDate * responseDate = notification.date;

    //獲得響應體
    UNNotificationRequest * request = notification.request;

    //獲得響應體的標識符
//    NSString * identifier = request.identifier;

    // 喚起通知的對象
//    UNNotificationTrigger * trigger = request.trigger;

    //獲得通知內容
    UNNotificationContent * content = request.content;

    //比如獲得我想要的alert
    NSString * alertString = content.body;

    //可以彈出Alert提示一下
    [self performSelector:NSSelectorFromString(@"__showAlert:") withObject:alertString afterDelay:1];

    //比如這裡可以進行界面的跳轉等操作...

    //告知完成
    completionHandler();
}
遠程推送階段預覽
以上配置完畢後,使用PushMeBaby進行推送預覽一下,以下是推送的內容。
具體內容的格式如下:具體格式摘自簡書博主linatan博文-iOS10-UserNotifications
{
"aps":
    {
        "alert":
        {
            "title":"hello",
            "subtitle" : "Session 01",
            "body":"it is a beautiful day"
        },
        "category":"helloIdentifier",//比如我們想要使用自定義的UI,可以通過該值設置當前request對象的identifier
        "badge":1,
        "mutable-content":1,//如果想要啟用Service的拓展,需要此數據,這個後面會有介紹
        "sound":"default",
        "image":"https://picjumbo.imgix.net/HNCK8461.jpg?q=40&w=200&sharp=30"
    }
}
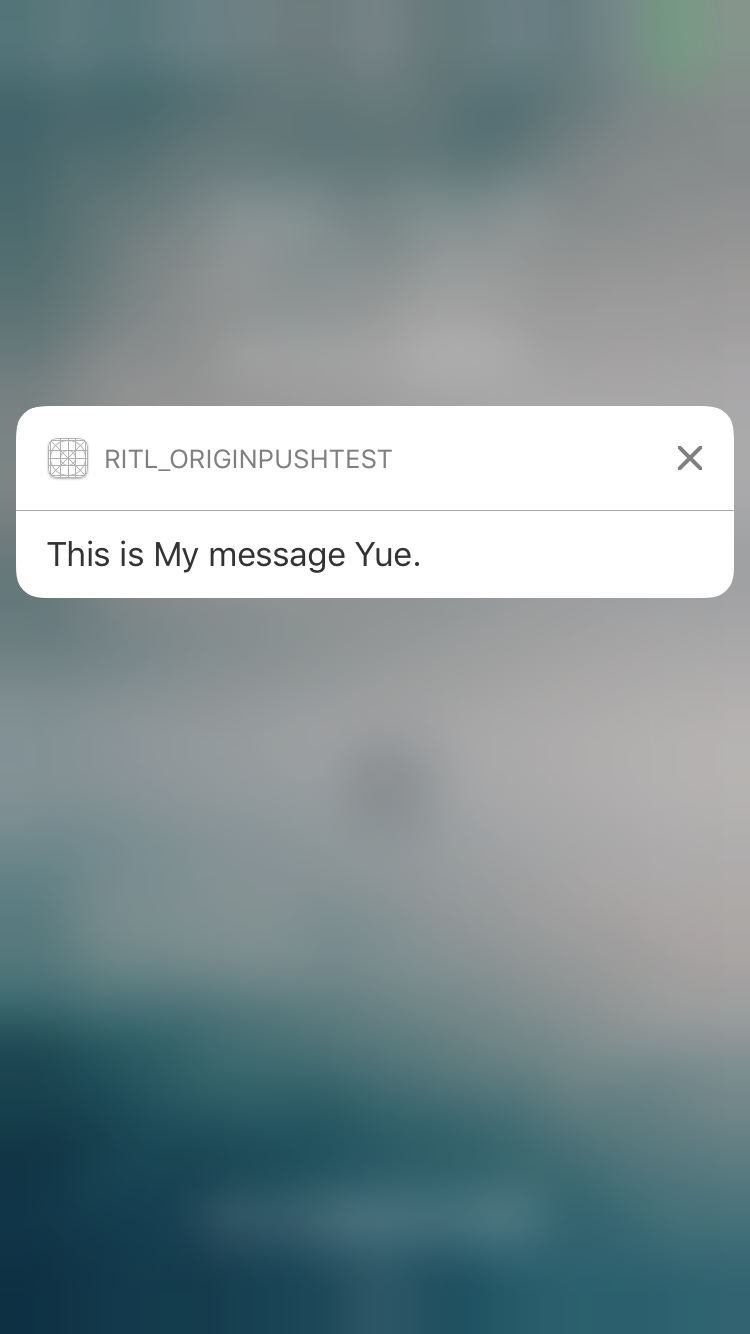
在進行測試的過程中,樓主使用的遠程推送如下:
//Demo中進行推送的內容如下:
{
    "aps":
    {
        "alert" : "This is My message Yue.",
        "badge" : "1",
        "mutable-content" : 1
    }
}

//pushMeBody中推送的字符串
self.payload = @"{\"aps\":{\"alert\":\"This is My message Yue.\",\"badge\":\"1\",\"mutable-content\":1}}";
後台接收的推送、響應3D Touch的推送以及點擊推送進入App後的效果如下:

本地進行推送
項目中推送的聲明類
對於Demo中大部分的測試,樓主都是使用了本地推送,所以樓主將推送功能封裝成了RITLPushMessageManager類,聲明方法如下:
/// iOS10之前的本地推送
- (void)pushLocationNotificationbeforeiOS10;

//由於iOS10推送的可更新性,還新增了一個枚舉,當然,本來是不需要的,但為了測試才有的這個枚舉類型
typedef NS_ENUM(NSUInteger, RITLPushMessageType)
{
    RITLPushMessageTypeNew = 0,     /**<默認為推送新的推送通知*/
    RITLPushMessageTypeUpdate = 1,  /**<更新當前的推送通知*/
};


/// iOS10 之後的本地推送,並根據類型選擇是新的推送還是更新
- (void)pushLicationNotification:(nullable NSArray  *)attachments
                        pushType:(RITLPushMessageType)type NS_AVAILABLE_IOS(10_0);
UserNotifications以前本地推送
這個推送相信大家都是比較熟的了,使用iOS10建議廢棄的UILocalNotification類,實現方法如下:
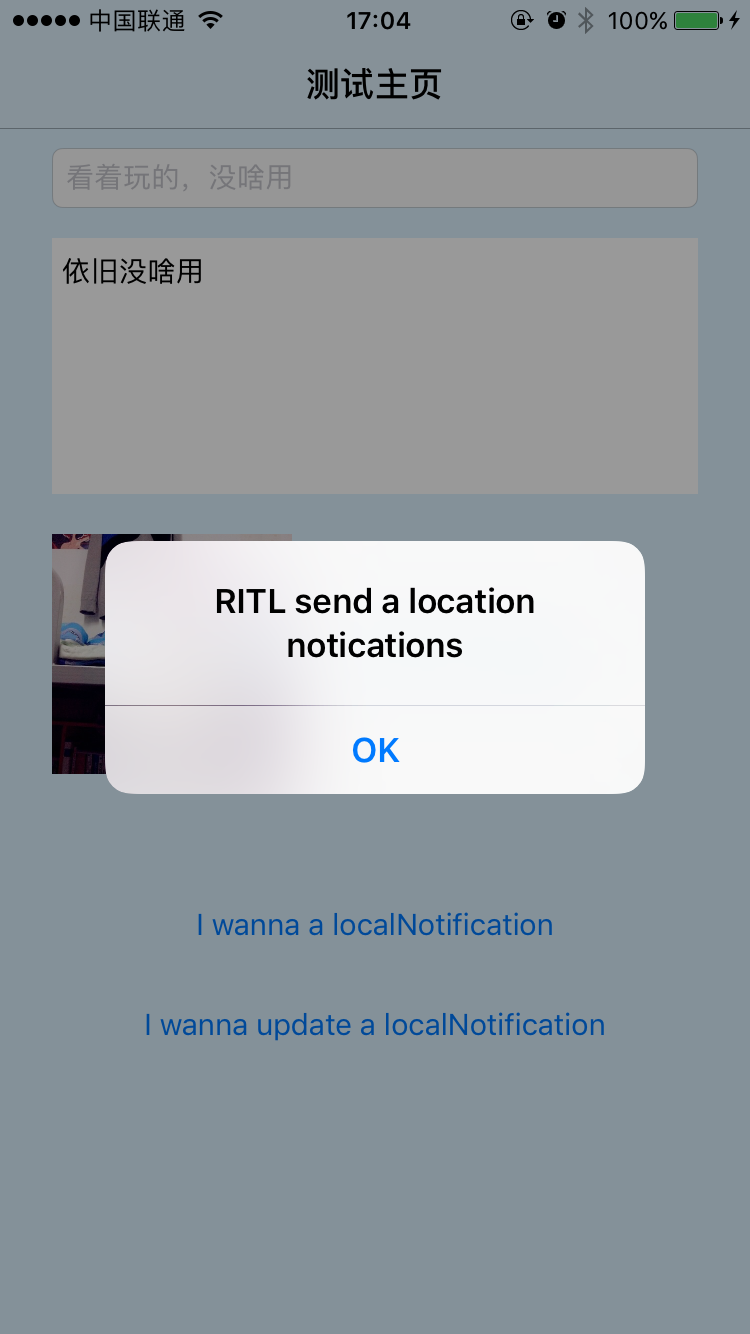
-(void)pushLocationNotificationbeforeiOS10
{
    UILocalNotification * localNotification = [[UILocalNotification alloc]init];

    //設置消息體
    localNotification.alertBody = @"RITL send a location notications (iOS9)";

#ifdef __IPHONE_8_2
    //設置詳細內容,iOS8.2才存在
    localNotification.alertTitle = @"I am SubTitle";
#endif

    //設置彈出時的圖
    localNotification.alertLaunchImage = @"Stitch.png";

#ifdef __IPHONE_8_0
    //拓展id
    localNotification.category = RITLRequestIdentifier;
#endif

    //觸發聲音
    localNotification.soundName = UILocalNotificationDefaultSoundName;

    //觸發標志
    localNotification.applicationIconBadgeNumber = 1;

    //1秒之後觸發
    localNotification.fireDate = [NSDate dateWithTimeIntervalSinceNow:1];

    //注冊通知
    [[UIApplication sharedApplication] scheduleLocalNotification:localNotification];
}
UserNotifications下的本地推送
在新的框架下,所有的推送都是使用了UNNotificationRequest類,這裡有一點需要注意: 媒體的url可以存儲在UNNotificationAttachment類之中,但是必須是本地路徑,如果是網絡圖,需要先從網絡下載下來,存到本地,然後將本地的路徑存儲進行處理;如果UNNotificationAttachment對象初始化失敗,會拋出異常,導致程序崩潰。比如Demo中就是通過選擇相冊的照片進行本地化,再賦值路徑來進行的本地推送實現方法如下:
-(void)pushLicationNotification:(NSArray*)attachments pushType:(RITLPushMessageType)type { NSString * subTitle = (type == RITLPushMessageTypeNew ? @"I am a new SubTitle" : @"I am a update SubTitle"); //初始化信息對象 UNMutableNotificationContent * content = [[UNMutableNotificationContent alloc]init]; //設置內容 content.body = @"RITL send a location notications"; //設置詳細內容 content.subtitle = subTitle; //設置圖片名稱 content.launchImageName = @"Stitch.png"; //設置拓展id content.categoryIdentifier = RITLRequestIdentifier; //設置推送聲音 content.sound = [UNNotificationSound defaultSound]; //設置通知 content.badge = @1; //設置附帶信息 content.userInfo = @{@"RITL":@"I am RITL.",@"network":@"https://www.baidu.com"}; //媒體附帶信息 content.attachments = attachments; #pragma mark - 延時發送 UNTimeIntervalNotificationTrigger * trigger = [UNNotificationTrigger defaultTimeIntervalNotificationTrigger]; //初始化通知請求 UNNotificationRequest * request = [UNNotificationRequest requestWithIdentifier:RITLRequestIdentifier content:content trigger:trigger]; //如果是更新,先移除 if (type == RITLPushMessageTypeUpdate) [[UNUserNotificationCenter currentNotificationCenter]removeDeliveredNotificationsWithIdentifiers:@[RITLRequestIdentifier]]; //獲得推送控制中心 [[UNUserNotificationCenter currentNotificationCenter]addNotificationRequest:request withCompletionHandler:^(NSError * _Nullable error) { if(error != nil)//出錯 { NSLog(@"error = %@",error.localizedDescription); } }]; }
UNNotificationTrigger 消息觸發類
可能名字翻譯的不是那麼正確,但個人的理解,它就是負責觸發條件的,比如Demo中的類別UNNotificationTrigger+RITLConveniceInitialize中,為Demo提供了三種默認的觸發條件,如下:
///默認的延時推送觸發時機
+(UNTimeIntervalNotificationTrigger *)defaultTimeIntervalNotificationTrigger
{
    return [UNTimeIntervalNotificationTrigger triggerWithTimeInterval:1 repeats:false];
}
/// 默認的日歷推送觸發時機
+(UNCalendarNotificationTrigger *)defaultCalendarNotificationTrigger
{

    NSDateComponents * dateCompents = [NSDateComponents new];
    dateCompents.hour = 7;//表示每天的7點進行推送
    return [UNCalendarNotificationTrigger triggerWithDateMatchingComponents:dateCompents repeats:true];
}
/// 默認的地域推送觸發時機
+(UNLocationNotificationTrigger *)defaultLocationNotificationTrigger
{
    // 因為CLRegion類的初始化方法在iOS7提示廢棄,改用它的子類CLCircularRegion
    //    CLRegion * region = [CLRegion alloc]initCircularRegionWithCenter:cooddinate2D(100,100) radius:200 identifier:locationTriggerIdentifier

    //經緯度分別都是100
    CLLocationCoordinate2D coordinate2D = cooddinate2D(100,100);

    //初始化范圍類
    CLCircularRegion * region = [[CLCircularRegion alloc]initWithCenter:coordinate2D radius:200 identifier:locationTriggerIdentifier];

    return [UNLocationNotificationTrigger triggerWithRegion:region repeats:false];

}
本地推送階段預覽
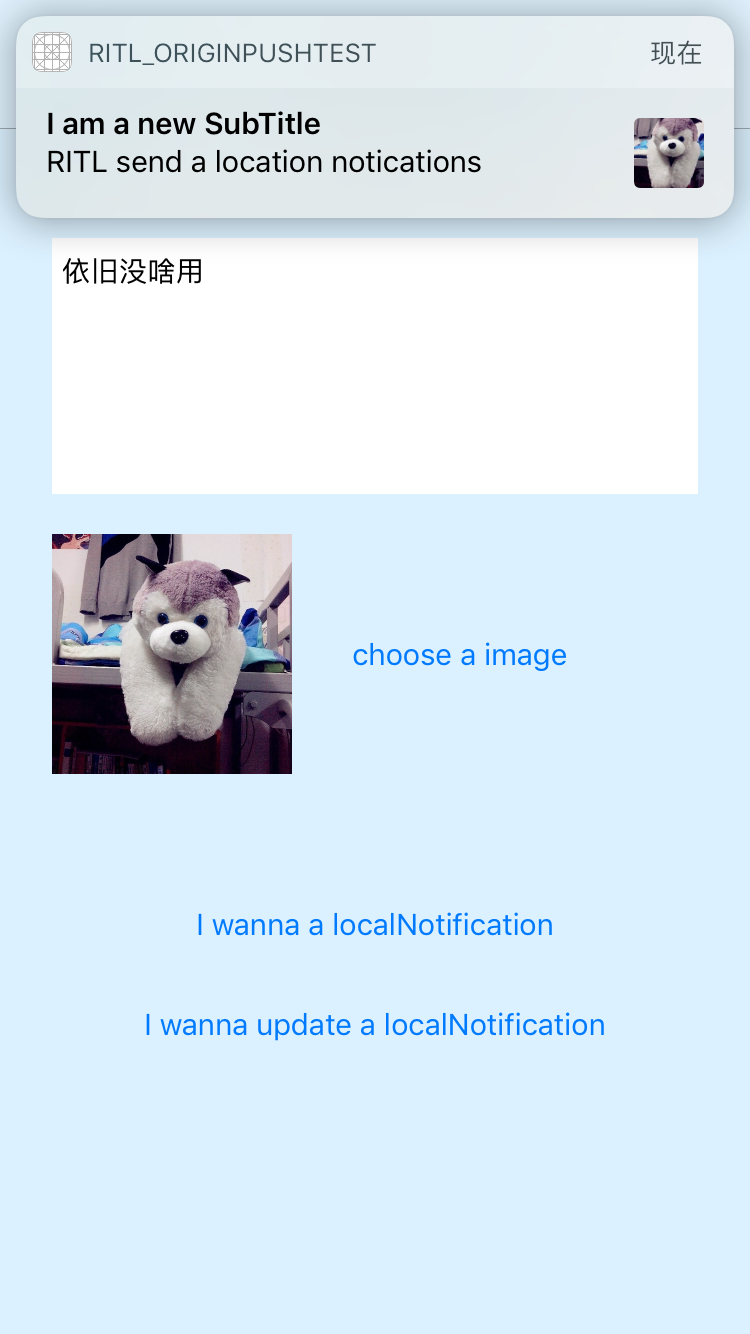
樓主選擇使用在本地相冊中選擇一個圖片來完成本地推送,大體思路如下:
//該過程通過類別UNNotificationAttachment+RITLConceniceInitialize實現 +(NSArray*)defaultNotificationAttachmentsWithImage:(UIImage *)image { if (image == nil) return nil; NSMutableArray * attachments = [NSMutableArray arrayWithCapacity:1]; //將image存到本地 [RITLPushFilesManager saveImage:image key:imageTransformPathKey]; NSError * error; UNNotificationAttachment * attachment = [UNNotificationAttachment attachmentWithIdentifier:attachmentIdentifier URL:[RITLPushFilesManager imageUrlPathWithKey:imageTransformPathKey] options:nil error:&error]; NSAssert(error == nil, error.localizedDescription); [attachments addObject:attachment]; return [attachments mutableCopy]; }
預覽圖如下:

推送消息的策略
推送策略是什麼呢,可以理解為推送的一個”類別”,當我們使用3D Touch得以響應推送信息之後,會出現類似的一排按鈕,不過目前最大的限制為4個,並且最早出於iOS 8.0(那個時候沒有3D Touch感應,怎麼能喚出拓展呢? 如果能告知的小伙伴,也請告知一下樓主,十分感謝)
同樣為了方便管理添加拓展,將添加拓展的方法封裝成RITLPushCategoryManager類
UserNotifications之前推送策略
// 為Demo添加默認的策略--before iOS10
+(UIUserNotificationCategory *)addDefaultCategorysBeforeiOS10
{
    //設置普通響應 -- 表示沒有便利初始化方法很坑
    UIMutableUserNotificationAction * foregroundAction = [UIMutableUserNotificationAction new];
    //設置屬性
    foregroundAction.identifier = foregroundActionIdentifier;
    foregroundAction.title = @"收到了";
    foregroundAction.activationMode = UIUserNotificationActivationModeForeground;


    //設置文本響應
    UIMutableUserNotificationAction * destructiveTextAction = [UIMutableUserNotificationAction new];
    //設置屬性
    destructiveTextAction.identifier = destructiveTextActionIdentifier;
    destructiveTextAction.title = @"我想說兩句";
    destructiveTextAction.activationMode = UIUserNotificationActivationModeForeground;
    destructiveTextAction.behavior = UIUserNotificationActionBehaviorTextInput;
    destructiveTextAction.authenticationRequired = false;
    destructiveTextAction.destructive = true;

    //初始化Category
    UIMutableUserNotificationCategory * category = [UIMutableUserNotificationCategory new];
    //設置屬性
    category.identifier = RITLRequestIdentifier;
    [category setActions:@[foregroundAction,destructiveTextAction] forContext:UIUserNotificationActionContextDefault];

    //返回
    return [category copy];
}

//並在外部使用注冊推送的時候添加即可,代碼有點長,Demo中有演示
/*
[[UIApplication sharedApplication] registerUserNotificationSettings:categories:中的第二個參數,以NSSet的形式傳入即可
*/
UserNotifications下的推送策略
UserNotifications框架為我們提供了很多的便利初始化方法,從代碼也可以看出它的簡潔性,由於是單行,所以會顯得比較長 (相信我,在這裡換行格式也是很難看的,所以索性用了一行 0.0)
+(void)addDefaultCategorys
{
    // 設置響應
    UNNotificationAction * foregroundAction = [UNNotificationAction actionWithIdentifier:foregroundActionIdentifier title:@"收到了" options:UNNotificationActionOptionForeground];

    // 設置文本響應
    UNTextInputNotificationAction * destructiveTextAction = [UNTextInputNotificationAction actionWithIdentifier:destructiveTextActionIdentifier title:@"我想說兩句" options:UNNotificationActionOptionDestructive|UNNotificationActionOptionForeground textInputButtonTitle:@"發送" textInputPlaceholder:@"想說什麼?"];

    // 初始化策略對象,這裡的categoryWithIdentifier一定要與需要使用Category的UNNotificationRequest的identifier匹配(相同)才可觸發
    UNNotificationCategory * category = [UNNotificationCategory categoryWithIdentifier:RITLRequestIdentifier actions:@[foregroundAction,destructiveTextAction] intentIdentifiers:@[foregroundActionIdentifier,destructiveTextActionIdentifier] options:UNNotificationCategoryOptionCustomDismissAction];

    //直接通過UNUserNotificationCenter設置策略即可
    [[UNUserNotificationCenter currentNotificationCenter]setNotificationCategories:[NSSet setWithObjects:category, nil]];

}
響應策略的方式
如何響應我們添加的策略呢,這裡就只介紹UserNotifications下的響應方法,找到負責響應最新推送協議方法的類別RITLOriginPushAppDelegate+RITLUserNotifications:
在- (void)userNotificationCenter:didReceiveNotificationResponse:withCompletionHandler:方法體最前面進行一下策略判定即可,如下:
if ([response.actionIdentifier isEqualToString:foregroundActionIdentifier])
{
//可以彈出Alert提示一下
[self performSelector:NSSelectorFromString(@"__showAlert:") withObject:@"我是第一個策略動作,收到了" afterDelay:0];
completionHandler();return;
}
else if([response.actionIdentifier isEqualToString:destructiveTextActionIdentifier])
{
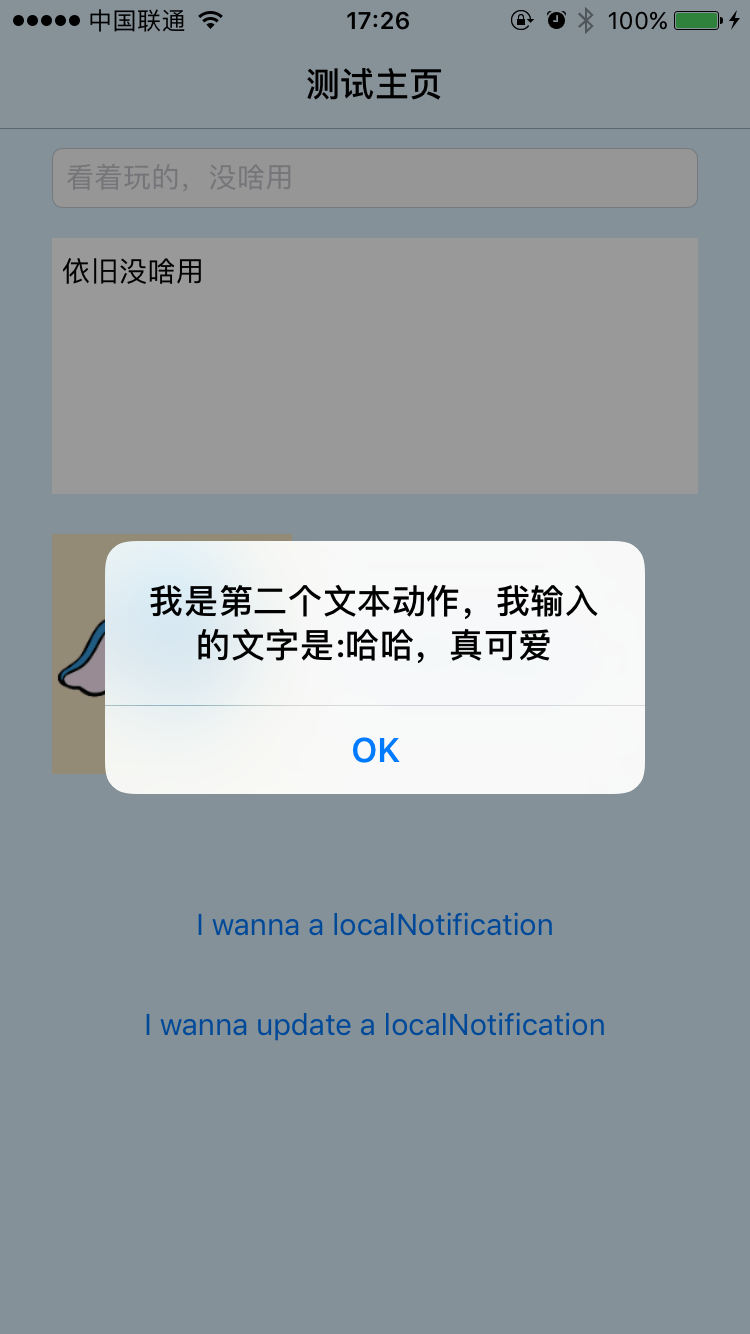
[self performSelector:NSSelectorFromString(@"__showAlert:") withObject:[NSString stringWithFormat:@"我是第二個文本動作,我輸入的文字是:%@",((UNTextInputNotificationResponse *)response).userText] afterDelay:0];
completionHandler();return;
}
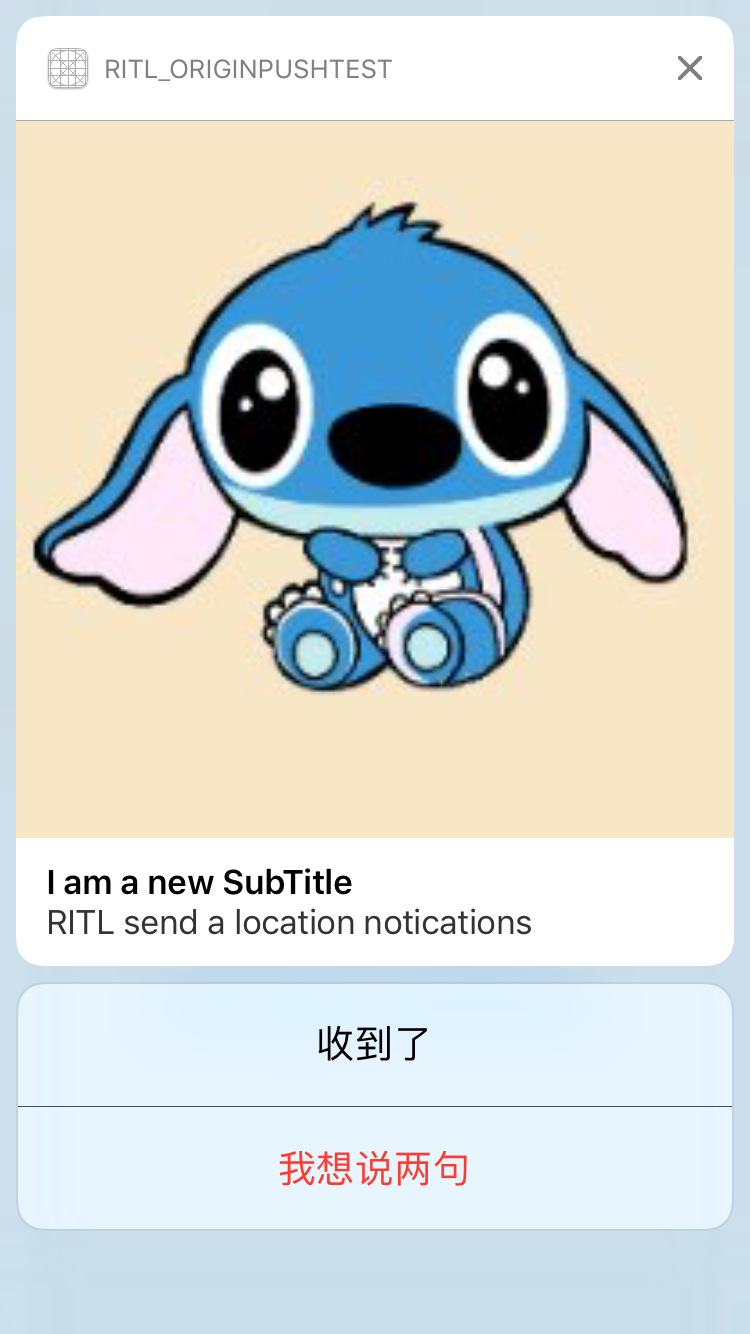
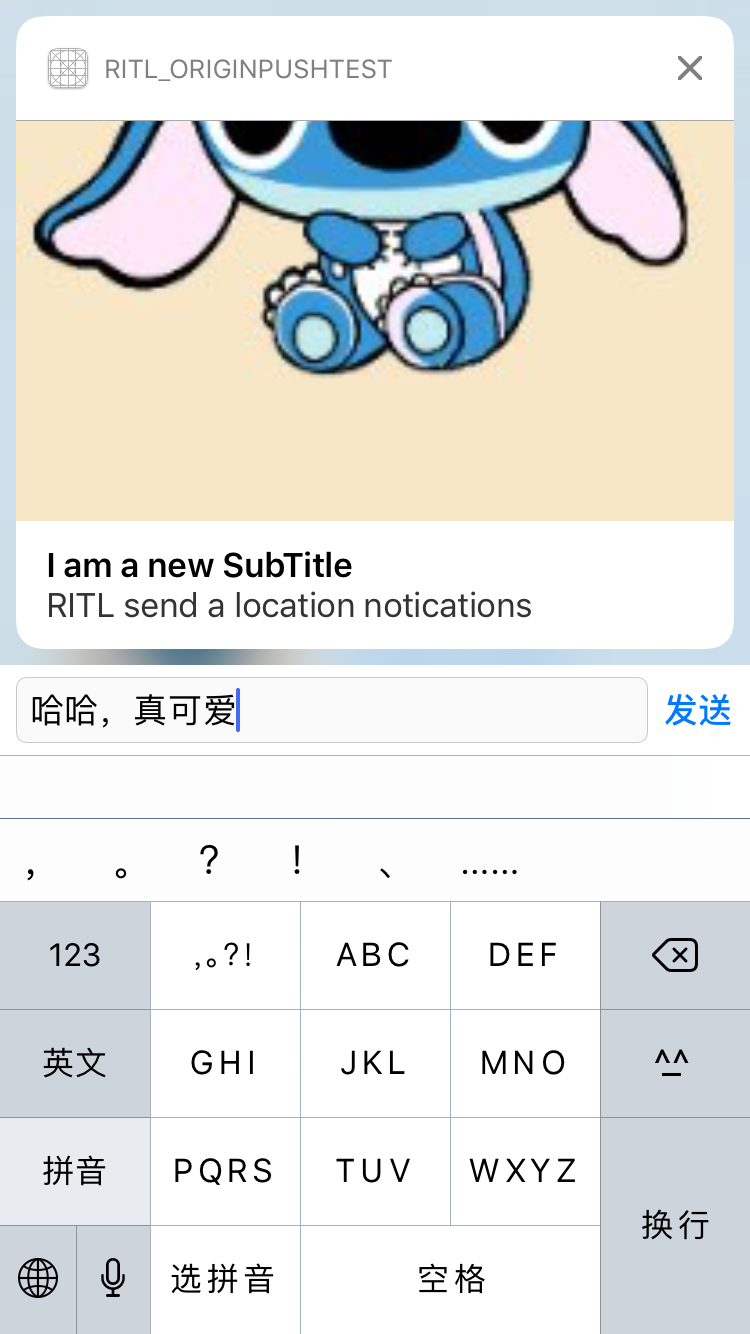
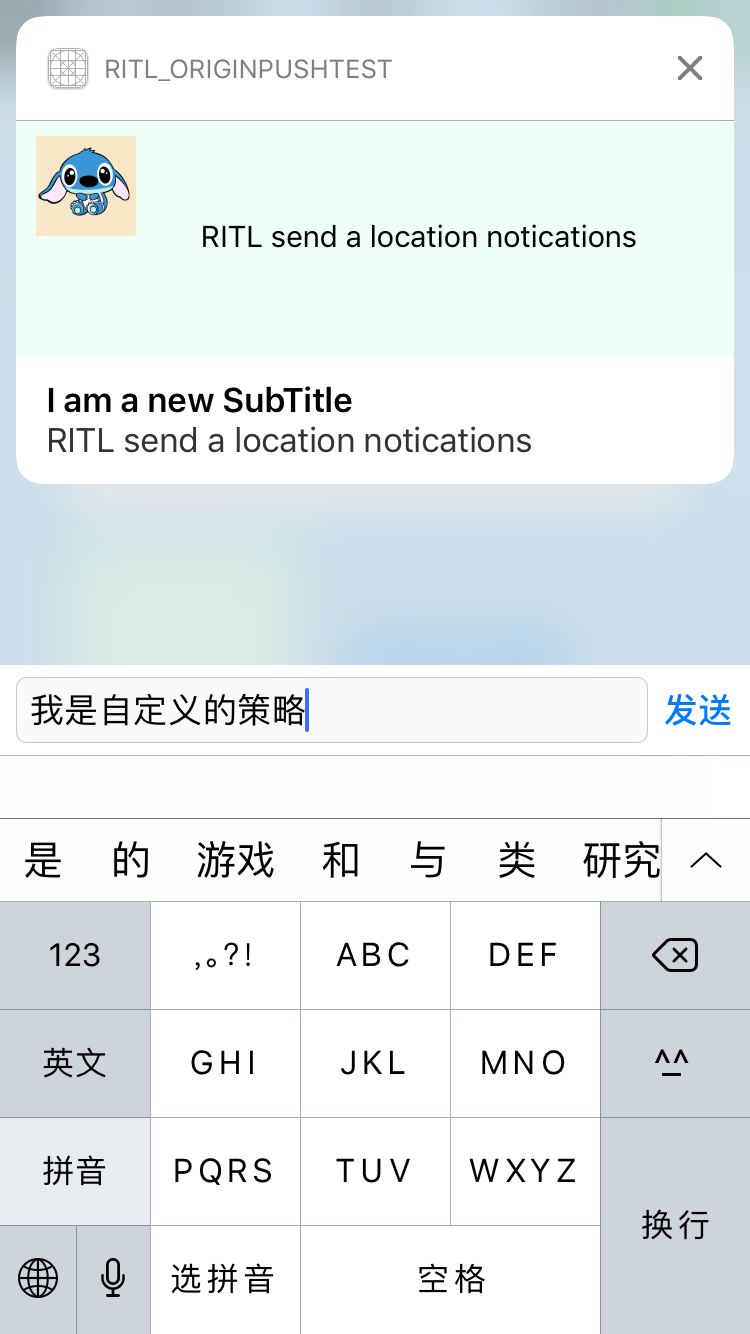
推送策略階段預覽
下面是通過Touch喚起推送策略、響應text策略以及響應策略的預覽圖
推送拓展插件-NotificationContentExtension
創建方式
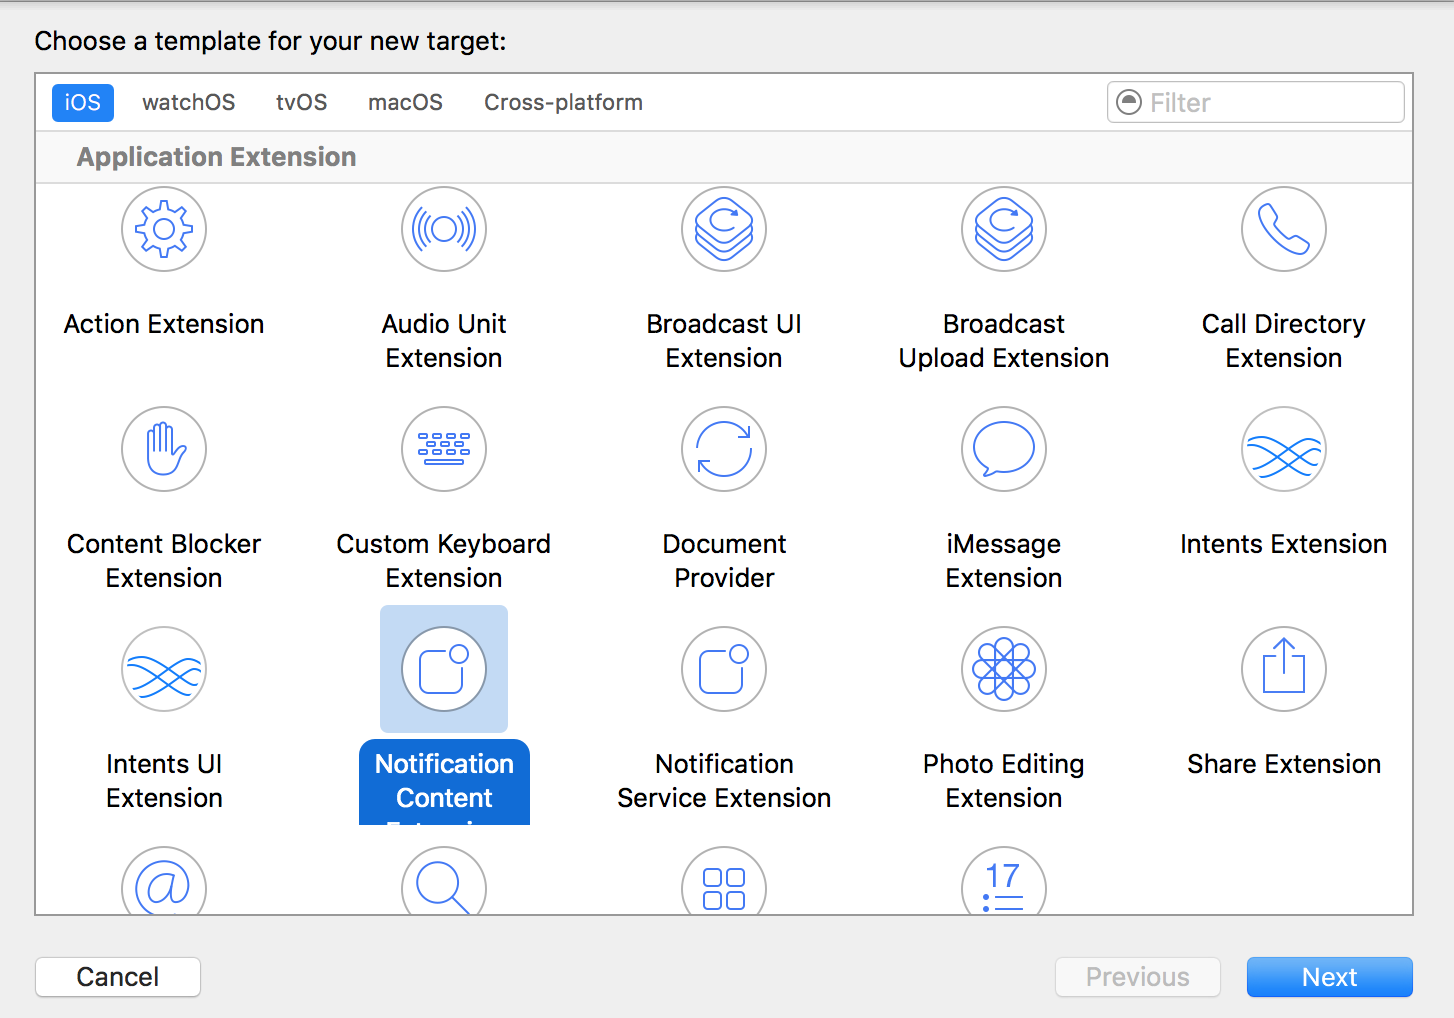
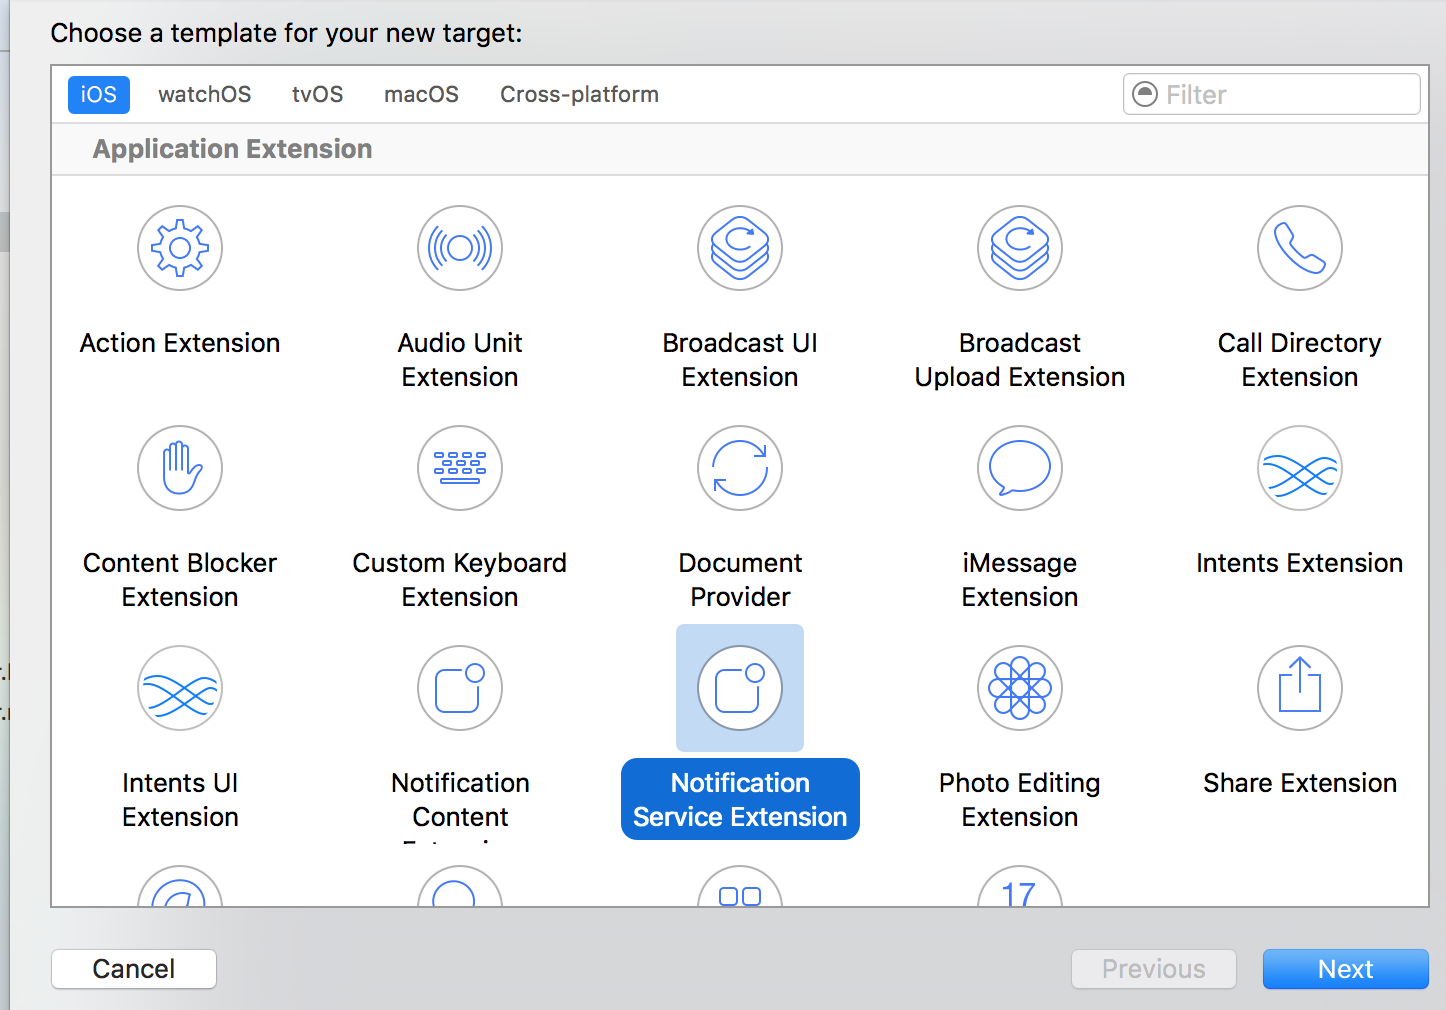
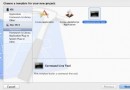
與Widget插件化開發的創建步驟是一樣的呢,File->New->Target->NotificationContentExtension
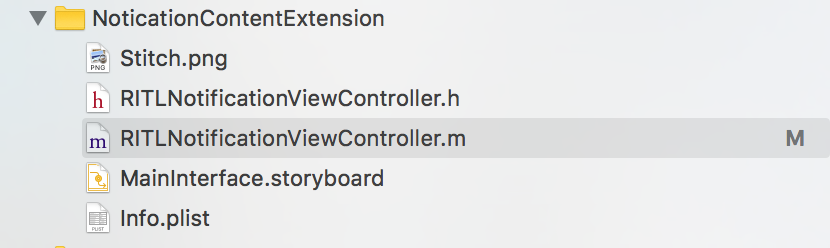
創建成功之後,默認的控制器名稱為NotificationViewController,Demo中僅僅改了一下名字,文件夾分布如下:
如果牽扯到UI的繪制的方法,數據與代碼的共享的方法,作為插件化開發其實是一致的,可回顧一下博主之前的博文iOS開發——Widget(Today Extension)插件化開發感謝。
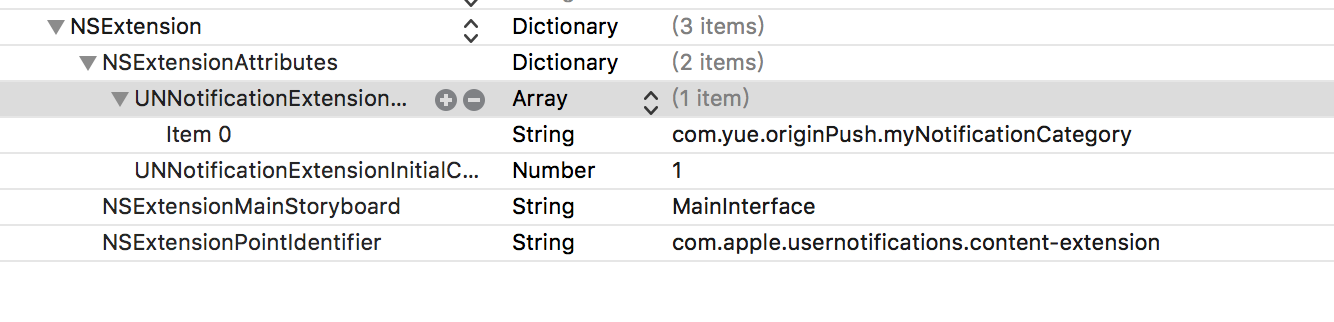
這裡需要注意一下,如果我們創建了拓展,但是本地推送的UI如果還是默認的UI形式,這個時候就需要看一下Info.plist文件下 NSExtension->NSExtensionAttributes->UNNotificationExtensionCategory (默認是一個String類型),裡面需要與UNNotificationRequest對象的identifier相匹配才可觸發;如果支持多個通知,可以將UNNotificationExtensionCategory更改為數組類型。下面是一個栗子0.0
下面是Demo中進行本地推送中初始化UNNotificationRequest對象的具體代碼形式:
//作為一個全局的固定字符串
NSString * const RITLRequestIdentifier = @"com.yue.originPush.myNotificationCategory";

//初始化通知請求
UNNotificationRequest * request = [UNNotificationRequest requestWithIdentifier:RITLRequestIdentifier content:content trigger:trigger];
同時為了保證能夠觸發自定義的推送UI,Demo中的plist文件設置如下:
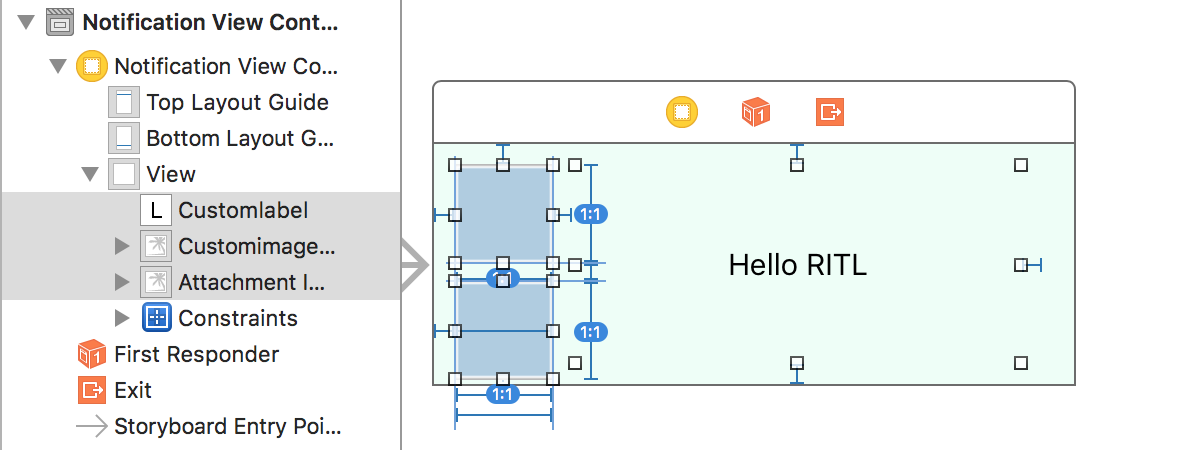
在Demo中,樓主依舊使用了storyboard進行UI布局,也只因為是研究框架,所以布局是非常的簡單,如下:
UNNotificationContentExtension協議
這個協議也是比較簡單的,只有兩個協議方法,有一個必須實現的方法,也有一個可選的。
// 收到推送消息後進行的回調,必須實現的方法
- (void)didReceiveNotification:(UNNotification *)notification
{
    //獲得內容對象
    UNNotificationContent * content = notification.request.content;

    //獲得需要展示的文本
    NSString * customTitle = content.body;

    //需要展示的圖片
    UIImage * image = [UIImage imageNamed:content.launchImageName];

    //設置
    self.customlabel.text = customTitle;

    //這是拓展裡自定義的圖片
    self.customimageView.image = image;

    //這是通知裡帶的照片
    self.attachmentImageView.image = nil;//直接使用attachment對象的路徑進行加載即可

    //如果是遠程推送的網絡圖沒有加載怎麼辦,這裡不用擔心
    //下面的NotificationServiceExtension就是解決這個問題的
}
下面這個協議方法是可選的。
它的作用就是,當我們使用自定義的UI進行通知顯示的時候,通過點擊或者響應策略Action的時候,會優先執行該協議方法,並通過它的回調來決定下一步的操作。
//回調類型的個人理解如下:
typedef NS_ENUM(NSUInteger, UNNotificationContentExtensionResponseOption)
{
    UNNotificationContentExtensionResponseOptionDoNotDismiss, //默認表示不消失
    UNNotificationContentExtensionResponseOptionDismiss,//消失
    UNNotificationContentExtensionResponseOptionDismissAndForwardAction,//消失並讓App對它進行處理,這個時候才會走原應用的回調
};
// 展開後的推送消息得到點擊響應
- (void)didReceiveNotificationResponse:(UNNotificationResponse *)response completionHandler:(void (^)(UNNotificationContentExtensionResponseOption option))completion
{
    //進行回調,這裡是使其消失並回到主App進行處理,處理完畢之後會走UNUserNotificationCenter的協議方法
    completion(UNNotificationContentExtensionResponseOptionDismissAndForwardAction);
}
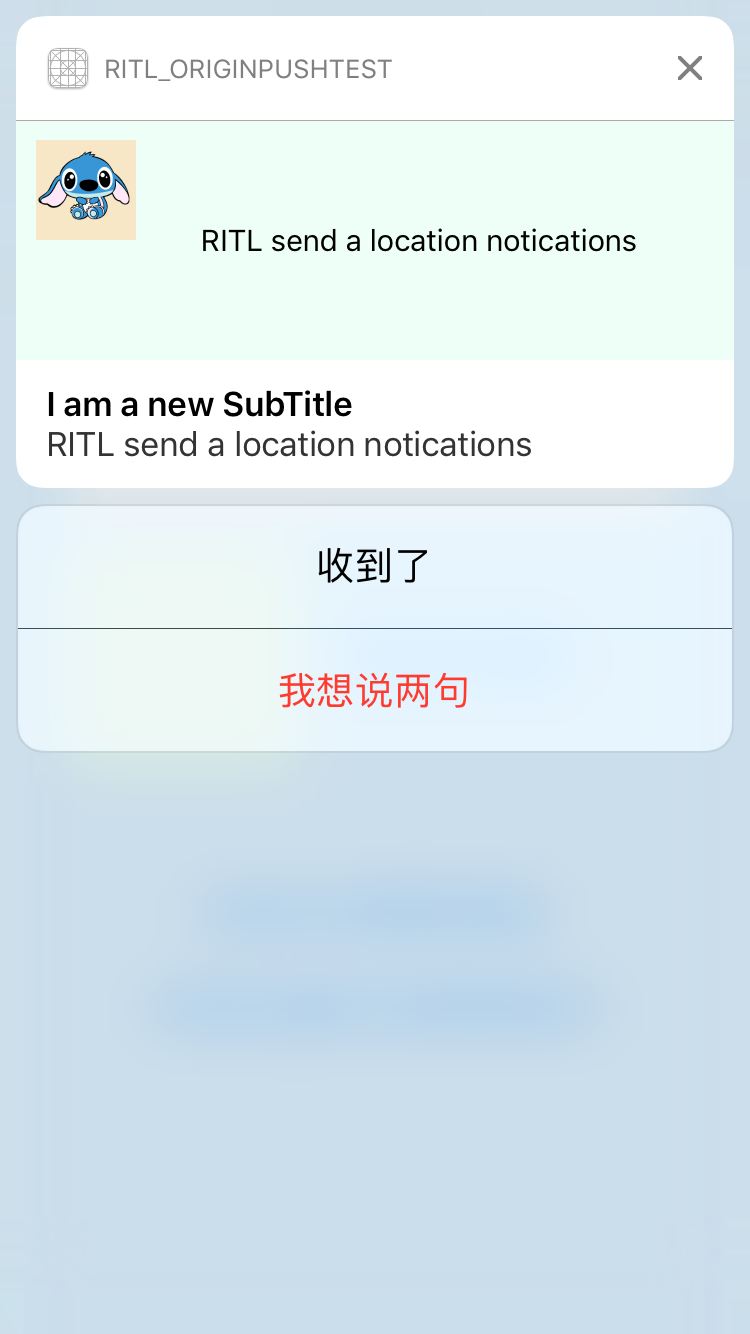
NotificationContentExtension階段預覽
下面是使用自定義的通知UI、使用策略輸入文本以及最後響應文本的操作

推送拓展插件-NotificationServiceExtension
如果眼睛比較厲害的小伙伴估計上面的截圖也看到了,在NotificationContentExtension旁邊,如下圖:
這個插件的作用是什麼呢,當然這個插件主要是用於遠程推送的數據處理,它能夠給我們最長30秒的時間讓我們對遠程推送的內容進行修改,或者對推送內容中的圖片、視頻、音頻鏈接進行下載的過程。
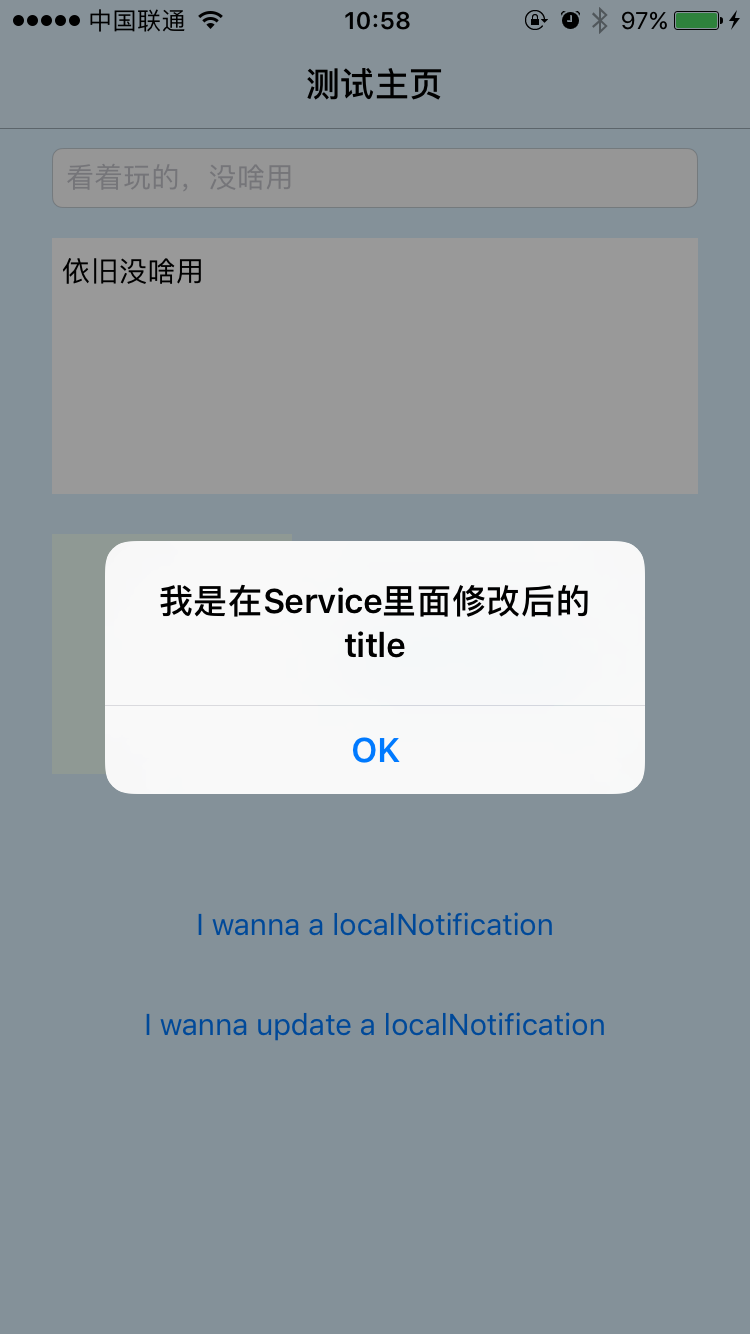
當然大部分的代碼系統已經幫我們寫好了,這裡之貼上Demo中的一個小實現,作用就是在收到遠程推送的時候,修改推送的內容,如下:
//大約會給30秒的時間限制
- (void)didReceiveNotificationRequest:(UNNotificationRequest *)request withContentHandler:(void (^)(UNNotificationContent * _Nonnull))contentHandler {

    //獲取request以及block對象
    self.contentHandler = contentHandler;
    self.bestAttemptContent = [request.content mutableCopy];


    //對內容可以進行修改
    self.bestAttemptContent.body = @"我是在Service裡面修改後的title";

    //如果如果含有圖片,視頻音頻的url,可以利用這裡進行下載coding...

    //然後初始化UNNotificationAttachment對象,賦值數組即可

    //回調處理完畢的content內容
    self.contentHandler(self.bestAttemptContent);
}
下面的協議方法雖然能大體翻譯出來,但卻不知道到底有什麼用,如果有知道的小伙伴,也請告知一下,十分感謝
//提供最後一個機會,當該拓展將被系統殺死的時候執行的方法
- (void)serviceExtensionTimeWillExpire {
    // Called just before the extension will be terminated by the system.
    // Use this as an opportunity to deliver your "best attempt" at modified content, otherwise the original push payload will be used.

    //就比如上面英文介紹所說的:可以用這個機會來表達一下你最想在content中表達的,不然的話最初推送的payload將被用到
    self.contentHandler(self.bestAttemptContent);
}
NotificationServiceExtension階段預覽
使用pushMeBody進行一次遠程推送,Touch響應以及點擊推送該內容結果如下:


更多的請在GitHub
- 上一頁:iOS項目組件化解耦
- 下一頁:iOS開發UI篇—CAlayer層的屬性

- 抓圖、倒影、圓角
- iOS客戶端的微信支付接入
- 《從零開始學Swift》學習筆記(Day3)——Swift2.0之後增加的關鍵字
- iOS App開辟中Objective-C應用正則表達式停止婚配的辦法
- iOS 容器控制器 (Container View Controller)
- iOS Runntime 動態添加類方法並調用-class_addMethod
- 《從零開始學Swift》學習筆記(Day 57)——Swift編碼規范之注釋規范:
- iOS開發-UI (四)UIViewController
- 舉例講授iOS運用開辟中hitTest觸摸事宜的編寫辦法
- iOS 9應用開發教程之定制應用程序圖標以及真機測試