
iOS_21團購_iPad中子控制器的屏幕適配
編輯:IOS開發綜合
最終效果圖:
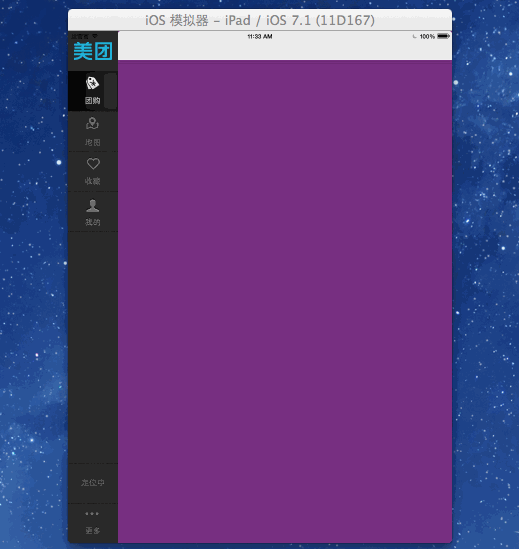
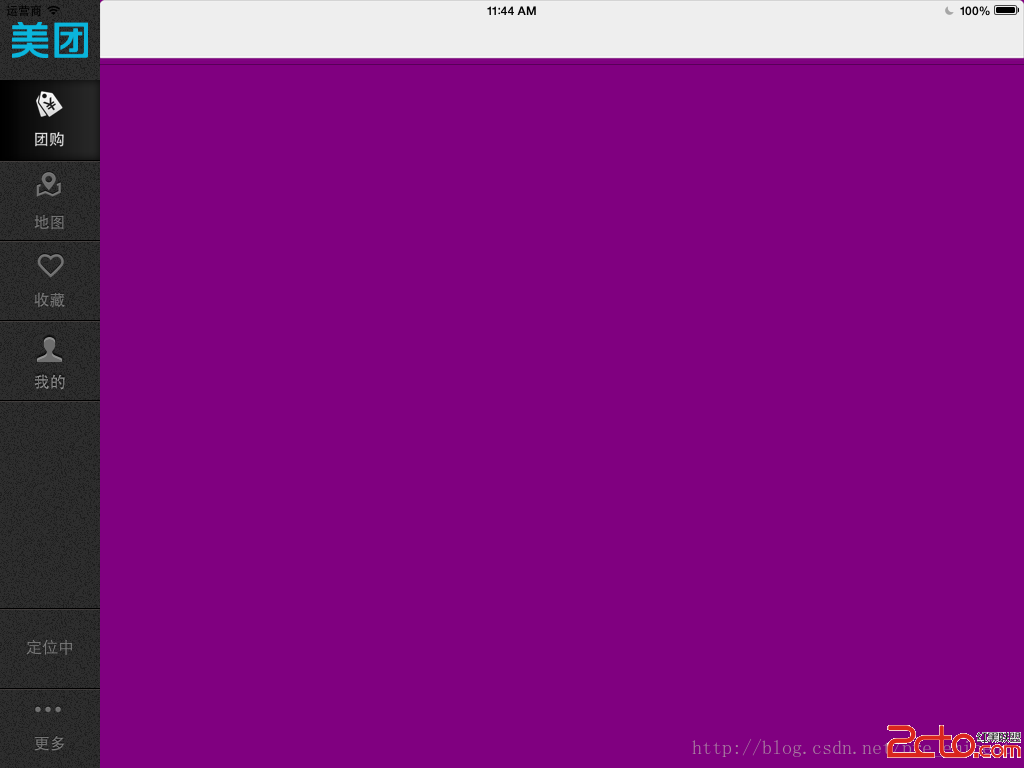
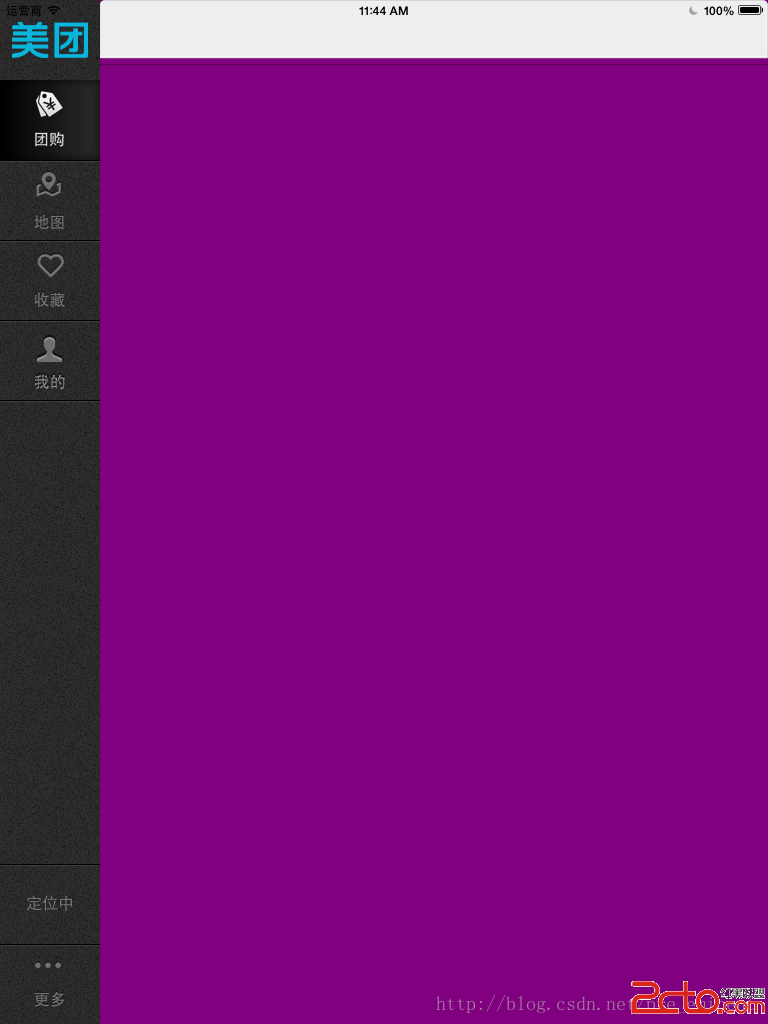
iPad中重要的屏幕適配技巧,
先添加一個contentView占位,
並且只在viewDidLoad方法中設置frame,
因為iPad中無論橫屏還是豎屏,W都是窄的那一條邊,
因此,先添加一個contentView到主控制器的右側,
並讓它隨著主控制器寬高自動伸縮,
而子控制器的view只需添加到contentView中即可,x 0 y 0寬高就是contentView的bounds
代碼片段:
// // MainViewController.m // 帥哥_團購 // // Created by beyond on 14-8-13. // Copyright (c) 2014年 com.beyond. All rights reserved. // 主控制器,左側是dock,右側是子控制器 #import "MainViewController.h" #import "Dock.h" #import "DockDelegate.h" // 自定義的導航器 #import "BeyondNavigationController.h" // dock上面的【四個】按鈕對應的控制器 #import "DealListController.h" #import "MapController.h" #import "CollectionController.h" #import "MineController.h" @interface MainViewController (){ // 重要的屏幕適配技巧,先添加一個contentView占位,並且只在viewDidLoad方法中設置frame,因為iPad中無論橫屏還是豎屏,W都是窄的那一條邊,因此,先添加一個contentView到主控制器的右側,並讓它隨著主控制器寬高自動伸縮,而子控制器的view只需添加到contentView中即可,x 0 y 0 寬高就是contentView的bounds UIView *_contentView; } @end @implementation MainViewController - (void)viewDidLoad { [super viewDidLoad]; log(@"%@",NSStringFromCGRect(self.view.frame)); self.view.backgroundColor = [UIColor whiteColor]; // 1.添加Dock到主控制器 [self addDock]; // 2.重要的屏幕適配技巧,先添加一個contentView占位,並且只在viewDidLoad方法中設置frame,因為iPad中無論橫屏還是豎屏,W都是窄的那一條邊,因此,先添加一個contentView到主控制器的右側,並讓它隨著主控制器寬高自動伸縮,而子控制器的view只需添加到contentView中即可,x 0 y 0 寬高就是contentView的bounds [self addContentView]; // 3.添加所有的子控制器,共4個,與dock裡面的最上面4個tab按鈕相對應 [self addAllChildControllers]; } // 1.添加Dock到主控制器 - (void)addDock { Dock *dock = [[Dock alloc] init]; // dock內部設置了高度和右間距,自動拉伸,寬度也重寫了setFrame固定為100 dock.frame = CGRectMake(0, 0, 0, self.view.frame.size.height); // dock內部的欄目被點擊的時候,可以調用代理的方法(block效果也一樣) dock.delegate = self; [self.view addSubview:dock]; } // 1-1,實現dock的代理方法 - (void)dock:(Dock *)dock tabChangeFromIndex:(int)fromIndex toIndex:(int)toIndex { log(@"%d--點擊了-%d",fromIndex,toIndex); // 1.先移除舊的子控制器(導航包裝了的) UIViewController *oldVC = self.childViewControllers[fromIndex]; [oldVC.view removeFromSuperview]; // 2.添加新的子控制器(導航包裝了的) UIViewController *newVC = self.childViewControllers[toIndex]; // 3.子控制器的view直接添加到了contentView,並寬高自動伸縮,占滿contentView,即可完成豎屏與橫屏適配 newVC.view.autoresizingMask = UIViewAutoresizingFlexibleHeight | UIViewAutoresizingFlexibleWidth; // 占滿contentView,即可完成豎屏與橫屏適配 newVC.view.frame = _contentView.bounds; [_contentView addSubview:newVC.view]; } // 2.重要的屏幕適配技巧,先添加一個contentView占位,並且只在viewDidLoad方法中設置frame,因為iPad中無論橫屏還是豎屏,W都是窄的那一條邊,因此,先添加一個contentView到主控制器的右側,並讓它隨著主控制器寬高自動伸縮,而子控制器的view只需添加到contentView中即可,x 0 y 0 寬高就是contentView的bounds - (void)addContentView { // 添加contentview到主控制器的右側 _contentView = [[UIView alloc] init]; // 寬為主控制器的寬 - dock寬 CGFloat contentViewW = self.view.frame.size.width - kDockItemW; // 高度為控制器的高 CGFloat contentViewH = self.view.frame.size.height; // 重要,寬和高都自動伸縮 _contentView.autoresizingMask = UIViewAutoresizingFlexibleHeight | UIViewAutoresizingFlexibleWidth; // 僅要在view Did Load時候,設置一次contentView的frame即可 _contentView.frame = CGRectMake(kDockItemW, 0, contentViewW, contentViewH); [self.view addSubview:_contentView]; } // 3.添加所有的子控制器,共4個,與dock裡面的最上面4個tab按鈕相對應 - (void)addAllChildControllers { // 1.團購_子控制器 DealListController *dealVC = [[DealListController alloc] init]; dealVC.view.backgroundColor = [UIColor purpleColor]; BeyondNavigationController *nav = [[BeyondNavigationController alloc] initWithRootViewController:dealVC]; [self addChildViewController:nav]; // 2.地圖_子控制器 MapController *mapVC = [[MapController alloc] init]; mapVC.view.backgroundColor = [UIColor yellowColor]; nav = [[BeyondNavigationController alloc] initWithRootViewController:mapVC]; [self addChildViewController:nav]; // 3.收藏_子控制器 CollectionController *collectionVC = [[CollectionController alloc] init]; collectionVC.view.backgroundColor = [UIColor greenColor]; nav = [[BeyondNavigationController alloc] initWithRootViewController:collectionVC]; [self addChildViewController:nav]; // 4.我的_子控制器 MineController *mineVC = [[MineController alloc] init]; mineVC.view.backgroundColor = [UIColor blueColor]; nav = [[BeyondNavigationController alloc] initWithRootViewController:mineVC]; [self addChildViewController:nav]; // 5.並手動調用dock的代理方法,默認選中團購_子控制器 [self dock:nil tabChangeFromIndex:0 toIndex:0]; } @end
用到的自定義導航控制器:
//
//  BeyondNavigationController.m
//  帥哥_團購
//
//  Created by beyond on 14-8-14.
//  Copyright (c) 2014年 com.beyond. All rights reserved.
//

#import "BeyondNavigationController.h"

@interface BeyondNavigationController ()

@end

@implementation BeyondNavigationController


// 優化,第一次使用該類,實例化對象的時候調用,且只會調用一次
+ (void)initialize
{
    // 1.appearance方法返回一個導航欄的全局的外觀對象
    // 修改了這個外觀對象,相當於修改了整個項目中的外觀
    UINavigationBar *naviBar = [UINavigationBar appearance];

    // 2.設置導航欄的背景圖片(從中心拉伸一個像素)
    [naviBar setBackgroundImage:[UIImage imageStretchedWithName:@"bg_navigation.png"] forBarMetrics:UIBarMetricsDefault];

    // 3.設置導航欄文字的主題
    [naviBar setTitleTextAttributes:@{
                                  NSForegroundColorAttributeName : [UIColor blackColor],
                                  NSShadowAttributeName : [NSValue valueWithUIOffset:UIOffsetZero]
                                  }];

    // 4.同理,修改所有UIBarButtonItem的全局外觀
    UIBarButtonItem *barBtnItem = [UIBarButtonItem appearance];
    // 修改item的背景圖片
    [barBtnItem setBackgroundImage:[UIImage imageStretchedWithName:@"bg_navigation_right.png"] forState:UIControlStateNormal barMetrics:UIBarMetricsDefault];
    [barBtnItem setBackgroundImage:[UIImage imageStretchedWithName:@"bg_navigation_right_hl.png"] forState:UIControlStateHighlighted barMetrics:UIBarMetricsDefault];

    // 修改item上面的文字樣式
    NSDictionary *dict = @{
                           NSForegroundColorAttributeName : [UIColor darkGrayColor],
                           NSShadowAttributeName : [NSValue valueWithUIOffset:UIOffsetZero],
                           NSFontAttributeName : [UIFont systemFontOfSize:16]
                           };
    [barBtnItem setTitleTextAttributes:dict forState:UIControlStateNormal];
    [barBtnItem setTitleTextAttributes:dict forState:UIControlStateHighlighted];

    // 5.設置狀態欄樣式
    [UIApplication sharedApplication].statusBarStyle = UIStatusBarStyleLightContent;
}


@end
//
//  Dock.m
//  帥哥_團購
//
//  Created by beyond on 14-8-13.
//  Copyright (c) 2014年 com.beyond. All rights reserved.
//  主控制器左側是dock,右側是與dock欄目相對應的子控制器

#import "Dock.h"
// dock最下方的更多按鈕
#import "DockItemMore.h"
// dock下面倒數第2個【定位】按鈕
#import "DockItemLocation.h"
//  dock最上方的四個按鈕(團購,地圖,收藏,我的)都使用本類的實例
#import "DockItemTab.h"
#include "DockDelegate.h"

@interface Dock()
{
    // dock最上方的四個按鈕(團購,地圖,收藏,我的)中被點亮變白色的那一個(即被選中的那一個,圖片設置是disable狀態為白色)
    DockItemTab *_currentTab;
}
@end


@implementation Dock

- (id)initWithFrame:(CGRect)frame
{
    self = [super initWithFrame:frame];
    if (self) {
        // 1,設置dock永遠在主控制器的左側,以及背景
        [self setDockPositionAndBg];
        // 2.添加dock頂部的團購Logo
        [self addLogo];
        // 3.添加dock最下面的【更多】按鈕
        [self addMoreBtn];
        // 4.添加dock下面倒數第2個【定位】按鈕
        [self addLocationBtn];
        // 5.添加dock最上方的四個按鈕(團購,地圖,收藏,我的)
        [self addFourTabBtn];
    }
    return self;
}


// 1,設置dock永遠在主控制器的左側,以及背景
- (void)setDockPositionAndBg
{
    // 1.讓dock可以自動伸縮(高度 + 右邊間距)
    self.autoresizingMask = UIViewAutoresizingFlexibleHeight | UIViewAutoresizingFlexibleRightMargin;

    // 2.設置dock背景顏色,用圖片進行平鋪
    self.backgroundColor = [UIColor colorWithPatternImage:[UIImage imageNamed:@"bg_tabbar.png"]];
}

// 2.添加dock頂部的團購Logo
- (void)addLogo
{
    UIImageView *logo = [[UIImageView alloc] init];
    logo.image = [UIImage imageNamed:@"ic_logo.png"];
    // 設置尺寸
    CGFloat scale = 0.65;
    CGFloat logoW = logo.image.size.width * scale;
    CGFloat logoH = logo.image.size.height * scale;
    // 居中,先設置寬高,再設置中心點XY
    logo.bounds = CGRectMake(0, 0, logoW, logoH);
    // 設置位置
    logo.center = CGPointMake(kDockItemW*0.5, kDockItemH*0.5);
    [self addSubview:logo];
}

// 3.添加dock最下面的【更多】按鈕
- (void)addMoreBtn
{
    DockItemMore *moreBtn = [[DockItemMore alloc] init];
    CGFloat y = self.frame.size.height - kDockItemH;
    // 因為moreBtn按鈕是自動伸縮的,一直在dock的最底部,並且其父類已經在內部固定好了寬高
    moreBtn.frame = CGRectMake(0, y, 0, 0);
    [self addSubview:moreBtn];
}
// 4.添加dock下面倒數第2個【定位】按鈕
- (void)addLocationBtn
{
    DockItemLocation *locBtn = [[DockItemLocation alloc] init];
    // 因為locBtn按鈕是自動伸縮的,一直在dock的底部的倒數第2個,並且其父類已經在內部固定好了寬高
    CGFloat y = self.frame.size.height - kDockItemH * 2;
    locBtn.frame = CGRectMake(0, y, 0, 0);
    //    loc.enabled = NO;
    [self addSubview:locBtn];
}

// 5.添加dock最上方的四個按鈕(團購0,地圖1,收藏2,我的3)
-(void)addFourTabBtn
{
    // 1.使用抽取的方法添加一個TabBtn(團購)
    [self addOneTabBtn:@"ic_deal.png" selectedIcon:@"ic_deal_hl.png" index:0];

    // 2.使用抽取的方法添加一個TabBtn(地圖)
    [self addOneTabBtn:@"ic_map.png" selectedIcon:@"ic_map_hl.png" index:1];

    // 3.使用抽取的方法添加一個TabBtn(收藏)
    [self addOneTabBtn:@"ic_collect.png" selectedIcon:@"ic_collect_hl.png" index:2];

    // 4.使用抽取的方法添加一個TabBtn(我的)
    [self addOneTabBtn:@"ic_mine.png" selectedIcon:@"ic_mine_hl.png" index:3];

    // 5.添加標簽底部的分隔線
    UIImageView *dividerImgView = [[UIImageView  alloc] init];
    dividerImgView.frame = CGRectMake(0, kDockItemH * 5, kDockItemW, 2);
    dividerImgView.image = [UIImage imageNamed:@"separator_tabbar_item.png"];
    [self addSubview:dividerImgView];

}
// 5-1,使用抽取的方法添加一個TabBtn(團購0,地圖1,收藏2,我的3),參數index決定y值
- (void)addOneTabBtn:(NSString *)iconName selectedIcon:(NSString *)selectedIconName index:(int)index
{
    // (團購,地圖,收藏,我的)TabBtn使用同一個父類,它們只是Y值不同
    DockItemTab *tab = [[DockItemTab alloc] init];
    // 設置按鈕背景和選中的圖片
    [tab setIcon:iconName selectedIcon:selectedIconName];
    tab.frame = CGRectMake(0, kDockItemH * (index+1), 0, 0);
    // 因為是選項卡,只要用戶手指tap一下就觸發
    [tab addTarget:self action:@selector(tabBtnClick:) forControlEvents:UIControlEventTouchDown];
    // tag 0 1 2 3  (團購0,地圖1,收藏2,我的3)
    tab.tag = index;
    [self addSubview:tab];
    // 默認選中index == 0的這個 (團購0,地圖1,收藏2,我的3)
    if (index == 0) {
        [self tabBtnClick:tab];
    }
}
// 5-2,因為是dock添加了tab,所以dock擔當起監聽tab的點擊的任務,同時,又是主控制器添加了dock,所以主控制器就必須成為dock的代理,dock通知其代理,告訴代理,它內部的tab被人點擊了
- (void)tabBtnClick:(DockItemTab *)tab
{
    // 0.因為要傳兩個tag,必須先通知dock的代理(因為dock是添加到了主控制器,所以dock的代理就是主控制器)
    if ([_delegate respondsToSelector:@selector(dock:tabChangeFromIndex:toIndex:)]) {
        // 調用代理的方法,相當於通知代理,self dock裡面的按鈕從哪一個切換到了哪一個
        [_delegate dock:self tabChangeFromIndex:_currentTab.tag toIndex:tab.tag];
    }
    // 1.控制狀態
    // 先把上一個置灰,因為圖片設置是enable狀態是黑色
    _currentTab.enabled = YES;
    // 再把被點的這一個置白,圖片設置是disable狀態下為高亮白色
    tab.enabled = NO;
    // 最後把這一個被點擊的按鈕置為當前
    _currentTab = tab;
}

#pragma mark 1,重寫setFrame方法:內定自己的寬度,防止外部更改寬高
- (void)setFrame:(CGRect)frame
{
    frame.size.width = kDockItemW;
    [super setFrame:frame];
}


@end
相關文章
+