[iOS]將DataSource分離並構建更輕量的UIViewController
在objccn.io中看到一篇文章,構建更輕量的View Controllers,在此自己實踐一下加深理解。
新疆項目,learn--tableview,類前綴為LT,開始我們的實驗。
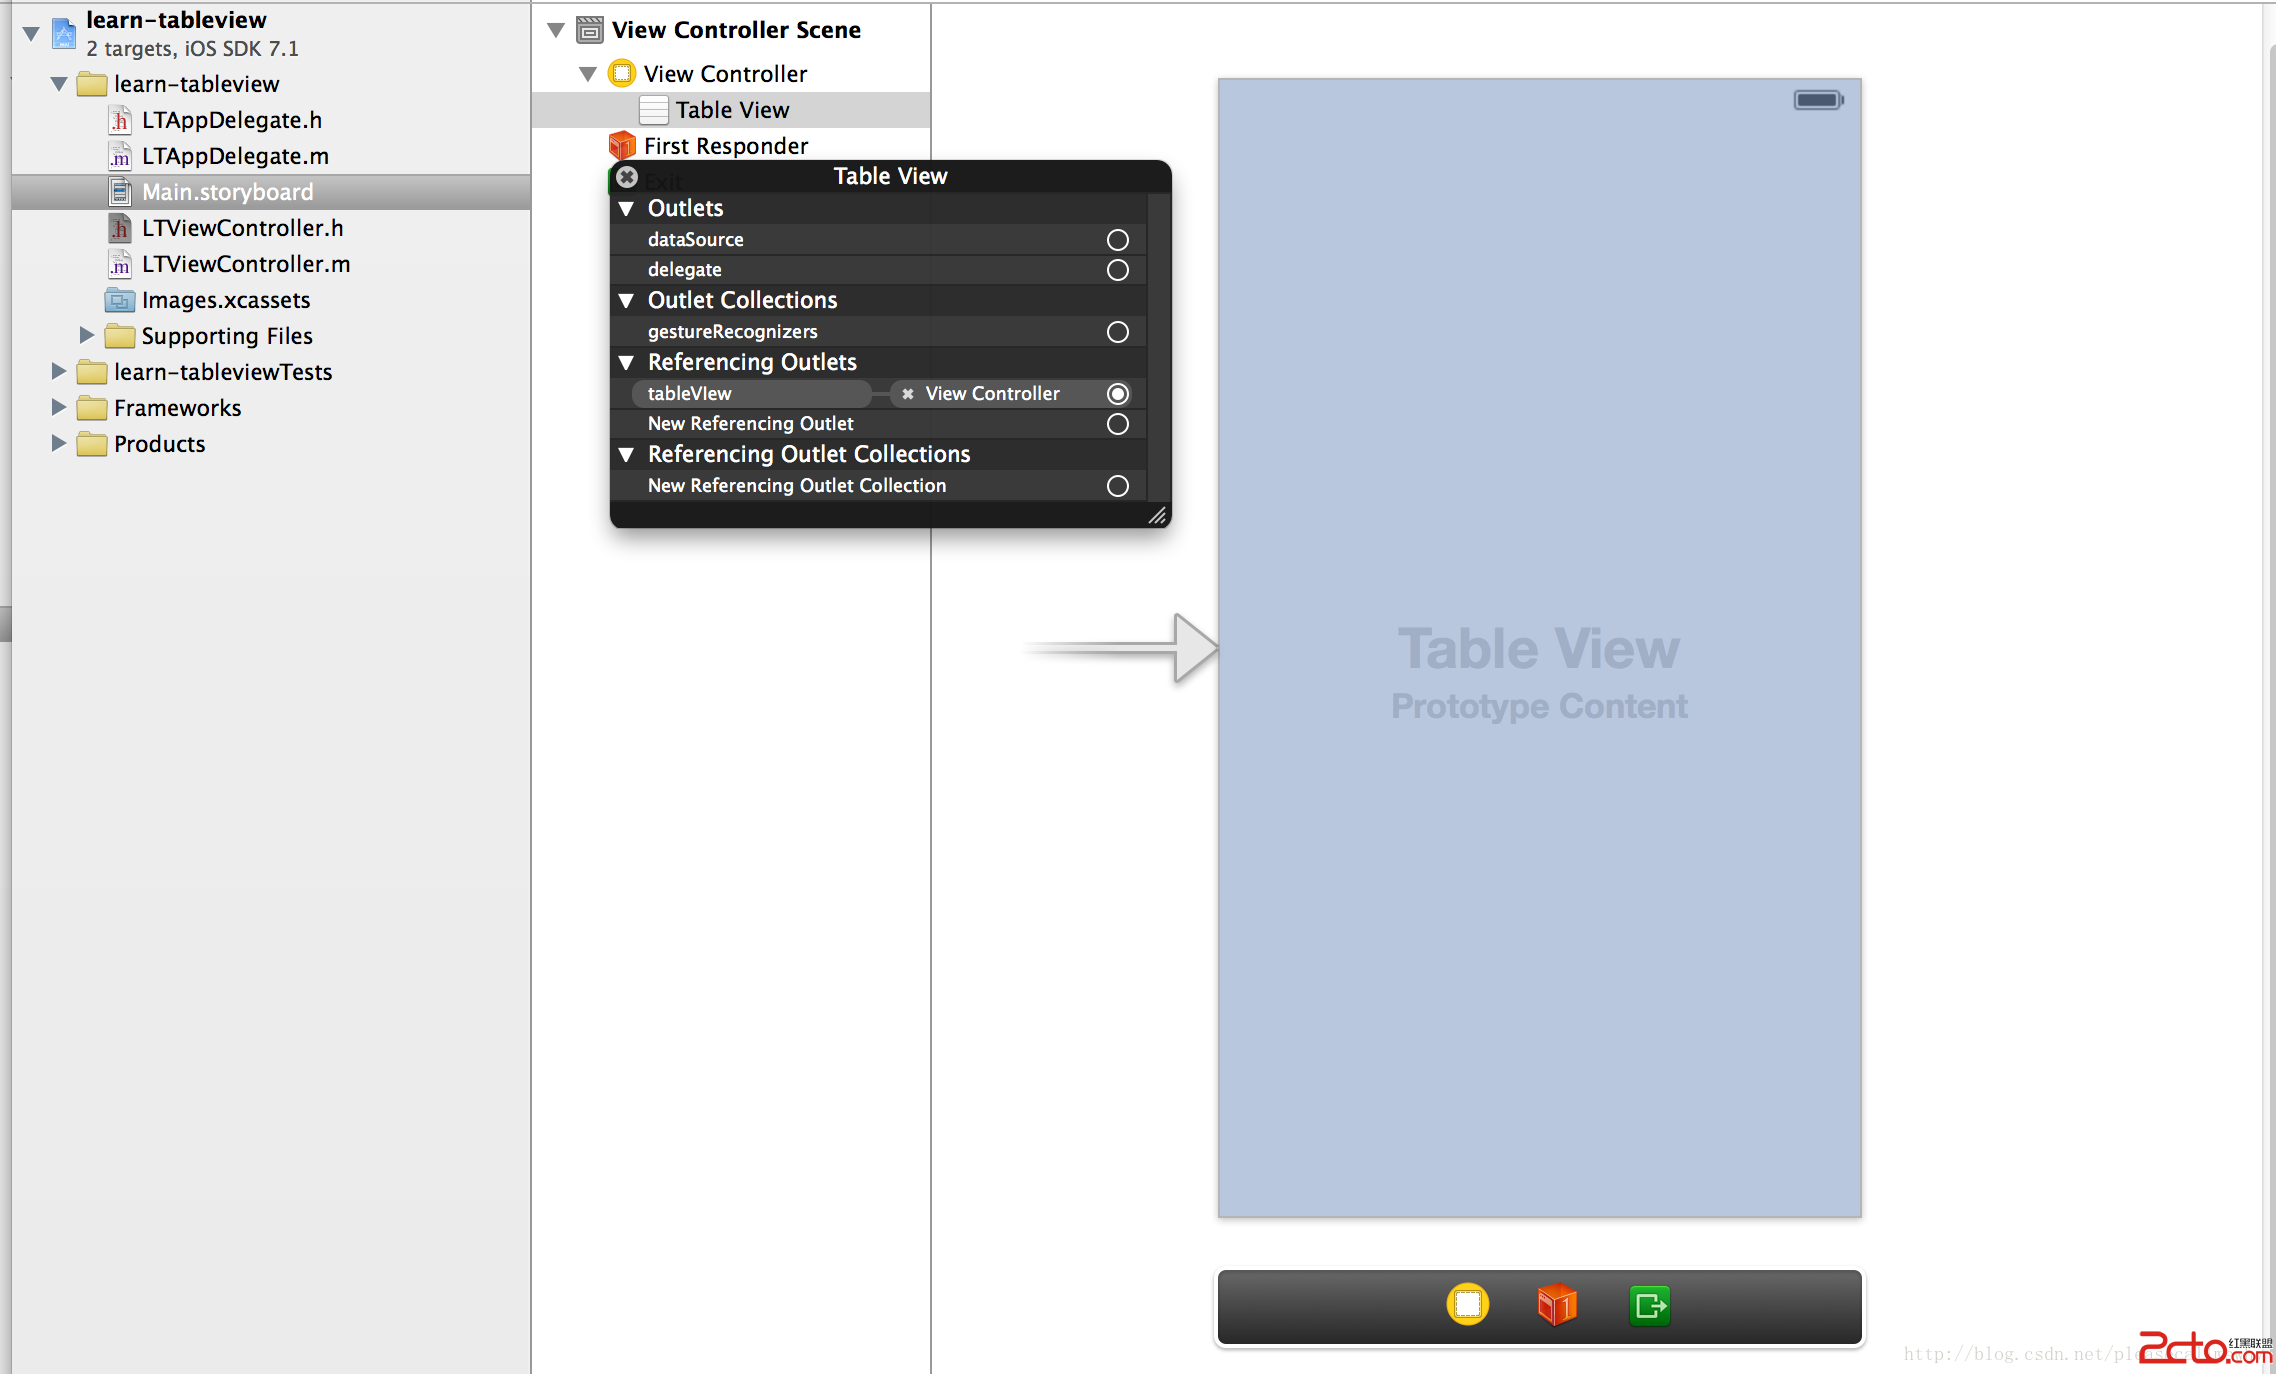
首先需要在StoryBoard中拖拽一個UITableView,在頭文件中申明tableView變量並建立連接:
新建ArrayDataSource類,作為TableView的DataSource。目的是將DataSource從原本的ViewController中分離出來:
// // ArrayDataSource.h // objc.io example project (issue #1) // #importtypedef void (^TableViewCellConfigureBlock)(id cell, id item); @interface ArrayDataSource : NSObject - (id)initWithItems:(NSArray *)anItems cellIdentifier:(NSString *)aCellIdentifier configureCellBlock:(TableViewCellConfigureBlock)aConfigureCellBlock; - (id)itemAtIndexPath:(NSIndexPath *)indexPath; @end
//
//  ArrayDataSource.h
//  objc.io example project (issue #1)
//

#import ArrayDataSource.h


@interface ArrayDataSource ()

@property (nonatomic, strong) NSArray *items;
@property (nonatomic, copy) NSString *cellIdentifier;
@property (nonatomic, copy) TableViewCellConfigureBlock configureCellBlock;

@end


@implementation ArrayDataSource

- (id)init
{
    return nil;
}

- (id)initWithItems:(NSArray *)anItems
     cellIdentifier:(NSString *)aCellIdentifier
 configureCellBlock:(TableViewCellConfigureBlock)aConfigureCellBlock
{
    self = [super init];
    if (self) {
        self.items = anItems;
        self.cellIdentifier = aCellIdentifier;
        self.configureCellBlock = [aConfigureCellBlock copy];
    }
    return self;
}

- (id)itemAtIndexPath:(NSIndexPath *)indexPath
{
    return self.items[(NSUInteger) indexPath.row];
}


#pragma mark UITableViewDataSource

- (NSInteger)tableView:(UITableView *)tableView numberOfRowsInSection:(NSInteger)section
{
    return self.items.count;
}

- (UITableViewCell *)tableView:(UITableView *)tableView cellForRowAtIndexPath:(NSIndexPath *)indexPath
{
    UITableViewCell *cell = [tableView dequeueReusableCellWithIdentifier:self.cellIdentifier
                                                            forIndexPath:indexPath];
    id item = [self itemAtIndexPath:indexPath];
    self.configureCellBlock(cell, item);
    return cell;
}

@end
可以看得出來,這個DataSource的管理類接受三個變量進行初始化,分別是:
1.anItems,存儲表格數據的對象,是一個NSArray,裡面存儲封裝好的對象,我們並不知道它是什麼類型的,所以在使用的時候用id取出其中的元素。
2.cellIdentifier,單元格的標示符,用來指定TableView使用的單元格,是單元格的唯一標識,在創建和設計Cell的時候可以指定。
3.configureCellBlock,一個用來設置每個單元格的block,因為具體的item格式我們並不知道,所以我們也就不知道該如何初始化一個cell裡面的數據,需要用block進行設置,因為這個block的目的是為了將item的數據應用到cell上,所以block接受兩個參數,cell和item。
接下來在添加一個LTMyCell類,作為自定義的單元格類。在xib中添加兩個label用來顯示數據:
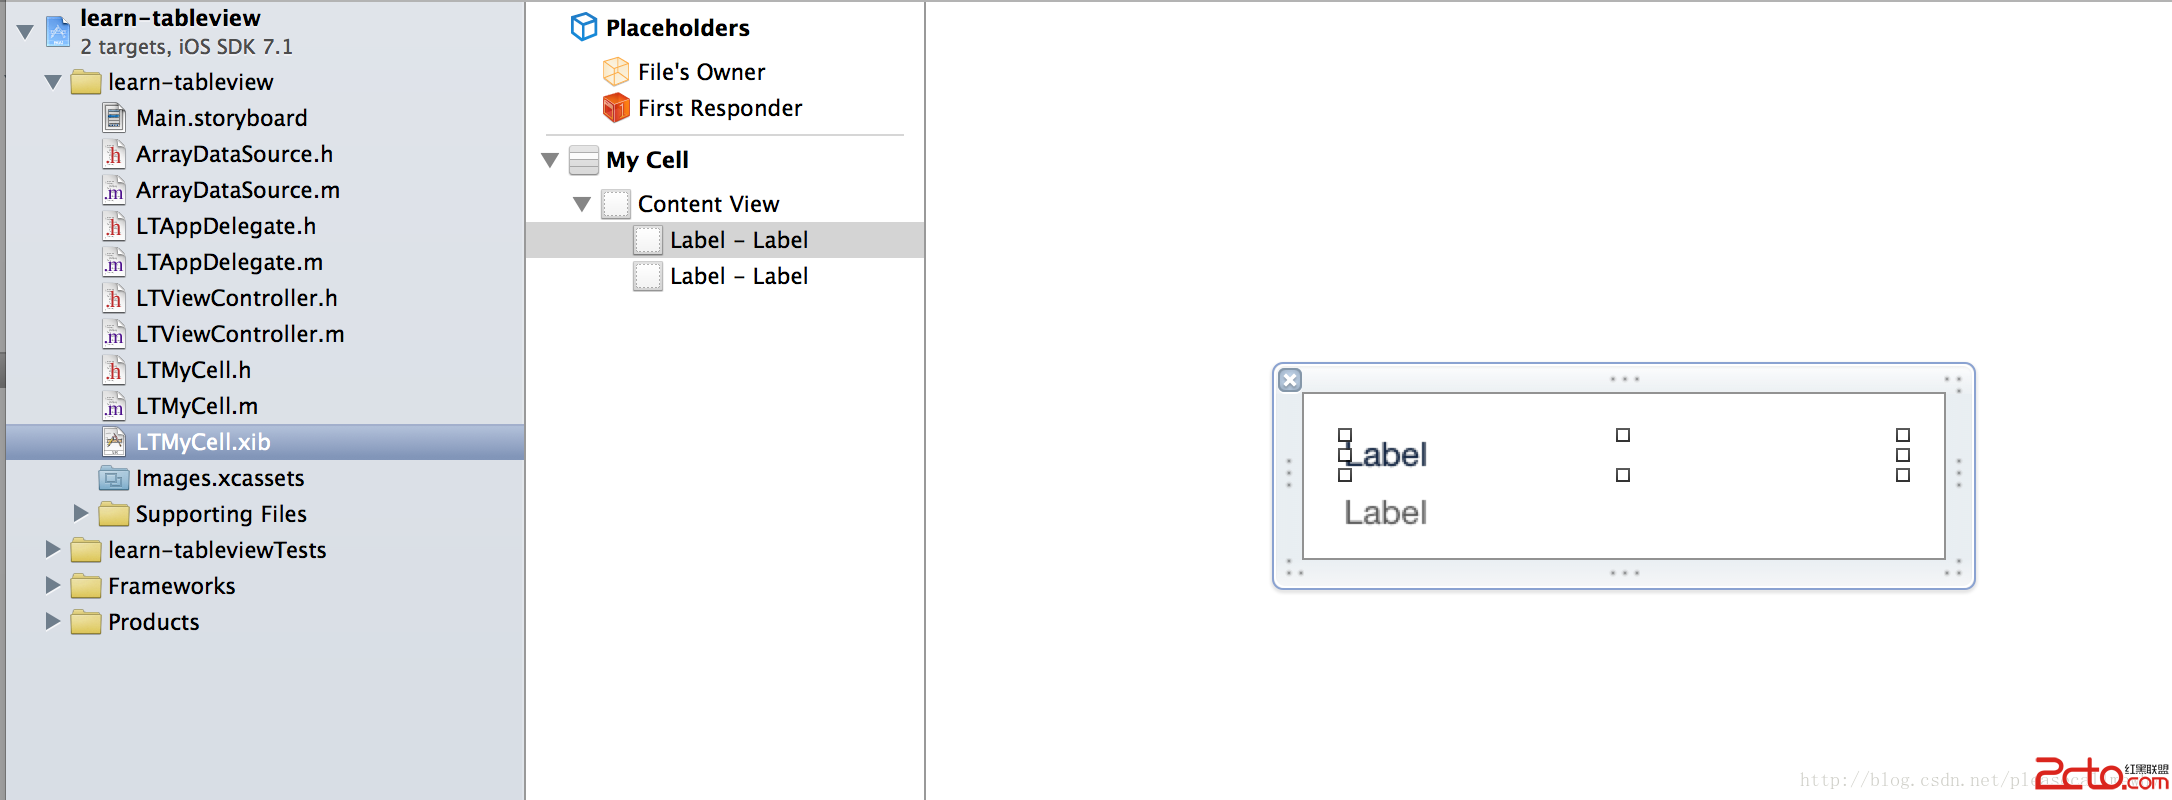
將xib中的兩個label與.h頭文件建立連接,連接後的頭文件如下:
+ (UINib *)nib;

@property (weak, nonatomic) IBOutlet UILabel *photoTitleLabel;
@property (weak, nonatomic) IBOutlet UILabel *photoDateLabel;
修改.m文件,實現相關方法如下:
+ (UINib *)nib
{
    return [UINib nibWithNibName:@PhotoCell bundle:nil];
}

- (void)setHighlighted:(BOOL)highlighted animated:(BOOL)animated
{
    [super setHighlighted:highlighted animated:animated];
    if (highlighted) {
        self.photoTitleLabel.shadowColor = [UIColor darkGrayColor];
        self.photoTitleLabel.shadowOffset = CGSizeMake(3, 3);
    } else {
        self.photoTitleLabel.shadowColor = nil;
    }
}
接著,新建LTPhoto的封裝類,我們需要把用來展示的數據進行分裝:
// // LTPhoto.h // learn-tableview // // Created by why on 8/11/14. // Copyright (c) 2014 why. All rights reserved. // #import@interface LTPhoto : NSObject @property (nonatomic, copy) NSString* name; @property (nonatomic, strong) NSDate* creationDate; @end // // LTPhoto.m // learn-tableview // // Created by why on 8/11/14. // Copyright (c) 2014 why. All rights reserved. // #import LTPhoto.h static NSString * const IdentifierKey = @identifier; static NSString * const NameKey = @name; static NSString * const CreationDateKey = @creationDate; static NSString * const RatingKey = @rating; @implementation LTPhoto - (void)encodeWithCoder:(NSCoder*)coder { [coder encodeObject:self.name forKey:NameKey]; [coder encodeObject:self.creationDate forKey:CreationDateKey]; } - (BOOL)requiresSecureCoding { return YES; } - (id)initWithCoder:(NSCoder*)coder { self = [super init]; if (self) { self.name = [coder decodeObjectOfClass:[NSString class] forKey:NameKey]; self.creationDate = [coder decodeObjectOfClass:[NSDate class] forKey:CreationDateKey]; } return self; } @end
在寫完了LTPhoto這個封裝對象之後,我們可以對原來的MyCell進行Category擴展。新建一個Category:
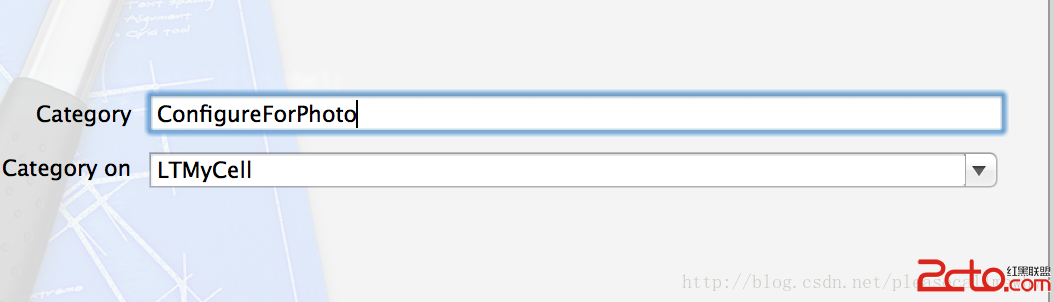
具體代碼如下:
#import LTMyCell.h

@class LTPhoto;

@interface LTMyCell (ConfigureForPhoto)
- (void)configureForPhoto:(LTPhoto *)photo;

@end


//
//  LTMyCell+ConfigureForPhoto.m
//  learn-tableview
//
//  Created by why on 8/11/14.
//  Copyright (c) 2014 why. All rights reserved.
//

#import LTMyCell+ConfigureForPhoto.h
#import LTPhoto.h


@implementation LTMyCell (ConfigureForPhoto)

- (void)configureForPhoto:(LTPhoto *)photo
{
    self.photoTitleLabel.text = photo.name;
    self.photoDateLabel.text = [self.dateFormatter stringFromDate:photo.creationDate];
}

- (NSDateFormatter *)dateFormatter
{
    static NSDateFormatter *dateFormatter;
    if (!dateFormatter) {
        dateFormatter = [[NSDateFormatter alloc] init];
        dateFormatter.timeStyle = NSDateFormatterMediumStyle;
        dateFormatter.dateStyle = NSDateFormatterMediumStyle;
    }
    return dateFormatter;
}

@end
接下來就是在ViewController中指定TableView的DataSource。修改m文件代碼如下:
// // LTViewController.m // learn-tableview // // Created by why on 8/11/14. // Copyright (c) 2014 why. All rights reserved. // #import LTViewController.h #import ArrayDataSource.h #import LTMyCell.h #import LTMyCell+ConfigureForPhoto.h #import LTPhoto.h static NSString * const PhotoCellIdentifier = @LTMyCell; @interface LTViewController ()@property (nonatomic, strong) ArrayDataSource *photosArrayDataSource; @end @implementation LTViewController - (void)viewDidLoad { [super viewDidLoad]; // Do any additional setup after loading the view, typically from a nib. [self setupTableView]; } - (void)setupTableView { TableViewCellConfigureBlock configureCell = ^(LTMyCell *cell, LTPhoto *photo) { [cell configureForPhoto:photo]; }; NSMutableArray *photos = [[NSMutableArray alloc] init]; for (int i = 0; i < 10; i++) { LTPhoto *photo = [[LTPhoto alloc] init]; photo.name = @Hello; photo.creationDate = [NSDate date]; [photos addObject:photo]; } self.photosArrayDataSource = [[ArrayDataSource alloc] initWithItems:photos cellIdentifier:PhotoCellIdentifier configureCellBlock:configureCell]; _tableVIew.dataSource = self.photosArrayDataSource; [_tableVIew registerNib:[LTMyCell nib] forCellReuseIdentifier:PhotoCellIdentifier]; } #pragma mark UITableViewDelegate - (void)tableView:(UITableView *)tableView didSelectRowAtIndexPath:(NSIndexPath *)indexPath { NSLog(@Click!); } - (void)didReceiveMemoryWarning { [super didReceiveMemoryWarning]; // Dispose of any resources that can be recreated. } @end
這樣就實現了基本的DataSource分離。