iPone應用開發 UIView 常用屬性和方法
編輯:IOS開發綜合
iPone應用程序開發 UIView常用屬性和方法
常用屬性
alpha 視圖的透明度0.0f - 1.0f backgroundColor 視圖的背景顏色 subviews 子視圖的集合 hidden 視圖是否隱藏 tag 視圖的唯一標示符,是一個整形數據 superview 視圖的父視圖 multipleTouchEnabled 是否開啟多點觸控 userInteractionEnable 是否響應觸摸事件常用方法
- (void)removeFromSuperview;
//從父視圖中刪除當前視圖
-(void)insertSubview:(UIView *)view atIndex:(NSInteger)index;
//從指定的索引位置插入視圖

- (void)exchangeSubviewAtIndex:(NSInteger)index1 withSubviewAtIndex:(NSInteger)index2;
//根據制定視圖的索引位置交換視圖
- (void)addSubview:(UIView *)view;
//在當前視圖層的上面添加一個新視圖,這個方法會對參數視圖的引用加1

- (void)insertSubview:(UIView *)view belowSubview:(UIView *)siblingSubview;
//在指定視圖下方添加一個視圖
- (void)insertSubview:(UIView *)view aboveSubVIew:(UIView *)siblingSubview;
//在指定的上方添加一個視圖

- (void)bringSubviewToFront:(UIView *)view;
//將參數指定的 view 移動到視圖的最前面
- (void)sendSubviewToBack:(UIView * )view;
//將參數指定的 view 移動到視圖的最後面

- (UIView *)viewWithTag:(NSInteger)tag;
//根據tag 屬性獲取已存在的 UIView 對象
具體實現
實現的方法:
     1.可以純代碼實現,主要使用手動寫代碼的方式實現,不使用Xcode中的自動加載主視圖的方法,我們手動管理視圖,不用 ViewController 來管理.
     2. 可以使用Xcode提供的UIView和UIVindow來實現
實現方法
第一步:
首先,刪掉工程中的 ViewController.h,ViewController.m,Main.storyboard 和 LaunchScre.xil 文件,我們自己手動寫加載窗口和視圖。
第二步:
把工程的 Main interface 中的 Main 刪除,並把 Launch Screen File 文件中的LaunchScreen 也刪掉.
接下來,我們在 AppDelegate.m 文件中寫代碼,加載主視圖和窗口
#import AppDelegate.h

@interface AppDelegate ()

@end

@implementation AppDelegate


- (BOOL)application:(UIApplication *)application didFinishLaunchingWithOptions:(NSDictionary *)launchOptions {

    self.window = [[UIWindow alloc] initWithFrame:[UIScreen mainScreen].bounds];
    self.window.backgroundColor = [UIColor grayColor];

    UIView *bgView = [[UIView alloc] initWithFrame:self.window.bounds];
    bgView.backgroundColor = [UIColor orangeColor];
    [self.window addSubview:bgView];

    UIView *greenView = [[UIView alloc] initWithFrame:CGRectMake(20, 20, 280, 160)];
    greenView.tag = 100;//這個 tag 是視圖的唯一標示,實際只是一個整數值
    greenView.backgroundColor = [UIColor greenColor];

    //bgView 和 greenView 建立了一種關系,即父子關系  bgView 叫做父視圖, greenView 叫子視圖
//    [bgView addSubview:greenView];
    greenView.superview.backgroundColor = [UIColor redColor];

    UIView *blueView = [[UIView alloc] initWithFrame:CGRectMake(20, 190,280, 160)];
    blueView.tag = 101;
    blueView.backgroundColor = [UIColor blueColor];
//    [bgView addSubview:blueView];

//    //通過子視圖改變父視圖的背景顏色
    blueView.superview.backgroundColor = [UIColor lightGrayColor];

    [bgView addSubview:blueView];
    [bgView addSubview:greenView];

    UIButton *btn = [[UIButton alloc] initWithFrame:CGRectMake(20, 20, 240, 40)];
    [btn setTitle:@別點我 forState:UIControlStateNormal];
    [btn setTitleColor:[UIColor blackColor] forState:UIControlStateNormal];
    [btn addTarget:self action:@selector(onButton) forControlEvents:UIControlEventTouchUpInside];
    btn.backgroundColor = [UIColor lightGrayColor];

    [bgView addSubview:btn];

//    greenView.userInteractionEnabled = NO;
//    [greenView addSubview:btn];
    UIView *gView = [bgView viewWithTag:100];
    gView.backgroundColor = [UIColor purpleColor];

    UIView *bView = [bgView viewWithTag:101];
    bView.backgroundColor = [UIColor redColor];

    [self.window makeKeyAndVisible];
    return YES;
}

- (void)onButton
{
    NSLog(@%s,__func__);
}


@end
運行結果如下:

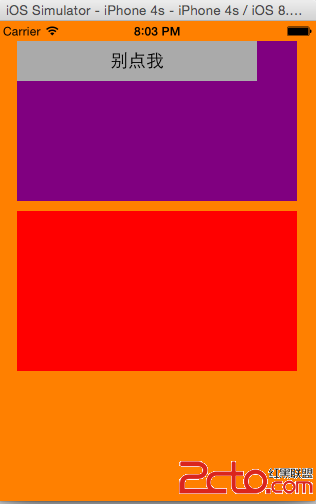
結果分析:
這裡的視圖是有層次的,最底層的是橙色的視圖 bgView,就是父視圖,其他的都是子視圖,其它視圖按照代碼中的位置和大小放在 bgView 上.父視圖 baVIew 可以通過子視圖來改變其屬性.
- 上一頁:IOS開發—自定義多選相冊
- 下一頁:iOS截取視頻縮略圖的兩種方法

相關文章
+- iOS獲得以後裝備型號等信息(全)包括iPhone7和iPhone7P
- 史上最具體的CocoaPods裝置教程(圖文)
- xcode8提交ipa掉敗沒法構建版本成績的處理計劃
- Objective-C 代碼與Javascript 代碼互相挪用實例
- 2016 cocoapods的裝置和應用辦法和版本進級碰到的成績
- IOS 陀螺儀開辟(CoreMotion框架)實例詳解
- 進修iOS自界說導航掌握器UINavigationController
- iOS10告訴框架UserNotification懂得與運用
- iOS設置UIButton文字顯示地位和字體年夜小、色彩的辦法
- iOS開辟之UIPickerView完成城市選擇器的步調詳解
- iOS 開辟中 NavigationController常常湧現的成績緣由剖析
- iOS10 App適配權限 Push Notifications 字體Frame 碰到的成績
- iOS簡略登錄LoginViewController、注冊RegisterViewController等功效完成辦法
- iPhone/iPad開辟經由過程LocalNotification完成iOS准時當地推送功效
- iOS自界說collectionView完成毛玻璃後果