iOS UI_相冊
編輯:IOS開發綜合
//
//  MainViewController.m
//  相冊
//
//  Created by dllo on 15/8/6.
//  Copyright (c) 2015年 zhozhicheng. All rights reserved.
//

#import MainViewController.h
#import SecondViewController.h
@interface MainViewController ()
//建立一個數組,存放圖片
@property(nonatomic,retain)NSMutableArray *arr;

@end

@implementation MainViewController
-(void)dealloc
{
    [_arr release];
    [super dealloc];
}

- (void)viewDidLoad {
    [super viewDidLoad];
    // Do any additional setup after loading the view.
    //相冊的目錄界面,先改成不透明
    self.navigationController.navigationBar.translucent=NO;
    self.view.backgroundColor=[UIColor orangeColor];
    //設置標題
    self.navigationItem.title=@相冊;
    //初始化數組
    self.arr = [[NSMutableArray alloc] init];
    //七張視圖
    for (int i = 1; i < 8; i++) {
        NSString *imageName=[NSString stringWithFormat:@h%d.jpeg,i];
        UIImage *image=[UIImage imageNamed:imageName];
        [self.arr addObject:image];

    }
    //建立七個button
    for (int i = 0; i < 3; i++) {
        for (int j = 0; j < 3; j++) {
            if (3 * i + j < 7) {
                UIButton *button = [UIButton buttonWithType:UIButtonTypeCustom];
                button.tag=3 * i + j +1;
                button.frame=CGRectMake(j * 120 + 20, i * 120 + 100, 100, 100);
                [self.view addSubview:button];
                button.layer.borderWidth=1;
                //把圖片放到對應的button
                [button setImage:(UIImage *)self.arr[3 * i + j] forState:UIControlStateNormal];
                [button addTarget:self action:@selector(click:) forControlEvents:UIControlEventTouchUpInside];
            }
        }
    }
}
-(void)click:(UIButton *)button
{
    //點擊跳到下一頁
    SecondViewController *secVC=[[SecondViewController alloc] init];
    [self.navigationController pushViewController:secVC animated:YES];
    [secVC release];
    //傳一個number值
    secVC.number=button.tag - 1;

}

- (void)didReceiveMemoryWarning {
    [super didReceiveMemoryWarning];
    // Dispose of any resources that can be recreated.
}

/*
#pragma mark - Navigation

// In a storyboard-based application, you will often want to do a little preparation before navigation
- (void)prepareForSegue:(UIStoryboardSegue *)segue sender:(id)sender {
    // Get the new view controller using [segue destinationViewController].
    // Pass the selected object to the new view controller.
}
*/

@end
//
//  SecondViewController.h
//  相冊
//
//  Created by dllo on 15/8/6.
//  Copyright (c) 2015年 zhozhicheng. All rights reserved.
//

#import

@interface SecondViewController : UIViewController
@property(nonatomic,assign)NSInteger number;
@end
//
// SecondViewController.m
// 相冊
//
// Created by dllo on 15/8/6.
// Copyright (c) 2015年 zhozhicheng. All rights reserved.
//
#import SecondViewController.h
//定義兩個宏,寬'高
#define WIDTH self.view.frame.size.width
#define HEIGHT self.view.frame.size.height
@interface SecondViewController ()
@property(nonatomic,retain)UIScrollView *scrollView;
@end
@implementation SecondViewController
-(void)dealloc
{
[_scrollView release];
[super dealloc];
}
- (void)viewDidLoad {
[super viewDidLoad];
// Do any additional setup after loading the view.
//創建滾動頁面
self.scrollView=[[UIScrollView alloc] initWithFrame:self.view.frame];
[self.view addSubview:self.scrollView];
[_scrollView release];
//讓視圖滾動起來屬性,滾動范圍
//-100是為了下面的滾動圓點
self.scrollView.contentSize=CGSizeMake(7 * WIDTH, HEIGHT - 100);
//按頁進行滾動
self.scrollView.pagingEnabled=YES;
//滾動的圖片
for (int i = 1; i < 8; i++) {
NSString *imageName =[NSString stringWithFormat:@h%d.jpeg,i];
//創建滾動的七個視圖
UIImageView *imageView=[[UIImageView alloc] initWithImage:[UIImage imageNamed:imageName]];
//設置圖片的起始位置
imageView.frame=CGRectMake(i * WIDTH - WIDTH, 0, WIDTH, HEIGHT-100);
[self.scrollView addSubview:imageView];
[imageView release];
}
// 關閉邊界回彈效果
self.scrollView.bounces=NO;
//關閉滾動條
self.scrollView.showsHorizontalScrollIndicator=NO;
self.scrollView.showsVerticalScrollIndicator=NO;
//設置代理人
self.scrollView.delegate=self;
//創建圓點
UIPageControl *page=[[UIPageControl alloc] initWithFrame:CGRectMake(100, 580, 200, 40)];
page.backgroundColor=[UIColor whiteColor];
[self.view addSubview:page];
[page release];
//圓點個數
page.numberOfPages=7;
//圓點顏色
page.pageIndicatorTintColor=[UIColor cyanColor];
//選中點的顏色
page.currentPageIndicatorTintColor=[UIColor yellowColor];
page.tag=1000;
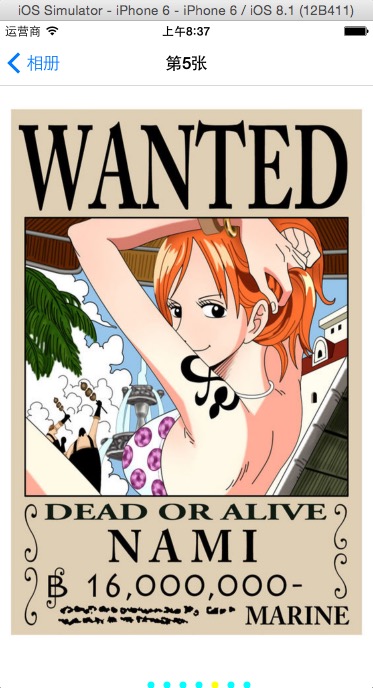
//顯示第幾頁在第一張
self.scrollView.contentOffset=CGPointMake(WIDTH * self.number, 0);
NSString *str=[NSString stringWithFormat:@第%ld張,self.number+1];
self.navigationItem.title=str;
}
//點隨著圖片滾動動
-(void)scrollViewDidScroll:(UIScrollView *)scrollView
{
UIPageControl *page=(UIPageControl *)[self.view viewWithTag:1000];
page.currentPage =self.scrollView.contentOffset.x / WIDTH;
NSString *str=[NSString stringWithFormat:@第%ld張,page.currentPage + 1];
self.navigationItem.title=str;
}
- (void)didReceiveMemoryWarning {
[super didReceiveMemoryWarning];
// Dispose of any resources that can be recreated.
}
/*
#pragma mark - Navigation
// In a storyboard-based application, you will often want to do a little preparation before navigation
- (void)prepareForSegue:(UIStoryboardSegue *)segue sender:(id)sender {
// Get the new view controller using [segue destinationViewController].
// Pass the selected object to the new view controller.
}
*/
@end

- 上一頁:iOS技術框架構和更新版本的技術特性
- 下一頁:iOS UI_電話本
相關文章
+