如何實現iOS圖書動畫:第1部分(上)
如何實現iOS圖書動畫:第1部分
原文鏈接 : How to Create an iOS Book Open Animation: Part 1 原文作者 : Vincent Ngo 譯文出自 : 開發技術前線 www.devtf.cn 譯者 : kmyhy
本教程分為2個部分,教你開發一個漂亮的iOS圖書打開和翻頁動畫,就像你在Paper 53中所見到的一樣:
在第1部分,你將學習到如何定制化Collection View Layout,並通過使用深度和陰影使App看起來更真實。
在第2部分,你將學習如何以一種合理的方法在兩個不同的控制器之間創建自定義的過渡特效,以及利用手勢在兩個視圖間創建自然的、直觀的過渡效果。
本教程適用於中級-高級的開發者;你將使用自定義過渡動畫和自定義Collection View Layout。如果你從來沒有用過Colleciton View,請先參考其他iOS教程。
注意:感謝Attila Hegdüs創建了本教程中的示例項目。
開始
從此處下載本教程的開始項目;解開zip壓縮包,用Xcode打開Paper.xcodeproj。
編譯項目,在模擬器中運行App;你將看到如下畫面:
這個App的功能已經很完善了,你可以在你的書庫中滾動,查看圖書,選中某本圖書進行浏覽。但當你讀一本書的時候,為什麼它的書頁都是並排放置的?通過一些UICollectionView的知識,你可以讓這些書頁看起來更好一些!
項目結構
Here’s a quick rundown of the most important bits of the starter project:
關於這個開始項目,有幾個重要的地方需要解釋:
Data Models文件夾包含3個文件:
Books.plist 中包含了幾本用於演示的圖書信息。每本圖書包含一張封面圖片,以及一個表示每一頁的內容的圖片的數組。 BookStore.swift實現了單例,在整個App聲明周期中只能創建一次對象。BookStore的職責是從Books.plist中加載數據並創建Book類實例。 Book.swift用於存放圖書相關信息的類,比如圖書的封面,每一頁的圖片,以及頁號。Books文件夾包含了兩個文件:
BooksViewController.swift是一個UICollectionViewController子類。負責以水平方式顯式圖書列表。 BookCoverCell.swift負責顯示圖書的封面,這個類被BooksViewController類所引用。在Book文件夾中則包括:
BookViewController.swift也是UICollectionViewController的子類。當用戶在BooksViewController中選定的一本書後,它負責顯示圖書中的書頁。 BookPageCell.swift被BookViewController用於顯示圖書中的書頁。在最後一個文件夾Helper中包含了:
UIImage+Helpers.swift是UIImage的擴展。該擴展包含了兩個實用方法,一個用於讓圖片呈圓角顯示,一個用於將圖片縮放到指定大小。這就是整個開始項目的大致介紹——接下來該是我們寫點代碼的時候了!
定制化圖書界面
首先我們需要在BooksViewController中覆蓋Collection View的默認布局方式。但當前的布局是在屏幕上顯示3張圖書封面的大圖。為了美觀,我們將這些圖片縮減到一定大小,如下圖所示:
當我們滑動圖片,移動到屏幕中心的圖片將被放大,以表示該圖書為選中狀態。如果繼續滑動,該圖書的封面又會縮小到一邊,表示我們放棄選擇該圖書。
在AppBooks文件夾下新建一個文件夾組:Layout。在Layout上點擊右鍵,選擇New File…,然後選擇iOSSourceCocoa Touch Class模板,並點擊Next。類名命名為BooksLayout,繼承UICollectionViewFlowLayout類,語言設置為Swift。
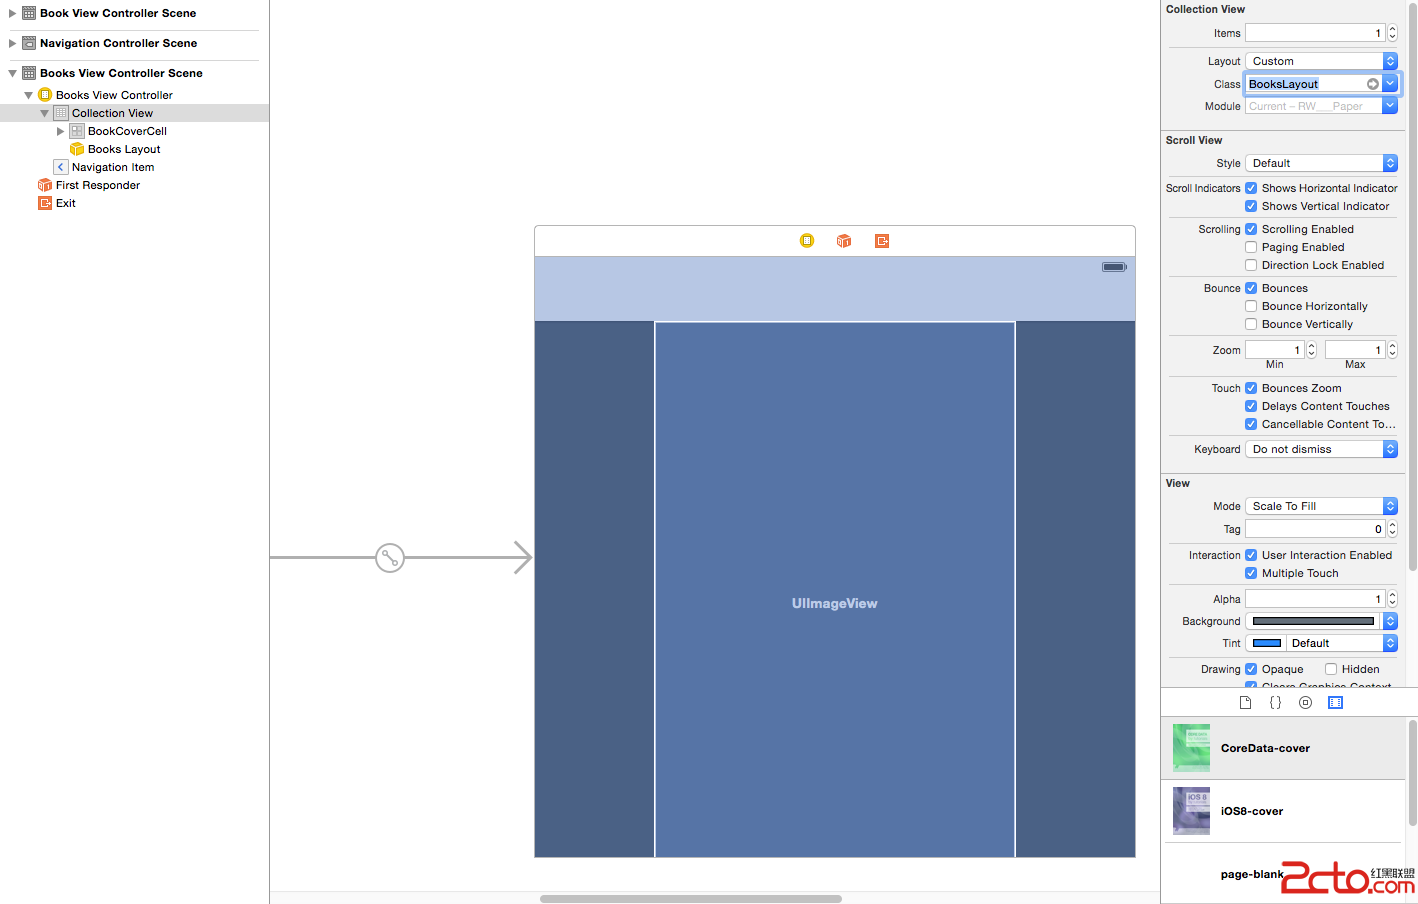
然後需要告訴BooksViewController中的Collection View,適用我們新建的BooksLayout。
打開Main.storyboard,展開BooksViewController對象,然後選擇Collection View。在屬性面板中,設置Layout 屬性為 Custom,設置Class屬性為BooksLayout,如下圖所示:
打開BooksLayout.swift,在BooksLayout類聲明之上加入以下代碼:
private let PageWidth: CGFloat = 362
private let PageHeight: CGFloat = 568
這個兩個常量將用於設置單元格的的大小。
現在,在類定義內部定義如下初始化方法:
required init(coder aDecoder: NSCoder) {
  super.init(coder: aDecoder)

  scrollDirection = UICollectionViewScrollDirection.Horizontal //1
  itemSize = CGSizeMake(PageWidth, PageHeight) //2
  minimumInteritemSpacing = 10 //3
}
上述代碼作用如下:
設置Collectioin View的滾動方向為水平方向。 設置單元格的大小為PageWidth和PageHeight,即362x568。 設置兩個單元格間距10。然後,在init(coder:)方法中加入代碼:
override func prepareLayout() {
  super.prepareLayout()

  //The rate at which we scroll the collection view.
  //1
  collectionView?.decelerationRate = UIScrollViewDecelerationRateFast

  //2
  collectionView?.contentInset = UIEdgeInsets(
    top: 0,
    left: collectionView!.bounds.width / 2 - PageWidth / 2,
    bottom: 0,
    right: collectionView!.bounds.width / 2 - PageWidth / 2
  )
}
prepareLayout()方法允許我們在每個單元格的布局信息生效之前可以進行一些計算。
對應注釋中的編號,以上代碼分別說明如下:
設置當用戶手指離開後,CollectionView停止滾動的速度。默認的設置為UIScrollViewDecelerationRateFast,這是一個較快的速度。你可以嘗試著設置為Normal 和 Fast,看看二者之間有什麼區別。 設置Collection View的contentInset,以使第一本書的封面位於Collection View的中心。
現在我們需要處理每一個單元格的布局信息。
在prepareLayout()方法下面,加入以下代碼:
override func layoutAttributesForElementsInRect(rect: CGRect) -> [AnyObject]? {
  //1
  var array = super.layoutAttributesForElementsInRect(rect) as! [UICollectionViewLayoutAttributes]

  //2
  for attributes in array {
    //3
    var frame = attributes.frame
    //4
    var distance = abs(collectionView!.contentOffset.x + collectionView!.contentInset.left - frame.origin.x)
    //5
    var scale = 0.7 * min(max(1 - distance / (collectionView!.bounds.width), 0.75), 1)
    //6
    attributes.transform = CGAffineTransformMakeScale(scale, scale)
  }

  return array
}
layoutAttributesForElementsInRect(_:) 方法返回一個UICollectionViewLayoutAttributes對象數組,其中包含了每一個單元格的布局屬性。以上代碼稍作說明如下:
調用父類的layoutAttributesForElementsInRect方法,已獲得默認的單元格布局屬性。 遍歷數組中的每個單元格布局屬性。 從單元格布局屬性中讀取frame。 計算兩本書的封面之間的間距——即兩個單元格之間的間距——以及屏幕的中心點。 以0.75~1之間的比率縮放封面,具體的比率取決於前面計算出來的間距。然後為了美觀,將所有的封面都縮放70%。 最後,應用仿射變換。接下來,在layoutAttributesForElementsInRect(_:)方法後增加如下代碼:
override func shouldInvalidateLayoutForBoundsChange(newBounds: CGRect) -> Bool {
  return true
}
返回true表示每當Collection View的bounds發生改變時都強制重新計算布局屬性。Collection View在滾動時會改變它的bounds,因此我們需要重新計算單元格的布局屬性。
編譯運行程序,我們將看到位於中央的封面明顯比其他封面要大上一圈:
拖動Colleciton View,查看每本書放大、縮小。但仍然有一點稍顯不足,為什麼不讓書本能夠卡到固定的位置呢?
接下來我們介紹的這個方法就是干這個的。
對齊書本
targetContentOffsetForProposedContentOffset(_:withScrollingVelocity:)方法用於計算每本書應該在對齊到哪個位置,它返回一個偏移位置,可用於設置Collection View的contentOffset。如果你不覆蓋這個方法,它會返回一個默認的值。
在shouldInvalidateLayoutForBoundsChange(_:)方法後添加如下代碼:
override func targetContentOffsetForProposedContentOffset(proposedContentOffset: CGPoint, withScrollingVelocity velocity: CGPoint) -> CGPoint {
  // Snap cells to centre
  //1
  var newOffset = CGPoint()
  //2
  var layout = collectionView!.collectionViewLayout as! UICollectionViewFlowLayout
  //3
  var width = layout.itemSize.width + layout.minimumLineSpacing
  //4
  var offset = proposedContentOffset.x + collectionView!.contentInset.left

  //5
  if velocity.x > 0 {
    //ceil returns next biggest number
    offset = width * ceil(offset / width)
  } else if velocity.x == 0 { //6
    //rounds the argument
    offset = width * round(offset / width)
  } else if velocity.x < 0 { //7
    //removes decimal part of argument
    offset = width * floor(offset / width)
  }
  //8
  newOffset.x = offset - collectionView!.contentInset.left
  newOffset.y = proposedContentOffset.y //y will always be the same...
  return newOffset
}
這段代碼計算當用戶手指離開屏幕時,封面應該位於哪個偏移位置:
聲明一個CGPoint。 獲得Collection View的當前布局。 獲得單元格的總寬度。 計算相對於屏幕中央的currentOffset。 如果velocity.x>0,表明用戶向右滾動,用offset除以width,得到書的索引,並滾動到相應的位置。 如果velocity.x=0,表明用戶是無意識的滾動,原來的選擇不會發生改變。 如果velocity.x<0,表明用戶向左滾動。 修改newOffset.x,然後返回newOffset。這樣就保證書本總是對齊到屏幕的中央。編譯運行程序;再次滾動封面,你會注意到滾動動作將變得更整齊了。
要完成這個布局,我們還需要使用一種機制,以限制用戶只能點擊位於中央的封面。目前,不管哪個位置的封面都是可點擊的。
打開BooksViewController.swift,在注釋”//MARK:Helpers”下面加入以下代碼:
func selectedCell() -> BookCoverCell? {
  if let indexPath = collectionView?.indexPathForItemAtPoint(CGPointMake(collectionView!.contentOffset.x + collectionView!.bounds.width / 2, collectionView!.bounds.height / 2)) {
    if let cell = collectionView?.cellForItemAtIndexPath(indexPath) as? BookCoverCell {
      return cell
    }
  }
  return nil
}
selectedCell()方法返回位於中央的那個單元格。
替換openBook(_:)方法的代碼如下:
func openBook() {
  let vc = storyboard?.instantiateViewControllerWithIdentifier(BookViewController) as! BookViewController
  vc.book = selectedCell()?.book
  // UICollectionView loads it's cells on a background thread, so make sure it's loaded before passing it to the animation handler
  dispatch_async(dispatch_get_main_queue(), { () -> Void in
    self.navigationController?.pushViewController(vc, animated: true)
    return
  })
}
這裡,直接調用新的selectedCell方法,並用它的book屬性代替原來的book參數。
然後,將collectionView(_:didSelectItemAtIndexPath:)方法替換為:
override func collectionView(collectionView: UICollectionView, didSelectItemAtIndexPath indexPath: NSIndexPath) {
  openBook()
}
這裡,我們簡單地刪除了原來的打開某個索引處的圖書的代碼,而直接打開了當前位於屏幕中央的圖書。
編譯運行程序,我們將看到每次打開的圖書總是位於屏幕中央的那本。


- ReactiveCocoa 4 如何運用冷熱信號
- iOS------教你如何APP怎樣加急審核
- iOS之如何啟動app時全屏顯示Default.png(圖片)
- iOS利用AFNetworking實現文件上傳的示例代碼
- iOS 使用 socket 實現即時通信示例(非第三方庫)
- ios swift3.0實現二維碼掃描、生成、識別示例代碼
- IOS 開發狀態欄隱藏的實現辦法
- IOS購物車界面實現效果示例
- iOS中UITableView Cell實現自定義單選功能
- iOS實現錄音轉碼MP3及轉碼BASE64上傳示例
- PrefixHeader.pch file not found 以及 Xcode 中如何添加pch文件
- AIR Native Extension for iOS 接入第三方sdk 如何實現 AppDelegate 生命周期
- iOS使用分類(category)實現有序字典
- iOS 利用runtime 實現全局字體的改變
- 類比Spring框架來實現OC中的依賴注入