[IOS 開發]基本 UI 控件詳解 (UIButton | UITextField | UITextView | UISwitch)
1. UI 控件分類
UI 控件分類 : 活動控件, 被動控件, 靜態控件;
-- 活動控件 : 繼承了 UIControl 基類, 該類控件可以與用戶交互, 對應操作會激發對應的 事件綁定回調方法, 之前的 UIButton 就是這種控件;
-- 靜態控件 : 繼承了 UIView 基類, 該類控件與用戶之間不能交互, 之前使用的 UILabel 就是這種控件;
-- 被動控件 : 該類控件可以接受用戶操作, 通常用於接收用戶輸入, 這種方法不會觸發 IBAction 方法, 文本框就是一種被動控件;
2. UIControl 介紹
(1) UIControl 簡介
UIControl 簡介 :
-- 使用頻率 : UIControl 控件一般不會被使用, 經常被使用的是 UIControl 的子類 UI 控件;
-- UIControl 主要作用 : 定義通用接口, 為活動控件的事件機制提供實現, 發生指定的動作後, 控件會初始化 Action 方法, 回調對應的事件處理方法;
-- 事件處理方法 : UI 控件繼承 UIControl 方法, 在 Interface Builder 關聯到 IBAction 方法, 這個方法就是事件處理方法;
(2) UIControl 方法
UIControl 方法 :
-- - (void) addTarget : (id) target action : (SEL) action forControlEvents : (UIControlEvents) events 方法 : 注冊事件處理方法, target 方法所在對象, action 方法的 SEL 參數, forControlEvents UIControlEvents 類型的枚舉值;
-- - (void) removeTarget : (id) target action : (SEL) action forControlEvents : (UIControlEvents) events 方法 : 移除之前注冊的事件處理方法;
-- - (NSArray *) actionsForTarget : (id) target forControlEvents : (UIControlEvents) controlEvent 方法 : 獲取注冊的方法;
-- - (NSSet *) allTargets 方法 : 獲取方法對象集合;
-- - (UIControlEvents) allControlEvents 方法 : 獲取所有的事件集合;
(3) UI 控件狀態
UI 控件狀態 :
-- 普通 : UI 控件的默認狀態;
-- 高亮 : UI 控件突出顯示, 處於高亮狀態; 手放在按鈕上處於高亮狀態;
-- 禁用 : UI 控件關閉後, 處於禁用狀態; 禁用狀態的控件不可操作, 禁用操作在 Interface Builder 取消 Enable 復選框;
-- 選中 : 用於標識控件已啟用 或 被選中, 選中狀態可以不斷持續, 高亮狀態只在 按下才顯示;
(4) UI 控件狀態
UI 控件狀態 :
-- enabled : UIControl 控件是否可用;
-- selected : 該屬性判斷該 UIControl 控件是否被選中;
-- highlighted : UIControl 控件是否高亮;

(5) UIControl 觸摸方法
UIControl 常用觸摸方法 :
-- beginTrackingWithTouch : withEvent : 方法 : 開始觸摸 UIControl 控件時會回調該方法;
-- continueTrackingWithTouch : withEvent : 方法 : 連續觸摸 UIControl 控件時會激發該方法;
-- endTrackingWithTouch : withEvent : 方法 : 結束碰觸 UIControl 控件時會激發該方法;
二. UIButton 控件
1. 按鈕屬性詳解
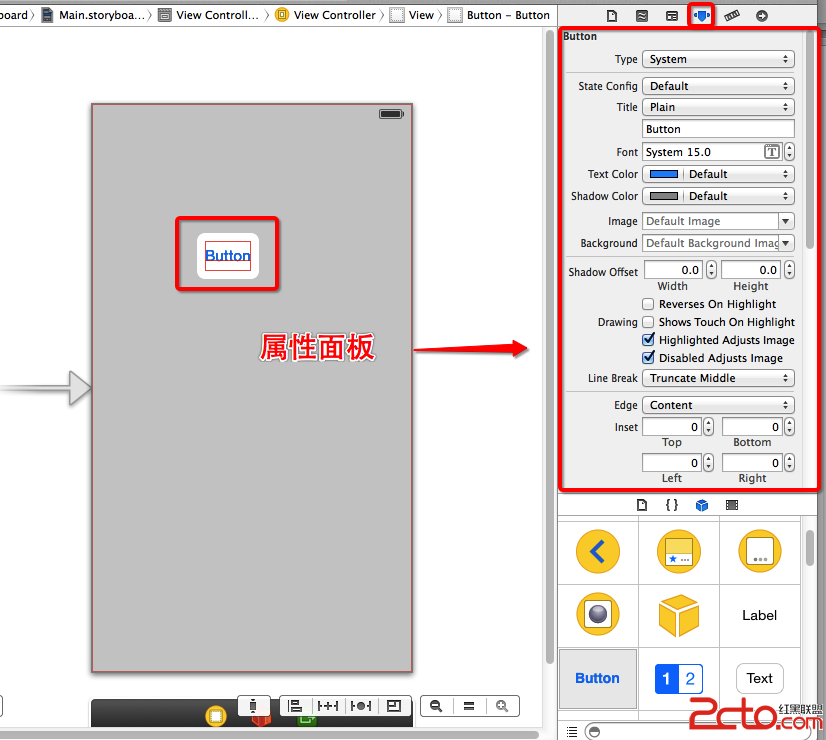
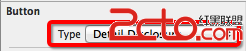
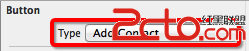
(1) Type 屬性
Type 屬性 : 如果需要自定義按鈕, 使用 Custom 屬性;
-- Custom : 外觀靠開發者設置, 效果如下 :
-- System : 默認按鈕風格, 默認按鈕, 效果如下 :
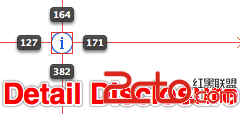
-- Detail Disclosure : i 圖標, 常用與顯示列表詳情, 效果如下 :
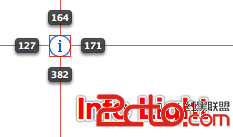
-- Info Light | Info Dark : 顯示 i 圖標, 顯示簡短的說明信息, 效果如下 :
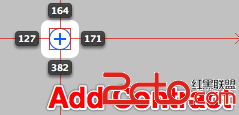
-- Add Contact : 顯示 + 按鈕, 常用於添加內容, 效果如圖 :
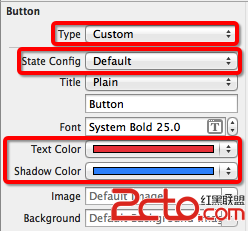
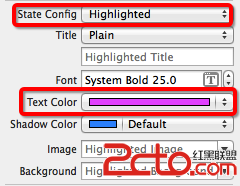
(2) State Config 屬性
UIButton 狀態 : 每種狀態都可以設置不同的 文本, 圖片, 格式;
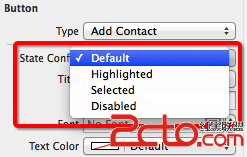
-- Default : 默認狀態;
-- Highlighted : 用戶碰觸時的高亮狀態;
-- Selected : 被選中時的狀態;
-- Disabled : 禁用狀態;
為不同狀態的 UIButton 設置樣式 :
-- setTittle : forState : 方法 : UIButton 不同狀態 設置不同的標題;
-- setTittleColor : forState : 方法 : UIButton 不同狀態設置不同的標題顏色;
-- setTittleShadowColor : forState : 方法 : UIButton 不同狀態 設置 不同的按鈕中文本的陰影設置顏色;
-- setBackgroundImage : forState : 方法 : UIButton 不同狀態設置不同的背景圖片;
-- setImage : forState : 方法 : UIButton 不同狀態設置不同圖片;
forState 參數 : UIControlState 整數枚舉值;
-- UIControlStateNormal : 默認正常狀態;
-- UIControlStateHighlighted : 高亮狀態;
-- UIControlStateDisabled : 禁用狀態;
-- UIControlStateSelected : 被選中狀態;
(3) Tittle 屬性
Tittle 屬性 : 設置不同的文本方式;
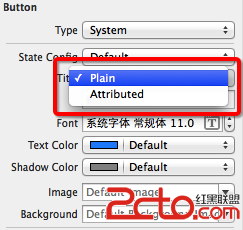
-- Plain 屬性值 : 默認即可;
-- Attribute 屬性值 :
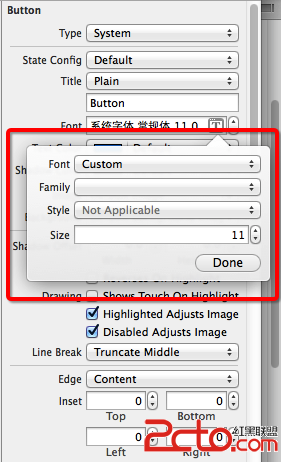
(4) Tittle 屬性
Font 屬性 : 用於控制文字的 字體, 大小, 風格;
(5) Text Color | Shadow Color 屬性
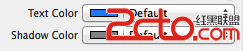
Text Color 屬性 : 控制文本的顏色;
Shadow Color 屬性 : 控制文本陰影的顏色;
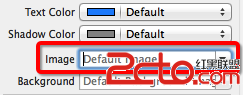
(6) Image 屬性
Image 屬性 : 為按鈕設置圖片, 設置後該按鈕會成為圖片按鈕, 之前設置的 Tittle 屬性作廢;
(7) Background 屬性
Background 屬性 : 用於為按鈕設置背景圖片;
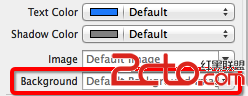
-- 文本圖片共存 : 該屬性可以設置 文本 和 圖片 共同作為按鈕背景, 比使用 Image 屬性設置圖片 顯示內容 更豐富;
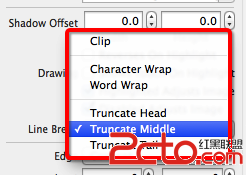
(8) Shadow Offset 屬性
Shadow Offset 屬性 :

-- 偏移值 : 控制 UILabel 控件內陰影文本與 正常文本 之間的偏移量;
-- 偏移方向 : 需要為 水平 和 垂直 兩個方向 分別指定兩個值;
-- Horizontal 水平方向 : > 0 向右偏移, < 0 向左偏移;
-- Vertical 垂直方向 : > 0 向下偏移, < 0 向上偏移;
(9) Line Break 屬性
Line Break : 文本截斷的屬性;
(10) Edge 屬性
Edge 屬性 : 控制按鈕邊界;
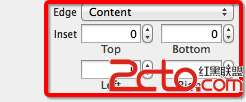
-- Content : 按鈕內容作為按鈕邊界;
-- Tittle : 按鈕的標題文本作為邊界;
-- Image : 按鈕圖片作為按鈕邊界;
(11) Inset 屬性
Inset 屬性 :
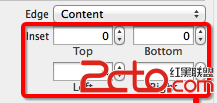
-- 作用 : 控制按鈕邊界間距, 在按鈕四周留出空白;
-- 間距值 : 該屬性需要設置 Top, Bottom, Left 和 Right 四個值代表 上 下 左 右 間距;
2. 按鈕示例
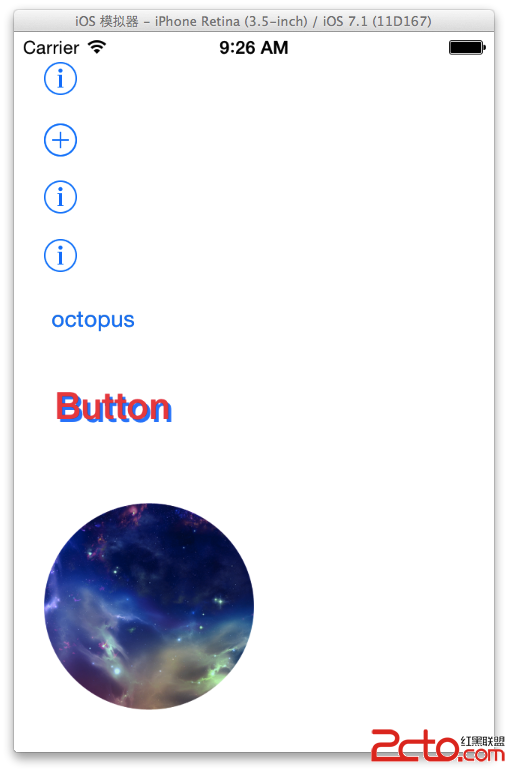
(1) 創建 Detail Disclosure 按鈕
創建 Detail Disclosure 按鈕 : UIButton 的 Type 屬性類型是 Detail Disclosure;
(2) 創建 Add Contact 按鈕
創建 Add Contact 按鈕 : 設置 UIButton 的 Type 屬性類型是 Add Contact;
(3) 創建 Info Light | Info Dark 按鈕
創建 Info Light 按鈕 :

創建 Info Dark 按鈕 :

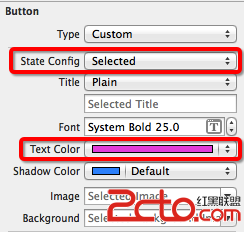
(4) 創建 文字 按鈕
創建文字按鈕 :
-- Type 屬性 : 設置為 Custom;
-- Default 狀態設置 : 設置 文本顏色 紅色, 設置 陰影顏色 藍色;
-- HighLighted 狀態 : 設置 文本顏色 粉色, 陰影顏色藍色;
-- Selected 狀態 : 設置文本顏色 粉色, 陰影顏色 藍色;
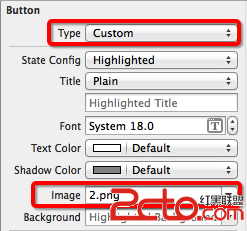
(5) 創建 圖片 按鈕
創建 圖片 按鈕 :
-- 設置 Type 參數 : 設置為 Custom;
-- 設置 Default 參數 : 設置 Image 參數 1.png;
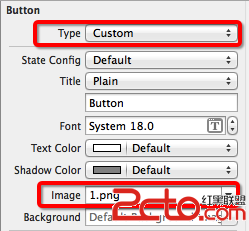
-- 設置 HighLighted 參數 : 設置 Image 參數 2.png;
(6) 示例
示例展示 :
三. UITextField 控件
1. UITextField 屬性
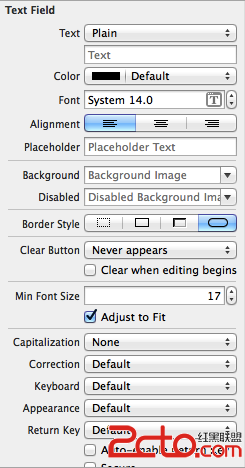
(1) PlaceHolder 屬性
PlaceHolder 屬性 : 屬性值是一個字符串, 再文本框沒有輸入內容時, 文本框內顯示的灰色文本, 用於作為文本框提示信息;

(2) Border Style 屬性
Border Style 屬性 : 設置文本框邊框風格, 支持四種風格, 一般情況下是選擇最右邊的圓角矩形按鈕;

(3) Clear Button 屬性
Clear Button 屬性 : 文本框右邊的 x 標識按鈕, 用戶單擊該圖片, 清空文本框內容;

-- Never appears : 不顯示清除按鈕;
-- Appears while editing : 編輯內容時顯示清除按鈕;
-- Appears unless editing : 除了編輯之外, 都會顯示清除按鈕;
-- Is always visible : 一直可見;
Clear when editing begins 復選框 : 每次編輯文本框時, 自動清除文本框中原有內容;
(4) Min Font Size | Adjust to Fit 屬性
Adjust to Fit 復選框 : 指定文本字體是否隨著文本框縮小 而 減小;
-- 作用 : 勾選該復選框可以確保整個文本在文本框總是可見;

Min Font Size 屬性 :
-- 作用 : 指定文本框內文本的最小值, 保證文本框內文本不會因為太小而看不見;

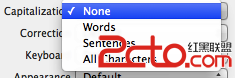
(5) Capitalization 屬性
Capitalization 屬性 :
-- None : 不切換大小寫;
-- Words : 自動將首字母轉大寫字母;
-- Sentence : 每個句子首字母轉為大寫字母;
-- All Characters : 將每個字母轉為大寫字母;

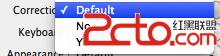
(6) Correction 屬性
Correction 屬性 : 自動更正屬性;
-- No : 不自動更正字母;
-- Yes : 自動更正字母;

(7) KeyBoard 屬性
KeyBoard 屬性 : 設置虛擬鍵盤類型,  ;
;
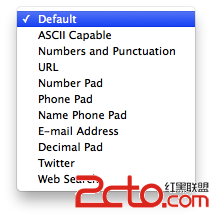
-- Default : 默認虛擬鍵盤;
-- ASCII Capable : 英文字母鍵盤;
-- Numbers and Production : 數字 和 標點符號鍵盤;
-- Number Pad : 數字鍵盤;
-- Phone Pad : 電話撥號鍵盤;
-- E-mail Address : E-mail 地址虛擬鍵盤;
-- Decimal Pad : 數字 小數點 虛擬鍵盤;
(8) Return Key 屬性
Return Key 屬性 : 按下文本框中的 return 鍵行為,  ;
;
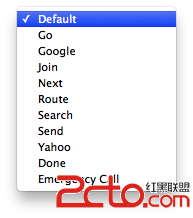
-- 默認選項 : 通常使用 Done 屬性值;
Return Key 復選框 :
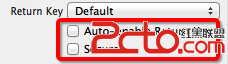
-- Auto-enable Return Key : 勾選復選框, return 框默認禁用, 輸入文本後可用, 用於強制用戶必須輸入內容;
-- Secure : 勾選後, 輸入內容以黑點顯示, 用於輸入密碼;
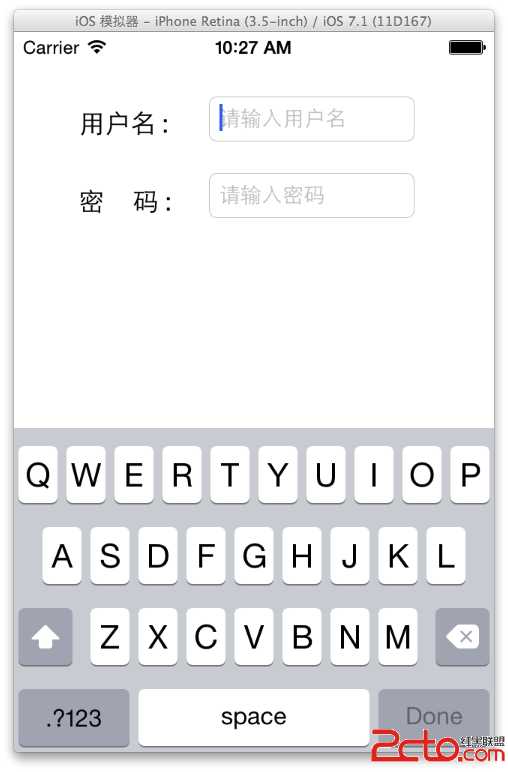
2. 用戶登錄界面示例
(1) 用戶名 UI 設置
用戶名設置 :
-- 設置 UILabel : 設置 Text 屬性值為 用戶名 : ;

-- 設置 Text Field 輸入框 : Placeholder 屬性值設置為 請輸入用戶名, Clear Button 屬性選擇 Appear while editing, Return 列表選擇 Done 屬性, 勾選 Auto-enable Return Key 復選框;
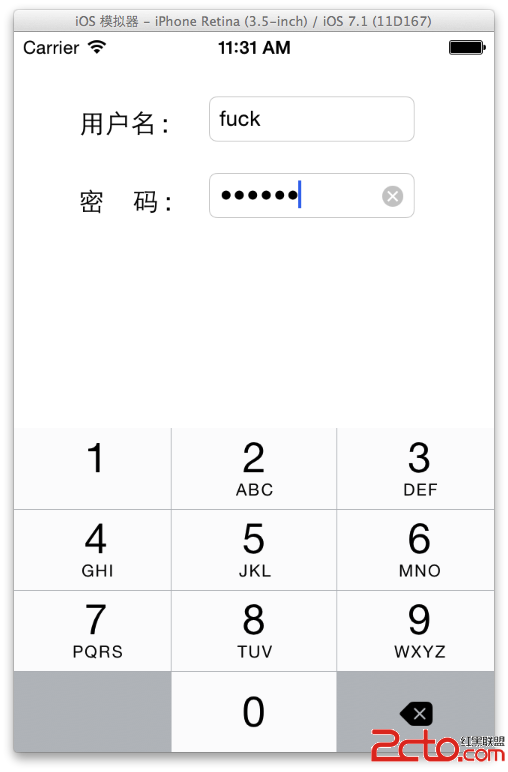
(2) 密碼 UI 設置
密碼 UI 設置 : 創建一個 Text Field 控件, 設置下面的屬性;
-- Placeholder 屬性 : 設置 請輸入密碼 提示字符串;
-- Clear Button 屬性 : 設置 Appear while editing 選項, 當編輯時出現取消按鈕;
-- Keyboard 屬性 : 選擇 Number Pad 顯示 數字虛擬鍵盤;
-- Secure 屬性 : 選中該復選框, 輸入內容都是小圓點;
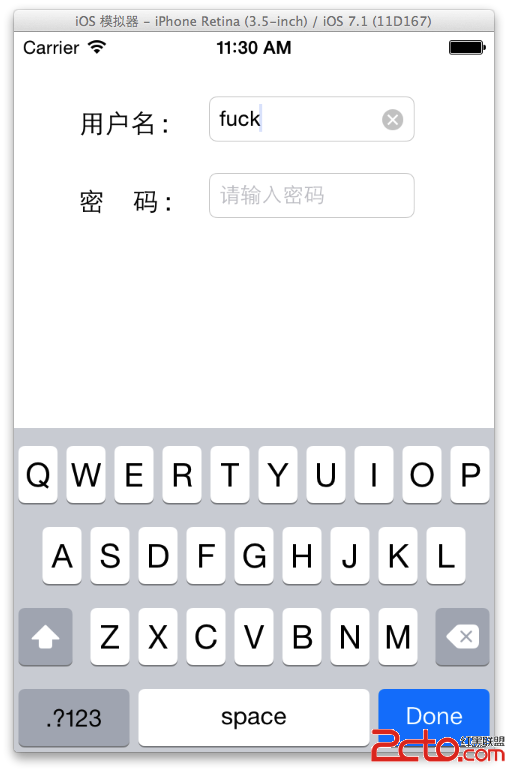
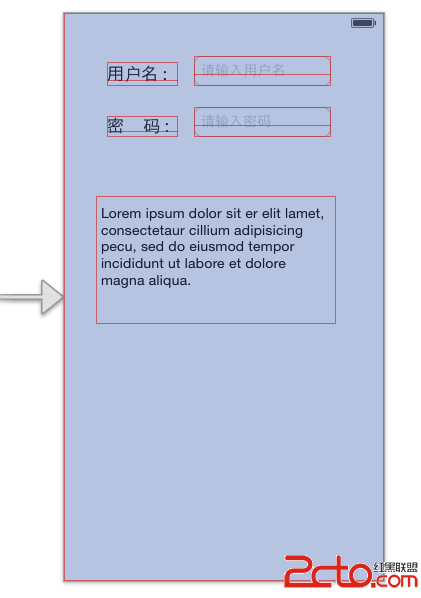
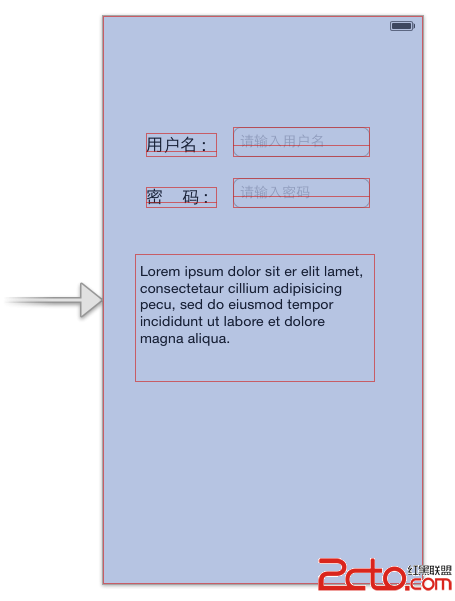
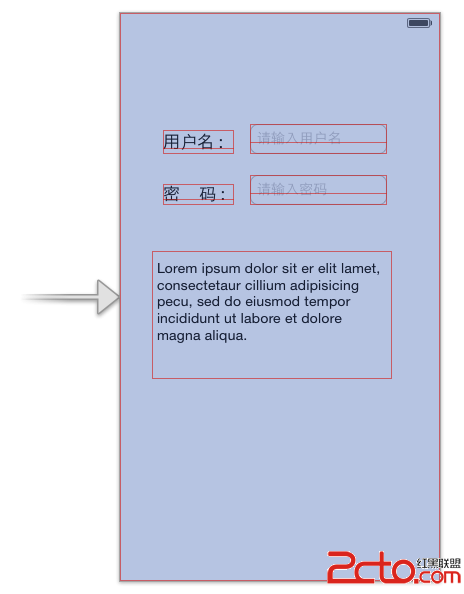
(3) 示例
示例演示 :
-- Interface Builder 設計 :
-- 用戶名展示 :
-- 密碼展示 :
3. 輸入完後關閉鍵盤
(1) 設置 IBOutlet
設置 IBOutlet :
-- 拖控件到 OCViewController 中 : control + 左鍵 拖動控件到 ViewController 中;
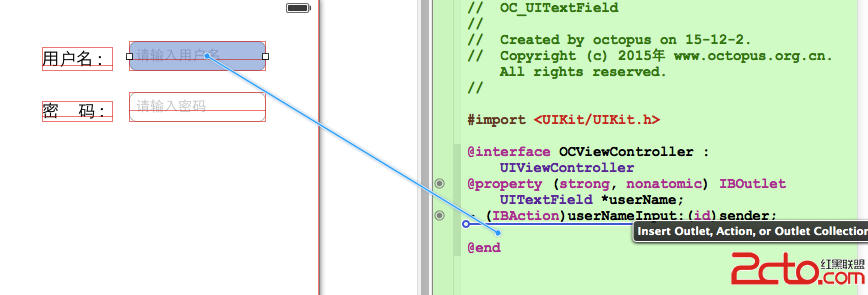
-- 設置 IBOutlet 參數 :

-- 自動生成的代碼 :
@property (strong, nonatomic) IBOutlet UITextField *userName;
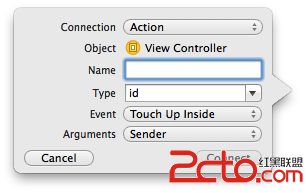
(2) 設置 IBAction
設置 IBAction 參數 :
-- 拖動控件到 OCViewController :
-- 設置 IBAction 參數 :
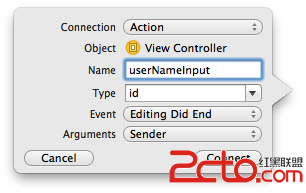
-- OCViewController.h 生成的代碼 :
- (IBAction)userNameInput:(id)sender;
-- OCViewController.m 代碼 :
- (IBAction)userNameInput:(id)sender {
}
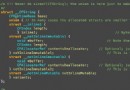
(3) 代碼示例
代碼示例 :
-- OCViewController.h :
// // OCViewController.h // OC_UITextField // // Created by octopus on 15-12-2. // Copyright (c) 2015年 www.octopus.org.cn. All rights reserved. // #import@interface OCViewController : UIViewController @property (strong, nonatomic) IBOutlet UITextField *userName; - (IBAction)userNameInput:(id)sender; @end
-- OCViewController.m :
//
//  OCViewController.m
//  OC_UITextField
//
//  Created by octopus on 15-12-2.
//  Copyright (c) 2015年 www.octopus.org.cn. All rights reserved.
//

#import OCViewController.h

@interface OCViewController ()

@end

@implementation OCViewController

- (void)viewDidLoad
{
    [super viewDidLoad];
	// Do any additional setup after loading the view, typically from a nib.
}

- (void)didReceiveMemoryWarning
{
    [super didReceiveMemoryWarning];
    // Dispose of any resources that can be recreated.
}

- (IBAction)userNameInput:(id)sender {
    //sender 放棄響應, 虛擬鍵盤消失
    [self.userName resignFirstResponder];
}

@end
4. 觸摸背景關閉虛擬鍵盤
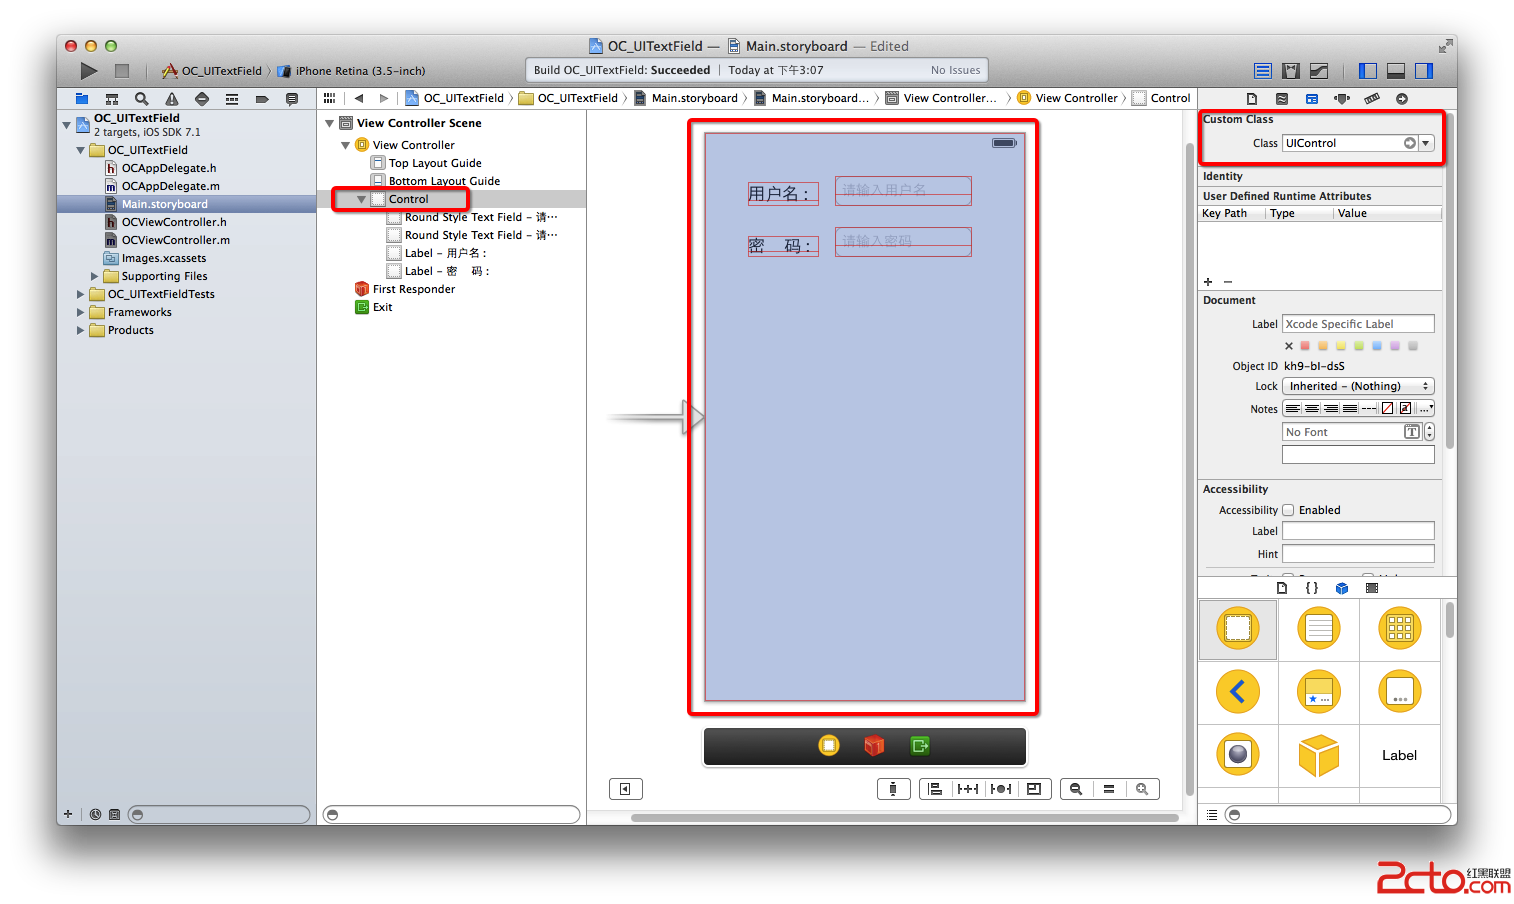
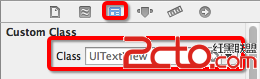
(1) 修改 Custom Class
修改背景類別 :
-- 修改原因 : 默認的背景控件時 UIView, 該控件沒有 IBAction 事件, 因此需要將背景控件設置為 UIControl;
-- 修改方法 : 使用 command + option + 3 打開身份檢查器面板, 將 Custom Class 設置為 UIControl 類;

-- 修改後 :
(2) 設置 IBOutlet
設置 IBOutlet :
-- 設置過程 : 將用戶名 和 密碼 輸入框 拖到 OCViewController.h 中;
-- 代碼示例 :
@property (strong, nonatomic) IBOutlet UITextField *userName;
@property (strong, nonatomic) IBOutlet UITextField *pswTextField;
(3) 設置 IBAction
設置 IBAction :
-- 設置過程 : 使用 control + 鼠標左鍵, 將背景控件 UIControl 設置 IBAction 到 OCViewController.h 中;
-- IBAction 屬性 :
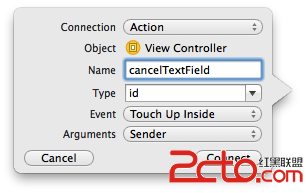
-- 代碼示例 :
- (IBAction)cancelTextField:(id)sender;
(4) 代碼示例
代碼示例 :
-- OCViewController.h :
// // OCViewController.h // OC_UITextField // // Created by octopus on 15-12-2. // Copyright (c) 2015年 www.octopus.org.cn. All rights reserved. // #import@interface OCViewController : UIViewController @property (strong, nonatomic) IBOutlet UITextField *userName; @property (strong, nonatomic) IBOutlet UITextField *pswTextField; - (IBAction)userNameInput:(id)sender; - (IBAction)pwdInput:(id)sender; - (IBAction)cancelTextField:(id)sender; @end
-- OCViewController.m :
//
//  OCViewController.m
//  OC_UITextField
//
//  Created by octopus on 15-12-2.
//  Copyright (c) 2015年 www.octopus.org.cn. All rights reserved.
//

#import OCViewController.h

@interface OCViewController ()

@end

@implementation OCViewController

- (void)viewDidLoad
{
    [super viewDidLoad];
	// Do any additional setup after loading the view, typically from a nib.
}

- (void)didReceiveMemoryWarning
{
    [super didReceiveMemoryWarning];
    // Dispose of any resources that can be recreated.
}

- (IBAction)userNameInput:(id)sender {
    //sender 放棄響應, 虛擬鍵盤消失
    [self.userName resignFirstResponder];
}

- (IBAction)pwdInput:(id)sender {
}

- (IBAction)cancelTextField:(id)sender {
    [self.userName resignFirstResponder];
    [self.pswTextField resignFirstResponder];
}

@end
四. 多行文本控件 (UITextView)
1. UITextView 簡介
(1) UITextView 繼承結構
UITextView 繼承結構簡介 :
-- 基類 : 繼承了 UIScrollView : UIView 控件, 默認這些控件都自帶滾動條;
(2) UITextView 屬性類別
UITextView 屬性類別 :
-- TextView 屬性 : UITextView 父類的屬性;

-- ScrollView 屬性 : UIScrollView 父類的屬性;
(3) UITextView 與 UITextField 區別
UITextView 與 UITextField 區別 :
-- 單行與多行 : UITextView 是多行文本, UITextField 是單行文本;
-- 不能觸發事件 : UITextView 沒有繼承 UIControl 控件, 不能綁定 IBAction 事件處理方法;
-- 可滾動 : UITextView 繼承了 UIScrollView, 有 UIScrollView 的各種功能特性;
2. UIScrollView 屬性簡介
(1) UIScrollView 簡介
UIScrollView 簡介 :
-- 顯示內容多 : 可滾動控件, 可以使用手指拖動控件中的內容, 在其中可以顯示多個屏幕的內容;
(2) UIScrollView 顯示區域屬性
UIScrollView 顯示區域屬性 :
-- contentSize : 屬性是一個 CGSize 類型值, CGSize 是結構體, 包含 width, height 兩個成員變量, 代表完整內容的寬度和高度;
-- contentInset : 屬性值是一個 UIEdgeInset 類型值, UIEdgeInset 是結構體, 包含 top, left, bottom, right 四個成員變量, 顯示內容 上下左右 的空白;
-- contentOffset : 屬性值是一個 CGPoint 類型值, CGPoint 是結構體, 包含 x, y 兩個變量, 代表 UIScrollView 的可視區域顯示內容上滾動距離;
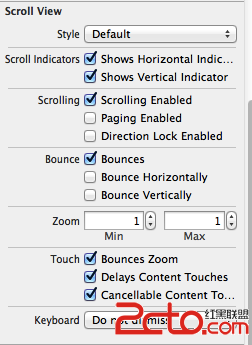
(3) Scroll Indicators 屬性
Scroll Indicators 屬性 :

-- Shows Horizontal Indicator : 水平滾動 Scroll View 時, 顯示水平滾動條;
-- Shows Vertical Indicator : 垂直滾動 ScrollView 時, 顯示垂直滾動條;
(4) Bounce 屬性
Bounce 屬性 :

-- Bounces : 選中後, 該 UITextView 控件有彈性, 拖動控件內容有彈回效果, 沒有勾選時拖到邊界僵硬的停止;
-- Bounce Horizontally : 水平方向有彈性;
-- Bounce Vertically : 垂直方向有彈性;
(5) Zoom 屬性
Zoom 屬性 :

-- Min : UIScrollView 的最小縮放比例;
-- Max : UIScrollView 的最大縮放比例;
(6) Touch 屬性
Touch 屬性 :
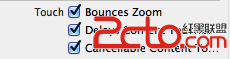
-- Bounces Zoom : UIScrollView 對內容縮放時有彈性, 縮小放大時比例超過控件的 minimumZoomScale 或 maximumZoomScale 縮放限制, 迅速彈回;
-- Delays Content Touches : 手勢完成後才能滾動 UIScrollView 控件, 如果沒有勾選, 用戶碰觸該控件立即調用 touchesShouldBegin 方法處理滾動;
-- Cancellabel Content Touches : 勾選後, 如果拖動手指不能啟動一個滾動事件, 會調用 touchesCancelled 方法, 建議勾選;
3. UITextView 常用方法簡介
(1) UITextView 簡介
UITextView 繼承結構 : UITextView 繼承了 UIScrollView, 沒有繼承 UIControl, 因此該控件沒有 Touch Up Inside 等綁定事件;
-- 下面是 UITextView 的控件拖動內容設置 :
(2) UITextView 委托方法簡介
UITextView 委托方法簡介 :
-- 委托方式 : UITextView 將事件交給委托對象處理, 其委托對象實現了 UITextViewDelegate 協議, 下面介紹該協議的各種方法;
-- - textViewShouldBeginEditing : 方法 : 用戶將要開始編輯 UITextView 內容時激發該方法;
-- - textViewDidBeginEditing : 方法 : 用戶開始編輯 UITextView 內容後 激發該方法;
-- - textViewShouldEndEditing : 方法 : 將要結束編輯 UITextView 控件時激發該方法;
-- - textViewDidEndEditing : 方法 : 結束編輯 UITextView 控件後激發該方法;
-- - textView : shouldChangeTextInRange : replacementText : 方法 : UITextView 控件指定范圍的文本內容將要被替換時激發的方法;
-- - textViewDidChange : 方法 : 文本內容發生改變時, 激發該方法;
-- - textViewDidChangeSelection : 方法 : 選中 UITextView 控件內文本時激發該方法;
4. UITextView 虛擬鍵盤關閉
(1) 需求分析
UITextView 與 UITextField 中使用的虛擬鍵盤對比 :
-- UITextField 虛擬鍵盤 : 右下角的鍵是 Done, 按下這個鍵可以設置成關閉虛擬鍵盤;
-- UITextView 虛擬鍵盤 : 由於 UITextView 是多行文本, 右下角的鍵是 return, 這個鍵是 回車鍵, 如果我們想要將虛擬鍵盤退出需要有其他方法;

(2) 點擊背景控件關閉虛擬鍵盤
點擊背景控件關閉虛擬鍵盤 :
-- 1. 將背景控件設置為 UIControl : 之前的 UIView 不能響應點擊事件, 在身份檢查器 面板將 Custom Class 由 UIView 修改為 UIControl;
-- 2. 設置背景控件的點擊方法 : 生成對應代碼;
- (IBAction)cancelTextField:(id)sender;
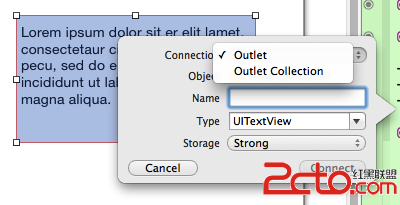
-- 3. 創建 UITextView 的 IBOutlet :
@property (strong, nonatomic) IBOutlet UITextView *textView;
-- 4. sender 方法實現 :
- (IBAction)cancelTextField:(id)sender {
    [self.userName resignFirstResponder];
    [self.pswTextField resignFirstResponder];
    [self.textView resignFirstResponder];
}
源碼示例 :
-- 界面設計文件 :
-- OCViewController.h :
// // OCViewController.h // OC_UITextField // // Created by octopus on 15-12-2. // Copyright (c) 2015年 www.octopus.org.cn. All rights reserved. // #import@interface OCViewController : UIViewController @property (strong, nonatomic) IBOutlet UITextField *userName; @property (strong, nonatomic) IBOutlet UITextField *pswTextField; @property (strong, nonatomic) IBOutlet UITextView *textView; - (IBAction)userNameInput:(id)sender; - (IBAction)pwdInput:(id)sender; - (IBAction)cancelTextField:(id)sender; @end
-- OCViewController.m :
//
//  OCViewController.m
//  OC_UITextField
//
//  Created by octopus on 15-12-2.
//  Copyright (c) 2015年 www.octopus.org.cn. All rights reserved.
//

#import OCViewController.h

@interface OCViewController ()

@end

@implementation OCViewController

- (void)viewDidLoad
{
    [super viewDidLoad];
	// Do any additional setup after loading the view, typically from a nib.
}

- (void)didReceiveMemoryWarning
{
    [super didReceiveMemoryWarning];
    // Dispose of any resources that can be recreated.
}

- (IBAction)userNameInput:(id)sender {
    //sender 放棄響應, 虛擬鍵盤消失
    [self.userName resignFirstResponder];
}

- (IBAction)pwdInput:(id)sender {
}

- (IBAction)cancelTextField:(id)sender {
    [self.userName resignFirstResponder];
    [self.pswTextField resignFirstResponder];
    [self.textView resignFirstResponder];
}

@end
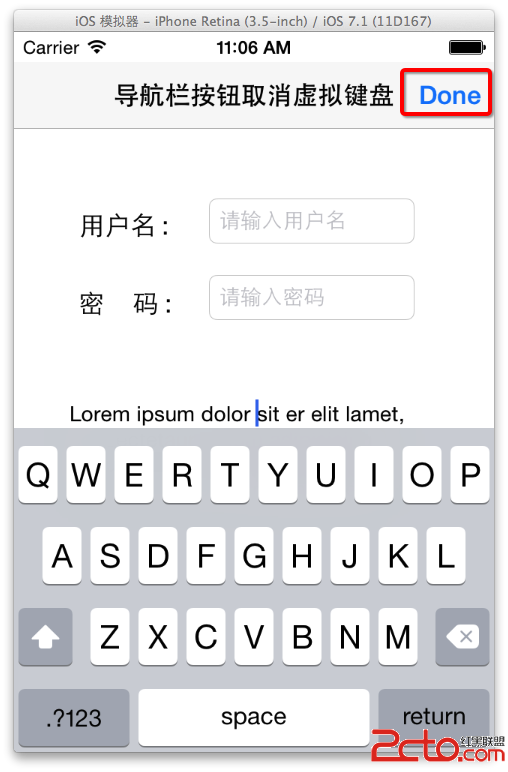
(3) 導航按鈕關閉虛擬鍵盤
導航按鈕關閉虛擬鍵盤 :
-- 1. 實現 UITextViewDelegate 協議 :
@interface OCViewController : UIViewController
-- 2. 創建 UITextView 的IBOutlet :
@property (strong, nonatomic) IBOutlet UITextView *textView;
-- 3. 設置 UITextView 的協議委托者 :
    //設置 UITextView 的控件委托對象為本類 OCViewController 對象
    self.textView.delegate = self;
-- 4. 實現 UITextViewDelegate 協議方法 :
- (void) textViewDidBeginEditing:(UITextView *)textView{
    //開始編輯是顯示導航條按鈕
    self.navItem.rightBarButtonItem = done;
}

- (void) textViewDidEndEditing:(UITextView *)textView{
    //結束編輯是不現實導航條按鈕
    self.navItem.rightBarButtonItem = nil;
}
-- 5. 創建並初始化導航條 :
//創建導航條
UINavigationBar *bar = [[UINavigationBar alloc] initWithFrame:CGRectMake(0, 20, 320, 44)];
//將導航條添加到 UIView 布局中
[self.view addSubview:bar];
//初始化導航條
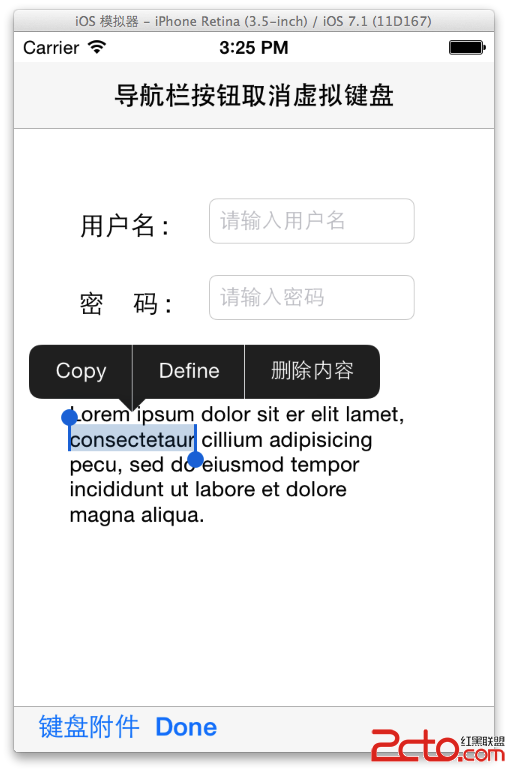
self.navItem = [[UINavigationItem alloc] initWithTitle:@導航欄按鈕取消虛擬鍵盤 ];
-- 6. 設置按鈕內容 :
    //向導航條中加入按鈕
    bar.items = [NSArray arrayWithObjects:self.navItem, nil];
    //創建導航條中的按鈕
    done = [[UIBarButtonItem alloc] initWithBarButtonSystemItem:UIBarButtonSystemItemDone target:self action:@selector(finish)];
源碼示例 :
-- 界面設計文件 :
-- OCViewController.h :
// // OCViewController.h // OC_UITextField // // Created by octopus on 15-12-2. // Copyright (c) 2015年 www.octopus.org.cn. All rights reserved. // #import@interface OCViewController : UIViewController @property (strong, nonatomic) IBOutlet UITextField *userName; @property (strong, nonatomic) IBOutlet UITextField *pswTextField; @property (strong, nonatomic) IBOutlet UITextView *textView; - (IBAction)userNameInput:(id)sender; - (IBAction)pwdInput:(id)sender; - (IBAction)cancelTextField:(id)sender; @end
-- OCViewController.m :
//
//  OCViewController.m
//  OC_UITextField
//
//  Created by octopus on 15-12-2.
//  Copyright (c) 2015年 www.octopus.org.cn. All rights reserved.
//

#import OCViewController.h

@interface OCViewController ()
@property (nonatomic, strong) UINavigationItem * navItem;
@end

@implementation OCViewController

UIBarButtonItem * done;

- (void)viewDidLoad
{
    [super viewDidLoad];

    //設置 UITextView 的控件委托對象為本類 OCViewController 對象
    self.textView.delegate = self;

    //創建導航條
    UINavigationBar *bar = [[UINavigationBar alloc] initWithFrame:CGRectMake(0, 20, 320, 44)];
    //將導航條添加到 UIView 布局中
    [self.view addSubview:bar];
    //初始化導航條
    self.navItem = [[UINavigationItem alloc] initWithTitle:@導航欄按鈕取消虛擬鍵盤 ];

    //向導航條中加入按鈕
    bar.items = [NSArray arrayWithObjects:self.navItem, nil];
    //創建導航條中的按鈕
    done = [[UIBarButtonItem alloc] initWithBarButtonSystemItem:UIBarButtonSystemItemDone target:self action:@selector(finish)];


}

- (void)didReceiveMemoryWarning
{
    [super didReceiveMemoryWarning];
    // Dispose of any resources that can be recreated.
}

- (IBAction)userNameInput:(id)sender {
    //sender 放棄響應, 虛擬鍵盤消失
    [self.userName resignFirstResponder];
}

- (IBAction)pwdInput:(id)sender {
}

- (IBAction)cancelTextField:(id)sender {
    [self.userName resignFirstResponder];
    [self.pswTextField resignFirstResponder];
    [self.textView resignFirstResponder];
}

- (void) textViewDidBeginEditing:(UITextView *)textView{
    //開始編輯是顯示導航條按鈕
    self.navItem.rightBarButtonItem = done;
}

- (void) textViewDidEndEditing:(UITextView *)textView{
    //結束編輯是不現實導航條按鈕
    self.navItem.rightBarButtonItem = nil;
}

- (void) finish{
    [self.userName resignFirstResponder];
    [self.pswTextField resignFirstResponder];
    [self.textView resignFirstResponder];
}

@end
-- 展示效果 : 點擊 Done 即可關閉按鈕;
(4) 自定義鍵盤附件關閉虛擬鍵盤
自定義鍵盤附件 :
-- 作用 : 不是所有的應用都有導航欄, 在沒有導航欄的應用中, 需要有鍵盤附件來關閉鍵盤;
-- 1. 創建工具條並設置風格 :
    //創建 ToolBar 工具條
    UIToolbar * toolBar = [[UIToolbar alloc] initWithFrame:CGRectMake(0, 0, 320, 30)];
    //設置工具條風格
    [toolBar setBarStyle:UIBarStyleDefault];
-- 2. 創建按鈕 :
    //創建第一個按鈕
    UIBarButtonItem * buttonItem = [[UIBarButtonItem alloc] initWithTitle:@鍵盤附件 style:UIBarButtonItemStyleBordered target:self action:nil];
-- 3. 將按鈕設置到工具條中 :
    //將按鈕放在集合中
    NSArray * buttonArray = [NSArray arrayWithObjects:buttonItem, spaceItem, doneItem, nil];
    //為工具條設置按鈕
    [toolBar setItems:buttonArray];
-- 4. 將工具條設置成 虛擬鍵盤 附件 :
    //將工具條關聯到 UITextView, 作為虛擬鍵盤附件
    [self.textView setInputAccessoryView:toolBar];
源碼工程實例 :
-- 界面設計文件 :
-- OCViewController.h :
// // OCViewController.h // OC_UITextField // // Created by octopus on 15-12-2. // Copyright (c) 2015年 www.octopus.org.cn. All rights reserved. // #import@interface OCViewController : UIViewController @property (strong, nonatomic) IBOutlet UITextField *userName; @property (strong, nonatomic) IBOutlet UITextField *pswTextField; @property (strong, nonatomic) IBOutlet UITextView *textView; - (IBAction)userNameInput:(id)sender; - (IBAction)pwdInput:(id)sender; - (IBAction)cancelTextField:(id)sender; @end
-- OCViewController.m :
//
//  OCViewController.m
//  OC_UITextField
//
//  Created by octopus on 15-12-2.
//  Copyright (c) 2015年 www.octopus.org.cn. All rights reserved.
//

#import OCViewController.h

@interface OCViewController ()
@property (nonatomic, strong) UINavigationItem * navItem;
@end

@implementation OCViewController

UIBarButtonItem * done;

- (void)viewDidLoad
{
    [super viewDidLoad];

    //設置 UITextView 的控件委托對象為本類 OCViewController 對象
    self.textView.delegate = self;

    //創建導航條
    UINavigationBar *bar = [[UINavigationBar alloc] initWithFrame:CGRectMake(0, 20, 320, 44)];
    //將導航條添加到 UIView 布局中
    [self.view addSubview:bar];
    //初始化導航條
    self.navItem = [[UINavigationItem alloc] initWithTitle:@導航欄按鈕取消虛擬鍵盤 ];

    //向導航條中加入按鈕
    bar.items = [NSArray arrayWithObjects:self.navItem, nil];
    //創建導航條中的按鈕
    done = [[UIBarButtonItem alloc] initWithBarButtonSystemItem:UIBarButtonSystemItemDone target:self action:@selector(finish)];


    /*
     * 下面是自定義鍵盤附件的代碼
     */

    //創建 ToolBar 工具條
    UIToolbar * toolBar = [[UIToolbar alloc] initWithFrame:CGRectMake(0, 0, 320, 30)];
    //設置工具條風格
    [toolBar setBarStyle:UIBarStyleDefault];

    //創建第一個按鈕
    UIBarButtonItem * buttonItem = [[UIBarButtonItem alloc] initWithTitle:@鍵盤附件 style:UIBarButtonItemStyleBordered target:self action:nil];
    //創建第二個按鈕
    UIBarButtonItem * spaceItem = [[UIBarButtonItem alloc] initWithBarButtonSystemItem:UIBarButtonSystemItemFixedSpace target:self action:nil];
    //創建第三個按鈕
    UIBarButtonItem * doneItem = [[UIBarButtonItem alloc] initWithTitle:@Done style:UIBarButtonItemStyleDone target:self action:@selector(finish)];
    //將按鈕放在集合中
    NSArray * buttonArray = [NSArray arrayWithObjects:buttonItem, spaceItem, doneItem, nil];
    //為工具條設置按鈕
    [toolBar setItems:buttonArray];
    //將工具條關聯到 UITextView, 作為虛擬鍵盤附件
    [self.textView setInputAccessoryView:toolBar];


}

- (void)didReceiveMemoryWarning
{
    [super didReceiveMemoryWarning];
    // Dispose of any resources that can be recreated.
}

- (IBAction)userNameInput:(id)sender {
    //sender 放棄響應, 虛擬鍵盤消失
    [self.userName resignFirstResponder];
}

- (IBAction)pwdInput:(id)sender {
}

- (IBAction)cancelTextField:(id)sender {
    [self.userName resignFirstResponder];
    [self.pswTextField resignFirstResponder];
    [self.textView resignFirstResponder];
}

- (void) textViewDidBeginEditing:(UITextView *)textView{
    //開始編輯是顯示導航條按鈕
    self.navItem.rightBarButtonItem = done;
}

- (void) textViewDidEndEditing:(UITextView *)textView{
    //結束編輯是不現實導航條按鈕
    self.navItem.rightBarButtonItem = nil;
}

- (void) finish{
    [self.userName resignFirstResponder];
    [self.pswTextField resignFirstResponder];
    [self.textView resignFirstResponder];
}

@end
-- 界面實例 :

5. 自定義選擇菜單
(1) 自定義菜單簡介
自定義菜單 :
-- 1. 創建菜單選項 :
    //創建菜單項
    UIMenuItem * delete = [[UIMenuItem alloc] initWithTitle:@刪除內容 action:@selector(deleteContent:)];
-- 2. 獲取菜單 :
    //獲取菜單
    UIMenuController * menu = [UIMenuController sharedMenuController];
-- 3. 設置菜單附加按鈕 :
    //設置菜單中的附加按鈕
    [menu setMenuItems:[NSArray arrayWithObject:delete]];
(2) 源碼示例
源碼示例 :
-- OCViewController.h :
// // OCViewController.h // OC_UITextField // // Created by octopus on 15-12-2. // Copyright (c) 2015年 www.octopus.org.cn. All rights reserved. // #import@interface OCViewController : UIViewController @property (strong, nonatomic) IBOutlet UITextField *userName; @property (strong, nonatomic) IBOutlet UITextField *pswTextField; @property (strong, nonatomic) IBOutlet UITextView *textView; - (IBAction)userNameInput:(id)sender; - (IBAction)pwdInput:(id)sender; - (IBAction)cancelTextField:(id)sender; @end
-- OCViewController.m :
//
//  OCViewController.m
//  OC_UITextField
//
//  Created by octopus on 15-12-2.
//  Copyright (c) 2015年 www.octopus.org.cn. All rights reserved.
//

#import OCViewController.h

@interface OCViewController ()
@property (nonatomic, strong) UINavigationItem * navItem;
@end

@implementation OCViewController

UIBarButtonItem * done;

- (void)viewDidLoad
{
    [super viewDidLoad];

    //設置 UITextView 的控件委托對象為本類 OCViewController 對象
    self.textView.delegate = self;

    //創建導航條
    UINavigationBar *bar = [[UINavigationBar alloc] initWithFrame:CGRectMake(0, 20, 320, 44)];
    //將導航條添加到 UIView 布局中
    [self.view addSubview:bar];
    //初始化導航條
    self.navItem = [[UINavigationItem alloc] initWithTitle:@導航欄按鈕取消虛擬鍵盤 ];

    //向導航條中加入按鈕
    bar.items = [NSArray arrayWithObjects:self.navItem, nil];
    //創建導航條中的按鈕
    done = [[UIBarButtonItem alloc] initWithBarButtonSystemItem:UIBarButtonSystemItemDone target:self action:@selector(finish)];


    /*
     * 下面是自定義鍵盤附件的代碼
     */

    //創建 ToolBar 工具條
    UIToolbar * toolBar = [[UIToolbar alloc] initWithFrame:CGRectMake(0, 0, 320, 30)];
    //設置工具條風格
    [toolBar setBarStyle:UIBarStyleDefault];

    //創建第一個按鈕
    UIBarButtonItem * buttonItem = [[UIBarButtonItem alloc] initWithTitle:@鍵盤附件 style:UIBarButtonItemStyleBordered target:self action:nil];
    //創建第二個按鈕
    UIBarButtonItem * spaceItem = [[UIBarButtonItem alloc] initWithBarButtonSystemItem:UIBarButtonSystemItemFixedSpace target:self action:nil];
    //創建第三個按鈕
    UIBarButtonItem * doneItem = [[UIBarButtonItem alloc] initWithTitle:@Done style:UIBarButtonItemStyleDone target:self action:@selector(finish)];
    //將按鈕放在集合中
    NSArray * buttonArray = [NSArray arrayWithObjects:buttonItem, spaceItem, doneItem, nil];
    //為工具條設置按鈕
    [toolBar setItems:buttonArray];
    //將工具條關聯到 UITextView, 作為虛擬鍵盤附件
    [self.textView setInputAccessoryView:toolBar];


    /*
     * 下面是自定義選中菜單代碼
     */

    //創建菜單項
    UIMenuItem * delete = [[UIMenuItem alloc] initWithTitle:@刪除內容 action:@selector(deleteContent:)];
    //獲取菜單
    UIMenuController * menu = [UIMenuController sharedMenuController];
    //設置菜單中的附加按鈕
    [menu setMenuItems:[NSArray arrayWithObject:delete]];


}

- (BOOL) canPerformAction:(SEL)action withSender:(id)sender{
    if(action == @selector(deleteContent:)){
        if(self.textView.selectedRange.length > 0){
            return YES;
        }
    }
    return NO;
}

- (void) deleteContent : (id) sender{
    NSLog(@刪除按鈕被點擊, 刪除操作);
}

- (void)didReceiveMemoryWarning
{
    [super didReceiveMemoryWarning];
    // Dispose of any resources that can be recreated.
}

- (IBAction)userNameInput:(id)sender {
    //sender 放棄響應, 虛擬鍵盤消失
    [self.userName resignFirstResponder];
}

- (IBAction)pwdInput:(id)sender {
}

- (IBAction)cancelTextField:(id)sender {
    [self.userName resignFirstResponder];
    [self.pswTextField resignFirstResponder];
    [self.textView resignFirstResponder];
}

- (void) textViewDidBeginEditing:(UITextView *)textView{
    //開始編輯是顯示導航條按鈕
    self.navItem.rightBarButtonItem = done;
}

- (void) textViewDidEndEditing:(UITextView *)textView{
    //結束編輯是不現實導航條按鈕
    self.navItem.rightBarButtonItem = nil;
}

- (void) finish{
    [self.userName resignFirstResponder];
    [self.pswTextField resignFirstResponder];
    [self.textView resignFirstResponder];
}

@end
-- 界面示例 :
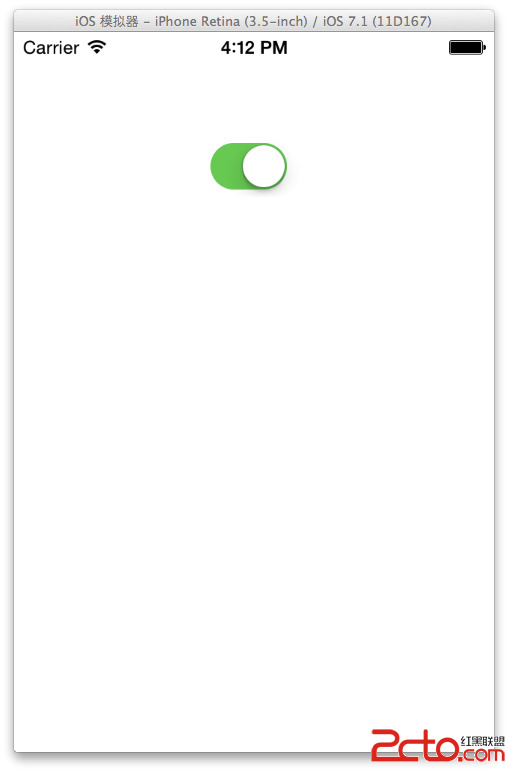
五. 開關按鈕 (UISwitch)
1. UISwitch 示例
UISwitch 屬性 :
-- 創建 UISwitch 的 IBAction :

-- OCViewController.h :
// // OCViewController.h // UISwitchButton // // Created by octopus on 15-12-3. // Copyright (c) 2015年 www.octopus.org.cn. All rights reserved. // #import@interface OCViewController : UIViewController - (IBAction)valueChange:(id)sender; @end
-- OCViewController.m :
//
//  OCViewController.m
//  UISwitchButton
//
//  Created by octopus on 15-12-3.
//  Copyright (c) 2015年 www.octopus.org.cn. All rights reserved.
//

#import OCViewController.h

@interface OCViewController ()

@end

@implementation OCViewController

- (void)viewDidLoad
{
    [super viewDidLoad];
}

- (void)didReceiveMemoryWarning
{
    [super didReceiveMemoryWarning];
}

- (IBAction)valueChange:(id)sender {
    if([sender isOn] == YES){
        self.view.backgroundColor = [UIColor whiteColor];
    }else{
        self.view.backgroundColor = [UIColor blackColor];
    }
}

@end
-- 界面示例 關閉 :
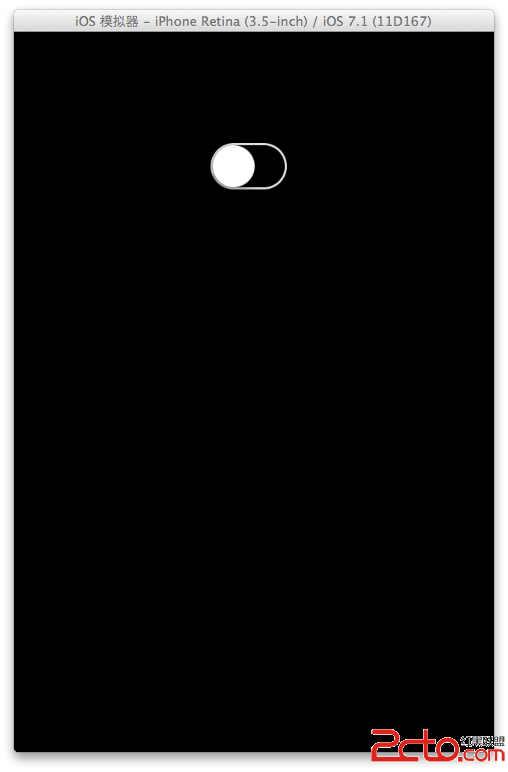
-- 界面示例 打開 :