CoreText 的排版引擎:基礎
本章前言
使用 CoreText 技術,我們可以對富文本進行復雜的排版。經過一些簡單的擴展,我們還可以實現對於圖片,鏈接的點擊效果。CoreText 技術相對於 UIWebView,有著更少的內存占用,以及可以在後台渲染的優點,非常適合用於內容的排版工作。
本章我們將從最基本的開始,一步一步完成一個支持圖文混排、支持圖片和鏈接點擊的排版引擎。
CoreText 簡介
CoreText 是用於處理文字和字體的底層技術。它直接和 Core Graphics(又被稱為 Quartz)打交道。Quartz 是一個 2D 圖形渲染引擎,能夠處理 OSX 和 iOS 中的圖形顯示。
Quartz 能夠直接處理字體(font)和字形(glyphs),將文字渲染到界面上,它是基礎庫中唯一能夠處理字形的模塊。因此,CoreText 為了排版,需要將顯示的文本內容、位置、字體、字形直接傳遞給 Quartz。相比其它 UI 組件,由於 CoreText 直接和 Quartz 來交互,所以它具有高速的排版效果。
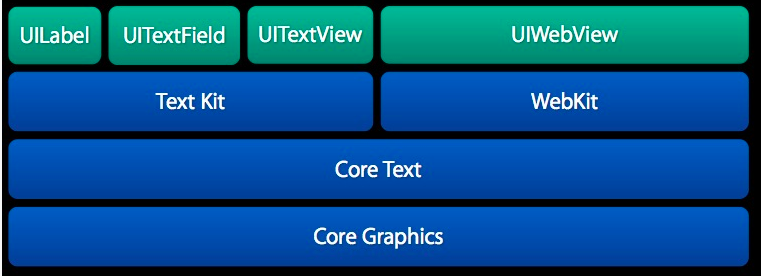
下圖是 CoreText 的架構圖,可以看到,CoreText 處於非常底層的位置,上層的 UI 控件(包括 UILabel,UITextField 以及 UITextView)和 UIWebView 都是基於 CoreText 來實現的。
注意:這個是 iOS7 之後的架構圖,在 iOS7 以前,並沒有圖中的 Text Kit 類,不過 CoreText 仍然是處在最底層直接和 Core Graphics 打交道的模塊。
UIWebView 也是處理復雜的文字排版的備選方案。對於排版,基於 CoreText 和基於 UIWebView 相比,前者有以下好處:
CoreText 占用的內存更少,渲染速度快,UIWebView 占用的內存更多,渲染速度慢。CoreText 在渲染界面前就可以精確地獲得顯示內容的高度(只要有了 CTFrame 即可),而 UIWebView 只有渲染出內容後,才能獲得內容的高度(而且還需要用 javascript 代碼來獲取)CoreText 的 CTFrame 可以在後台線程渲染,UIWebView 的內容只能在主線程(UI 線程)渲染。基於 CoreText 可以做更好的原生交互效果,交互效果可以更細膩。而 UIWebView 的交互效果都是用 javascript 來實現的,在交互效果上會有一些卡頓存在。例如,在 UIWebView 下,一個簡單的按鈕按下效果,都無法做到原生按鈕的即時和細膩的按下效果。當然,基於 CoreText 的排版方案也有一些劣勢:
CoreText 渲染出來的內容不能像 UIWebView 那樣方便地支持內容的復制。基於 CoreText 來排版需要自己處理很多復雜邏輯,例如需要自己處理圖片與文字混排相關的邏輯,也需要自己實現鏈接點擊操作的支持。在業界,很多應用都采用了基於 CoreText 技術的排版方案,例如:新浪微博客戶端,多看閱讀客戶端。我所在的創業公司的猿題庫,也使用了自己基於 CoreText 技術實現的排版引擎,下圖是我們產品的一個圖文混排的界面(其中所有公式都是用圖片的方式呈現的),可以看到,圖片和文字排版效果很好。
vcmVUZXh0IOTWyL61xL3nw+Y=" src="/uploadfile/Collfiles/20160427/20160427092605351.png" />
基於 CoreText 的基礎排版引擎
不帶圖片的排版引擎
下面我們來嘗試完成一個基於 CoreText 的排版引擎。我們將從最簡單的排版功能開始,然後逐步支持圖文混排,鏈接點擊等功能。
首先我們來嘗試完成一個不支持圖片內容的純文字排版引擎。
注意 1:由於整個排版引擎的代碼太多,為方便讀者閱讀,文章中只會列出最關鍵的核心代碼,完整的代碼請參考本書對應的 github 項目,項目地址是:https://github.com/tangqiaoboy/iOS-Pro 。
能輸出 Hello World 的 CoreText 工程
操作步驟
我們首先新建一個 Xcode 工程,步驟如下:
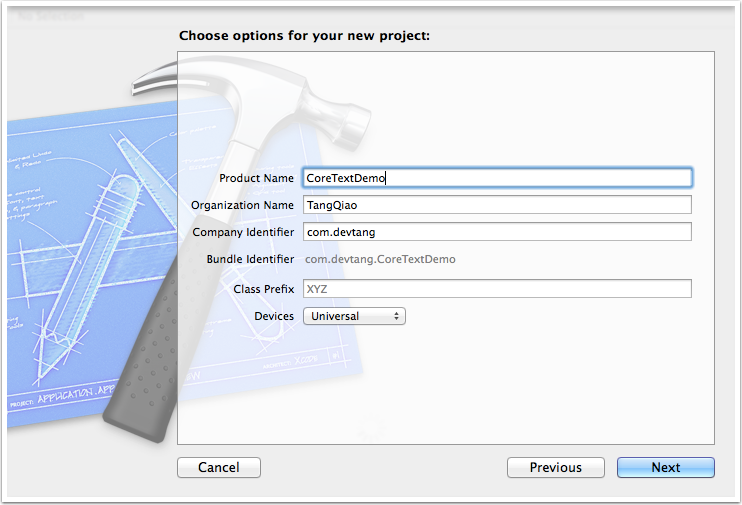
打開 Xcode,選擇 “File”->”New”->”Project”, 在彈出的對話框中,選擇 “Single View Application”,然後點擊 “Next”。(圖 2)接著填上項目名 CoreTextDemo,然後點擊 “Next”。(圖 3)選擇保存目錄後,我們就成功創建了一個空的工程。
圖 2
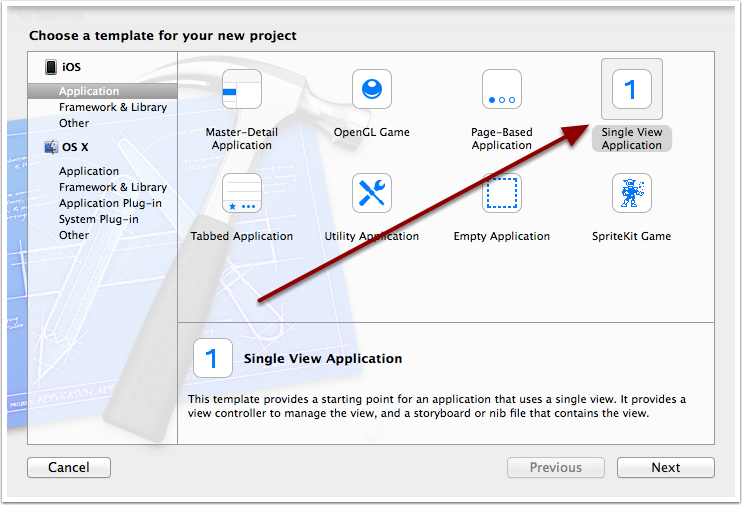
圖 3
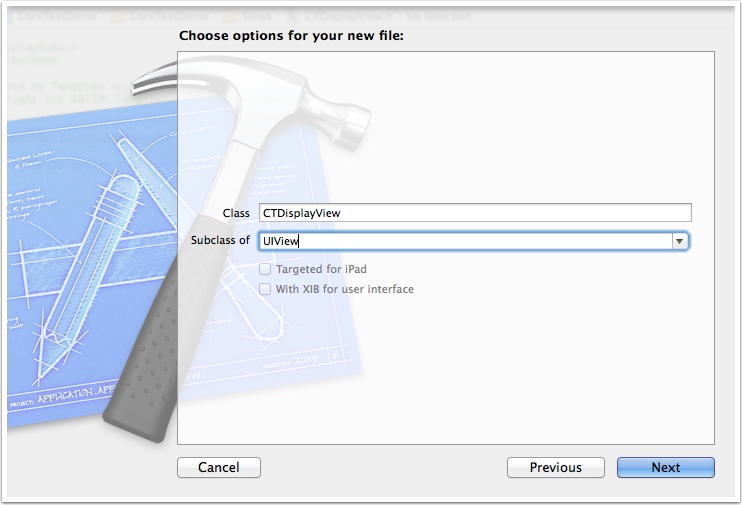
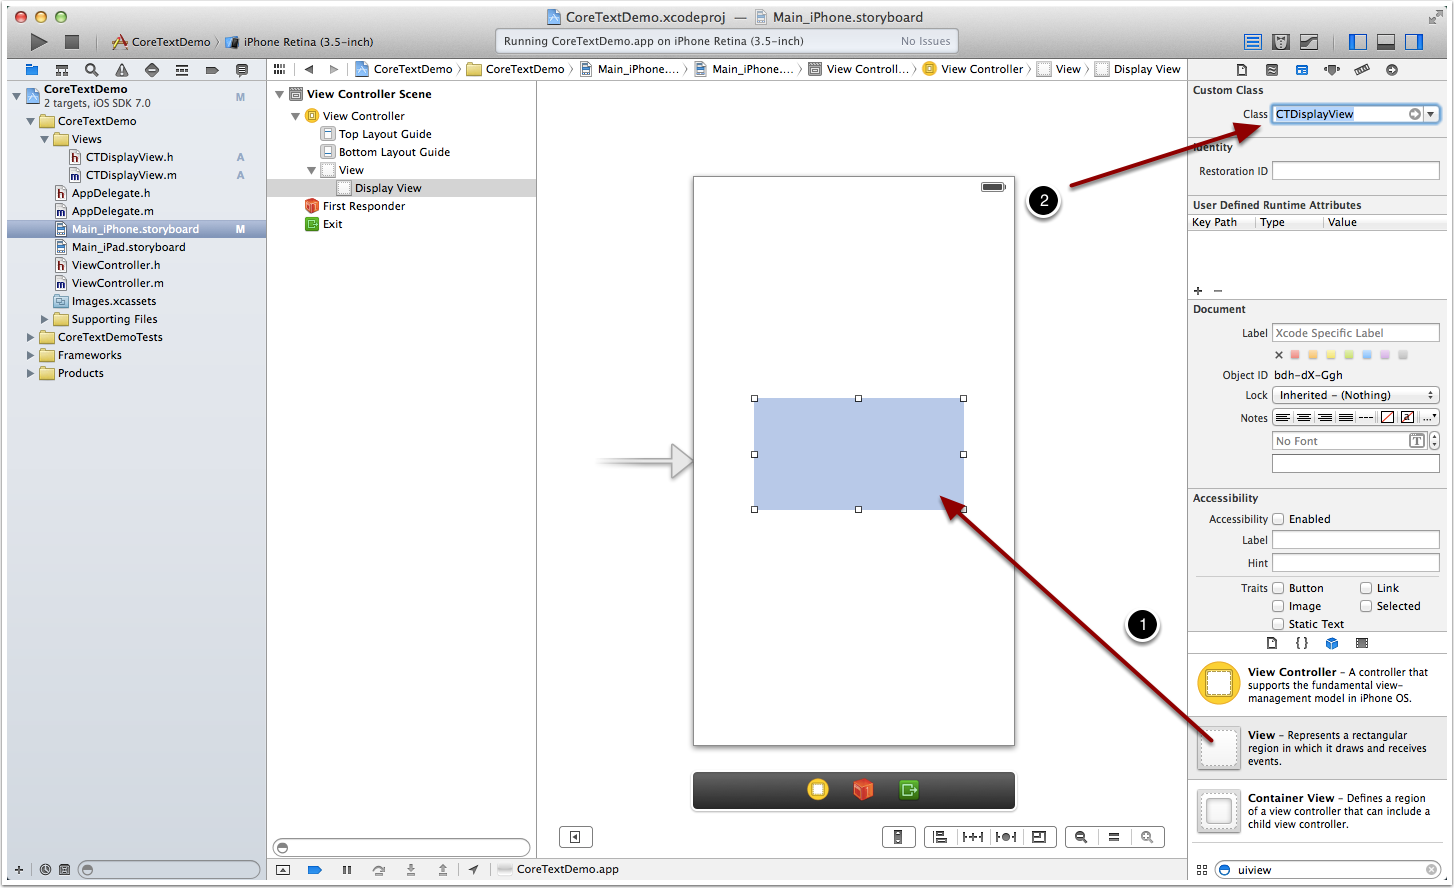
在工程目錄 “CoreTextDemo” 上右擊,選擇 “New File”, 然後填入類名CTDisplayView, 並且讓它的父類是 UIView。(如下圖)
接著,我們在CTDisplayView.m文件中,讓其 import 頭文件CoreText/CoreText.h,接著輸入以下代碼來實現其drawRect方法:
#import "CTDisplayView.h"
#import "CoreText/CoreText.h"

@implementation CTDisplayView

- (void)drawRect:(CGRect)rect
{
    [super drawRect:rect];

    // 步驟 1
    CGContextRef context = UIGraphicsGetCurrentContext();

    // 步驟 2
    CGContextSetTextMatrix(context, CGAffineTransformIdentity);
    CGContextTranslateCTM(context, 0, self.bounds.size.height);
    CGContextScaleCTM(context, 1.0, -1.0);

    // 步驟 3
    CGMutablePathRef path = CGPathCreateMutable();
    CGPathAddRect(path, NULL, self.bounds);

    // 步驟 4
    NSAttributedString *attString = [[NSAttributedString alloc] initWithString:@"Hello World!"];
    CTFramesetterRef framesetter =
    CTFramesetterCreateWithAttributedString((CFAttributedStringRef)attString);
    CTFrameRef frame =
    CTFramesetterCreateFrame(framesetter,
                             CFRangeMake(0, [attString length]), path, NULL);

    // 步驟 5
    CTFrameDraw(frame, context);

    // 步驟 6
    CFRelease(frame);
    CFRelease(path);
    CFRelease(framesetter);
}

@end
打開程序的 Storyboard 文件:Main_iPhone.storyboard:執行下面 2 步:
UIView修改為CTDisplayView。(如下圖步驟 2)
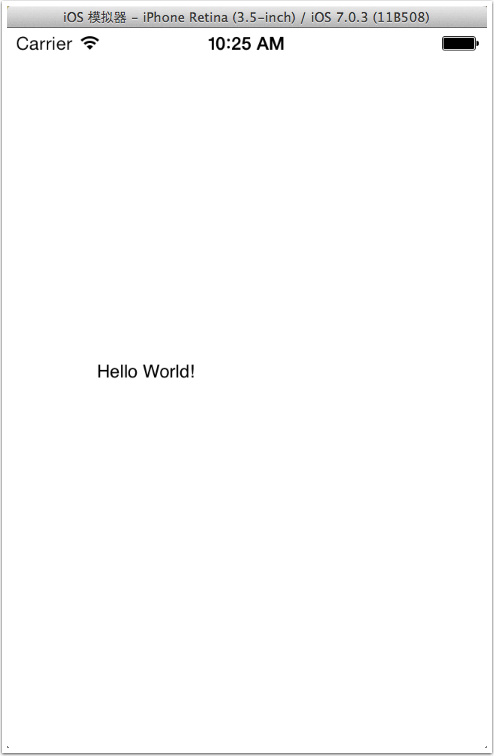
之後,我們運行程序,就可以看到,Hello World 出現在程序正中間了。如下圖。
###代碼解釋
下面解釋一下drawRect方法主要的步驟:
將坐標系上下翻轉。對於底層的繪制引擎來說,屏幕的左下角是(0, 0)坐標。而對於上層的 UIKit 來說,左上角是 (0, 0) 坐標。所以我們為了之後的坐標系描述按 UIKit 來做,所以先在這裡做一個坐標系的上下翻轉操作。翻轉之後,底層和上層的 (0, 0) 坐標就是重合的了。
為了加深理解,我們將這部分的代碼塊注釋掉,你會發現,整個Hello World界面將上下翻轉,如下圖所示。

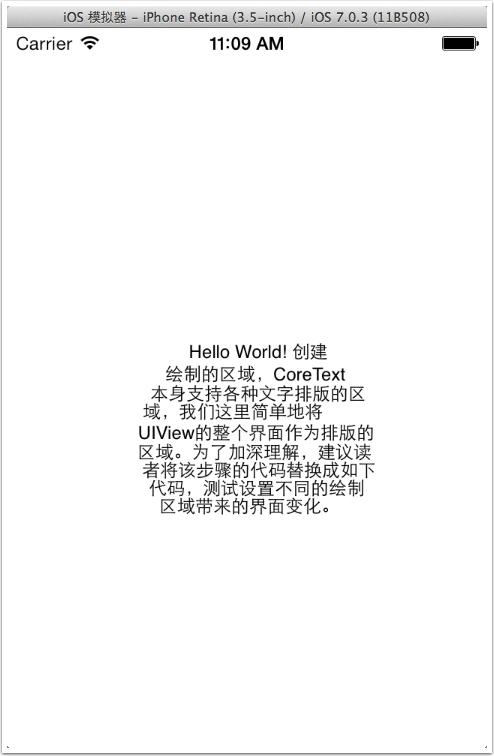
為了加深理解,我們將該步驟的代碼替換成如下代碼,測試設置不同的繪制區域帶來的界面變化。
// 步驟 3
CGMutablePathRef path = CGPathCreateMutable();
CGPathAddEllipseInRect(path, NULL, self.bounds);

// 步驟 4
NSAttributedString *attString = [[NSAttributedString alloc] initWithString:@"Hello World! "
                                 " 創建繪制的區域,CoreText 本身支持各種文字排版的區域,"
                                 " 我們這裡簡單地將 UIView 的整個界面作為排版的區域。"
                                 " 為了加深理解,建議讀者將該步驟的代碼替換成如下代碼,"
                                 " 測試設置不同的繪制區域帶來的界面變化。"];
執行結果如下圖所示:
代碼基本的宏定義和 Category
為了方便我們的代碼編寫,我在CoreTextDemo-Prefix.pch文件中增加了以下基本的宏定義,以方便我們使用 NSLog 和 UIColor。
#ifdef DEBUG
#define debugLog(...) NSLog(__VA_ARGS__)
#define debugMethod() NSLog(@"%s", __func__)
#else
#define debugLog(...)
#define debugMethod()
#endif

#define RGB(A, B, C)    [UIColor colorWithRed:A/255.0 green:B/255.0 blue:C/255.0 alpha:1.0]
我也為 UIView 的 frame 調整增加了一些擴展,可以方便地調整 UIView 的 x, y, width, height 等值。部分關鍵代碼如下(完整的代碼請查看示例工程):
UIView+frameAdjust.h 文件:
#import@interface UIView (frameAdjust) - (CGFloat)x; - (void)setX:(CGFloat)x; - (CGFloat)y; - (void)setY:(CGFloat)y; - (CGFloat)height; - (void)setHeight:(CGFloat)height; - (CGFloat)width; - (void)setWidth:(CGFloat)width; @end
UIView+frameAdjust.m 文件:
@implementation UIView (frameAdjust)
- (CGFloat)x {
    return self.frame.origin.x;
}

- (void)setX:(CGFloat)x {
    self.frame = CGRectMake(x, self.y, self.width, self.height);
}

- (CGFloat)y {
    return self.frame.origin.y;
}

- (void)setY:(CGFloat)y {
    self.frame = CGRectMake(self.x, y, self.width, self.height);
}

- (CGFloat)height {
    return self.frame.size.height;
}
- (void)setHeight:(CGFloat)height {
    self.frame = CGRectMake(self.x, self.y, self.width, height);
}

- (CGFloat)width {
    return self.frame.size.width;
}
- (void)setWidth:(CGFloat)width {
    self.frame = CGRectMake(self.x, self.y, width, self.height);
}

@end
文章中的其余代碼默認都#import 了以上提到的宏定義和 UIView Category。
排版引擎框架
上面的 Hello World 工程僅僅展示了 Core Text 排版的基本能力。但是要制作一個較完善的排版引擎,我們不能簡單的將所有代碼都放到 CTDisplayView 的drawRect方法裡面。根據設計模式中的 “ 單一功能原則 “(Single responsibility principle),我們應該把功能拆分,把不同的功能都放到各自不同的類裡面。
對於一個復雜的排版引擎來說,可以將其功能拆成以下幾個類來完成:
一個顯示用的類,僅負責顯示內容,不負責排版一個模型類,用於承載顯示所需要的所有數據一個排版類,用於實現文字內容的排版一個配置類,用於實現一些排版時的可配置項注:” 單一功能原則 “(Single responsibility principle)
參考鏈接:http://zh.wikipedia.org/wiki/%E5%8D%95%E4%B8%80%E5%8A%9F%E8%83%BD%E5%8E%9F%E5%88%99
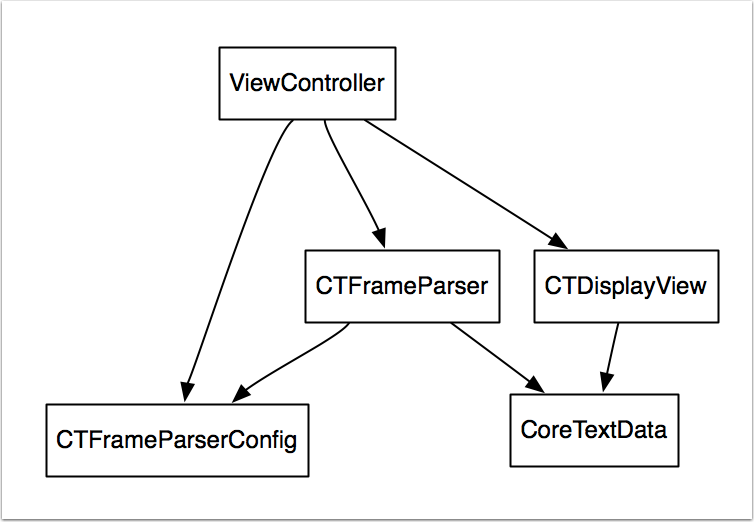
按照以上原則,我們將CTDisplayView中的部分內容拆開,由 4 個類構成:
CTFrameParserConfig類,用於配置繪制的參數,例如:文字顏色,大小,行間距等。CTFrameParser類,用於生成最後繪制界面需要的CTFrameRef實例。CoreTextData類,用於保存由CTFrameParser類生成的CTFrameRef實例以及CTFrameRef實際繪制需要的高度。CTDisplayView類,持有CoreTextData類的實例,負責將CTFrameRef繪制到界面上。
關於這 4 個類的關鍵代碼如下:
CTFrameParserConfig類:
#import@interface CTFrameParserConfig : NSObject @property (nonatomic, assign) CGFloat width; @property (nonatomic, assign) CGFloat fontSize; @property (nonatomic, assign) CGFloat lineSpace; @property (nonatomic, strong) UIColor *textColor; @end
#import "CTFrameParserConfig.h"

@implementation CTFrameParserConfig

- (id)init {
    self = [super init];
    if (self) {
        _width = 200.0f;
        _fontSize = 16.0f;
        _lineSpace = 8.0f;
        _textColor = RGB(108, 108, 108);
    }
    return self;
}

@end
CTFrameParser類:
#import#import "CoreTextData.h" #import "CTFrameParserConfig.h" @interface CTFrameParser : NSObject + (CoreTextData *)parseContent:(NSString *)content config:(CTFrameParserConfig*)config; @end
#import "CTFrameParser.h"
#import "CTFrameParserConfig.h"

@implementation CTFrameParser

+ (NSDictionary *)attributesWithConfig:(CTFrameParserConfig *)config {
    CGFloat fontSize = config.fontSize;
    CTFontRef fontRef = CTFontCreateWithName((CFStringRef)@"ArialMT", fontSize, NULL);
    CGFloat lineSpacing = config.lineSpace;
    const CFIndex kNumberOfSettings = 3;
    CTParagraphStyleSetting theSettings[kNumberOfSettings] = {
        { kCTParagraphStyleSpecifierLineSpacingAdjustment, sizeof(CGFloat), &lineSpacing },
        { kCTParagraphStyleSpecifierMaximumLineSpacing, sizeof(CGFloat), &lineSpacing },
        { kCTParagraphStyleSpecifierMinimumLineSpacing, sizeof(CGFloat), &lineSpacing }
    };

    CTParagraphStyleRef theParagraphRef = CTParagraphStyleCreate(theSettings, kNumberOfSettings);

    UIColor * textColor = config.textColor;

    NSMutableDictionary * dict = [NSMutableDictionary dictionary];
    dict[(id)kCTForegroundColorAttributeName] = (id)textColor.CGColor;
    dict[(id)kCTFontAttributeName] = (__bridge id)fontRef;
    dict[(id)kCTParagraphStyleAttributeName] = (__bridge id)theParagraphRef;

    CFRelease(theParagraphRef);
    CFRelease(fontRef);
    return dict;
}

+ (CoreTextData *)parseContent:(NSString *)content config:(CTFrameParserConfig*)config {
    NSDictionary *attributes = [self attributesWithConfig:config];
    NSAttributedString *contentString =
        [[NSAttributedString alloc] initWithString:content
                                        attributes:attributes];

    // 創建 CTFramesetterRef 實例
    CTFramesetterRef framesetter = CTFramesetterCreateWithAttributedString((CFAttributedStringRef)contentString);

    // 獲得要繪制的區域的高度
    CGSize restrictSize = CGSizeMake(config.width, CGFLOAT_MAX);
    CGSize coreTextSize = CTFramesetterSuggestFrameSizeWithConstraints(framesetter, CFRangeMake(0,0), nil, restrictSize, nil);
    CGFloat textHeight = coreTextSize.height;

    // 生成 CTFrameRef 實例
    CTFrameRef frame = [self createFrameWithFramesetter:framesetter config:config height:textHeight];

    // 將生成好的 CTFrameRef 實例和計算好的繪制高度保存到 CoreTextData 實例中,最後返回 CoreTextData 實例
    CoreTextData *data = [[CoreTextData alloc] init];
    data.ctFrame = frame;
    data.height = textHeight;

    // 釋放內存
    CFRelease(frame);
    CFRelease(framesetter);
    return data;
}

+ (CTFrameRef)createFrameWithFramesetter:(CTFramesetterRef)framesetter
                                  config:(CTFrameParserConfig *)config
                                  height:(CGFloat)height {

    CGMutablePathRef path = CGPathCreateMutable();
    CGPathAddRect(path, NULL, CGRectMake(0, 0, config.width, height));

    CTFrameRef frame = CTFramesetterCreateFrame(framesetter, CFRangeMake(0, 0), path, NULL);
    CFRelease(path);
    return frame;
}

@end
CoreTextData類:
#import@interface CoreTextData : NSObject @property (assign, nonatomic) CTFrameRef ctFrame; @property (assign, nonatomic) CGFloat height; @end
#import "CoreTextData.h"

@implementation CoreTextData

- (void)setCtFrame:(CTFrameRef)ctFrame {
    if (_ctFrame != ctFrame) {
        if (_ctFrame != nil) {
            CFRelease(_ctFrame);
        }
        CFRetain(ctFrame);
        _ctFrame = ctFrame;
    }
}

- (void)dealloc {
    if (_ctFrame != nil) {
        CFRelease(_ctFrame);
        _ctFrame = nil;
    }
}

@end
CTDisplayView類:
#import#import "CoreTextData.h" @interface CTDisplayView : UIView @property (strong, nonatomic) CoreTextData * data; @end
#import "CTDisplayView.h"

@implementation CTDisplayView

- (void)drawRect:(CGRect)rect
{
    [super drawRect:rect];
    CGContextRef context = UIGraphicsGetCurrentContext();
    CGContextSetTextMatrix(context, CGAffineTransformIdentity);
    CGContextTranslateCTM(context, 0, self.bounds.size.height);
    CGContextScaleCTM(context, 1.0, -1.0);

    if (self.data) {
        CTFrameDraw(self.data.ctFrame, context);
    }
}

@end
以上 4 個類中的邏輯與之前 Hello World 那個項目的邏輯基本一致,只是分拆到了 4 個類中完成。另外,CTFrameParser 增加了方法來獲得要繪制的區域的高度,並將高度信息保存到CoreTextData類的實例中。之所以要獲得繪制區域的高度,是因為在很多實際使用場景中,我們需要先知道所要顯示內容的高度,之後才可以進行繪制。
例如,在 UITableView 在渲染時,UITableView 首先會向 delegate 回調如下方法來獲得每個將要渲染的 cell 的高度:
- (CGFloat)tableView:(UITableView *)tableView heightForRowAtIndexPath:(NSIndexPath *)indexPath;
之後,UITableView 會計算當前滾動的位置具體需要繪制的 UITableViewCell 是哪些,然後對於那些需要繪制的 Cell,UITableView 才會繼續向其 data source 回調如下方法來獲得 UITableViewCell 實例:
- (UITableViewCell *)cellForRowAtIndexPath:(NSIndexPath *)indexPath;
對於上面的情況,如果我們使用 CoreText 來作為 TableViewCell 的內容,那麼就必須在每個 Cell 繪制之前,就知道其需要的繪制高度,否則 UITableView 將無法正常工作。
完成以上 4 個類之後,我們就可以簡單地在ViewController.m文件中,加入如下代碼來配置CTDisplayView的顯示內容,位置,高度,字體,顏色等信息。代碼如下所示。
#import "ViewController.h"

@interface ViewController ()

@property (weak, nonatomic) IBOutlet CTDisplayView *ctView;

@end

@implementation ViewController

- (void)viewDidLoad
{
    [super viewDidLoad];

    CTFrameParserConfig *config = [[CTFrameParserConfig alloc] init];
    config.textColor = [UIColor redColor];
    config.width = self.ctView.width;

    CoreTextData *data = [CTFrameParser parseContent:@" 按照以上原則,我們將`CTDisplayView`中的部分內容拆開。" config:config];
    self.ctView.data = data;
    self.ctView.height = data.height;
    self.ctView.backgroundColor = [UIColor yellowColor];
}

@end
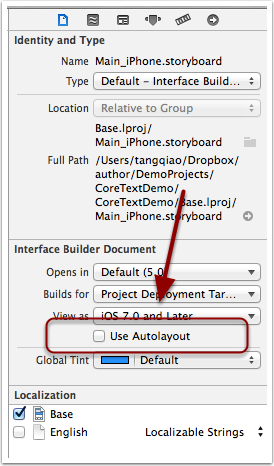
注意:從 Xcode4.0 開始,默認的界面編輯就開啟了對於Use Autolayout的使用,但因為我們在代碼中直接修改了變量ctView的 frame 信息,所以需要在Main_iPhone.storyboard中將Use Autolayout這一項取消勾選。如下圖所示:
以下是本框架的 UML 示意圖,從圖中我們可以看出,這 4 個 Core Text 類的關系是這樣的:
CTFrameParser通過CTFrameparserConfig實例來生成CoreTextData實例。CTDisplayView通過持有CoreTextData實例來獲得繪制所需要的所有信息。ViewController類通過配置CTFrameparserConfig實例,進而獲得生成的CoreTextData實例,最後將其賦值給他的CTDisplayView成員,達到將指定內容顯示在界面上的效果。
說明 1:整個工程代碼在名為basic_arch的分支下,讀者可以在示例的源代碼工程中使用git checkout basic_arch來切換到當前講解的工程示例代碼。
說明 2:為了方便操作UIView的frame屬性,項目中增加了一個名為UIView+frameAdjust.m文件,它通過Category來給UIView增加了直接設置height屬性的方法。
定制排版文件格式
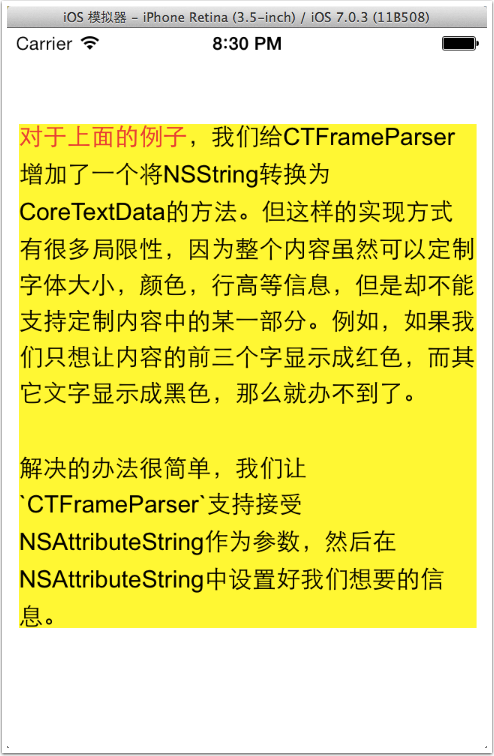
對於上面的例子,我們給 CTFrameParser 使增加了一個將 NSString 轉換為 CoreTextData 的方法。但這樣的實現方式有很多局限性,因為整個內容雖然可以定制字體大小,顏色,行高等信息,但是卻不能支持定制內容中的某一部分。例如,如果我們只想讓內容的前三個字顯示成紅色,而其它文字顯示成黑色,那麼就辦不到了。
解決的辦法很簡單,我們讓CTFrameParser支持接受 NSAttributeString 作為參數,然後在ViewController類中設置我們想要的 NSAttributeString 信息。
@implementation ViewController

- (void)viewDidLoad
{
    [super viewDidLoad];

    CTFrameParserConfig *config = [[CTFrameParserConfig alloc] init];
    config.width = self.ctView.width;
    config.textColor = [UIColor blackColor];

    NSString *content =
        @" 對於上面的例子,我們給 CTFrameParser 增加了一個將 NSString 轉 "
         " 換為 CoreTextData 的方法。"
         " 但這樣的實現方式有很多局限性,因為整個內容雖然可以定制字體 "
         " 大小,顏色,行高等信息,但是卻不能支持定制內容中的某一部分。"
         " 例如,如果我們只想讓內容的前三個字顯示成紅色,而其它文字顯 "
         " 示成黑色,那麼就辦不到了。"
         "\n\n"
         " 解決的辦法很簡單,我們讓`CTFrameParser`支持接受 "
         "NSAttributeString 作為參數,然後在 NSAttributeString 中設置好 "
         " 我們想要的信息。";
    NSDictionary *attr = [CTFrameParser attributesWithConfig:config];
    NSMutableAttributedString *attributedString =
         [[NSMutableAttributedString alloc] initWithString:content
                                                attributes:attr];
    [attributedString addAttribute:NSForegroundColorAttributeName
                             value:[UIColor redColor]
                             range:NSMakeRange(0, 7)];

    CoreTextData *data = [CTFrameParser parseAttributedContent:attributedString
                                                        config:config];
    self.ctView.data = data;
    self.ctView.height = data.height;
    self.ctView.backgroundColor = [UIColor yellowColor];
}

@end
結果如下圖所示,我們很方便就把前面 7 個字變成了紅色。
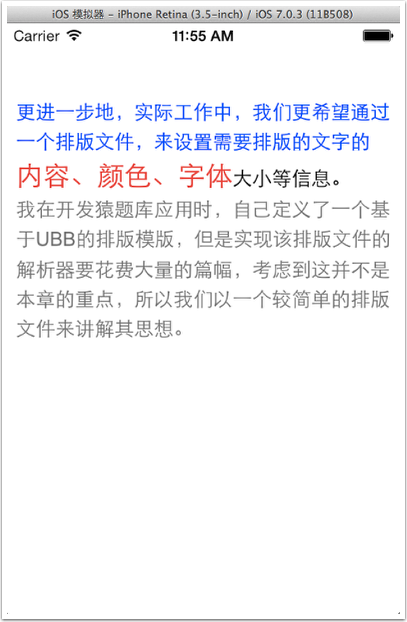
更進一步地,實際工作中,我們更希望通過一個排版文件,來設置需要排版的文字的內容、顏色、字體大小等信息。我在開發猿題庫應用時,自己定義了一個基於 UBB 的排版模版,但是實現該排版文件的解析器要花費大量的篇幅,考慮到這並不是本章的重點,所以我們以一個較簡單的排版文件來講解其思想。
我們規定排版的模版文件為 JSON 格式。JSON(JavaScript Object Notation) 是一種輕量級的數據交換格式,易於閱讀和編寫,同時也易於機器解析和生成。iOS 從 5.0 開始,提供了名為NSJSONSerialization的類庫來方便開發者對 JSON 的解析。在 iOS5.0 之前,業界也有很多相關的 JSON 解析開源庫,例如 JSONKit 可供大家使用。
我們的排版模版示例文件如下所示:
[ { "color" : "blue",
    "content" : " 更進一步地,實際工作中,我們更希望通過一個排版文件,來設置需要排版的文字的 ",
    "size" : 16,
    "type" : "txt"
  },
  { "color" : "red",
    "content" : " 內容、顏色、字體 ",
    "size" : 22,
    "type" : "txt"
  },
  { "color" : "black",
    "content" : " 大小等信息。\n",
    "size" : 16,
    "type" : "txt"
  },
  { "color" : "default",
    "content" : " 我在開發猿題庫應用時,自己定義了一個基於 UBB 的排版模版,但是實現該排版文件的解析器要花費大量的篇幅,考慮到這並不是本章的重點,所以我們以一個較簡單的排版文件來講解其思想。",
    "type" : "txt"
  }
]
通過蘋果提供的NSJSONSerialization類,我們可以將上面的模版文件轉換成 NSArray 數組,每一個數組元素是一個 NSDictionary,代表一段相同設置的文字。為了簡單,我們的配置文件只支持配置顏色和字號,但是讀者可以依據同樣的思想,很方便地增加其它配置信息。
接下來我們要為CTFrameParser增加一個方法,讓其可以從如上格式的模版文件中生成CoreTextData。最終我們的實現代碼如下:
// 方法一
+ (CoreTextData *)parseTemplateFile:(NSString *)path config:(CTFrameParserConfig*)config {
    NSAttributedString *content = [self loadTemplateFile:path config:config];
    return [self parseAttributedContent:content config:config];
}

// 方法二
+ (NSAttributedString *)loadTemplateFile:(NSString *)path config:(CTFrameParserConfig*)config {
    NSData *data = [NSData dataWithContentsOfFile:path];
    NSMutableAttributedString *result = [[NSMutableAttributedString alloc] init];
    if (data) {
        NSArray *array = [NSJSONSerialization JSONObjectWithData:data
                                           options:NSJSONReadingAllowFragments
                                             error:nil];
        if ([array isKindOfClass:[NSArray class]]) {
            for (NSDictionary *dict in array) {
                NSString *type = dict[@"type"];
                if ([type isEqualToString:@"txt"]) {
                    NSAttributedString *as =
                       [self parseAttributedContentFromNSDictionary:dict
                                                             config:config];
                    [result appendAttributedString:as];
                }
            }
        }
    }
    return result;
}

// 方法三
+ (NSAttributedString *)parseAttributedContentFromNSDictionary:(NSDictionary *)dict
                                                        config:(CTFrameParserConfig*)config {
    NSMutableDictionary *attributes = [self attributesWithConfig:config];
    // set color
    UIColor *color = [self colorFromTemplate:dict[@"color"]];
    if (color) {
        attributes[(id)kCTForegroundColorAttributeName] = (id)color.CGColor;
    }
    // set font size
    CGFloat fontSize = [dict[@"size"] floatValue];
    if (fontSize > 0) {
        CTFontRef fontRef = CTFontCreateWithName((CFStringRef)@"ArialMT", fontSize, NULL);
        attributes[(id)kCTFontAttributeName] = (__bridge id)fontRef;
        CFRelease(fontRef);
    }
    NSString *content = dict[@"content"];
    return [[NSAttributedString alloc] initWithString:content attributes:attributes];
}

// 方法四
+ (UIColor *)colorFromTemplate:(NSString *)name {
    if ([name isEqualToString:@"blue"]) {
        return [UIColor blueColor];
    } else if ([name isEqualToString:@"red"]) {
        return [UIColor redColor];
    } else if ([name isEqualToString:@"black"]) {
        return [UIColor blackColor];
    } else {
        return nil;
    }
}

// 方法五
+ (CoreTextData *)parseAttributedContent:(NSAttributedString *)content config:(CTFrameParserConfig*)config {
    // 創建 CTFramesetterRef 實例
    CTFramesetterRef framesetter = CTFramesetterCreateWithAttributedString((CFAttributedStringRef)content);

    // 獲得要緩制的區域的高度
    CGSize restrictSize = CGSizeMake(config.width, CGFLOAT_MAX);
    CGSize coreTextSize = CTFramesetterSuggestFrameSizeWithConstraints(framesetter, CFRangeMake(0,0), nil, restrictSize, nil);
    CGFloat textHeight = coreTextSize.height;

    // 生成 CTFrameRef 實例
    CTFrameRef frame = [self createFrameWithFramesetter:framesetter config:config height:textHeight];

    // 將生成好的 CTFrameRef 實例和計算好的緩制高度保存到 CoreTextData 實例中,最後返回 CoreTextData 實例
    CoreTextData *data = [[CoreTextData alloc] init];
    data.ctFrame = frame;
    data.height = textHeight;

    // 釋放內存
    CFRelease(frame);
    CFRelease(framesetter);
    return data;
}

// 方法六
+ (CTFrameRef)createFrameWithFramesetter:(CTFramesetterRef)framesetter
                                  config:(CTFrameParserConfig *)config
                                  height:(CGFloat)height {

    CGMutablePathRef path = CGPathCreateMutable();
    CGPathAddRect(path, NULL, CGRectMake(0, 0, config.width, height));

    CTFrameRef frame = CTFramesetterCreateFrame(framesetter, CFRangeMake(0, 0), path, NULL);
    CFRelease(path);
    return frame;
}
以上代碼主要由 6 個子方法構成:
方法一用於提供對外的接口,調用方法二實現從一個 JSON 的模版文件中讀取內容,然後調用方法五生成CoreTextData。方法二讀取 JSON 文件內容,並且調用方法三獲得從NSDictionary到NSAttributedString的轉換結果。方法三將NSDictionary內容轉換為NSAttributedString。方法四提供將NSString轉為UIColor的功能。方法五接受一個NSAttributedString和一個config參數,將NSAttributedString轉換成CoreTextData返回。方法六是方法五的一個輔助函數,供方法五調用。
然後我們將ViewController中的調用代碼作一下更改,使其從模版文件中加載內容,如下所示:
@implementation ViewController

- (void)viewDidLoad
{
    [super viewDidLoad];

    CTFrameParserConfig *config = [[CTFrameParserConfig alloc] init];
    config.width = self.ctView.width;
    NSString *path = [[NSBundle mainBundle] pathForResource:@"content" ofType:@"json"];
    CoreTextData *data = [CTFrameParser parseTemplateFile:path config:config];
    self.ctView.data = data;
    self.ctView.height = data.height;
    self.ctView.backgroundColor = [UIColor whiteColor];
}

@end
最後運行得到的結果如下所示,可以看到,通過一個簡單的模板文件,我們已經可以很方便地定義排版的配置信息了。

- iOS9與XCode7中不克不及應用http銜接的疾速處理方法
- xcode8 封閉掌握台不打印不信息的處理辦法(圖文詳解)
- 史上最具體的CocoaPods裝置教程(圖文)
- IOS Xcode中快捷鍵年夜全
- iOS中處理Xcode 8掌握台亂碼的方法
- IOS開辟之適配iOS10及Xcode8的留意點
- xcode8提交ipa掉敗沒法構建版本成績的處理計劃
- IOS 開辟自界說條形ProgressView的實例
- XCode 加速編譯鏈接速度的辦法
- 2016 cocoapods的裝置和應用辦法和版本進級碰到的成績
- IOS 陀螺儀開辟(CoreMotion框架)實例詳解
- 進修iOS自界說導航掌握器UINavigationController
- Xcode 8打印log日記的成績小結及處理辦法
- iOS10 適配和Xcode8設置裝備擺設總結
- iOS Xcode8更新後輸入log日記封閉的辦法