iOS開發之讓你的應用“動”起來
概覽
在iOS中隨處都可以看到絢麗的動畫效果,實現這些動畫的過程並不復雜,今天將帶大家一窺iOS動畫全貌。在這裡你可以看到iOS中如何使用圖層精簡非交互式繪圖,如何通過核心動畫創建基礎動畫、關鍵幀動畫、動畫組、轉場動畫,如何通過UIView的裝飾方法對這些動畫操作進行簡化等。在今天的文章裡您可以看到動畫操作在iOS中是如何簡單和高效,很多原來想做但是苦於沒有思路的動畫在iOS中將變得越發簡單:
CALayer
一、CALayer簡介
在介紹動畫操作之前我們必須先來了解一個動畫中常用的對象CALayer。CALayer包含在QuartzCore框架中,這是一個跨平台的框架,既可以用在iOS中又可以用在Mac OS X中。在使用Core Animation開發動畫的本質就是將CALayer中的內容轉化為位圖從而供硬件操作,所以要熟練掌握動畫操作必須先來熟悉CALayer。
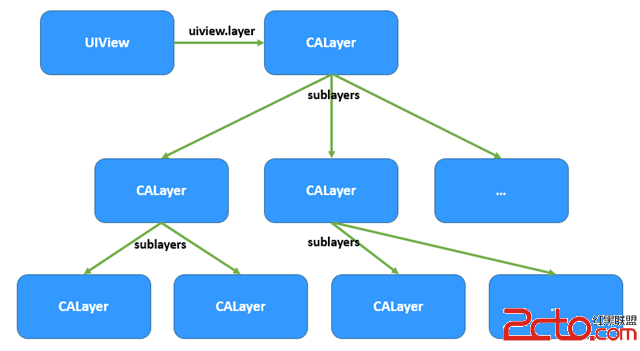
在上一篇文章中使用Quartz 2D繪圖時大家其實已經用到了CALayer,當利用drawRect:方法繪圖的本質就是繪制到了UIView的layer(屬性)中,可是這個過程大家在上一節中根本體會不到。但是在Core Animation中我們操作更多的則不再是UIView而是直接面對CALayer。下圖描繪了CALayer和UIView的關系,在UIView中有一個layer屬性作為根圖層,根圖層上可以放其他子圖層,在UIView中所有能夠看到的內容都包含在layer中:
二、CALayer常用屬性
在iOS中CALayer的設計主要是了為了內容展示和動畫操作,CALayer本身並不包含在UIKit中,它不能響應事件。由於CALayer在設計之初就考慮它的動畫操作功能,CALayer很多屬性在修改時都能形成動畫效果,這種屬性稱為“隱式動畫屬性”。但是對於UIView的根圖層而言屬性的修改並不形成動畫效果,因為很多情況下根圖層更多的充當容器的做用,如果它的屬性變動形成動畫效果會直接影響子圖層。另外,UIView的根圖層創建工作完全由iOS負責完成,無法重新創建,但是可以往根圖層中添加子圖層或移除子圖層。
下表列出了CALayer常用的屬性:
1.隱式屬性動畫的本質是這些屬性的變動默認隱含了CABasicAnimation動畫實現,詳情大家可以參照Xcode幫助文檔中“Animatable Properties”一節。
2.在CALayer中很少使用frame屬性,因為frame本身不支持動畫效果,通常使用bounds和position代替。
3.CALayer中透明度使用opacity表示而不是alpha;中心點使用position表示而不是center。
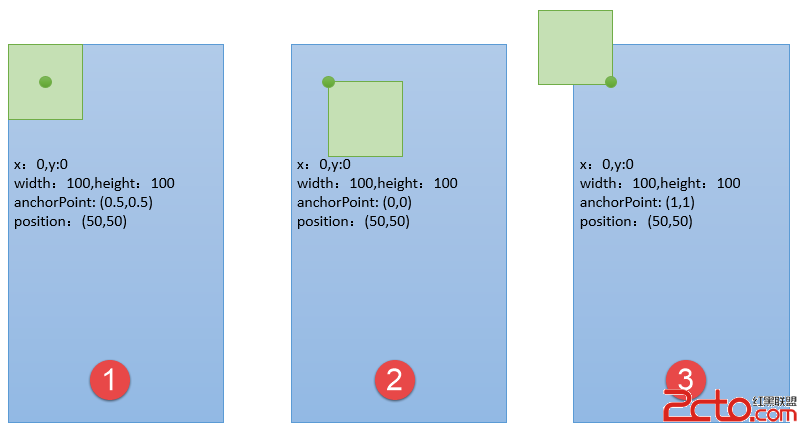
4.anchorPoint屬性是圖層的錨點,范圍在(0~1,0~1)表示在x、y軸的比例,這個點永遠可以同position(中心點)重合,當圖層中心點固定後,調整anchorPoint即可達到調整圖層顯示位置的作用(因為它永遠和position重合)
為了進一步說明anchorPoint的作用,假設有一個層大小100*100,現在中心點位置(50,50),由此可以得出frame(0,0,100,100)。上面說過anchorPoint默認為(0.5,0.5),同中心點position重合,此時使用圖形描述如圖1;當修改anchorPoint為(0,0),此時錨點處於圖層左上角,但是中心點poition並不會改變,因此圖層會向右下角移動,如圖2;然後修改anchorPoint為(1,1,),position還是保持位置不變,錨點處於圖層右下角,此時圖層如圖3。
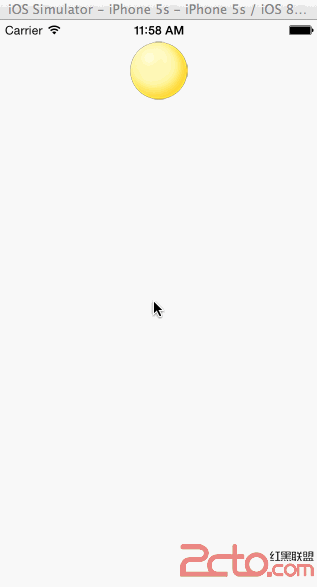
下面通過一個簡單的例子演示一下上面幾個屬性,程序初始化階段我們定義一個正方形,但是圓角路徑調整為正方形邊長的一般,使其看起來是一個圓形,在點擊屏幕的時候修改圖層的屬性形成動畫效果(注意在程序中沒有直接修改UIView的layer屬性,因為根圖層無法形成動畫效果):
//
//KCMainViewController.m
//CALayer
//
//CreatedbyKenshinCuion14-3-22.
//Copyright(c)2014年KenshinCui.Allrightsreserved.
//

#import"KCMainViewController.h"
#defineWIDTH50

@interfaceKCMainViewController()

@end

@implementationKCMainViewController
-(void)viewDidLoad{
[superviewDidLoad];
//Doanyadditionalsetupafterloadingtheview.
[selfdrawMyLayer];
}

#pragmamark繪制圖層
-(void)drawMyLayer{
CGSizesize=[UIScreenmainScreen].bounds.size;

//獲得根圖層

CALayer*layer=[[CALayeralloc]init];
//設置背景顏色,由於QuartzCore是跨平台框架,無法直接使用UIColor
layer.backgroundColor=[UIColorcolorWithRed:0green:146/255.0blue:1.0alpha:1.0].CGColor;
//設置中心點
layer.position=CGPointMake(size.width/2,size.height/2);
//設置大小
layer.bounds=CGRectMake(0,0,WIDTH,WIDTH);
//設置圓角,當圓角半徑等於矩形的一半時看起來就是一個圓形
layer.cornerRadius=WIDTH/2;
//設置陰影
layer.shadowColor=[UIColorgrayColor].CGColor;
layer.shadowOffset=CGSizeMake(2,2);
layer.shadowOpacity=.9;
//設置邊框
//layer.borderColor=[UIColorwhiteColor].CGColor;
//layer.borderWidth=1;
//設置錨點
//layer.anchorPoint=CGPointZero;
[self.view.layeraddSublayer:layer];

}

#pragmamark點擊放大
-(void)touchesEnded:(NSSet*)toucheswithEvent:(UIEvent*)event{
UITouch*touch=[touchesanyObject];
CALayer*layer=self.view.layer.sublayers[0];
CGFloatwidth=layer.bounds.size.width;
if(width==WIDTH){
width=WIDTH*4;
}else{
width=WIDTH;
}
layer.bounds=CGRectMake(0,0,width,width);
layer.position=[touchlocationInView:self.view];
layer.cornerRadius=width/2;
}
@end
運行效果

CALayer繪圖
上一篇文章中重點討論了使用Quartz 2D繪圖,當時調用了UIView的drawRect:方法繪制圖形、圖像,這種方式本質還是在圖層中繪制,但是這裡會著重介紹一下如何直接在圖層中繪圖。在圖層中繪圖的方式跟原來基本沒有區別,只是drawRect:方法是由UIKit組件進行調用,因此裡面可以使用一些UIKit封裝的方法進行繪圖,而直接繪制到圖層的方法由於並非UIKit直接調用因此只能用原生的Core Graphics方法繪制。
圖層繪圖有兩種方法,不管使用哪種方法繪制完必須調用圖層的setNeedDisplay方法(注意是圖層的方法,不是UIView的方法,前面我們介紹過UIView也有此方法)
-
通過圖層代理drawLayer: inContext:方法繪制
-
通過自定義圖層drawInContext:方法繪制
使用代理方法繪圖
通過代理方法進行圖層繪圖只要指定圖層的代理,然後在代理對象中重寫-(void)drawLayer:(CALayer *)layer inContext:(CGContextRef)ctx方法即可。需要注意這個方法雖然是代理方法但是不用手動實現CALayerDelegate,因為CALayer定義中給NSObject做了分類擴展,所有的NSObject都包含這個方法。另外設置完代理後必須要調用圖層的setNeedDisplay方法,否則繪制的內容無法顯示。
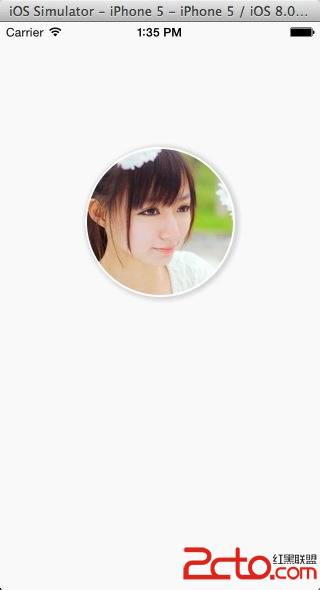
下面的代碼演示了在一個自定義圖層繪制一張圖像並將圖像設置成圓形,這種效果在很多應用中很常見,如最新版的手機QQ頭像就是這種效果:
//
//KCMainViewController.m
//CALayer
//
//CreatedbyKenshinCuion14-3-22.
//Copyright(c)2014年KenshinCui.Allrightsreserved.
//
#import"KCMainViewController.h"
#definePHOTO_HEIGHT150
@interfaceKCMainViewController()
@end
@implementationKCMainViewController
-(void)viewDidLoad{
[superviewDidLoad];

//自定義圖層
CALayer*layer=[[CALayeralloc]init];
layer.bounds=CGRectMake(0,0,PHOTO_HEIGHT,PHOTO_HEIGHT);
layer.position=CGPointMake(160,200);
layer.backgroundColor=[UIColorredColor].CGColor;
layer.cornerRadius=PHOTO_HEIGHT/2;
//注意僅僅設置圓角,對於圖形而言可以正常顯示,但是對於圖層中繪制的圖片無法正確顯示
//如果想要正確顯示則必須設置masksToBounds=YES,剪切子圖層
layer.masksToBounds=YES;
//陰影效果無法和masksToBounds同時使用,因為masksToBounds的目的就是剪切外邊框,
//而陰影效果剛好在外邊框
//layer.shadowColor=[UIColorgrayColor].CGColor;
//layer.shadowOffset=CGSizeMake(2,2);
//layer.shadowOpacity=1;
//設置邊框
layer.borderColor=[UIColorwhiteColor].CGColor;
layer.borderWidth=2;

//設置圖層代理
layer.delegate=self;

//添加圖層到根圖層
[self.view.layeraddSublayer:layer];

//調用圖層setNeedDisplay,否則代理方法不會被調用
[layersetNeedsDisplay];
}
#pragmamark繪制圖形、圖像到圖層,注意參數中的ctx是圖層的圖形上下文,其中繪圖位置也是相對圖層而言的
-(void)drawLayer:(CALayer*)layerinContext:(CGContextRef)ctx{
//NSLog(@"%@",layer);//這個圖層正是上面定義的圖層
CGContextSaveGState(ctx);
//圖形上下文形變,解決圖片倒立的問題
CGContextScaleCTM(ctx,1,-1);
CGContextTranslateCTM(ctx,0,-PHOTO_HEIGHT);

UIImage*image=[UIImageimageNamed:@"photo.png"];
//注意這個位置是相對於圖層而言的不是屏幕
CGContextDrawImage(ctx,CGRectMake(0,0,PHOTO_HEIGHT,PHOTO_HEIGHT),image.CGImage);
//CGContextFillRect(ctx,CGRectMake(0,0,100,100));
//CGContextDrawPath(ctx,kCGPathFillStroke);

CGContextRestoreGState(ctx);
}
@end
運行效果
使用代理方法繪制圖形、圖像時在drawLayer:inContext:方法中可以通過事件參數獲得繪制的圖層和圖形上下文。在這個方法中繪圖時所有的位置都是相對於圖層而言的,圖形上下文指的也是當前圖層的圖形上下文。
需要注意的是上面代碼中繪制圖片圓形裁切效果時如果不設置masksToBounds是無法顯示圓形,但是對於其他圖形卻沒有這個限制。原因就是當繪制一張圖片到圖層上的時候會重新創建一個圖層添加到當前圖層,這樣一來如果設置了圓角之後雖然底圖層有圓角效果,但是子圖層還是矩形,只有設置了masksToBounds為YES讓子圖層按底圖層剪切才能顯示圓角效果。同樣的,有些朋友經常在網上提問說為什麼使用UIImageView的layer設置圓角後圖片無法顯示圓角,只有設置masksToBounds才能出現效果,也是類似的問題。
擴展1--帶陰影效果的圓形圖片裁切
如果設置了masksToBounds=YES之後確實可以顯示圖片圓角效果,但遺憾的是設置了這個屬性之後就無法設置陰影效果。因為masksToBounds=YES就意味著外邊框不能顯示,而陰影恰恰作為外邊框繪制的,這樣兩個設置就產生了矛盾。要解決這個問題不妨換個思路:使用兩個大小一樣的圖層,下面的圖層負責繪制陰影,上面的圖層用來顯示圖片。
//
//KCMainViewController.m
//CALayer
//
//CreatedbyKenshinCuion14-3-22.
//Copyright(c)2014年KenshinCui.Allrightsreserved.
//
#import"KCMainViewController.h"
#definePHOTO_HEIGHT150
@interfaceKCMainViewController()
@end
@implementationKCMainViewController
-(void)viewDidLoad{
[superviewDidLoad];

CGPointposition=CGPointMake(160,200);
CGRectbounds=CGRectMake(0,0,PHOTO_HEIGHT,PHOTO_HEIGHT);
CGFloatcornerRadius=PHOTO_HEIGHT/2;
CGFloatborderWidth=2;

//陰影圖層
CALayer*layerShadow=[[CALayeralloc]init];
layerShadow.bounds=bounds;
layerShadow.position=position;
layerShadow.cornerRadius=cornerRadius;
layerShadow.shadowColor=[UIColorgrayColor].CGColor;
layerShadow.shadowOffset=CGSizeMake(2,1);
layerShadow.shadowOpacity=1;
layerShadow.borderColor=[UIColorwhiteColor].CGColor;
layerShadow.borderWidth=borderWidth;
[self.view.layeraddSublayer:layerShadow];

//容器圖層
CALayer*layer=[[CALayeralloc]init];
layer.bounds=bounds;
layer.position=position;
layer.backgroundColor=[UIColorredColor].CGColor;
layer.cornerRadius=cornerRadius;
layer.masksToBounds=YES;
layer.borderColor=[UIColorwhiteColor].CGColor;
layer.borderWidth=borderWidth;

//設置圖層代理
layer.delegate=self;

//添加圖層到根圖層
[self.view.layeraddSublayer:layer];

//調用圖層setNeedDisplay,否則代理方法不會被調用
[layersetNeedsDisplay];
}
#pragmamark繪制圖形、圖像到圖層,注意參數中的ctx是圖層的圖形上下文,其中繪圖位置也是相對圖層而言的
-(void)drawLayer:(CALayer*)layerinContext:(CGContextRef)ctx{
//NSLog(@"%@",layer);//這個圖層正是上面定義的圖層
CGContextSaveGState(ctx);

//圖形上下文形變,解決圖片倒立的問題
CGContextScaleCTM(ctx,1,-1);
CGContextTranslateCTM(ctx,0,-PHOTO_HEIGHT);

UIImage*image=[UIImageimageNamed:@"photo.jpg"];
//注意這個位置是相對於圖層而言的不是屏幕
CGContextDrawImage(ctx,CGRectMake(0,0,PHOTO_HEIGHT,PHOTO_HEIGHT),image.CGImage);

//CGContextFillRect(ctx,CGRectMake(0,0,100,100));
//CGContextDrawPath(ctx,kCGPathFillStroke);

CGContextRestoreGState(ctx);
}
@end
運行效果

擴展2--圖層的形變
從上面代碼中大家不難發現使用Core Graphics繪制圖片時會倒立顯示,對圖層的圖形上下文進行了反轉。在前一篇文章中也采用了類似的方法去解決這個問題,但是在那篇文章中也提到過如果直接讓圖像沿著x軸旋轉180度同樣可以達到正確顯示的目的,只是當時的旋轉靠圖形上下文還無法繞x軸旋轉。今天學習了圖層之後,其實可以控制圖層直接旋轉而不用借助於圖形上下文的形變操作,而且這麼操作起來會更加簡單和直觀。對於上面的程序,只需要設置圖層的transform屬性即可。需要注意的是transform是CATransform3D類型,形變可以在三個維度上進行,使用方法和前面介紹的二維形變是類似的,而且都有對應的形變設置方法(如:CATransform3DMakeTranslation()、CATransform3DMakeScale()、CATransform3DMakeRotation())。下面的代碼通過CATransform3DMakeRotation()方法在x軸旋轉180度解決倒立問題:
//
//形變演示
//CALayer
//
//CreatedbyKenshinCuion14-3-22.
//Copyright(c)2014年KenshinCui.Allrightsreserved.
//
#import"KCMainViewController.h"
#definePHOTO_HEIGHT150
@interfaceKCMainViewController()
@end
@implementationKCMainViewController
-(void)viewDidLoad{
[superviewDidLoad];
CGPointposition=CGPointMake(160,200);
CGRectbounds=CGRectMake(0,0,PHOTO_HEIGHT,PHOTO_HEIGHT);
CGFloatcornerRadius=PHOTO_HEIGHT/2;
CGFloatborderWidth=2;
//陰影圖層
CALayer*layerShadow=[[CALayeralloc]init];
layerShadow.bounds=bounds;
layerShadow.position=position;
layerShadow.cornerRadius=cornerRadius;
layerShadow.shadowColor=[UIColorgrayColor].CGColor;
layerShadow.shadowOffset=CGSizeMake(2,1);
layerShadow.shadowOpacity=1;
layerShadow.borderColor=[UIColorwhiteColor].CGColor;
layerShadow.borderWidth=borderWidth;
[self.view.layeraddSublayer:layerShadow];
//容器圖層
CALayer*layer=[[CALayeralloc]init];
layer.bounds=bounds;
layer.position=position;
layer.backgroundColor=[UIColorredColor].CGColor;
layer.cornerRadius=cornerRadius;
layer.masksToBounds=YES;
layer.borderColor=[UIColorwhiteColor].CGColor;
layer.borderWidth=borderWidth;

//利用圖層形變解決圖像倒立問題
layer.transform=CATransform3DMakeRotation(M_PI,1,0,0);

//設置圖層代理
layer.delegate=self;
//添加圖層到根圖層
[self.view.layeraddSublayer:layer];
//調用圖層setNeedDisplay,否則代理方法不會被調用
[layersetNeedsDisplay];
}
#pragmamark繪制圖形、圖像到圖層,注意參數中的ctx時圖層的圖形上下文,其中繪圖位置也是相對圖層而言的
-(void)drawLayer:(CALayer*)layerinContext:(CGContextRef)ctx{
//NSLog(@"%@",layer);//這個圖層正是上面定義的圖層
UIImage*image=[UIImageimageNamed:@"photo.jpg"];
//注意這個位置是相對於圖層而言的不是屏幕
CGContextDrawImage(ctx,CGRectMake(0,0,PHOTO_HEIGHT,PHOTO_HEIGHT),image.CGImage);
}
@end
事實上如果僅僅就顯示一張圖片在圖層中當然沒有必要那麼麻煩,直接設置圖層contents就可以了,不牽涉到繪圖也就沒有倒立的問題了。
//
//圖層內容設置
//CALayer
//
//CreatedbyKenshinCuion14-3-22.
//Copyright(c)2014年KenshinCui.Allrightsreserved.
//

#import"KCMainViewController.h"
#definePHOTO_HEIGHT150

@interfaceKCMainViewController()

@end

@implementationKCMainViewController

-(void)viewDidLoad{
[superviewDidLoad];
CGPointposition=CGPointMake(160,200);
CGRectbounds=CGRectMake(0,0,PHOTO_HEIGHT,PHOTO_HEIGHT);
CGFloatcornerRadius=PHOTO_HEIGHT/2;
CGFloatborderWidth=2;

//陰影圖層
CALayer*layerShadow=[[CALayeralloc]init];
layerShadow.bounds=bounds;
layerShadow.position=position;
layerShadow.cornerRadius=cornerRadius;
layerShadow.shadowColor=[UIColorgrayColor].CGColor;
layerShadow.shadowOffset=CGSizeMake(2,1);
layerShadow.shadowOpacity=1;
layerShadow.borderColor=[UIColorwhiteColor].CGColor;
layerShadow.borderWidth=borderWidth;
[self.view.layeraddSublayer:layerShadow];

//容器圖層
CALayer*layer=[[CALayeralloc]init];
layer.bounds=bounds;
layer.position=position;
layer.backgroundColor=[UIColorredColor].CGColor;
layer.cornerRadius=cornerRadius;
layer.masksToBounds=YES;
layer.borderColor=[UIColorwhiteColor].CGColor;
layer.borderWidth=borderWidth;
//設置內容(注意這裡一定要轉換為CGImage)
UIImage*image=[UIImageimageNamed:@"photo.jpg"];
//layer.contents=(id)image.CGImage;
[layersetContents:(id)image.CGImage];

//添加圖層到根圖層
[self.view.layeraddSublayer:layer];
}

@end
既然如此為什麼還大費周章的說形變呢,因為形變對於動畫有特殊的意義。在動畫開發中形變往往不是直接設置transform,而是通過keyPath進行設置。這種方法設置形變的本質和前面沒有區別,只是利用了KVC可以動態修改其屬性值而已,但是這種方式在動畫中確實很常用的,因為它可以很方便的將幾種形變組合到一起使用。同樣是解決動畫旋轉問題,只要將前面的旋轉代碼改為下面的代碼即可:
[layersetValue:@M_PIforKeyPath:@"transform.rotation.x"];
當然,通過key path設置形變參數就需要了解有哪些key path可以設置,這裡就不再一一列舉,大家可以參照Xcode幫助文檔中“CATransform3D Key Paths”一節,裡面描述的很詳細。
使用自定義圖層繪圖
在自定義圖層中繪圖時只要自己編寫一個類繼承於CALayer然後在drawInContext:中繪圖即可。同前面在代理方法繪圖一樣,要顯示圖層中繪制的內容也要調用圖層的setNeedDisplay方法,否則drawInContext方法將不會調用。
前面的文章中曾經說過,在使用Quartz 2D在UIView中繪制圖形的本質也是繪制到圖層中,為了說明這個問題下面演示自定義圖層繪圖時沒有直接在視圖控制器中調用自定義圖層,而是在一個UIView將自定義圖層添加到UIView的根圖層中(例子中的UIView跟自定義圖層繪圖沒有直接關系)。從下面的代碼中可以看到:UIView在顯示時其根圖層會自動創建一個CGContextRef(CALayer本質使用的是位圖上下文),同時調用圖層代理(UIView創建圖層會自動設置圖層代理為其自身)的draw: inContext:方法並將圖形上下文作為參數傳遞給這個方法。而在UIView的draw:inContext:方法中會調用其drawRect:方法,在drawRect:方法中使用UIGraphicsGetCurrentContext()方法得到的上下文正是前面創建的上下文。
KCLayer.m
//
//KCLayer.m
//CALayer
//
//CreatedbyKenshinCuion14-3-22.
//Copyright(c)2014年KenshinCui.Allrightsreserved.
//

#import"KCLayer.h"

@implementationKCLayer

-(void)drawInContext:(CGContextRef)ctx{
NSLog(@"3-drawInContext:");
NSLog(@"CGContext:%@",ctx);
//CGContextRotateCTM(ctx,M_PI_4);
CGContextSetRGBFillColor(ctx,135.0/255.0,232.0/255.0,84.0/255.0,1);
CGContextSetRGBStrokeColor(ctx,135.0/255.0,232.0/255.0,84.0/255.0,1);
//CGContextFillRect(ctx,CGRectMake(0,0,100,100));
//CGContextFillEllipseInRect(ctx,CGRectMake(50,50,100,100));
CGContextMoveToPoint(ctx,94.5,33.5);

////StarDrawing
CGContextAddLineToPoint(ctx,104.02,47.39);
CGContextAddLineToPoint(ctx,120.18,52.16);
CGContextAddLineToPoint(ctx,109.91,65.51);
CGContextAddLineToPoint(ctx,110.37,82.34);
CGContextAddLineToPoint(ctx,94.5,76.7);
CGContextAddLineToPoint(ctx,78.63,82.34);
CGContextAddLineToPoint(ctx,79.09,65.51);
CGContextAddLineToPoint(ctx,68.82,52.16);
CGContextAddLineToPoint(ctx,84.98,47.39);
CGContextClosePath(ctx);

CGContextDrawPath(ctx,kCGPathFillStroke);
}
@end
KCView.m
//
//KCView.m
//CALayer
//
//CreatedbyKenshinCuion14-3-22.
//Copyright(c)2014年KenshinCui.Allrightsreserved.
//
#import"KCView.h"
#import"KCLayer.h"
@implementationKCView
-(instancetype)initWithFrame:(CGRect)frame{
NSLog(@"initWithFrame:");
if(self=[superinitWithFrame:frame]){
KCLayer*layer=[[KCLayeralloc]init];
layer.bounds=CGRectMake(0,0,185,185);
layer.position=CGPointMake(160,284);
layer.backgroundColor=[UIColorcolorWithRed:0green:146/255.0blue:1.0alpha:1.0].CGColor;

//顯示圖層
[layersetNeedsDisplay];

[self.layeraddSublayer:layer];
}
returnself;
}
-(void)drawRect:(CGRect)rect{
NSLog(@"2-drawRect:");
NSLog(@"CGContext:%@",UIGraphicsGetCurrentContext());//得到的當前圖形上下文正是drawLayer中傳遞的
[superdrawRect:rect];

}
-(void)drawLayer:(CALayer*)layerinContext:(CGContextRef)ctx{
NSLog(@"1-drawLayer:inContext:");
NSLog(@"CGContext:%@",ctx);
[superdrawLayer:layerinContext:ctx];

}
@end
KCMainViewController.m
//
//KCMainViewController.m
//CALayer
//
//CreatedbyKenshinCuion14-3-22.
//Copyright(c)2014年KenshinCui.Allrightsreserved.
//
#import"KCMainViewController.h"
#import"KCView.h"
@interfaceKCMainViewController()
@end
@implementationKCMainViewController
-(void)viewDidLoad{
[superviewDidLoad];

KCView*view=[[KCViewalloc]initWithFrame:[UIScreenmainScreen].bounds];
view.backgroundColor=[UIColorcolorWithRed:249.0/255.0green:249.0/255.0blue:249.0/255.0alpha:1];


[self.viewaddSubview:view];
}
@end
運行效果

Core Animation
大家都知道在iOS中實現一個動畫相當簡單,只要調用UIView的塊代碼即可實現一個動畫效果,這在其他系統開發中基本不可能實現。下面通過一個簡單的UIView進行一個圖片放大動畫效果演示:
//
//KCMainViewController.m
//Animation
//
//CreatedbyKenshinCuion14-3-22.
//Copyright(c)2014年KenshinCui.Allrightsreserved.
//
#import"KCMainViewController.h"
@interfaceKCMainViewController()
@end
@implementationKCMainViewController
-(void)viewDidLoad{
[superviewDidLoad];

UIImage*image=[UIImageimageNamed:@"open2.png"];
UIImageView*imageView=[[UIImageViewalloc]init];
imageView.image=image;
imageView.frame=CGRectMake(120,140,80,80);
[self.viewaddSubview:imageView];

//兩秒後開始一個持續一分鐘的動畫
[UIViewanimateWithDuration:1delay:2options:UIViewAnimationOptionBeginFromCurrentStateanimations:^{
imageView.frame=CGRectMake(80,100,160,160);
}completion:nil];
}
@end
使用上面UIView封裝的方法進行動畫設置固然十分方便,但是具體動畫如何實現我們是不清楚的,而且上面的代碼還有一些問題是無法解決的,例如:如何控制動畫的暫停?如何進行動畫的組合?
這裡就需要了解iOS的核心動畫Core Animation(包含在Quartz Core框架中)。在iOS中核心動畫分為幾類:基礎動畫、關鍵幀動畫、動畫組、轉場動畫。各個類的關系大致如下:
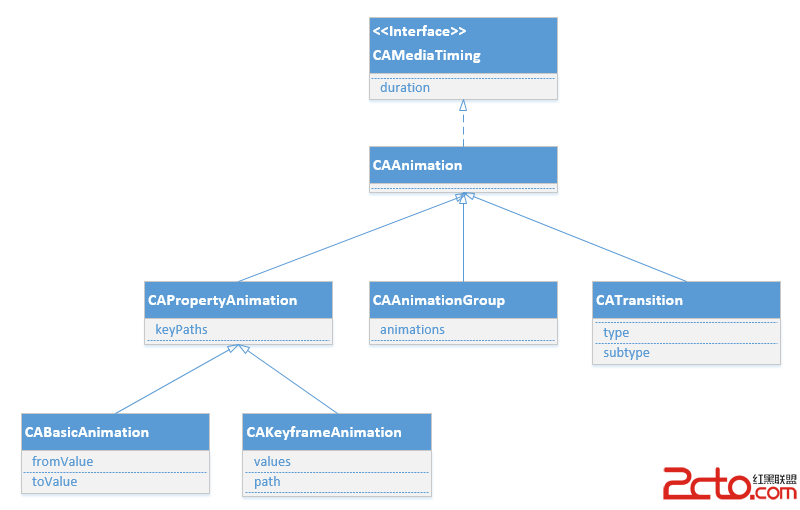
CAAnimation:核心動畫的基礎類,不能直接使用,負責動畫運行時間、速度的控制,本身實現了CAMediaTiming協議。
CAPropertyAnimation:屬性動畫的基類(通過屬性進行動畫設置,注意是可動畫屬性),不能直接使用。
CAAnimationGroup:動畫組,動畫組是一種組合模式設計,可以通過動畫組來進行所有動畫行為的統一控制,組中所有動畫效果可以並發執行。
CATransition:轉場動畫,主要通過濾鏡進行動畫效果設置。
CABasicAnimation:基礎動畫,通過屬性修改進行動畫參數控制,只有初始狀態和結束狀態。
CAKeyframeAnimation:關鍵幀動畫,同樣是通過屬性進行動畫參數控制,但是同基礎動畫不同的是它可以有多個狀態控制。
基礎動畫、關鍵幀動畫都屬於屬性動畫,就是通過修改屬性值產生動畫效果,開發人員只需要設置初始值和結束值,中間的過程動畫(又叫“補間動畫”)由系統自動計算產生。和基礎動畫不同的是關鍵幀動畫可以設置多個屬性值,每兩個屬性中間的補間動畫由系統自動完成,因此從這個角度而言基礎動畫又可以看成是有兩個關鍵幀的關鍵幀動畫。
基礎動畫
在開發過程中很多情況下通過基礎動畫就可以滿足開發需求,前面例子中使用的UIView代碼塊進行圖像放大縮小的演示動畫也是基礎動畫(在iOS7中UIView也對關鍵幀動畫進行了封裝),只是UIView裝飾方法隱藏了更多的細節。如果不使用UIView封裝的方法,動畫創建一般分為以下幾步:
1.初始化動畫並設置動畫屬性
2.設置動畫屬性初始值(可以省略)、結束值以及其他動畫屬性
3.給圖層添加動畫
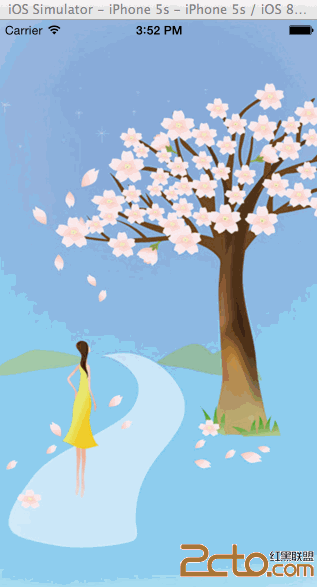
下面以一個移動動畫為例進行演示,在這個例子中點擊屏幕哪個位置落花將飛向哪裡。
//
//KCMainViewController.m
//Animation
//
//CreatedbyKenshinCuion14-3-22.
//Copyright(c)2014年KenshinCui.Allrightsreserved.
//
#import"KCMainViewController.h"
@interfaceKCMainViewController(){
CALayer*_layer;
}
@end
@implementationKCMainViewController
-(void)viewDidLoad{
[superviewDidLoad];

//設置背景(注意這個圖片其實在根圖層)
UIImage*backgroundImage=[UIImageimageNamed:@"background.jpg"];
self.view.backgroundColor=[UIColorcolorWithPatternImage:backgroundImage];

//自定義一個圖層
_layer=[[CALayeralloc]init];
_layer.bounds=CGRectMake(0,0,10,20);
_layer.position=CGPointMake(50,150);
_layer.contents=(id)[UIImageimageNamed:@"petal.png"].CGImage;
[self.view.layeraddSublayer:_layer];
}
#pragmamark移動動畫
-(void)translatonAnimation:(CGPoint)location{
//1.創建動畫並指定動畫屬性
CABasicAnimation*basicAnimation=[CABasicAnimationanimationWithKeyPath:@"position"];

//2.設置動畫屬性初始值和結束值
//basicAnimation.fromValue=[NSNumbernumberWithInteger:50];//可以不設置,默認為圖層初始狀態
basicAnimation.toValue=[NSValuevalueWithCGPoint:location];

//設置其他動畫屬性
basicAnimation.duration=5.0;//動畫時間5秒
//basicAnimation.repeatCount=HUGE_VALF;//設置重復次數,HUGE_VALF可看做無窮大,起到循環動畫的效果
//basicAnimation.removedOnCompletion=NO;//運行一次是否移除動畫

//3.添加動畫到圖層,注意key相當於給動畫進行命名,以後獲得該動畫時可以使用此名稱獲取
[_layeraddAnimation:basicAnimationforKey:@"KCBasicAnimation_Translation"];
}
#pragmamark點擊事件
-(void)touchesBegan:(NSSet*)toucheswithEvent:(UIEvent*)event{
UITouch*touch=touches.anyObject;
CGPointlocation=[touchlocationInView:self.view];
//創建並開始動畫
[selftranslatonAnimation:location];
}
@end
運行效果
上面實現了一個基本動畫效果,但是這個動畫存在一個問題:動畫結束後動畫圖層回到了原來的位置,當然是用UIView封裝的方法是沒有這個問題的。如何解決這個問題呢?
前面說過圖層動畫的本質就是將圖層內部的內容轉化為位圖經硬件操作形成一種動畫效果,其實圖層本身並沒有任何的變化。上面的動畫中圖層並沒有因為動畫效果而改變它的位置(對於縮放動畫其大小也是不會改變的),所以動畫完成之後圖層還是在原來的顯示位置沒有任何變化,如果這個圖層在一個UIView中你會發現在UIView移動過程中你要觸發UIView的點擊事件也只能點擊原來的位置(即使它已經運動到了別的位置),因為它的位置從來沒有變過。當然解決這個問題方法比較多,這裡不妨在動畫完成之後重新設置它的位置。
//
//KCMainViewController.m
//Animation
//
//CreatedbyKenshinCuion14-3-22.
//Copyright(c)2014年KenshinCui.Allrightsreserved.
//
#import"KCMainViewController.h"
@interfaceKCMainViewController(){
CALayer*_layer;
}
@end
@implementationKCMainViewController
-(void)viewDidLoad{
[superviewDidLoad];

//設置背景(注意這個圖片其實在根圖層)
UIImage*backgroundImage=[UIImageimageNamed:@"background.jpg"];
self.view.backgroundColor=[UIColorcolorWithPatternImage:backgroundImage];

//自定義一個圖層
_layer=[[CALayeralloc]init];
_layer.bounds=CGRectMake(0,0,10,20);
_layer.position=CGPointMake(50,150);
_layer.contents=(id)[UIImageimageNamed:@"petal.png"].CGImage;
[self.view.layeraddSublayer:_layer];
}
#pragmamark移動動畫
-(void)translatonAnimation:(CGPoint)location{
//1.創建動畫並指定動畫屬性
CABasicAnimation*basicAnimation=[CABasicAnimationanimationWithKeyPath:@"position"];

//2.設置動畫屬性初始值和結束值
//basicAnimation.fromValue=[NSNumbernumberWithInteger:50];//可以不設置,默認為圖層初始狀態
basicAnimation.toValue=[NSValuevalueWithCGPoint:location];

//設置其他動畫屬性
basicAnimation.duration=5.0;//動畫時間5秒
//basicAnimation.repeatCount=HUGE_VALF;//設置重復次數,HUGE_VALF可看做無窮大,起到循環動畫的效果
//basicAnimation.removedOnCompletion=NO;//運行一次是否移除動畫
basicAnimation.delegate=self;
//存儲當前位置在動畫結束後使用
[basicAnimationsetValue:[NSValuevalueWithCGPoint:location]forKey:@"KCBasicAnimationLocation"];

//3.添加動畫到圖層,注意key相當於給動畫進行命名,以後獲得該動畫時可以使用此名稱獲取
[_layeraddAnimation:basicAnimationforKey:@"KCBasicAnimation_Translation"];
}
#pragmamark點擊事件
-(void)touchesBegan:(NSSet*)toucheswithEvent:(UIEvent*)event{
UITouch*touch=touches.anyObject;
CGPointlocation=[touchlocationInView:self.view];
//創建並開始動畫
[selftranslatonAnimation:location];
}
#pragmamark-動畫代理方法
#pragmamark動畫開始
-(void)animationDidStart:(CAAnimation*)anim{
NSLog(@"animation(%@)start.\r_layer.frame=%@",anim,NSStringFromCGRect(_layer.frame));
NSLog(@"%@",[_layeranimationForKey:@"KCBasicAnimation_Translation"]);//通過前面的設置的key獲得動畫
}
#pragmamark動畫結束
-(void)animationDidStop:(CAAnimation*)animfinished:(BOOL)flag{
NSLog(@"animation(%@)stop.\r_layer.frame=%@",anim,NSStringFromCGRect(_layer.frame));
_layer.position=[[animvalueForKey:@"KCBasicAnimationLocation"]CGPointValue];
}
@end
上面通過給動畫設置一個代理去監聽動畫的開始和結束事件,在動畫開始前給動畫添加一個自定義屬性“KCBasicAnimationLocation”存儲動畫終點位置,然後在動畫結束後設置動畫的位置為終點位置。
如果運行上面的代碼大家可能會發現另外一個問題,那就是動畫運行完成後會重新從起始點運動到終點。這個問題產生的原因就是前面提到的,對於非根圖層,設置圖層的可動畫屬性(在動畫結束後重新設置了position,而position是可動畫屬性)會產生動畫效果。解決這個問題有兩種辦法:關閉圖層隱式動畫、設置動畫圖層為根圖層。顯然這裡不能采取後者,因為根圖層當前已經作為動畫的背景。
要關閉隱式動畫需要用到動畫事務CATransaction,在事務內將隱式動畫關閉,例如上面的代碼可以改為:
#pragmamark動畫結束
-(void)animationDidStop:(CAAnimation*)animfinished:(BOOL)flag{
NSLog(@"animation(%@)stop.\r_layer.frame=%@",anim,NSStringFromCGRect(_layer.frame));
//開啟事務
[CATransactionbegin];
//禁用隱式動畫
[CATransactionsetDisableActions:YES];

_layer.position=[[animvalueForKey:@"KCBasicAnimationLocation"]CGPointValue];

//提交事務
[CATransactioncommit];
}
補充
上面通過在animationDidStop中重新設置動畫的位置主要為了說明隱式動畫關閉和動畫事件之間傳參的內容,有朋友發現這種方式有可能在動畫運行完之後出現從原點瞬間回到終點的過程,最早在調試的時候沒有發現這個問題,這裡感謝這位朋友。其實解決這個問題並不難,首先必須設置fromValue,其次在動畫開始前設置動畫position為終點位置(當然也必須關閉隱式動畫)。但是這裡主要還是出於學習的目的,真正開發的時候做平移動畫直接使用隱式動畫即可,沒有必要那麼麻煩。
當然上面的動畫還顯得有些生硬,因為落花飄散的時候可能不僅僅是自由落體運動,本身由於空氣阻力、外界風力還會造成落花在空中的旋轉、搖擺等,這裡不妨給圖層添加一個旋轉的動畫。對於圖層的旋轉前面已經演示過怎麼通過key path設置圖層旋轉的內容了,在這裡需要強調一下,圖層的形變都是基於錨點進行的。例如旋轉,旋轉的中心點就是圖層的錨點。
//
//KCMainViewController.m
//Animation
//
//CreatedbyKenshinCuion14-3-22.
//Copyright(c)2014年KenshinCui.Allrightsreserved.
//

#import"KCMainViewController.h"

@interfaceKCMainViewController(){
CALayer*_layer;
}

@end

@implementationKCMainViewController

-(void)viewDidLoad{
[superviewDidLoad];

//設置背景(注意這個圖片其實在根圖層)
UIImage*backgroundImage=[UIImageimageNamed:@"background.jpg"];
self.view.backgroundColor=[UIColorcolorWithPatternImage:backgroundImage];

//自定義一個圖層
_layer=[[CALayeralloc]init];
_layer.bounds=CGRectMake(0,0,10,20);
_layer.position=CGPointMake(50,150);
_layer.anchorPoint=CGPointMake(0.5,0.6);//設置錨點
_layer.contents=(id)[UIImageimageNamed:@"petal.png"].CGImage;
[self.view.layeraddSublayer:_layer];
}


#pragmamark移動動畫
-(void)translatonAnimation:(CGPoint)location{
//1.創建動畫並指定動畫屬性
CABasicAnimation*basicAnimation=[CABasicAnimationanimationWithKeyPath:@"position"];

//2.設置動畫屬性初始值、結束值
//basicAnimation.fromValue=[NSNumbernumberWithInteger:50];//可以不設置,默認為圖層初始狀態
basicAnimation.toValue=[NSValuevalueWithCGPoint:location];

//設置其他動畫屬性
basicAnimation.duration=5.0;//動畫時間5秒
//basicAnimation.repeatCount=HUGE_VALF;//設置重復次數,HUGE_VALF可看做無窮大,起到循環動畫的效果
//basicAnimation.removedOnCompletion=NO;//運行一次是否移除動畫
basicAnimation.delegate=self;
//存儲當前位置在動畫結束後使用
[basicAnimationsetValue:[NSValuevalueWithCGPoint:location]forKey:@"KCBasicAnimationLocation"];

//3.添加動畫到圖層,注意key相當於給動畫進行命名,以後獲得該圖層時可以使用此名稱獲取
[_layeraddAnimation:basicAnimationforKey:@"KCBasicAnimation_Translation"];
}

#pragmamark旋轉動畫
-(void)rotationAnimation{
//1.創建動畫並指定動畫屬性
CABasicAnimation*basicAnimation=[CABasicAnimationanimationWithKeyPath:@"transform.rotation.z"];

//2.設置動畫屬性初始值、結束值
//basicAnimation.fromValue=[NSNumbernumberWithInt:M_PI_2];
basicAnimation.toValue=[NSNumbernumberWithFloat:M_PI_2*3];

//設置其他動畫屬性
basicAnimation.duration=6.0;
basicAnimation.autoreverses=true;//旋轉後再旋轉到原來的位置


//4.添加動畫到圖層,注意key相當於給動畫進行命名,以後獲得該動畫時可以使用此名稱獲取
[_layeraddAnimation:basicAnimationforKey:@"KCBasicAnimation_Rotation"];
}

#pragmamark點擊事件
-(void)touchesBegan:(NSSet*)toucheswithEvent:(UIEvent*)event{
UITouch*touch=touches.anyObject;
CGPointlocation=[touchlocationInView:self.view];
//創建並開始動畫
[selftranslatonAnimation:location];

[selfrotationAnimation];
}

#pragmamark-動畫代理方法
#pragmamark動畫開始
-(void)animationDidStart:(CAAnimation*)anim{
NSLog(@"animation(%@)start.\r_layer.frame=%@",anim,NSStringFromCGRect(_layer.frame));
NSLog(@"%@",[_layeranimationForKey:@"KCBasicAnimation_Translation"]);//通過前面的設置的key獲得動畫
}

#pragmamark動畫結束
-(void)animationDidStop:(CAAnimation*)animfinished:(BOOL)flag{
NSLog(@"animation(%@)stop.\r_layer.frame=%@",anim,NSStringFromCGRect(_layer.frame));
//開啟事務
[CATransactionbegin];
//禁用隱式動畫
[CATransactionsetDisableActions:YES];

_layer.position=[[animvalueForKey:@"KCBasicAnimationLocation"]CGPointValue];

//提交事務
[CATransactioncommit];
}
@end
上面代碼中結合兩種動畫操作,需要注意的是只給移動動畫設置了代理,在旋轉動畫中並沒有設置代理,否則代理方法會執行兩遍。由於旋轉動畫會無限循環執行(上面設置了重復次數無窮大),並且兩個動畫的執行時間沒有必然的關系,這樣一來移動停止後可能還在旋轉,為了讓移動動畫停止後旋轉動畫,停止就需要使用到動畫的暫停和恢復方法。
核心動畫的運行有一個媒體時間的概念,假設將一個旋轉動畫設置旋轉一周用時60秒的話,那麼當動畫旋轉90度後媒體時間就是15秒。如果此時要將動畫暫停只需要讓媒體時間偏移量設置為15秒即可,並把動畫運行速度設置為0使其停止運動。類似的,如果又過了60秒後需要恢復動畫(此時媒體時間為75秒),這時只要將動畫開始開始時間設置為當前媒體時間75秒減去暫停時的時間(也就是之前定格動畫時的偏移量)15秒(開始時間=75-15=60秒),那麼動畫就會重新計算60秒後的狀態再開始運行,與此同時將偏移量重新設置為0並且把運行速度設置1。這個過程中真正起到暫停動畫和恢復動畫的其實是動畫速度的調整,媒體時間偏移量以及恢復時的開始時間設置主要為了讓動畫更加連貫。
下面的代碼演示了移動動畫結束後旋轉動畫暫停,並且當再次點擊動畫時旋轉恢復的過程(注意在移動過程中如果再次點擊屏幕可以暫停移動和旋轉動畫,再次點擊可以恢復兩種動畫。但是當移動結束後觸發了移動動畫的完成事件如果再次點擊屏幕則只能恢復旋轉動畫,因為此時移動動畫已經結束而不是暫停,無法再恢復)。
//
//KCMainViewController.m
//Animation
//
//CreatedbyKenshinCuion14-3-22.
//Copyright(c)2014年KenshinCui.Allrightsreserved.
//

#import"KCMainViewController.h"

@interfaceKCMainViewController(){
CALayer*_layer;
}

@end

@implementationKCMainViewController
-(void)viewDidLoad{
[superviewDidLoad];

//設置背景(注意這個圖片其實在根圖層)
UIImage*backgroundImage=[UIImageimageNamed:@"background.jpg"];
self.view.backgroundColor=[UIColorcolorWithPatternImage:backgroundImage];

//自定義一個圖層
_layer=[[CALayeralloc]init];
_layer.bounds=CGRectMake(0,0,10,20);
_layer.position=CGPointMake(50,150);
_layer.anchorPoint=CGPointMake(0.5,0.6);//設置錨點
_layer.contents=(id)[UIImageimageNamed:@"petal.png"].CGImage;
[self.view.layeraddSublayer:_layer];
}


#pragmamark移動動畫
-(void)translatonAnimation:(CGPoint)location{
//1.創建動畫並指定動畫屬性
CABasicAnimation*basicAnimation=[CABasicAnimationanimationWithKeyPath:@"position"];

//2.設置動畫屬性初始值、結束值
//basicAnimation.fromValue=[NSNumbernumberWithInteger:50];//可以不設置,默認為圖層初始狀態
basicAnimation.toValue=[NSValuevalueWithCGPoint:location];

//設置其他動畫屬性
basicAnimation.duration=5.0;//動畫時間5秒
//basicAnimation.repeatCount=HUGE_VALF;//設置重復次數,HUGE_VALF可看做無窮大,起到循環動畫的效果
basicAnimation.removedOnCompletion=NO;//運行一次是否移除動畫
basicAnimation.delegate=self;
//存儲當前位置在動畫結束後使用
[basicAnimationsetValue:[NSValuevalueWithCGPoint:location]forKey:@"KCBasicAnimationLocation"];

//3.添加動畫到圖層,注意key相當於給動畫進行命名,以後獲得該圖層時可以使用此名稱獲取
[_layeraddAnimation:basicAnimationforKey:@"KCBasicAnimation_Translation"];
}

#pragmamark旋轉動畫
-(void)rotationAnimation{
//1.創建動畫並指定動畫屬性
CABasicAnimation*basicAnimation=[CABasicAnimationanimationWithKeyPath:@"transform.rotation.z"];

//2.設置動畫屬性初始值、結束值
//basicAnimation.fromValue=[NSNumbernumberWithInt:M_PI_2];
basicAnimation.toValue=[NSNumbernumberWithFloat:M_PI_2*3];

//設置其他動畫屬性
basicAnimation.duration=6.0;
basicAnimation.autoreverses=true;//旋轉後在旋轉到原來的位置
basicAnimation.repeatCount=HUGE_VALF;//設置無限循環
basicAnimation.removedOnCompletion=NO;
//basicAnimation.delegate=self;

//4.添加動畫到圖層,注意key相當於給動畫進行命名,以後獲得該動畫時可以使用此名稱獲取
[_layeraddAnimation:basicAnimationforKey:@"KCBasicAnimation_Rotation"];
}

#pragmamark點擊事件
-(void)touchesBegan:(NSSet*)toucheswithEvent:(UIEvent*)event{
UITouch*touch=touches.anyObject;
CGPointlocation=[touchlocationInView:self.view];
//判斷是否已經常見過動畫,如果已經創建則不再創建動畫
CAAnimation*animation=[_layeranimationForKey:@"KCBasicAnimation_Translation"];
if(animation){
if(_layer.speed==0){
[selfanimationResume];
}else{
[selfanimationPause];
}
}else{
//創建並開始動畫
[selftranslatonAnimation:location];

[selfrotationAnimation];
}
}

#pragmamark動畫暫停
-(void)animationPause{
//取得指定圖層動畫的媒體時間,後面參數用於指定子圖層,這裡不需要
CFTimeIntervalinterval=[_layerconvertTime:CACurrentMediaTime()fromLayer:nil];
//設置時間偏移量,保證暫停時停留在旋轉的位置
[_layersetTimeOffset:interval];
//速度設置為0,暫停動畫
_layer.speed=0;
}

#pragmamark動畫恢復
-(void)animationResume{
//獲得暫停的時間
CFTimeIntervalbeginTime=CACurrentMediaTime()-_layer.timeOffset;
//設置偏移量
_layer.timeOffset=0;
//設置開始時間
_layer.beginTime=beginTime;
//設置動畫速度,開始運動
_layer.speed=1.0;
}

#pragmamark-動畫代理方法
#pragmamark動畫開始
-(void)animationDidStart:(CAAnimation*)anim{
NSLog(@"animation(%@)start.\r_layer.frame=%@",anim,NSStringFromCGRect(_layer.frame));
NSLog(@"%@",[_layeranimationForKey:@"KCBasicAnimation_Translation"]);//通過前面的設置的key獲得動畫
}

#pragmamark動畫結束
-(void)animationDidStop:(CAAnimation*)animfinished:(BOOL)flag{
NSLog(@"animation(%@)stop.\r_layer.frame=%@",anim,NSStringFromCGRect(_layer.frame));

//開啟事務
[CATransactionbegin];
//禁用隱式動畫
[CATransactionsetDisableActions:YES];

_layer.position=[[animvalueForKey:@"KCBasicAnimationLocation"]CGPointValue];

//提交事務
[CATransactioncommit];

//暫停動畫
[selfanimationPause];

}

@end
運行效果

注意:
動畫暫停針對的是圖層而不是圖層中的某個動畫。
要做無限循環的動畫,動畫的removedOnCompletion屬性必須設置為NO,否則運行一次動畫就會銷毀。
關鍵幀動畫
熟悉flash開發的朋友對於關鍵幀動畫應該不陌生,這種動畫方式在flash開發中經常用到。關鍵幀動畫就是在動畫控制過程中開發者指定主要的動畫狀態,至於各個狀態間動畫如何進行則由系統自動運算補充(每兩個關鍵幀之間系統形成的動畫稱為“補間動畫”),這種動畫的好處就是開發者不用逐個控制每個動畫幀,而只要關心幾個關鍵幀的狀態即可。
關鍵幀動畫開發分為兩種形式:一種是通過設置不同的屬性值進行關鍵幀控制,另一種是通過繪制路徑進行關鍵幀控制。後者優先級高於前者,如果設置了路徑則屬性值就不再起作用。
對於前面的落花動畫效果而言其實落花的過程並不自然,很顯然實際生活中它不可能沿著直線下落,這裡我們不妨通過關鍵幀動畫的values屬性控制它在下落過程中的屬性。假設下落過程如圖:

在這裡需要設置四個關鍵幀(如圖中四個關鍵點),具體代碼如下(動畫創建過程同基本動畫基本完全一致):
//
//通過values設置關鍵幀動畫
//Animation
//
//CreatedbyKenshinCuion14-3-22.
//Copyright(c)2014年KenshinCui.Allrightsreserved.
//

#import"KCMainViewController.h"

@interfaceKCMainViewController(){
CALayer*_layer;
}

@end

@implementationKCMainViewController
-(void)viewDidLoad{
[superviewDidLoad];

//設置背景(注意這個圖片其實在根圖層)
UIImage*backgroundImage=[UIImageimageNamed:@"background.jpg"];
self.view.backgroundColor=[UIColorcolorWithPatternImage:backgroundImage];

//自定義一個圖層
_layer=[[CALayeralloc]init];
_layer.bounds=CGRectMake(0,0,10,20);
_layer.position=CGPointMake(50,150);
_layer.contents=(id)[UIImageimageNamed:@"petal.png"].CGImage;
[self.view.layeraddSublayer:_layer];

//創建動畫
[selftranslationAnimation];
}

#pragmamark關鍵幀動畫
-(void)translationAnimation{

//1.創建關鍵幀動畫並設置動畫屬性
CAKeyframeAnimation*keyframeAnimation=[CAKeyframeAnimationanimationWithKeyPath:@"position"];

//2.設置關鍵幀,這裡有四個關鍵幀
NSValue*key1=[NSValuevalueWithCGPoint:_layer.position];//對於關鍵幀動畫初始值不能省略
NSValue*key2=[NSValuevalueWithCGPoint:CGPointMake(80,220)];
NSValue*key3=[NSValuevalueWithCGPoint:CGPointMake(45,300)];
NSValue*key4=[NSValuevalueWithCGPoint:CGPointMake(55,400)];
NSArray*values=@[key1,key2,key3,key4];
keyframeAnimation.values=values;
//設置其他屬性
keyframeAnimation.duration=8.0;
keyframeAnimation.beginTime=CACurrentMediaTime()+2;//設置延遲2秒執行


//3.添加動畫到圖層,添加動畫後就會執行動畫
[_layeraddAnimation:keyframeAnimationforKey:@"KCKeyframeAnimation_Position"];
}

@end
運行效果(注意運行結束沒有設置圖層位置為動畫運動結束位置):
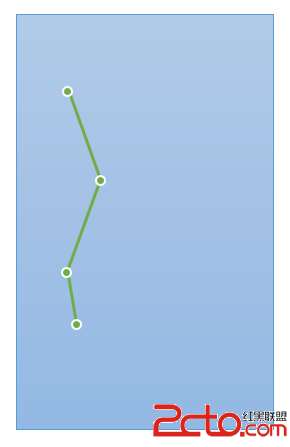
上面的方式固然比前面使用基礎動畫效果要好一些,但其實還是存在問題,那就是落花飛落的路徑是直線的,當然這個直線是根據程序中設置的四個關鍵幀自動形成的,那麼如何讓它沿著曲線飄落呢?這就是第二種類型的關鍵幀動畫,通過描繪路徑進行關鍵幀動畫控制。假設讓落花沿著下面的曲線路徑飄落:
當然,這是一條貝塞爾曲線,學習了前篇文章之後相信對於這類曲線應該並不陌生,下面是具體實現代碼:
//
//通過path設置關鍵幀動畫
//Animation
//
//CreatedbyKenshinCuion14-3-22.
//Copyright(c)2014年KenshinCui.Allrightsreserved.
//

#import"KCMainViewController.h"

@interfaceKCMainViewController(){
CALayer*_layer;
}

@end

@implementationKCMainViewController

-(void)viewDidLoad{
[superviewDidLoad];

//設置背景(注意這個圖片其實在根圖層)
UIImage*backgroundImage=[UIImageimageNamed:@"background.jpg"];
self.view.backgroundColor=[UIColorcolorWithPatternImage:backgroundImage];

//自定義一個圖層
_layer=[[CALayeralloc]init];
_layer.bounds=CGRectMake(0,0,10,20);
_layer.position=CGPointMake(50,150);
_layer.contents=(id)[UIImageimageNamed:@"petal.png"].CGImage;
[self.view.layeraddSublayer:_layer];

//創建動畫
[selftranslationAnimation];
}

#pragmamark關鍵幀動畫
-(void)translationAnimation{
//1.創建關鍵幀動畫並設置動畫屬性
CAKeyframeAnimation*keyframeAnimation=[CAKeyframeAnimationanimationWithKeyPath:@"position"];

//2.設置路徑
//繪制貝塞爾曲線
CGPathRefpath=CGPathCreateMutable();
CGPathMoveToPoint(path,NULL,_layer.position.x,_layer.position.y);//移動到起始點
CGPathAddCurveToPoint(path,NULL,160,280,-30,300,55,400);//繪制二次貝塞爾曲線
keyframeAnimation.path=path;//設置path屬性
CGPathRelease(path);//釋放路徑對象
//設置其他屬性
keyframeAnimation.duration=8.0;
keyframeAnimation.beginTime=CACurrentMediaTime()+5;//設置延遲2秒執行


//3.添加動畫到圖層,添加動畫後就會執行動畫
[_layeraddAnimation:keyframeAnimationforKey:@"KCKeyframeAnimation_Position"];
}
@end
運行效果(注意運行結束沒有設置圖層位置為動畫運動結束位置):

看起來動畫不會那麼生硬了,但是這裡需要注意,對於路徑類型的關鍵幀動畫系統是從描繪路徑的位置開始路徑,直到路徑結束。如果上面的路徑不是貝塞爾曲線而是矩形路徑那麼它會從矩形的左上角開始運行,順時針一周回到左上角;如果指定的路徑是一個橢圓,那麼動畫運行的路徑是從橢圓右側開始(0度)順時針一周回到右側。
補充--其他屬性
在關鍵幀動畫中還有一些動畫屬性初學者往往比較容易混淆,這裡專門針對這些屬性做一下介紹。
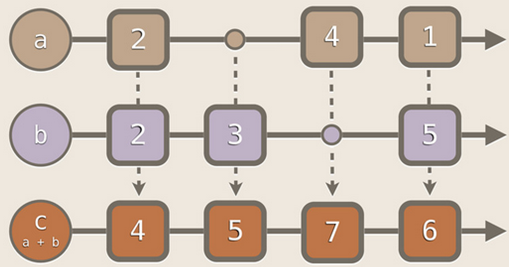
keyTimes:各個關鍵幀的時間控制。前面使用values設置了四個關鍵幀,默認情況下每兩幀之間的間隔為:8/(4-1)秒。如果想要控制動畫從第一幀到第二針占用時間4秒,從第二幀到第三幀時間為2秒,而從第三幀到第四幀時間2秒的話,就可以通過keyTimes進行設置。keyTimes中存儲的是時間占用比例點,此時可以設置keyTimes的值為0.0,0.5,0.75,1.0(當然必須轉換為NSNumber),也就是說1到2幀運行到總時間的50%,2到3幀運行到總時間的75%,3到4幀運行到8秒結束。
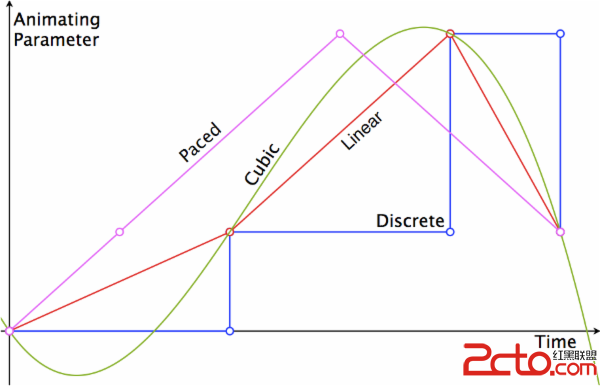
caculationMode:動畫計算模式。還拿上面keyValues動畫舉例,之所以1到2幀能形成連貫性動畫而不是直接從第1幀經過8/3秒到第2幀是因為動畫模式是連續的(值為kCAAnimationLinear,這是計算模式的默認值);而如果指定了動畫模式為kCAAnimationDiscrete離散的那麼你會看到動畫從第1幀經過8/3秒直接到第2幀,中間沒有任何過渡。其他動畫模式還有:kCAAnimationPaced(均勻執行,會忽略keyTimes)、kCAAnimationCubic(平滑執行,對於位置變動關鍵幀動畫運行軌跡更平滑)、kCAAnimationCubicPaced(平滑均勻執行)。
下圖描繪出了幾種動畫模式的關系(橫坐標是運行時間,縱坐標是動畫屬性[例如位置、透明度等]):
動畫組
實際開發中一個物體的運動往往是復合運動,單一屬性的運動情況比較少,但恰恰屬性動畫每次進行動畫設置時一次只能設置一個屬性進行動畫控制(不管是基礎動畫還是關鍵幀動畫都是如此),這樣一來要做一個復合運動的動畫就必須創建多個屬性動畫進行組合。對於一兩種動畫的組合或許處理起來還比較容易,但是對於更多動畫的組合控制往往會變得很麻煩,動畫組的產生就是基於這樣一種情況而產生的。動畫組是一系列動畫的組合,凡是添加到動畫組中的動畫都受控於動畫組,這樣一來各類動畫公共的行為就可以統一進行控制而不必單獨設置,而且放到動畫組中的各個動畫可以並發執行,共同構建出復雜的動畫效果。
動畫組使用起來並不復雜,首先單獨創建單個動畫(可以是基礎動畫也可以是關鍵幀動畫),然後將基礎動畫添加到動畫組,最後將動畫組添加到圖層即可。
前面關鍵幀動畫部分,路徑動畫看起來效果雖然很流暢,但是落花本身的旋轉運動沒有了,這裡不妨將基礎動畫部分的旋轉動畫和路徑關鍵幀動畫進行組合使得整個動畫看起來更加的和諧、順暢。
//
//動畫組
//Animation
//
//CreatedbyKenshinCuion14-3-22.
//Copyright(c)2014年KenshinCui.Allrightsreserved.
//

#import"KCMainViewController.h"

@interfaceKCMainViewController(){

CALayer*_layer;
}

@end

@implementationKCMainViewController
-(void)viewDidLoad{
[superviewDidLoad];

//設置背景(注意這個圖片其實在根圖層)
UIImage*backgroundImage=[UIImageimageNamed:@"background.jpg"];
self.view.backgroundColor=[UIColorcolorWithPatternImage:backgroundImage];

//自定義一個圖層
_layer=[[CALayeralloc]init];
_layer.bounds=CGRectMake(0,0,10,20);
_layer.position=CGPointMake(50,150);
_layer.contents=(id)[UIImageimageNamed:@"petal.png"].CGImage;
[self.view.layeraddSublayer:_layer];

//創建動畫
[selfgroupAnimation];
}

#pragmamark基礎旋轉動畫
-(CABasicAnimation*)rotationAnimation{

CABasicAnimation*basicAnimation=[CABasicAnimationanimationWithKeyPath:@"transform.rotation.z"];

CGFloattoValue=M_PI_2*3;

basicAnimation.toValue=[NSNumbernumberWithFloat:M_PI_2*3];
//basicAnimation.duration=6.0;
basicAnimation.autoreverses=true;
basicAnimation.repeatCount=HUGE_VALF;
basicAnimation.removedOnCompletion=NO;

[basicAnimationsetValue:[NSNumbernumberWithFloat:toValue]forKey:@"KCBasicAnimationProperty_ToValue"];

returnbasicAnimation;
}

#pragmamark關鍵幀移動動畫
-(CAKeyframeAnimation*)translationAnimation{
CAKeyframeAnimation*keyframeAnimation=[CAKeyframeAnimationanimationWithKeyPath:@"position"];

CGPointendPoint=CGPointMake(55,400);
CGPathRefpath=CGPathCreateMutable();
CGPathMoveToPoint(path,NULL,_layer.position.x,_layer.position.y);
CGPathAddCurveToPoint(path,NULL,160,280,-30,300,endPoint.x,endPoint.y);

keyframeAnimation.path=path;
CGPathRelease(path);

[keyframeAnimationsetValue:[NSValuevalueWithCGPoint:endPoint]forKey:@"KCKeyframeAnimationProperty_EndPosition"];

returnkeyframeAnimation;
}

#pragmamark創建動畫組
-(void)groupAnimation{

//1.創建動畫組
CAAnimationGroup*animationGroup=[CAAnimationGroupanimation];

//2.設置組中的動畫和其他屬性
CABasicAnimation*basicAnimation=[selfrotationAnimation];
CAKeyframeAnimation*keyframeAnimation=[selftranslationAnimation];
animationGroup.animations=@[basicAnimation,keyframeAnimation];

animationGroup.delegate=self;
animationGroup.duration=10.0;//設置動畫時間,如果動畫組中動畫已經設置過動畫屬性則不再生效
animationGroup.beginTime=CACurrentMediaTime()+5;//延遲五秒執行

//3.給圖層添加動畫
[_layeraddAnimation:animationGroupforKey:nil];
}

#pragmamark-代理方法
#pragmamark動畫完成
-(void)animationDidStop:(CAAnimation*)animfinished:(BOOL)flag{
CAAnimationGroup*animationGroup=(CAAnimationGroup*)anim;
CABasicAnimation*basicAnimation=animationGroup.animations[0];
CAKeyframeAnimation*keyframeAnimation=animationGroup.animations[1];
CGFloattoValue=[[basicAnimationvalueForKey:@"KCBasicAnimationProperty_ToValue"]floatValue];
CGPointendPoint=[[keyframeAnimationvalueForKey:@"KCKeyframeAnimationProperty_EndPosition"]CGPointValue];

[CATransactionbegin];
[CATransactionsetDisableActions:YES];

//設置動畫最終狀態
_layer.position=endPoint;
_layer.transform=CATransform3DMakeRotation(toValue,0,0,1);

[CATransactioncommit];
}

@end
運行效果

轉場動畫
轉場動畫就是從一個場景以動畫的形式過渡到另一個場景。轉場動畫的使用一般分為以下幾個步驟:
1.創建轉場動畫
2.設置轉場類型、子類型(可選)及其他屬性
3.設置轉場後的新視圖並添加動畫到圖層
下表列出了常用的轉場類型(注意私有API是蘋果官方沒有公開的動畫類型,但是目前通過仍然可以使用):
另外對於支持方向設置的動畫類型還包含子類型:
在前面的文章“iOS開發系列--無限循環的圖片浏覽器”中為了使用UIScrollView做無限循環圖片浏覽器花費了不少時間在性能優化上面,這裡使用轉場動畫利用一個UIImageView實現一個漂亮的無限循環圖片浏覽器。
//
//KCMainViewController.m
//TransitionAnimation
//
//CreatedbyKenshinCuion14-3-12.
//Copyright(c)2014年KenshinCui.Allrightsreserved.
//

#import"KCMainViewController.h"
#defineIMAGE_COUNT5
@interfaceKCMainViewController(){
UIImageView*_imageView;
int_currentIndex;
}

@end

@implementationKCMainViewController

-(void)viewDidLoad{
[superviewDidLoad];

//定義圖片控件
_imageView=[[UIImageViewalloc]init];
_imageView.frame=[UIScreenmainScreen].applicationFrame;
_imageView.contentMode=UIViewContentModeScaleAspectFit;
_imageView.image=[UIImageimageNamed:@"0.jpg"];//默認圖片
[self.viewaddSubview:_imageView];
//添加手勢
UISwipeGestureRecognizer*leftSwipeGesture=[[UISwipeGestureRecognizeralloc]initWithTarget:selfaction:@selector(leftSwipe:)];
leftSwipeGesture.direction=UISwipeGestureRecognizerDirectionLeft;
[self.viewaddGestureRecognizer:leftSwipeGesture];

UISwipeGestureRecognizer*rightSwipeGesture=[[UISwipeGestureRecognizeralloc]initWithTarget:selfaction:@selector(rightSwipe:)];
rightSwipeGesture.direction=UISwipeGestureRecognizerDirectionRight;
[self.viewaddGestureRecognizer:rightSwipeGesture];
}

#pragmamark向左滑動浏覽下一張圖片
-(void)leftSwipe:(UISwipeGestureRecognizer*)gesture{
[selftransitionAnimation:YES];
}

#pragmamark向右滑動浏覽上一張圖片
-(void)rightSwipe:(UISwipeGestureRecognizer*)gesture{
[selftransitionAnimation:NO];
}

#pragmamark轉場動畫
-(void)transitionAnimation:(BOOL)isNext{
//1.創建轉場動畫對象
CATransition*transition=[[CATransitionalloc]init];

//2.設置動畫類型,注意對於蘋果官方沒公開的動畫類型只能使用字符串,並沒有對應的常量定義
transition.type=@"cube";

//設置子類型
if(isNext){
transition.subtype=kCATransitionFromRight;
}else{
transition.subtype=kCATransitionFromLeft;
}
//設置動畫時常
transition.duration=1.0f;

//3.設置轉場後的新視圖添加轉場動畫
_imageView.image=[selfgetImage:isNext];
[_imageView.layeraddAnimation:transitionforKey:@"KCTransitionAnimation"];
}

#pragmamark取得當前圖片
-(UIImage*)getImage:(BOOL)isNext{
if(isNext){
_currentIndex=(_currentIndex+1)%IMAGE_COUNT;
}else{
_currentIndex=(_currentIndex-1+IMAGE_COUNT)%IMAGE_COUNT;
}
NSString*imageName=[NSStringstringWithFormat:@"%i.jpg",_currentIndex];
return[UIImageimageNamed:imageName];
}
@end
運行效果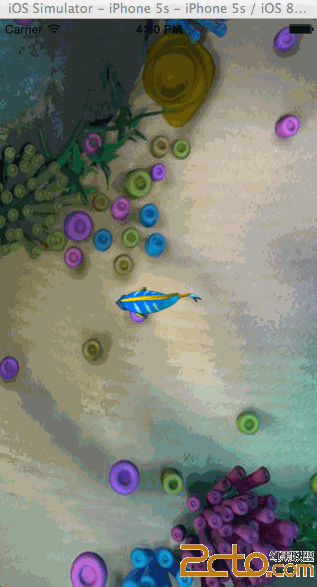
代碼十分簡單,但是效果和性能卻很驚人。當然演示代碼有限,其他動畫類型大家可以自己實現,效果都很絢麗。
逐幀動畫
前面介紹了核心動畫中大部分動畫類型,但是做過動畫處理的朋友都知道,在動畫制作中還有一種動畫類型“逐幀動畫”。說到逐幀動畫相信很多朋友第一個想到的就是UIImageView,通過設置UIImageView的animationImages屬性,然後調用它的startAnimating方法去播放這組圖片。當然這種方法在某些場景下是可以達到逐幀的動畫效果,但是它也存在著很大的性能問題,並且這種方法一旦設置完圖片中間的過程就無法控制了。當然,也許有朋友會想到利用iOS的定時器NSTimer定時更新圖片來達到逐幀動畫的效果。這種方式確實可以解決UIImageView一次性加載大量圖片的問題,而且讓播放過程可控,唯一的缺點就是定時器方法調用有時可能會因為當前系統執行某種比較占用時間的任務造成動畫連續性出現問題。
雖然在核心動畫沒有直接提供逐幀動畫類型,但是卻提供了用於完成逐幀動畫的相關對象CADisplayLink。CADisplayLink是一個計時器,但是同NSTimer不同的是,CADisplayLink的刷新周期同屏幕完全一致。例如在iOS中屏幕刷新周期是60次/秒,CADisplayLink刷新周期同屏幕刷新一致也是60次/秒,這樣一來使用它完成的逐幀動畫(又稱為“時鐘動畫”)完全感覺不到動畫的停滯情況。
在iOS開篇“IOS開發系列--IOS程序開發概覽”中就曾說過:iOS程序在運行後就進入一個消息循環中(這個消息循環稱為“主運行循環”),整個程序相當於進入一個死循環中,始終等待用戶輸入。將CADisplayLink加入到主運行循環隊列後,它的時鐘周期就和主運行循環保持一致,而主運行循環周期就是屏幕刷新周期。在CADisplayLink加入到主運行循環隊列後就會循環調用目標方法,在這個方法中更新視圖內容就可以完成逐幀動畫。
當然這裡不得不強調的是逐幀動畫性能勢必較低,但是對於一些事物的運動又不得不選擇使用逐幀動畫,例如人的運動,這是一個高度復雜的運動,基本動畫、關鍵幀動畫是不可能解決的。所大家一定要注意在循環方法中盡可能的降低算法復雜度,同時保證循環過程中內存峰值盡可能低。下面以一個魚的運動為例為大家演示一下逐幀動畫。
//
//KCMainViewController.m
//DisplayLink
//
//CreatedbyKenshinCuion14-3-22.
//Copyright(c)2014年KenshinCui.Allrightsreserved.
//

#import"KCMainViewController.h"
#defineIMAGE_COUNT10

@interfaceKCMainViewController(){
CALayer*_layer;
int_index;
NSMutableArray*_images;
}

@end

@implementationKCMainViewController
-(void)viewDidLoad{
[superviewDidLoad];

//設置背景
self.view.layer.contents=(id)[UIImageimageNamed:@"bg.png"].CGImage;

//創建圖像顯示圖層
_layer=[[CALayeralloc]init];
_layer.bounds=CGRectMake(0,0,87,32);
_layer.position=CGPointMake(160,284);
[self.view.layeraddSublayer:_layer];

//由於魚的圖片在循環中會不斷創建,而10張魚的照片相對都很小
//與其在循環中不斷創建UIImage不如直接將10張圖片緩存起來
_images=[NSMutableArrayarray];
for(inti=0;i<10;++i){
NSString*imageName=[NSStringstringWithFormat:@"fish%i.png",i];
UIImage*image=[UIImageimageNamed:imageName];
[_imagesaddObject:image];
}

//定義時鐘對象
CADisplayLink*displayLink=[CADisplayLinkdisplayLinkWithTarget:selfselector:@selector(step)];
//添加時鐘對象到主運行循環
[displayLinkaddToRunLoop:[NSRunLoopmainRunLoop]forMode:NSDefaultRunLoopMode];
}

#pragmamark每次屏幕刷新就會執行一次此方法(每秒接近60次)
-(void)step{
//定義一個變量記錄執行次數
staticints=0;
//每秒執行6次
if(++s==0){
UIImage*image=_images[_index];
_layer.contents=(id)image.CGImage;//更新圖片
_index=(_index+1)%IMAGE_COUNT;
}
}
@end
運行效果
注意:上面僅僅演示了逐幀動畫的過程,事實上結合其他動畫類型可以讓整條魚游動起來,這裡不再贅述。
UIView動畫封裝
有了前面核心動畫的知識,相信大家開發出一般的動畫效果應該不在話下。在核心動畫開篇也給大家說過,其實UIView本身對於基本動畫和關鍵幀動畫、轉場動畫都有相應的封裝,在對動畫細節沒有特殊要求的情況下使用起來也要簡單的多。可以說在日常開發中90%以上的情況使用UIView的動畫封裝方法都可以搞定,因此在熟悉了核心動畫的原理之後還是有必要給大家簡單介紹一下UIView中各類動畫使用方法的。由於前面核心動畫內容已經進行過詳細介紹,學習UIView的封裝方法根本是小菜一碟,這裡對於一些細節就不再贅述了。
基礎動畫
基礎動畫部分和前面的基礎動畫演示相對應,演示點擊屏幕落葉飄落到鼠標點擊位置的過程。注意根據前面介紹的隱式動畫知識其實非根圖層直接設置終點位置不需要使用UIView的動畫方法也可以實現動畫效果,因此這裡落花不再放到圖層中而是放到了一個UIImageView中。
下面的代碼演示了通過block和靜態方法實現動畫控制的過程:
//
//UIView實現基礎動畫
//Animation
//
//CreatedbyKenshinCuion14-3-22.
//Copyright(c)2014年KenshinCui.Allrightsreserved.
//

#import"KCMainViewController.h"

@interfaceKCMainViewController(){
UIImageView*_imageView;
}

@end

@implementationKCMainViewController
-(void)viewDidLoad{
[superviewDidLoad];

//設置背景
UIImage*backgroundImage=[UIImageimageNamed:@"background.jpg"];
self.view.backgroundColor=[UIColorcolorWithPatternImage:backgroundImage];

//創建圖像顯示控件
_imageView=[[UIImageViewalloc]initWithImage:[UIImageimageNamed:@"petal.png"]];
_imageView.center=CGPointMake(50,150);
[self.viewaddSubview:_imageView];
}

#pragmamark點擊事件
-(void)touchesBegan:(NSSet*)toucheswithEvent:(UIEvent*)event{
UITouch*touch=touches.anyObject;
CGPointlocation=[touchlocationInView:self.view];
//方法1:block方式
/*開始動畫,UIView的動畫方法執行完後動畫會停留在重點位置,而不需要進行任何特殊處理
duration:執行時間
delay:延遲時間
options:動畫設置,例如自動恢復、勻速運動等
completion:動畫完成回調方法
*/
//[UIViewanimateWithDuration:5.0delay:0options:UIViewAnimationOptionCurveLinearanimations:^{
//_imageView.center=location;
//}completion:^(BOOLfinished){
//NSLog(@"Animationend.");
//}];

//方法2:靜態方法
//開始動畫
[UIViewbeginAnimations:@"KCBasicAnimation"context:nil];
[UIViewsetAnimationDuration:5.0];
//[UIViewsetAnimationDelay:1.0];//設置延遲
//[UIViewsetAnimationRepeatAutoreverses:NO];//是否回復
//[UIViewsetAnimationRepeatCount:10];//重復次數
//[UIViewsetAnimationStartDate:(NSDate*)];//設置動畫開始運行的時間
//[UIViewsetAnimationDelegate:self];//設置代理
//[UIViewsetAnimationWillStartSelector:(SEL)];//設置動畫開始運動的執行方法
//[UIViewsetAnimationDidStopSelector:(SEL)];//設置動畫運行結束後的執行方法

_imageView.center=location;


//開始動畫
[UIViewcommitAnimations];
}
@end
補充--彈簧動畫效果
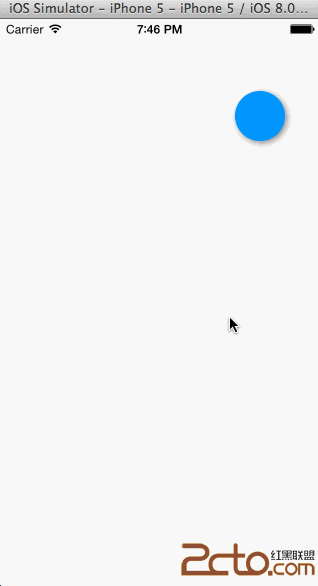
由於在iOS開發中彈性動畫使用很普遍,所以在iOS7蘋果官方直接提供了一個方法用於彈性動畫開發,下面簡單的演示一下:
//
//UIView實現基礎動畫--彈性動畫
//Animation
//
//CreatedbyKenshinCuion14-3-22.
//Copyright(c)2014年KenshinCui.Allrightsreserved.
//

#import"KCMainViewController.h"

@interfaceKCMainViewController(){

UIImageView*_imageView;
}

@end

@implementationKCMainViewController

-(void)viewDidLoad{
[superviewDidLoad];

//創建圖像顯示控件
_imageView=[[UIImageViewalloc]initWithImage:[UIImageimageNamed:@"ball.png"]];
_imageView.center=CGPointMake(160,50);
[self.viewaddSubview:_imageView];
}

#pragmamark點擊事件
-(void)touchesBegan:(NSSet*)toucheswithEvent:(UIEvent*)event{
UITouch*touch=touches.anyObject;
CGPointlocation=[touchlocationInView:self.view];
/*創建彈性動畫
damping:阻尼,范圍0-1,阻尼越接近於0,彈性效果越明顯
velocity:彈性復位的速度
*/
[UIViewanimateWithDuration:5.0delay:0usingSpringWithDamping:0.1initialSpringVelocity:1.0options:UIViewAnimationOptionCurveLinearanimations:^{
_imageView.center=location;//CGPointMake(160,284);
}completion:nil];
}
@end
運行效果

補充--動畫設置參數
在動畫方法中有一個option參數,UIViewAnimationOptions類型,它是一個枚舉類型,動畫參數分為三類,可以組合使用:
1.常規動畫屬性設置(可以同時選擇多個進行設置)
-
UIViewAnimationOptionLayoutSubviews:動畫過程中保證子視圖跟隨運動。
-
UIViewAnimationOptionAllowUserInteraction:動畫過程中允許用戶交互。
-
UIViewAnimationOptionBeginFromCurrentState:所有視圖從當前狀態開始運行。
-
UIViewAnimationOptionRepeat:重復運行動畫。
-
UIViewAnimationOptionAutoreverse :動畫運行到結束點後仍然以動畫方式回到初始點。
-
UIViewAnimationOptionOverrideInheritedDuration:忽略嵌套動畫時間設置。
-
UIViewAnimationOptionOverrideInheritedCurve:忽略嵌套動畫速度設置。
-
UIViewAnimationOptionAllowAnimatedContent:動畫過程中重繪視圖(注意僅僅適用於轉場動畫)。
-
UIViewAnimationOptionShowHideTransitionViews:視圖切換時直接隱藏舊視圖、顯示新視圖,而不是將舊視圖從父視圖移除(僅僅適用於轉場動畫)
-
UIViewAnimationOptionOverrideInheritedOptions :不繼承父動畫設置或動畫類型。
2.動畫速度控制(可從其中選擇一個設置)
-
UIViewAnimationOptionCurveEaseInOut:動畫先緩慢,然後逐漸加速。
-
UIViewAnimationOptionCurveEaseIn :動畫逐漸變慢。
-
UIViewAnimationOptionCurveEaseOut:動畫逐漸加速。
-
UIViewAnimationOptionCurveLinear :動畫勻速執行,默認值。
3.轉場類型(僅適用於轉場動畫設置,可以從中選擇一個進行設置,基本動畫、關鍵幀動畫不需要設置)
-
UIViewAnimationOptionTransitionNone:沒有轉場動畫效果。
-
UIViewAnimationOptionTransitionFlipFromLeft :從左側翻轉效果。
-
UIViewAnimationOptionTransitionFlipFromRight:從右側翻轉效果。
-
UIViewAnimationOptionTransitionCurlUp:向後翻頁的動畫過渡效果。
-
UIViewAnimationOptionTransitionCurlDown :向前翻頁的動畫過渡效果。
-
UIViewAnimationOptionTransitionCrossDissolve:舊視圖溶解消失顯示下一個新視圖的效果。
-
UIViewAnimationOptionTransitionFlipFromTop :從上方翻轉效果。
-
UIViewAnimationOptionTransitionFlipFromBottom:從底部翻轉效果。
關鍵幀動畫
從iOS7開始UIView動畫中封裝了關鍵幀動畫,下面就來看一下如何使用UIView封裝方法進行關鍵幀動畫控制,這裡實現前面關鍵幀動畫部分對於落花的控制。
//
//UIView關鍵幀動畫
//UIViewAnimation
//
//CreatedbyKenshinCuion14-3-22.
//Copyright(c)2014年KenshinCui.Allrightsreserved.
//

#import"KCMainViewController.h"

@interfaceKCMainViewController(){
UIImageView*_imageView;
}

@end

@implementationKCMainViewController

-(void)viewDidLoad{
[superviewDidLoad];

//設置背景
UIImage*backgroundImage=[UIImageimageNamed:@"background.jpg"];
self.view.backgroundColor=[UIColorcolorWithPatternImage:backgroundImage];

//創建圖像顯示控件
_imageView=[[UIImageViewalloc]initWithImage:[UIImageimageNamed:@"petal.png"]];
_imageView.center=CGPointMake(50,150);
[self.viewaddSubview:_imageView];
}
-(void)touchesBegan:(NSSet*)toucheswithEvent:(UIEvent*)event{
//UITouch*touch=touches.anyObject;
//CGPointlocation=[touchlocationInView:self.view];

/*關鍵幀動畫
options:
*/
[UIViewanimateKeyframesWithDuration:5.0delay:0options:UIViewAnimationOptionCurveLinear|UIViewAnimationOptionCurveLinearanimations:^{
//第二個關鍵幀(准確的說第一個關鍵幀是開始位置):從0秒開始持續50%的時間,也就是5.0*0.5=2.5秒
[UIViewaddKeyframeWithRelativeStartTime:0.0relativeDuration:0.5animations:^{
_imageView.center=CGPointMake(80.0,220.0);
}];
//第三個關鍵幀,從0.5*5.0秒開始,持續5.0*0.25=1.25秒
[UIViewaddKeyframeWithRelativeStartTime:0.5relativeDuration:0.25animations:^{
_imageView.center=CGPointMake(45.0,300.0);
}];
//第四個關鍵幀:從0.75*5.0秒開始,持所需5.0*0.25=1.25秒
[UIViewaddKeyframeWithRelativeStartTime:0.75relativeDuration:0.25animations:^{
_imageView.center=CGPointMake(55.0,400.0);
}];

}completion:^(BOOLfinished){
NSLog(@"Animationend.");
}];
}
@end
補充--動畫設置參數
對於關鍵幀動畫也有一些動畫參數設置options,UIViewKeyframeAnimationOptions類型,和上面基本動畫參數設置有些差別,關鍵幀動畫設置參數分為兩類,可以組合使用:
1.常規動畫屬性設置(可以同時選擇多個進行設置)
-
UIViewAnimationOptionLayoutSubviews:動畫過程中保證子視圖跟隨運動。
-
UIViewAnimationOptionAllowUserInteraction:動畫過程中允許用戶交互。
-
UIViewAnimationOptionBeginFromCurrentState:所有視圖從當前狀態開始運行。
-
UIViewAnimationOptionRepeat:重復運行動畫。
-
UIViewAnimationOptionAutoreverse :動畫運行到結束點後仍然以動畫方式回到初始點。
-
UIViewAnimationOptionOverrideInheritedDuration:忽略嵌套動畫時間設置。
-
UIViewAnimationOptionOverrideInheritedOptions :不繼承父動畫設置或動畫類型。
2.動畫模式設置(同前面關鍵幀動畫動畫模式一一對應,可以從其中選擇一個進行設置)
-
UIViewKeyframeAnimationOptionCalculationModeLinear:連續運算模式。
-
UIViewKeyframeAnimationOptionCalculationModeDiscrete :離散運算模式。
-
UIViewKeyframeAnimationOptionCalculationModePaced:均勻執行運算模式。
-
UIViewKeyframeAnimationOptionCalculationModeCubic:平滑運算模式。
-
UIViewKeyframeAnimationOptionCalculationModeCubicPaced:平滑均勻運算模式。
注意:前面說過關鍵幀動畫有兩種形式,上面演示的是屬性值關鍵幀動畫,路徑關鍵幀動畫目前UIView還不支持。
轉場動畫
從iOS4.0開始,UIView直接封裝了轉場動畫,使用起來同樣很簡單。
//
//UIView轉場動畫
//TransitionAnimation
//
//CreatedbyKenshinCuion14-3-12.
//Copyright(c)2014年KenshinCui.Allrightsreserved.
//

#import"KCMainViewController.h"
#defineIMAGE_COUNT5

@interfaceKCMainViewController(){
UIImageView*_imageView;
int_currentIndex;
}

@end

@implementationKCMainViewController

-(void)viewDidLoad{
[superviewDidLoad];

//定義圖片控件
_imageView=[[UIImageViewalloc]init];
_imageView.frame=[UIScreenmainScreen].applicationFrame;
_imageView.contentMode=UIViewContentModeScaleAspectFit;
_imageView.image=[UIImageimageNamed:@"0.jpg"];//默認圖片
[self.viewaddSubview:_imageView];
//添加手勢
UISwipeGestureRecognizer*leftSwipeGesture=[[UISwipeGestureRecognizeralloc]initWithTarget:selfaction:@selector(leftSwipe:)];
leftSwipeGesture.direction=UISwipeGestureRecognizerDirectionLeft;
[self.viewaddGestureRecognizer:leftSwipeGesture];

UISwipeGestureRecognizer*rightSwipeGesture=[[UISwipeGestureRecognizeralloc]initWithTarget:selfaction:@selector(rightSwipe:)];
rightSwipeGesture.direction=UISwipeGestureRecognizerDirectionRight;
[self.viewaddGestureRecognizer:rightSwipeGesture];
}
#pragmamark向左滑動浏覽下一張圖片
-(void)leftSwipe:(UISwipeGestureRecognizer*)gesture{
[selftransitionAnimation:YES];
}

#pragmamark向右滑動浏覽上一張圖片
-(void)rightSwipe:(UISwipeGestureRecognizer*)gesture{
[selftransitionAnimation:NO];
}

#pragmamark轉場動畫
-(void)transitionAnimation:(BOOL)isNext{
UIViewAnimationOptionsoption;
if(isNext){
option=UIViewAnimationOptionCurveLinear|UIViewAnimationOptionTransitionFlipFromRight;
}else{
option=UIViewAnimationOptionCurveLinear|UIViewAnimationOptionTransitionFlipFromLeft;
}

[UIViewtransitionWithView:_imageViewduration:1.0options:optionanimations:^{
_imageView.image=[selfgetImage:isNext];
}completion:nil];
}

#pragmamark取得當前圖片
-(UIImage*)getImage:(BOOL)isNext{
if(isNext){
_currentIndex=(_currentIndex+1)%IMAGE_COUNT;
}else{
_currentIndex=(_currentIndex-1+IMAGE_COUNT)%IMAGE_COUNT;
}
NSString*imageName=[NSStringstringWithFormat:@"%i.jpg",_currentIndex];
return[UIImageimageNamed:imageName];
}
@end
上面的轉場動畫演示中,其實僅僅有一個視圖UIImageView做轉場動畫,每次轉場通過切換UIImageView的內容而已。如果有兩個完全不同的視圖,並且每個視圖布局都很復雜,此時要在這兩個視圖之間進行轉場可以使用+ (void)transitionFromView:(UIView *)fromView toView:(UIView *)toView duration:(NSTimeInterval)duration options:(UIViewAnimationOptions)options completion:(void (^)(BOOL finished))completion NS_AVAILABLE_IOS(4_0)方法進行兩個視圖間的轉場,需要注意的是默認情況下轉出的視圖會從父視圖移除,轉入後重新添加,可以通過UIViewAnimationOptionShowHideTransitionViews參數設置,設置此參數後轉出的視圖會隱藏(不會移除)轉入後再顯示。
注意:轉場動畫設置參數完全同基本動畫參數設置;同直接使用轉場動畫不同的是使用UIView的裝飾方法進行轉場動畫其動畫效果較少,因為這裡無法直接使用私有API。
-
-
-
-
-
- 上一頁:iOS9官方文檔
- 下一頁:iOS runtime運行時詳解