iOS百度地圖-BMK標注&覆蓋物
在iOS開發中,地圖算是一個比較重要的模塊。我們常用的地圖有高德地圖,百度地圖,谷歌地圖,對於中國而言,蘋果公司已經不再使用谷歌地圖,官方使用的是高德地圖。下面將講述一下百度地圖開發過程中的一些小的知識點。
對於如何配置百度地圖的開發環境,在此不再講述,具體可以參考:http://developer.baidu.com/map/index.php?title=iossdk/guide/buildproject
百度地圖iOS的API下載地址:http://developer.baidu.com/map/index.php?title=iossdk/sdkiosdev-download
關於百度地圖的基本使用,我們可以參考百度地圖的開發文檔,在此主要總結一下開發文檔中一些重要的知識點和延伸點。(地圖版本IOS SDK 2.9.0)
首先說明一下百度地圖開發中可能遇到的問題:
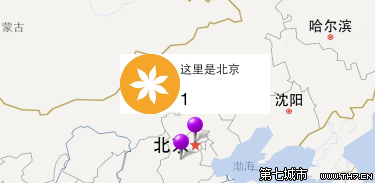
如何添加標注(系統標注和自定義標注)
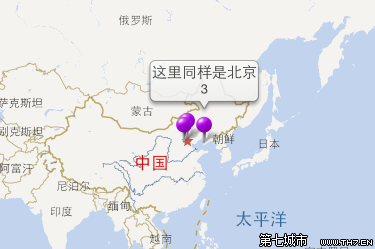

1 //添加標記 2 -(void)viewDidAppear:(BOOL)animated 3 { 4 /* 5 for (int i = 0; i < 3; i++) { 6 BMKPointAnnotation* annotation = [[BMKPointAnnotation alloc]init]; 7 CLLocationCoordinate2D coor; 8 coor.latitude = 39.915 + i*2; 9 coor.longitude = 116.404 + i*2;10 annotation.coordinate = coor;11 annotation.title = @"這裡是北京";12 [myMapView addAnnotation:annotation];13 }14 */15 BMKPointAnnotation* annotation = [[BMKPointAnnotation alloc]init];16 CLLocationCoordinate2D coor;17 coor.latitude = 39.915;18 coor.longitude = 116.404;19 annotation.coordinate = coor;20 annotation.title = @"這裡是北京";21 annotation.subtitle = @"1";22 //[myMapView addAnnotation:annotation];23 24 BMKPointAnnotation* annotation1 = [[BMKPointAnnotation alloc]init];25 CLLocationCoordinate2D coor1;26 coor1.latitude = 38.915;27 coor1.longitude = 113.404 + 2;28 annotation1.coordinate = coor1;29 annotation1.title = @"這裡也是北京";30 annotation1.subtitle = @"2";31 //[myMapView addAnnotation:annotation1];32 33 BMKPointAnnotation* annotation2 = [[BMKPointAnnotation alloc]init];34 CLLocationCoordinate2D coor2;35 coor2.latitude = 38.915;36 coor2.longitude = 119.404 + 2;37 annotation2.coordinate = coor2;38 annotation2.title = @"這裡同樣是北京";39 annotation2.subtitle = @"3";40 //[myMapView addAnnotation:annotation2];41 42 NSArray *arr = [NSArray arrayWithObjects:annotation,annotation1,annotation2, nil];43 [myMapView addAnnotations:arr];44 }45 46 -(BMKAnnotationView *)mapView:(BMKMapView *)mapView viewForAnnotation:(id)annotation47 {48 if ([annotation isKindOfClass:[BMKPointAnnotation class]])49 {50 BMKPinAnnotationView *newAnnotationView = (BMKPinAnnotationView *)[mapView dequeueReusableAnnotationViewWithIdentifier:@"AnnotationView"];51 newAnnotationView = [[BMKPinAnnotationView alloc] initWithAnnotation:annotation reuseIdentifier:@"AnnotationView"];52 newAnnotationView.pinColor = BMKPinAnnotationColorPurple;53 newAnnotationView.animatesDrop = YES;// 設置該標注點動畫顯示54 return newAnnotationView;55 }56 return nil;57 }
系統標記如何自定義大頭針
自定義大頭針就是改變大頭針的樣式,如你想使用自己的圖片代替上面顯示的樣式,代碼實現跟上面的代碼基本一樣。只是在上面代理實現的代碼中加入下面的代碼即可。1newAnnotationView.image = [UIImage imageNamed:@"2"];(圖片顯示的大小,可以通過newAnnotationView的frame設定)如何修改氣泡樣式在氣泡上默認是可以顯示兩行信息,一個title,一個subtitle,在此僅修改氣泡的樣式,如邊框大小,字體,等基本信息,沒有改變總體布局。
1 -(BMKAnnotationView *)mapView:(BMKMapView *)mapView viewForAnnotation:(id簡單定義氣泡樣式)annotation 2 { 3 if ([annotation isKindOfClass:[BMKPointAnnotation class]]) 4 { 5 BMKPinAnnotationView *newAnnotationView = (BMKPinAnnotationView *)[mapView dequeueReusableAnnotationViewWithIdentifier:@"AnnotationView"]; 6 newAnnotationView = [[BMKPinAnnotationView alloc] initWithAnnotation:annotation reuseIdentifier:@"AnnotationView"]; 7 newAnnotationView.pinColor = BMKPinAnnotationColorPurple; 8 newAnnotationView.animatesDrop = YES;// 設置該標注點動畫顯示 9 10 UIView *view = [[UIView alloc]init];11 view.frame = CGRectMake(0, 0, 100, 60);12 view.backgroundColor = [UIColor greenColor];13 [view.layer setMasksToBounds:YES];14 [view.layer setCornerRadius:3];15 view.alpha = 0.9;16 17 UILabel *label1 = [[UILabel alloc]init];18 label1.frame = CGRectMake(0, 0, 100, 30);19 label1.text = annotation.title;20 label1.numberOfLines = 0;21 label1.font = [UIFont systemFontOfSize:12];22 label1.textColor = [UIColor blackColor];23 [view addSubview:label1];24 25 UILabel *label2 = [[UILabel alloc]init];26 label2.frame = CGRectMake(0, 30, 100, 30);27 label2.text = annotation.subtitle;28 label2.numberOfLines = 0;29 label2.font = [UIFont systemFontOfSize:10];30 label2.textColor = [UIColor lightGrayColor];31 [view addSubview:label2];32 33 BMKActionPaopaoView *pView = [[BMKActionPaopaoView alloc]initWithCustomView:view];34 pView.frame = CGRectMake(0, 0, 100, 60);35 ((BMKPinAnnotationView *)newAnnotationView).paopaoView = pView;36 return newAnnotationView;37 }38 return nil;39 }
如果我們想要修改氣泡的布局怎樣處理呢?
因為系統默認的一個是坐標,一個標題,一個子標題,我們想要按照自己的方式布局彈出的氣泡,我們需要做什麼工作呢?
首先系統提供BMKPointAnnotation的方法不夠我們使用,我們需要繼承這個類,假如新類為myPoint,添加一些新的屬性。比如這個類,我們需要添加三個屬性。
分別是NSString *imgName ; NSString *placeName; NSString *idNum;
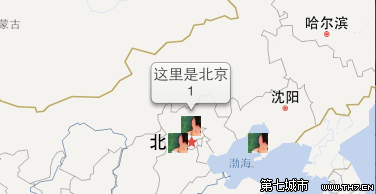
接下來我們我們需要自定義氣泡,氣泡本身是一個UIView,我們可以在繼承於UIView,創建一個子類myPaopao;在myPaopao裡面要添加三個控件,顯示上面定義的三個屬性。
1 #importmyPaopao.h2 3 @interface myPaopao : UIView4 @property(nonatomic,retain)UIImageView *imgView;5 @property(nonatomic,retain) UILabel *placeName;6 @property(nonatomic,retain) UILabel *idNum;7 8 @end
1 #import "myPaopao.h" 2 3 @implementation myPaopao 4 5 -(instancetype)initWithFrame:(CGRect)frame 6 { 7 self = [super initWithFrame:frame]; 8 if (self) 9 {10 self.frame = CGRectMake(0, 0, 150, 60);11 self.backgroundColor = [UIColor whiteColor];12 13 _imgView = [[UIImageView alloc]init];14 _imgView.frame = CGRectMake(0, 0, 60, 60);15 [self addSubview:_imgView];16 17 _placeName = [[UILabel alloc]init];18 _placeName.frame = CGRectMake(60, 0, 90, 30);19 _placeName.font = [UIFont systemFontOfSize:12];20 [self addSubview:_placeName];21 22 _idNum = [[UILabel alloc]init];23 _idNum.frame = CGRectMake(60, 30, 90, 30);24 [self addSubview:_idNum];25 26 }27 return self;28 }29 @end
myPaopao.m
1 //添加標記 2 -(void)viewDidAppear:(BOOL)animated 3 { 4 myPoint* annotation = [[myPoint alloc]init]; 5 CLLocationCoordinate2D coor; 6 coor.latitude = 39.915; 7 coor.longitude = 116.404; 8 annotation.coordinate = coor; 9 annotation.imgName = @"1.jpg";10 annotation.placeName = @"這裡是北京";11 annotation.idNum = @"1";12 [myMapView addAnnotation:annotation];13 14 myPoint* annotation1 = [[myPoint alloc]init];15 CLLocationCoordinate2D coor1;16 coor1.latitude = 38.915;17 coor1.longitude = 113.404 + 2;18 annotation1.coordinate = coor1;19 annotation1.imgName = @"2.jpg";20 annotation1.placeName = @"這裡也是北京";21 annotation1.idNum = @"2";22 [myMapView addAnnotation:annotation1];23 24 }25 -(BMKAnnotationView *)mapView:(BMKMapView *)mapView viewForAnnotation:(id)annotation26 {27 if ([annotation isKindOfClass:[myPoint class]])28 {29 myPoint *myAnnotation = (myPoint *)annotation;30 31 BMKPinAnnotationView *newAnnotationView = (BMKPinAnnotationView *)[mapView dequeueReusableAnnotationViewWithIdentifier:@"AnnotationView"];32 newAnnotationView = [[BMKPinAnnotationView alloc] initWithAnnotation:annotation reuseIdentifier:@"AnnotationView"];33 newAnnotationView.pinColor = BMKPinAnnotationColorPurple;34 newAnnotationView.animatesDrop = YES;// 設置該標注點動畫顯示35 myPaopao *paopapo = [[myPaopao alloc]init];36 37 paopapo.imgView.image = [UIImage imageNamed:myAnnotation.imgName];38 paopapo.placeName.text = myAnnotation.placeName;39 paopapo.idNum.text = myAnnotation.idNum;40 BMKActionPaopaoView *pView = [[BMKActionPaopaoView alloc]initWithCustomView:paopapo];41 ((BMKPinAnnotationView *)newAnnotationView).paopaoView = pView;42 return newAnnotationView;43 }44 return nil;45 }
實現代碼
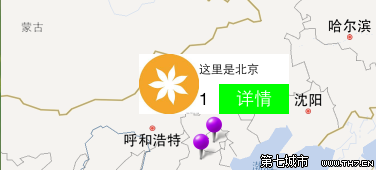
如果有需要,我們還可以添加一個按鈕,跳轉到詳情界面,添加按鈕的方法,與上面的方法相同,在此
點聚合功能
點聚合功能是v2.9.0新增加的一個功能,如果在一個區域有大量的點,會產生覆蓋現象,點聚合功能可以實現將很多點聚合到一個點上,通過縮放比例,可以顯示更多點或聚合點。我們在下載SDK的時候,會帶有一個Demo,從Demo中我們可以找到相應的實現代碼。在開發文檔中給出了我們核心代碼:

折線(從一位置到另一位置的線段)
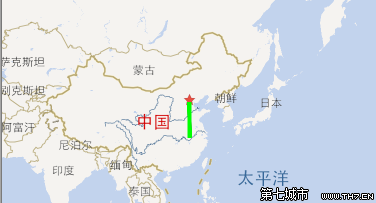
代碼段:
1 //添加標記 2 -(void)viewDidAppear:(BOOL)animated 3 { 4 CLLocationCoordinate2D coors[2] = {0}; 5 coors[0].latitude = 39.315; 6 coors[0].longitude = 116.304; 7 coors[1].latitude = 30.515; 8 coors[1].longitude = 116.504; 9 BMKPolyline *polyline = [BMKPolyline polylineWithCoordinates:coors count:2];10 [myMapView addOverlay:polyline];11 }12 -(BMKOverlayView *)mapView:(BMKMapView *)mapView viewForOverlay:(id)overlay13 {14 NSLog(@"sdf");15 if ([overlay isKindOfClass:[BMKPolyline class]])16 {17 BMKPolylineView *polylineView = [[BMKPolylineView alloc]initWithPolyline:overlay];18 polylineView.strokeColor = [[UIColor greenColor]colorWithAlphaComponent:1];19 polylineView.lineWidth = 5.0;20 return polylineView;21 }22 return nil;23 }
折線
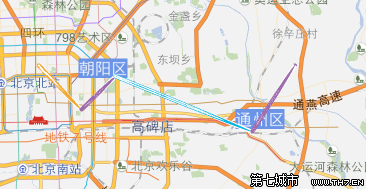
分段紋理分段折線
 代碼段:
代碼段:
1 //添加標記 2 -(void)viewDidAppear:(BOOL)animated 3 { 4 CLLocationCoordinate2D coords[5] = {0}; 5 coords[0].latitude = 39.965; 6 coords[0].longitude = 116.404; 7 coords[1].latitude = 39.925; 8 coords[1].longitude = 116.454; 9 coords[2].latitude = 39.955;10 coords[2].longitude = 116.494;11 coords[3].latitude = 39.905;12 coords[3].longitude = 116.654;13 coords[4].latitude = 39.965;14 coords[4].longitude = 116.704;15 //構建分段文理索引數組16 NSArray *textureIndex = [NSArray arrayWithObjects:17 [NSNumber numberWithInt:0],18 [NSNumber numberWithInt:1],19 [NSNumber numberWithInt:2],20 [NSNumber numberWithInt:1], nil];21 BMKPolyline *polyline = [BMKPolyline polylineWithCoordinates:coords count:5 textureIndex:textureIndex];22 [myMapView addOverlay:polyline];23 }24 -(BMKOverlayView *)mapView:(BMKMapView *)mapView viewForOverlay:(id)overlay25 {26 if ([overlay isKindOfClass:[BMKPolyline class]])27 {28 BMKPolylineView* polylineView = [[BMKPolylineView alloc] initWithOverlay:overlay];29 polylineView.lineWidth = 5;30 polylineView.isFocus = YES;// 是否分段紋理繪制(突出顯示),默認YES31 //加載分段紋理圖片,必須否則不能進行分段紋理繪制32 [polylineView loadStrokeTextureImages:33 [NSArray arrayWithObjects:[UIImage imageNamed:@"1.jpg"],34 [UIImage imageNamed:@"2.jpg"],35 [UIImage imageNamed:@"3.jpg"],nil]];36 return polylineView;37 }38 return nil;39 }
紋理折線
分段顏色分段折線
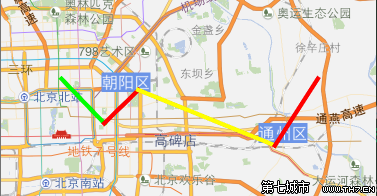
代碼段:
1 -(void)viewDidAppear:(BOOL)animated 2 { 3 CLLocationCoordinate2D coords[5] = {0}; 4 coords[0].latitude = 39.965; 5 coords[0].longitude = 116.404; 6 coords[1].latitude = 39.925; 7 coords[1].longitude = 116.454; 8 coords[2].latitude = 39.955; 9 coords[2].longitude = 116.494;10 coords[3].latitude = 39.905;11 coords[3].longitude = 116.654;12 coords[4].latitude = 39.965;13 coords[4].longitude = 116.704;14 //構建分段文理索引數組15 NSArray *colorIndexs = [NSArray arrayWithObjects:16 [NSNumber numberWithInt:0],17 [NSNumber numberWithInt:1],18 [NSNumber numberWithInt:2],19 [NSNumber numberWithInt:1], nil];20 BMKPolyline *polyline = [BMKPolyline polylineWithCoordinates:coords count:5 textureIndex:colorIndexs];21 [myMapView addOverlay:polyline];22 }23 -(BMKOverlayView *)mapView:(BMKMapView *)mapView viewForOverlay:(id)overlay24 {25 if ([overlay isKindOfClass:[BMKPolyline class]])26 {27 BMKPolylineView* polylineView = [[BMKPolylineView alloc] initWithOverlay:overlay];28 polylineView.lineWidth = 5;29 // 使用分段顏色繪制時,必須設置(內容必須為UIColor)30 polylineView.colors = [NSArray arrayWithObjects:[UIColor greenColor], [UIColor redColor], [UIColor yellowColor], nil];31 return polylineView;32 }33 return nil;34 }
顏色分段
弧線(起點,途經點,終點)
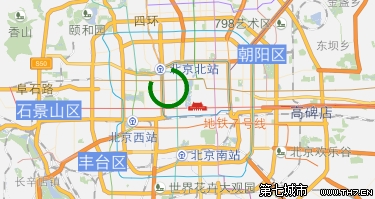
代碼段:
1 -(void)viewDidAppear:(BOOL)animated 2 { 3 CLLocationCoordinate2D coords[3] = {0}; 4 coords[0].latitude = 39.9374; 5 coords[0].longitude = 116.350; 6 coords[1].latitude = 39.9170; 7 coords[1].longitude = 116.360; 8 coords[2].latitude = 39.9479; 9 coords[2].longitude = 116.373;10 BMKArcline *arcline = [BMKArcline arclineWithCoordinates:coords];11 [myMapView addOverlay:arcline];12 }13 -(BMKOverlayView *)mapView:(BMKMapView *)mapView viewForOverlay:(id)overlay14 {15 if ([overlay isKindOfClass:[BMKArcline class]])16 {17 NSLog(@"adf");18 BMKArclineView* arclineView = [[BMKArclineView alloc] initWithOverlay:overlay];19 arclineView.strokeColor = [[UIColor blackColor]colorWithAlphaComponent:0.5];20 arclineView.lineWidth = 5.0;21 return arclineView;22 }23 return nil;24 }
弧線
多邊形
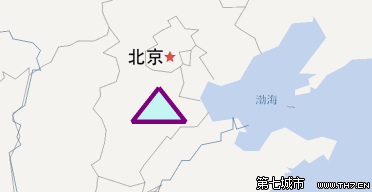
代碼段:
1 -(void)viewDidAppear:(BOOL)animated 2 { 3 CLLocationCoordinate2D coords[3] = {0}; 4 coords[0].latitude = 39; 5 coords[0].longitude = 116; 6 coords[1].latitude = 38; 7 coords[1].longitude = 115; 8 coords[2].latitude = 38; 9 coords[2].longitude = 117;10 BMKPolygon *ploygon = [BMKPolygon polygonWithCoordinates:coords count:3];11 [myMapView addOverlay:ploygon];12 }13 -(BMKOverlayView *)mapView:(BMKMapView *)mapView viewForOverlay:(id)overlay14 {15 if ([overlay isKindOfClass:[BMKPolygon class]])16 {17 BMKPolygonView* polygonView = [[BMKPolygonView alloc] initWithOverlay:overlay];18 polygonView.strokeColor = [[UIColor purpleColor] colorWithAlphaComponent:1];19 polygonView.fillColor = [[UIColor cyanColor] colorWithAlphaComponent:0.2];20 polygonView.lineWidth = 5.0;21 22 return polygonView;23 }24 return nil;25 }
多邊形
圓
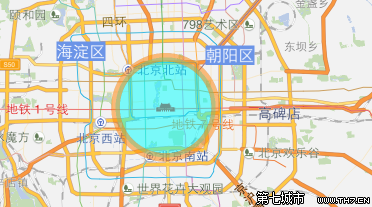
代碼段:
1 -(void)viewDidAppear:(BOOL)animated 2 { 3 CLLocationCoordinate2D coor; 4 coor.latitude = 39.915; 5 coor.longitude = 116.404; 6 BMKCircle* circle = [BMKCircle circleWithCenterCoordinate:coor radius:5000]; 7 [myMapView addOverlay:circle]; 8 } 9 -(BMKOverlayView *)mapView:(BMKMapView *)mapView viewForOverlay:(id)overlay10 {11 if ([overlay isKindOfClass:[BMKCircle class]])12 {13 BMKCircleView* circleView = [[BMKCircleView alloc] initWithOverlay:overlay];14 circleView.fillColor = [[UIColor cyanColor] colorWithAlphaComponent:0.5];15 circleView.strokeColor = [[UIColor orangeColor] colorWithAlphaComponent:0.5];16 circleView.lineWidth = 10.0;17 18 return circleView;19 }20 return nil;21 }