iOS開發200個tips總結(一)
tip 1 : 給UIImage添加毛玻璃效果
func blurImage(value:NSNumber) -> UIImage {
let context = CIContext(options:[KCIContextUseSoftwareRenderer:true])
let ciImage = CoreImage.CIImage(image:self)
let blurFilter = CIFilter(name:"CIGassianBlur")
blurFilter?.setValue(ciImage, forKey:KCIInputImageKey)
blurFilter?.setValue(value, forKey:"inputRadius")
let imageRef = context.createCGImage((blurFilter?.outputImage)!, fromRect:(ciImage?.extent)!)
let newImage = UIImage(CGImage:imageRef)
return newImage
}
value : value代表毛玻璃效果的程度
核心內容:let blurFilter = CIFilter(name:"CIGassianBlur") 使用濾鏡工具
tip 2 : 圖片壓縮
func imageCompress(targetWidth:CGFloat) -> UIIMage {
let targetHeight = targetWidth/width*height
UIGraphicsBeginImageContext(CGSizeMake(targetWidth,targetHeight))
self.drawInRect(CGRectMake(0,0,targetWidth,targetHeight))
let newImage:UIImage = UIGraphicsGetImageFromCurrentImageContext()
UIGrapicsEndImageContext()
return newImage
}
這裡是按原UIImage比例做壓縮所以:let targetHeight = targetWidth/width*height
tip 3 : SVN & Git 用法總結
一:SVN
A. 項目經理:1.創建項目—CheckIn
2.設置項目人員
B.工作人員:1.CheckOut 獲取項目的完整副本,此工作只需要做"一次"
2. 工作寫代碼....
3.階段性工作完成後,Commit(提交) 將自己修改的文件,上傳到服務器
每天下班前一定要做一次能夠編譯的提交!
4.定期Update項目,從服務器將最新的內容更新到本地,每天上班第一件事情一定要做的事情!
二. Git
A.項目經理:1.創建項目push
2.設置項目人員
B. 工作人員:1.Pull從服務器下拉最新的本版
2.Commit是將修改過的代碼提交至本地的代碼庫
3.每天下班前Push自己當前的代碼到服務器
4.每天上班前從服務器Pull最新的內容
三. M / A 文件更新
對於文件夾svn支持並不好,需要在工具下選定文件夾commit
對應文件選定文件commits
由於過去在公司多半時間是做獨立開發,最多人的時候也是兩個人做開發,所以協作工具用的少,但是不斷的關注著兩種代碼倉庫管理工具,總結了一些tip,還有待實踐驗證,吐槽吧......
tip 4: UINavigationController下的坐標系
iOS 9 前:
navigationBar 如果設置了背景圖片,那麼可視化坐標會從navgationbar下面開始
self.navigationController?.navigationBar.setBackgroundImage(UIImage(named:"nav"), forBarMetrics:UIBarMetrics.Default)
iOS 9 後 : 坐標從狀態欄下面開始
tip 5 : C字符串轉成NSString & NSString轉成C字符串
const char *cString = "CString";
C字符串轉成NSString : NSString *str = [NSString stringWithUTF8String:cString];
NSString * str = @"NSString";
NSString轉成C字符串 : const char *cString = [str UTF8String];
tip 6 : OC & Swift 代碼塊(語法糖)
Objective-C :
UILabel *label1 = ({
UILabel *label = [UILabelnew];
[self.view addSubview:label];
label.frame=CGRectMake(100,100,100,45);
label.backgroundColor= [UIColor redColor];
label.text=@"大家好1";
label;
});
UILabel*label2 = ({
UILabel*label = [UILabel new];
[self.view addSubview:label];
label.frame=CGRectMake(100,160,100,45);
label.backgroundColor= [UIColor redColor];
label.text=@"大家好2";
label;
});
UILabel*label3 = ({
UILabel*label = [UILabel new];
label.frame=CGRectMake(100,250,100,45);
label.backgroundColor= [UIColor redColor];
label.text=@"大家好3";
label;
});
[self.viewaddSubview:label3];
({
UILabel *label = [UILabel new];
[self.view addSubview:label];
label.frame=CGRectMake(100,310,100,45);
label.backgroundColor= [UIColor redColor];
label.text=@"大家好4";
});
Swift:
letlabel1:UILabel= {
let label =UILabel()
self.view.addSubview(label)
label.frame=CGRectMake(100,100,100,45)
label.backgroundColor=UIColor.redColor()
label.text="大家好"
return label
}()
let label2:UILabel= {
let label =UILabel()
label.frame=CGRectMake(100,200,100,45)
label.backgroundColor=UIColor.redColor()
label.text="大家好"
return label
}()
self.view.addSubview(label2)
使用語法糖的好處就是拷貝代碼時只需做少許的修改就可以達到目的,如上面的栗子,想要創建多個label,只要賦值粘貼,改一處,也就是對象名稱就可以輕松完成!
tip 7 : 數據持久化方式歸納總結
數據緩存方式選擇:
1: fmdata數據庫(增刪改查) --數據需要:增刪改查
2: coreData --數據需要:增刪改查
3:序列化(NSUserDefault) --狀態、偏好設置、默認選項
4:單獨.plist --列表數據,城市信息等
5:單獨.json文件 --頁面列表數據
6: realm框架(增刪改查) --數據需要:增刪改查
7: FastCoder 某“強哥”推薦,哈哈哈!
tip 8 : 清理Profiles證書文件
~/Library/MobileDevice/Provisioning Profiles
由於平時會負責多個項目的上線管理或是開發工作,因此MAC中有很多簽名文件,有時候都分不清東西南北,一不做,二不休,前往這個目錄下,將文件刪個精光,調試的時候用到證書再update一下當前項目的證書即可
tip 9 : 拿到當前屏幕所看到的viewController
Objective-c版本:
- (UIViewController *)getAppRootViewController
{
UIViewController *appRootVC = [UIApplication sharedApplication].keyWindow.rootViewController;
UIViewController *topVC = appRootVC;
while (topVC.presentedViewController) {
topVC = topVC.presentedViewController;
}
return topVC;
Swift版本:
func getAppRootViewController()->UIViewController?{
vartopVC=UIApplication.sharedApplication().keyWindow?.rootViewController
while topVC?.presentedViewController!=nil{
topVC=topVC?.presentedViewController
}
return topVC?
}
tip 10 : 制作pch文件
步驟:
1、新建iOS->Other->PCH File
2、targets->BuildSetting->Prefix Header->設置$(SRCROOT)/文件在工程中的路徑
3、pch能像以前一樣正常使用
如:$(SRCROOT)/FirstProject/PrefixHeader.pch
FirstProject : pch路徑中的最後一個拓展名
PrefixHeader.pch: 是pch文件名
簡介:/Users/ly/Desktop/FirstProject/FirstProject
tip 11 : 設置UINavigationController title
當 UIViewController作為UINavigationController的根視圖控制器的時候,將這個Nav(root)賦給 tabBarController時,
這樣寫:
root.title = @“title”;
那麼 :self.naviagtionItem.title 會顯示 title
同時 :nav.tabBarItem.title 也會顯示 title
tip 12 : 判斷UIScrollView是橫向滾動還是豎向滾動
- (BOOL)gestureRecognizerShouldBegin:(UIGestureRecognizer*)gestureRecognizer {
if([gestureRecognizerisKindOfClass:[UIPanGestureRecognizerclass]]) {
CGPointvelocity = [(UIPanGestureRecognizer*)gestureRecognizervelocityInView:gestureRecognizer.view];
BOOLisHorizontalPanning =fabsf(velocity.x) >fabsf(velocity.y);
return isHorizontalPanning;
}
returnYES;
}
tip 13 : 監聽 backBarButtonItem 返回事件
github上搜: UIViewController+BackButtonHandler 開源項目
tip 14 : 讓一個view透明度失效
self.view.backgroundColor=UIColor(colorLiteralRed:255.0/255, green:255.0/255, blue:255.0/255, alpha:0.3)
let subView = UIView()
subView.tintColor=UIColor.whiteColor()//不透明了
self.view.addSubview(subView)
tip 15 : 從ipod庫中讀出音樂文件
// 從ipod庫中讀出音樂文件
MPMediaQuery*everything=[[MPMediaQueryalloc]init];
//讀取條件
MPMediaPropertyPredicate*albumNamePredicate=[MPMediaPropertyPredicatepredicateWithValue:[NSNumbernumberWithInt:MPMediaTypeMusic]forProperty:MPMediaItemPropertyMediaType];
[everythingaddFilterPredicate:albumNamePredicate];
NSLog(@"Loggingitemsfromagenericquery...");
NSArray*itemsFromGenericQuery=[everythingitems];
for(MPMediaItem*songinitemsFromGenericQuery){
NSString*songTitle=[songvalueForProperty:MPMediaItemPropertyTitle];
NSLog(@"%@",songTitle);
}
tip 16 : 廣告標示符(adId) & adfv標示符的那些事
1.如何識別一個應用安裝在同一個設備上呢?
2.如何識別一個企業的應用安裝在同一個設備上呢?
蘋果給我們提供了advertisingIdentifier 來解決問題1;
只要是同一台設備,那麼advertisingIdentifier就是一樣的
但是如果在設置-隱私-廣告那裡關掉這個權限或是還原設備的話,就沒辦法了哭死去吧
蘋果給我們提供了identifierForVendor 來作為一個企業的app標示符
比如: com.game.yoyo
com.game.xoxo
只要在同一台設備上,那麼identifierForVendor 是一樣的
如果:com.game.yoyo
com.buyer.yoyo
不管是不是同一個應用identifierForVendor 都是不一樣的
上代碼:
廣告id:
#import
//每個設備有唯一一個,如果重置廣告或設置-隱私-關閉廣告就會關閉更換
NSString*adId = [[[ASIdentifierManagersharedManager]advertisingIdentifier]UUIDString];
企業id:
NSString*idfv = [[[UIDevicecurrentDevice]identifierForVendor]UUIDString];
tip 17 : 不使用JPush等的原始推送
一步一步教你做ios推送 - 有夢想的蝸牛 - 博客頻道 - CSDN.NET
推送通知iOS客戶端編寫實現及推送服務器端編寫 - OPEN 開發經驗庫
由於簡書的一些限制,不能粘貼文件,考慮選擇一個方式將我自己的實踐工程放出來,以後持續更新
(MAC下搭建服務器+證書制作+推送測試)
tip 18 : 設置系統音量(排版有段亂,將就一下(⊙﹏⊙)b)
#import"VolumeSetter.h"
#import
@implementationVolumeSetter
{
MPVolumeView*volumeView;
UISlider* volumeViewSlider;
}
+ (instancetype)shareInstance
{
staticVolumeSetter*vs;
staticdispatch_once_tonce;
dispatch_once(&once, ^{
vs = [[VolumeSetteralloc]init];
});
returnvs;
}
- (void)setVolume:(float)value
{
[self getSlider];
[volumeViewSlidersetValue:valueanimated:NO];// send UI control event to make the change effect right now.
[volumeViewSlidersendActionsForControlEvents:UIControlEventTouchUpInside];
}
- (float)getVolume:(volumeBlock)handel
{
_myHandel= handel;
[selfgetSlider];
returnvolumeViewSlider.value;
}
- (MPVolumeView*)getVolumeView
{
if(volumeView==nil) {
volumeView= [[MPVolumeViewalloc]init];
[[NSNotificationCenterdefaultCenter]addObserver:self
selector:@selector(volumeChanged:)
name:@"AVSystemController_SystemVolumeDidChangeNotification"
object:nil];
}
returnvolumeView;
}
- (UISlider*)getSlider
{
[selfgetVolumeView];
for(UIView*viewin[volumeViewsubviews]){
if([view.class.descriptionisEqualToString:@"MPVolumeSlider"]){
volumeViewSlider= (UISlider*)view;break;
}
}
returnvolumeViewSlider;
}
- (void)volumeChanged:(NSNotification*)notification
{
floatvolume =
[[[notificationuserInfo]
objectForKey:@"AVSystemController_AudioVolumeNotificationParameter"]
floatValue];
NSLog(@"current volume = %f", volume);
_myHandel(volume);
}
@end
tip 19 : 提高開發效率 開發工具(轉)
http://www.cocoachina.com/ios/20151110/14102.html
tip 20 : XMPP 開發與服務器搭建
待補充
tip 21 : 設置UINavigationItem 返回按鈕 和 back title
1. push 之前
// back title
self.navigationItem.backBarButtonItem=UIBarButtonItem(title:"返回", style:UIBarButtonItemStyle.Plain, target:nil, action:nil)
// 特別注意:在push之前設置
self.navigationController?.pushViewController(vc, animated:true)
2.設置顏色
self.navigationController?.navigationBar.tintColor=UIColor.blackColor()
總結:
self.navigationItem.backBarButtonItem=UIBarButtonItem(title:"返回", style:UIBarButtonItemStyle.Plain, target:nil, action:nil)
self.navigationController?.navigationBar.tintColor=UIColor.blackColor()
self.navigationController?.pushViewController(vc, animated:true)
tip 22 : 語法規范
Swift : https://github.com/raywenderlich/swift-style-guide#use-of-self
OC : https://github.com/raywenderlich/objective-c-style-guide
tip 23 : 謂詞
Person類:
@interfacePerson :NSObject
@property(nonatomic) NSUIntager age;
@property(nonatomic,copy)NSString*name;
@end
#import"Person.h"
@implementationPerson
- (NSString*)description
{
return[NSStringstringWithFormat:@"age=%d,name=%@",self.age,self.name];
}
@end
ViewController.m類:
Person*p1 = [[Personalloc]init];
p1.age=15;
p1.name=@"張三";
Person*p2 = [[Personalloc]init];
p2.age=25;
p2.name=@"小米";
Person*p3 = [[Personalloc]init];
p3.age=15;
p3.name=@"李四";
NSArray*arr =@[p1,p2,p3];
//謂詞
NSPredicate*pre = [NSPredicatepredicateWithFormat:@"%K==%d || %K==%@ || %K=%@",@"age",15,@"name",@"張三",@"name",@"李四"];
arr = [arrfilteredArrayUsingPredicate:pre];
NSLog(@"%@",arr);
輸出:
2015-12-08 11:24:05.862 Predicate[12080:634959] (
"age=15,name=\U5f20\U4e09",
"age=15,name=\U674e\U56db"
)
用於做查詢操作非常棒,避免寫一大堆的if else操作
tip 24 : Xcode 插件
VVDocumenter 是一個比較好用的注釋控件
Alcatraz(插件管理器)http://www.tuicool.com/articles/v2eIVb
https://github.com/supermarin/Alcatraz
Xcode 6.4找不到packageManager :http://blog.csdn.net/yimu520csdn/article/details/47040041
tip 25 : 微信登錄,分享等 不執行代理方法
方法一:
- (BOOL)application:(UIApplication*)application handleOpenURL:(NSURL*)url
{
return [WXApihandle OpenURL:urldelegate:self];
}
方法二:
- (BOOL)application:(UIApplication*)application openURL:(NSURL*)url sourceApplication:(NSString*)sourceApplication annotation:(id)annotation
{
return[WXApihandle OpenURL:url delegate:self];
}
今天做微信登陸功能,隨手寫一個demo,沒有設置bundle id , display name,結果就不走 方法一,方法二
導致下面兩個代理方法不走
- (void) onReq:(BaseReq*)req{
NSLog(@"xxxxxxxx");
}
- (void) onResp:(BaseResp*)resp{
NSLog(@"fffffffff");
}
解決方法:設置Bundle identifier 以及 Bundledisplayname ,注意要與注冊獲取appid secret key 時所填的保持一致.
當然其他設置也要保證設置上,比如 URL sechme , iOS9 注意適配 ATS,添加白名單
tip 26 : iOS7.0後隱藏狀態欄(UIStatusBar)
現象:
升級到iOS7後,UIStatusBar的出現導致現有UI界面亂掉了。
原因:
由於寫死了某些控件的絕對位置,原先隱藏UIStatusBar的代碼沒有在iOS7中起作用
解決方法:
iOS7以下版本隱藏UIStatusBar的方法:
-(BOOL)application:(UIApplication*)applicationdidFinishLaunchingWithOptions:(NSDictionary*)launchOptions
{
[application setStatusBarHidden:YES];
returnYES;
}
升級到iOS7後的方法:
在基類中重載UIViewController.h中的這個方法
-(BOOL)prefersStatusBarHiddenNS_AVAILABLE_IOS(7_0);//DefaultstoNO
-(BOOL)prefersStatusBarHidden
{
return YES;
//iOS7後以下方法已經不起作用: [[UIApplicationsharedApplication]setStatusBarHidden:YESwithAnimation:UIStatusBarAnimationFade];
}
tip 27 : UIColor 轉 RGB
UIColor*color = [UIColorcolorWithRed:0.0green:0.0blue:1.0alpha:1.0];
constCGFloat*components =CGColorGetComponents(color.CGColor);
NSLog(@"Red: %f", components[0]);
NSLog(@"Green: %f", components[1]);
NSLog(@"Blue: %f", components[2]);
tip 28 : 摳圖 & 合成圖片 (轉)
iOS開發-簡單圖片背景替換(實現摳圖效果)
http://www.tuicool.com/articles/VZN3yiZ
tip 29 : Mac 生成UUID 命令: uuidgen
在命令行工具輸入 $ uuidgen : 8-4-4-4-12
tip 30 : 23種設計模式
https://github.com/huang303513/Design-Pattern-For-iOS
tip 31 : 發布APP要求
發布APP要求,不能使用Beta版本的Xcode
如果一個開發團隊裡面有多個小伙伴,不要為了嘗新將所有的Mac OX 或是Xcode都升級到Beta版本,應該由一個小伙伴進行測試感受新版本是否穩定,是否有坑,否定後果很嚴重,說多都是淚,您想想:重新裝系統,重新下載Xcode是一件多麼苦逼的事情。。。
tip 32 : UIScrollView 判斷是向左滾動還是向右滾動
這是抄自項目裡面的一段代碼,如果您要用到判斷UIScrollView向左還是向右的滾動邏輯,請先定義相關狀態的全局變量
-(void)scrollViewWillBeginDragging:(UIScrollView*)scrollView
{
startContentOffsetX= scrollView.contentOffset.x;
}\
- (void)scrollViewWillEndDragging:(UIScrollView*)scrollView withVelocity:(CGPoint)velocity targetContentOffset:(inoutCGPoint*)targetContentOffset{//將要停止前的坐標
willEndContentOffsetX= scrollView.contentOffset.x;
}
- (void)scrollViewDidEndDecelerating:(UIScrollView*)scrollView{
endContentOffsetX= scrollView.contentOffset.x;
if(endContentOffsetX < willEndContentOffsetX && willEndContentOffsetX < startContentOffsetX) {
NSLog(@"畫面從右往左移動,前一頁");
}else if(endContentOffsetX > willEndContentOffsetX&&
willEndContentOffsetX > startContentOffsetX) {
NSLog(@"畫面從左往右移動,後一頁");
}
}
tip 33 : 判斷是否插入SiM卡
引入:CoreTelephony.framework
extern NSString*constkCTSMSMessageReceivedNotification;
extern NSString*constkCTSMSMessageReplaceReceivedNotification;
extern NSString*constkCTSIMSupportSIMStatusNotInserted;
extern NSString*constkCTSIMSupportSIMStatusReady;
id CTTelephonyCenterGetDefault(void);
void CTTelephonyCenterAddObserver(id,id,CFNotificationCallback,NSString*,void*,int);
void CTTelephonyCenterRemoveObserver(id,id,NSString*,void*);
int CTSMSMessageGetUnreadCount(void);
int CTSMSMessageGetRecordIdentifier(void* msg);
NSString* CTSIMSupportGetSIMStatus();
NSString* CTSIMSupportCopyMobileSubscriberIdentity();
id CTSMSMessageCreate(void* unknow/*always 0*/,NSString* number,NSString* text);
void* CTSMSMessageCreateReply(void* unknow/*always 0*/,void* forwardTo,NSString* text);
void* CTSMSMessageSend(idserver,idmsg);
NSString*CTSMSMessageCopyAddress(void*,void*);
NSString*CTSMSMessageCopyText(void*,void*);
NSLog(@"BOOL:%d", [CTSIMSupportGetSIMStatus()isEqualToString:kCTSIMSupportSIMStatusNotInserted] );
tip 34 : 獲取鏈接的Wifi
#import
- (id)fetchSSIDInfo {
NSArray*ifs = (__bridge_transfer id)CNCopySupportedInterfaces();
NSLog(@"Supported interfaces: %@", ifs);
id info =nil;
for (NSString*ifnam in ifs) {
info = (__bridge_transfer id)CNCopyCurrentNetworkInfo((__bridge CFStringRef)ifnam);
NSLog(@"%@ => %@", ifnam, info);
if(info && [info count]) {break; }
}
return info;
}
tip 36 : TableView UITableViewStylePlain狀態去掉省略多余的cell
_tableView= [[UITableView alloc] initWithFrame:self.view.bounds style:UITableViewStylePlain];
_tableView.delegate=self;
_tableView.dataSource=self;
_tableView.tableFooterView= [UIView new]; // 關鍵的一行代碼
tip 37 : block 類型聲明為strong 還是 copy ?
block聲明為strong 和copy什麼區別
block變量申明為strong或者copy 在ARC 的情況下 是等效的
但蘋果推薦的最佳實踐是 使用copy作為block的權限控制符
因為 copy能讓開發者更明確地知道 block內存操作的隱式行為
及copy 到heap上
ARC下面 strong修飾的block 會自動進行這一過程
MRC下面 使用copy是必須的
tip 38 : 坐標轉換
如果我的tableView的每個cell都有輸入框,那我怎麼樣在輸入的時候將對應的輸入框移到合適的位置?
每個cell可以拿到在當前table的位置然後轉換到屏幕上
然後自己算應該偏移多少
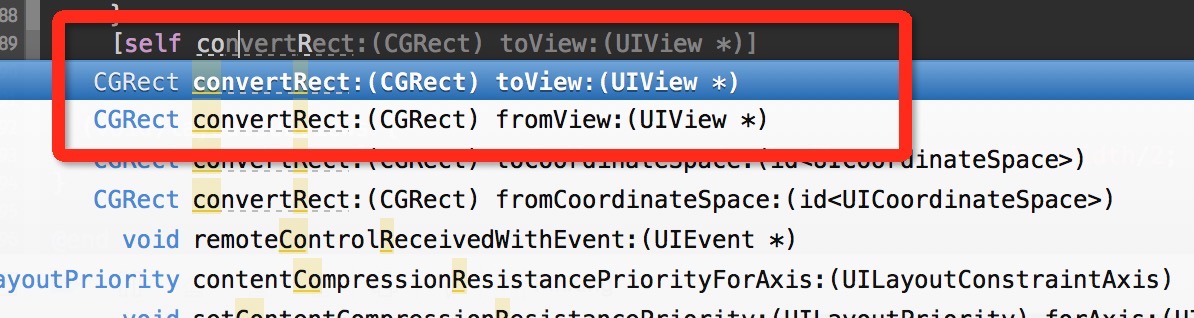
self是一個view 一個是把一個坐標從自己的換到其他的View上
一個是把其他的坐標換到自己上如果self你當做tableView,然後後面的uiview你用vc.view
就能相互轉了
tip 39 : 跳轉至指定QQ號碼
判斷是否安裝了QQ:
if([[UIApplication shareApplication] canOpenURL:[NSURL:URLWithString:@“mqq://“]]){
NSLog(@“had installed");
} else {
NSLog(@“no installed");
}
UIWebView*webView = [[UIWebView alloc] initWithFrame:CGRectZero];
NSURL*url=[NSURLURLWithString:@"mqq://im/chat?chat_type=wpa&uin=501863587&version=1&src_type=web"];
NSURLRequest*request=[NSURLRequest requestWithURL:url];
webView.delegate=self;
[webView loadRequest:request];
[self.view addSubview:webView];
tip 40 : 企業版app 與 appStore版app之間的問題
問題一 : 一台手機能否裝兩個名字一樣的應用呢.
回答 : 能否裝兩個一樣的應用不是取決於應用的名字,而是取決於boundid,appId(這個本人還沒考究。。。)是否一致。
但是蘋果應用商店是不允許有兩個名字一樣的應用程序的,那我們干嘛要糾結於名字一樣的問題呢?
因為如果公司有一個企業賬號和一個發布賬號,企業賬號希望發布一個到官網供用戶下載,而發布賬號希望發布到AppStore,而且名字一樣。
結論是:兩個應用同名行不行?行,只要你的企業賬號發布的應用的boundid跟AppStore上的應用的app的boundid不一致,名字可以一致。
而且蘋果不會管你的企業賬號發布的應用程序,你愛怎麼玩就怎麼玩,如果你不希望一台手機裝兩個名字一樣的應用,那麼開發者 只要將兩個應用的boundid設置成一樣就可以了。
注意:AppStore上不能有同名的應用程序,這個是受商標保護法保護的。但是企業賬號就可以任意起名字跟設置boundid。但是嘛,你懂的。。。
tip 41 : 打印 NSHomeDirectory為空
情況:打印獲取 NSHomeDirectory為空,打印有值,獲取到為nil。。
如果版本是release,就會出現上面的情況
解決的辦法 : 設置成 debug
安全的做法是:
NSArray *paths = NSSearchPathForDirectoriesInDomains(NSCachesDirectory, NSUserDomainMask, YES);
NSString *basePath = ([paths count] > 0) ? [paths objectAtIndex:0] : NSTemporaryDirectory();
tip 42 : app跳轉到safari
NSURL* url = [NSURL URLWithString:urlStr];
[[UIApplication sharedApplication] openURL:url];
tip 43 : 彈出鍵盤 & 收鍵盤
//監聽鍵盤
[[NSNotificationCenter defaultCenter] addObserver:self selector:@selector(keyBoardShow:)name:UIKeyboardWillShowNotification object:nil];
[[NSNotificationCenter defaultCenter] addObserver:self selector:@selector(keyBoardHide:)name:UIKeyboardWillHideNotification object:nil];
#pragma mark彈出鍵盤
-(void)keyBoardShow:(NSNotification*)notification
{
//notification.userInfo獲得用戶的所有信息,userInfo是一個字典,根據key值 為UIKeyboardFrameEndUserInfoKey拿到鍵盤的frame的“字符串”,將這個字符串轉成Rect
int y = [[notification.userInfoobjectForKey:UIKeyboardFrameBeginUserInfoKey]CGRectValue].size.height;
}
#pragma mark收鍵盤
-(void)keyBoardHide:(NSNotification*)notification
{
}
最強的收鍵盤方法 :
[[UIApplicationsharedApplication]sendAction:@selector(resignFirstResponder)to:nilfrom:nilforEvent:nil];
其他的鍵盤監聽 :
[[NSNotificationCenterdefaultCenter]addObserver:selfselector:@selector(keyboardWillChangeFrame:)name:UIKeyboardDidChangeFrameNotificationobject:nil];
tip 44 : 審核加急處理
鏈接:https://developer.apple.com/appstore/contact/appreviewteam/index.html
備注:到上面的連接填寫相關桂東,申請加急的理由:上線的App中有Bug
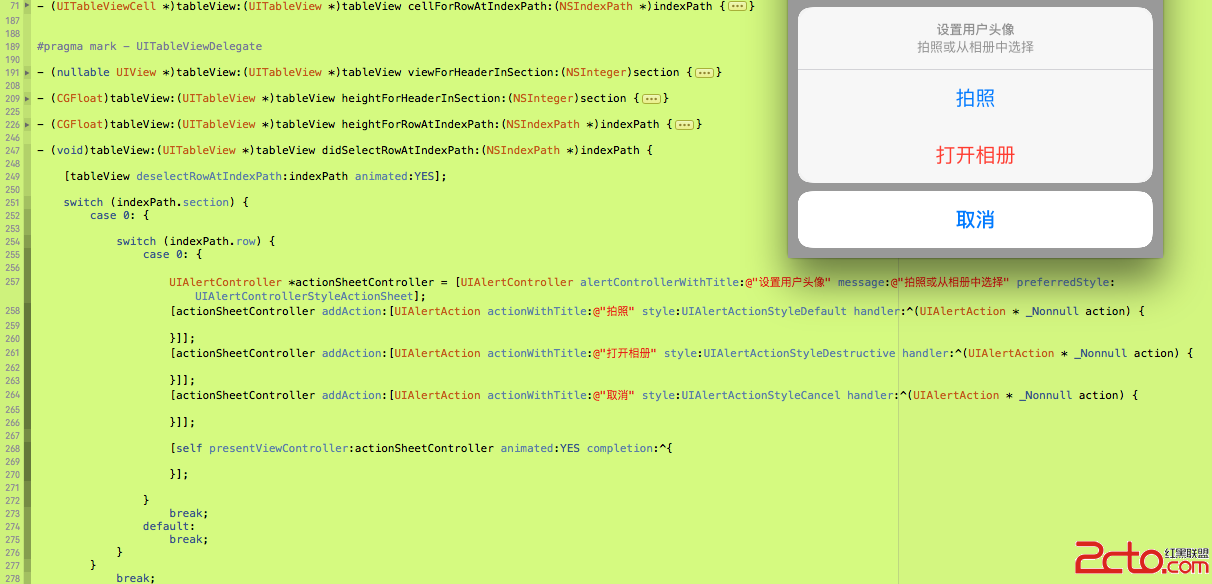
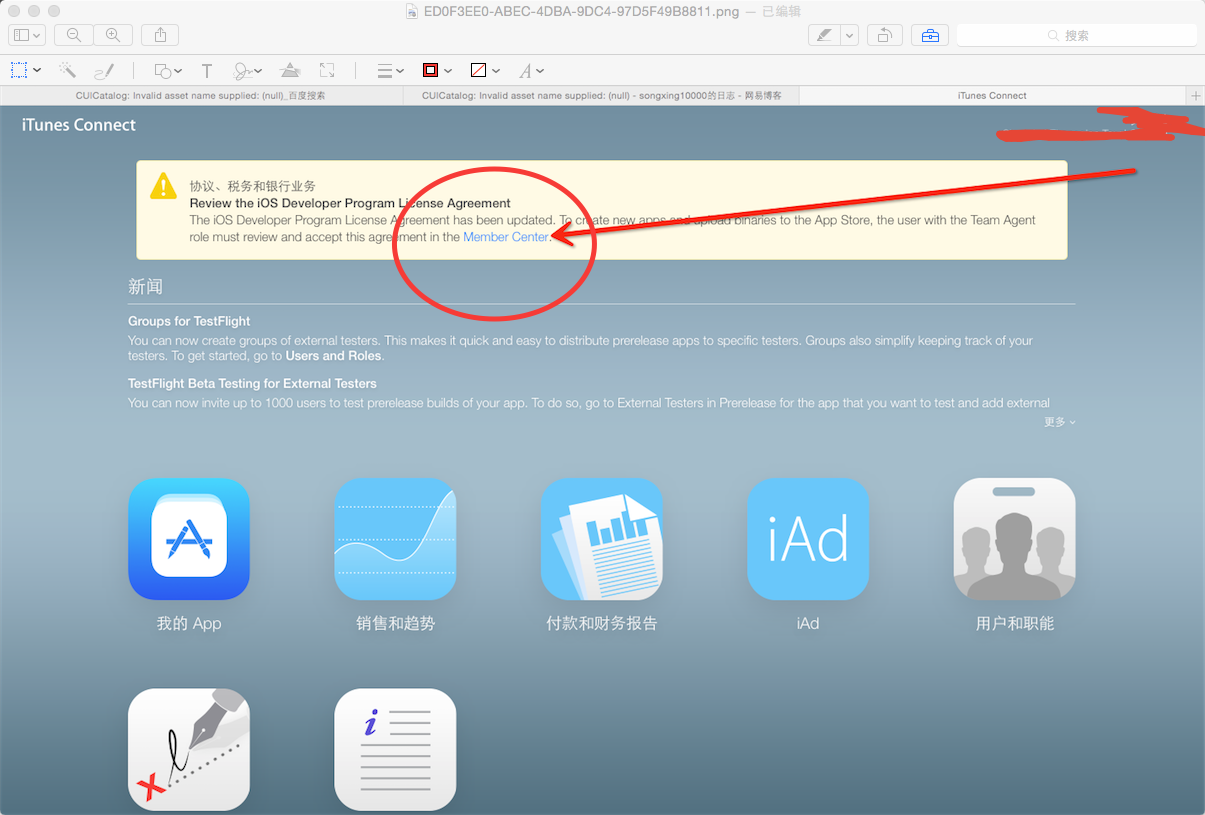
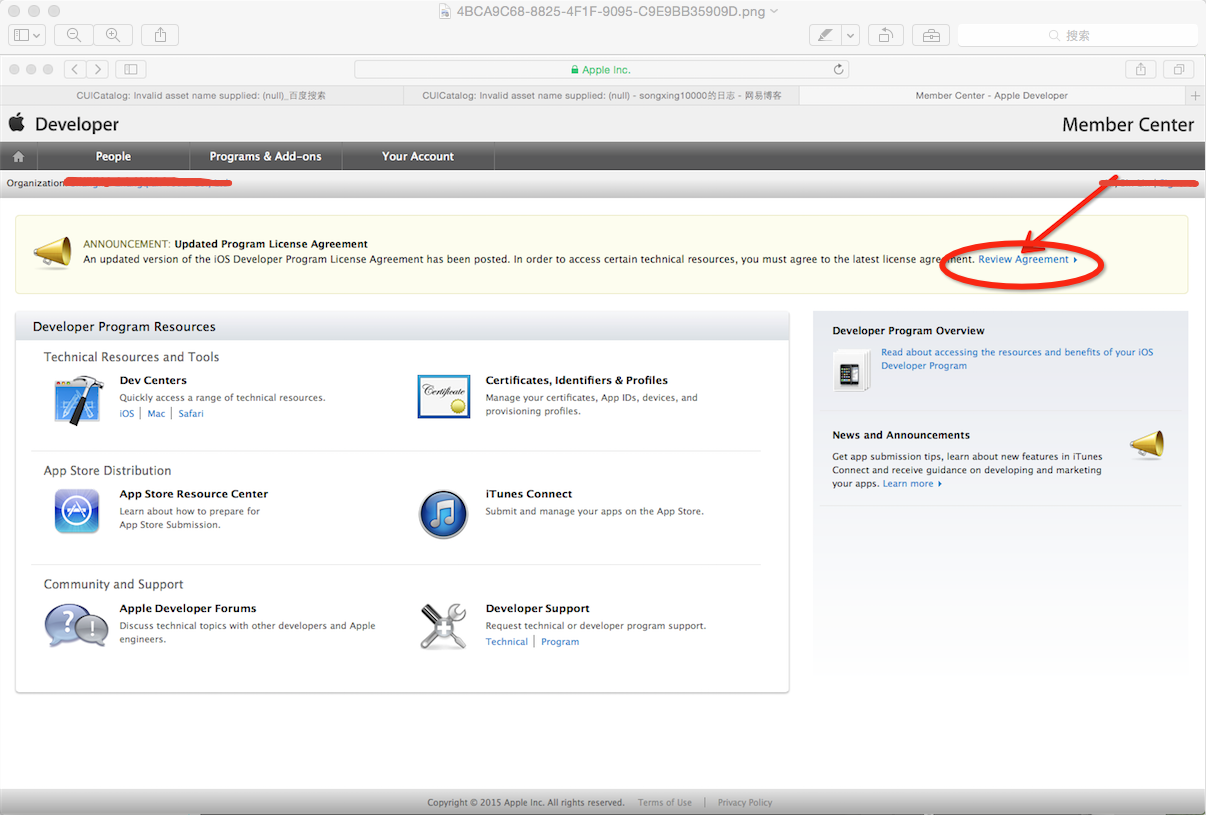
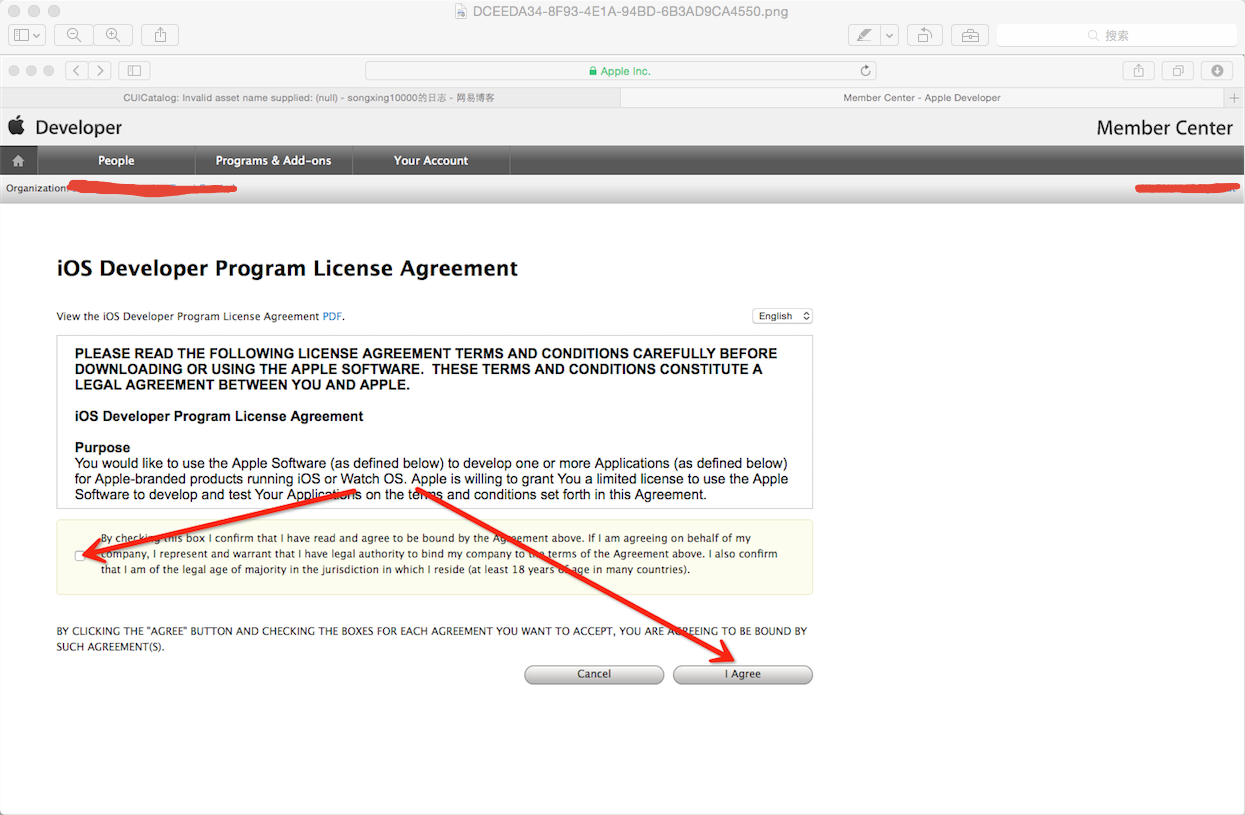
tip 45 : iTunesConnect 更新版本接受協議步驟
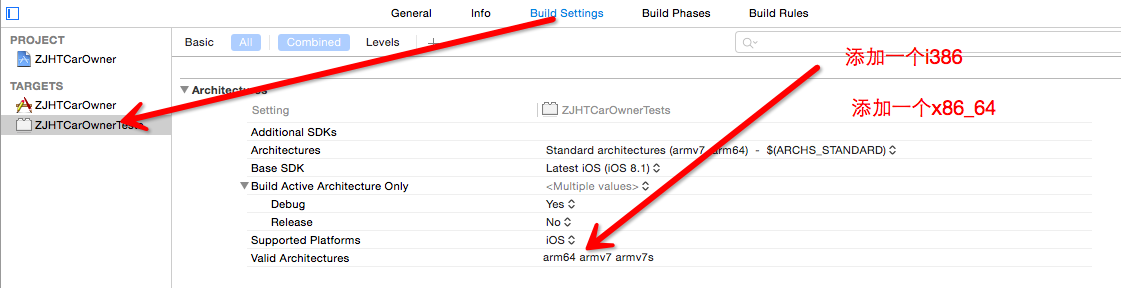
tip 46 : No architectures to compile for (ONLY_ACTIVE_ARCH=YES, active arch=x86_64, VALID_ARCHS=i386).
解決的辦法是 :
步驟1 :
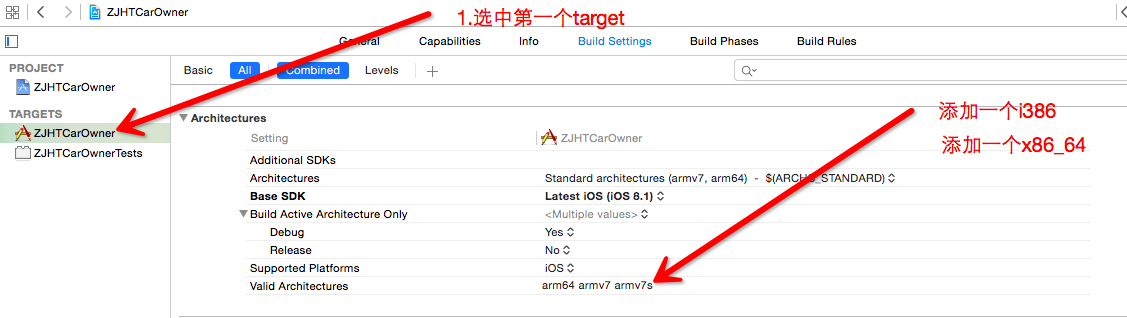
步驟2 :
tip 47 : Version 號 跟Build 號的區別
version 是給用戶看的,比如1.0 2.0
Build 是給開發者還有就是蘋果 iTunesconnect看的
具體情景:
今天發布一個版本叫 2.0 所以 version 2.0
於是我要archive-> validate -> submit
發布完成了!
正當我們其樂融融的的准備慶祝的時候,屌絲的產品進來大吼一聲,肅靜,吵什麼吵,我看那個搜附近的人頁面太爛了!!!!
一萬個草泥馬在天上飛啊。。。
沒事,蛋定,蛋定,改改改。。。
改完之後,發現validate不成功。提示:已經有一個2.0的版本了,怎麼破????產品經理堅持要用version 2.0這個數字,但是如果不改成version2.1之類的好像一直都傳不上去啊!!!靈光一閃,Build 號是干嘛的?經過一般查證,Build是給我們開發者和itunesconnect看的,改一下Build不就行了嗎,改改改,重新validate發現可行,歐耶,submit , 重新選擇版本,搞定!!!繼續慶祝
tip 48 :Xcode 6中對於圖片的要求規格: 1、AppIcon
(1)spotlight iOS 5-6 29*29
setting iOS 5-8 29*29 (1*2*3 三種尺寸)
(2)spotlight iOS 7-8 40*40 (2*3 兩種尺寸)
(3)iPhone App iOS 5-6 57*57 (1*2兩種尺寸)
(4)iPhone App iOS 7-8 60*60 (2*3兩種尺寸)
2、啟動圖片Default.png(320*480)
[email protected](640*960)
[email protected](640*1136)
[email protected](750*1334) 4.7寸
[email protected](1242*2208)5.5寸
tip 49 : 清除簽名文件 刪除簽名文件 清理Profile文件
Xcode - Preferences - Account - View Details,這個時候左下角有個刷新圖標,點擊一下就可以了
tip 50 : 應用內跳轉到系統設置頁面 (轉)
http://code4app.com/ios/DBPrivacyHelper/548e7550933bf031268b4d82
tip 51 : 使用lipo命令合並對應版本 靜態庫文件
lipo -create /Users/han-zi/Desktop/Release-iphoneos/libbaidumapapi.a /Users/han-zi/Desktop/Release-iphonesimulator/libbaidumapapi.a -output /Users/han-zi/Desktop/a/libbaidumapapi.a
備注:以百度地圖SDK為栗子
真機版本的文件路徑:/Users/han-zi/Desktop/Release-iphoneos/libbaidumapapi.a
模擬器版本的文件路徑:/Users/han-zi/Desktop/Release-iphonesimulator/libbaidumapapi.a
輸出文件路徑: /Users/han-zi/Desktop/a/libbaidumapapi.a
tip 52 : 應用在AppStore的地址
webpageUrl=@"http://itunes.apple.com/us/app/id+你的應用id";
tip 53 : 顏色值轉RGB
- (void)setBgRGB:(long)rub{
red = ((float)((rgb & 0xFF0000) >> 16))/255.0;
green = ((float)((rgb & 0xFF00) >> 8))/255.0;
blue = ((float)(rgb & 0xFF))/255.0;
}
tip 54 : App 上線簡介
心得體會:
1.准備一個APP ID(這個可以永遠用)
2.創建證書
a.創建證書的過程要上傳機器標示符(鑰匙串——>證書助理——>從證書頒發機構請求證書))
b.要綁定APP ID
c.填寫bundleID
d.下載證書
3.生成簽名文件——>綁定Bundle ID ——>生成簽名文件——>下載簽名文件
tip 55 : UIImage加載方式怎麼選?
方式一: imageName:有緩存的方式,如果一張圖片會被重復用到,那麼請用這種方式
方式二:contentOfFile:無緩存的方式,加載大的圖片文件,特別注意,jpg圖片只能以這種方式加載
tip 56 : ARC兼容MRC,MRC兼容ARC 設置關鍵字
ARC兼容MRC : -fno-objc-arc
MRC兼容ARC: -fobjc-arc
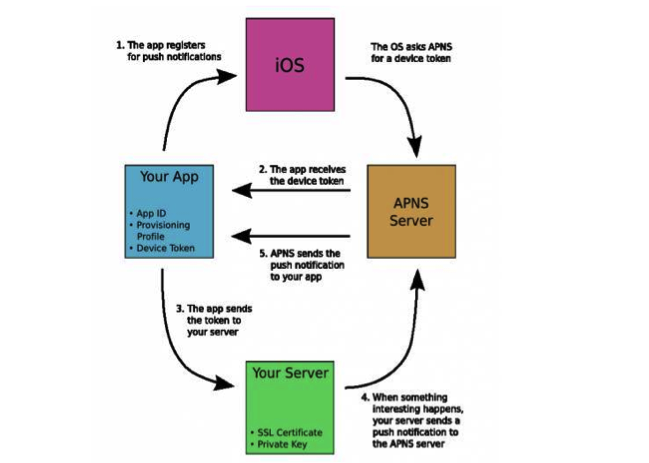
tip 57 : 消息推送機制理解
1.應用程序第一次起來的時候詢問是否允許消息推送,允許的時候才去注冊,
向蘋果APNS服務器注冊是哪個{應用程序,設備號}
2.注冊成功蘋果APNS服務器返回一個DeviceToken,程序員要保存這個{DeviceToken}
3.注冊失敗 。。。。
4.注冊成功,將DeviceToken發給服務器{可以是自己的服務器,可以是極光服務器},服務器保存這一大堆的DeviceToken
5.服務器要推送消息{可以是極光服務器}將這個消息發給蘋果APNS服務器,APNS服務器根據{一大堆的DevicToken}向應用程序推送消息
tip 58 : FMDB 事務操作步驟
@try{
啟動事務,執行數據庫操作
[_dataBase beginTransaction];//手動開啟一個事務
}@Catch{
出現問題,數據庫回滾
[_dataBase rollback];//回滾,回到最初的狀態
}@finally{
數據庫提交操作
[_dataBase commit];//提交事務,讓批量操作生效
}
備注:FMDB 使用進階包括兩個內容,一個是事務,一個是線程安全,詳細內容請看FMDB官方文檔。
事務解決的問題: 如果要對數據庫進行 多條數據的寫操作,應開啟事務,而不要只使用for循環直接寫入,否則會比較耗時
線程安全解決的問題: 如果對同一資源進行操作,FMDB不是線程安全的,使用FMDataBaseQueue這個類可以做到線程安全。
tip 59 : UITableView重用機制的理解
UITableView自身有一套重用的機制,根據UITaleVIew 的frame的大小和cell.frame大小來計算個數,實際會創建多一個cell,創建的這些cell都放在一個數組(隊列的數據結構)裡面,視圖出現時根據計算的結果將cell拿出來放在UITableView上面,剩下的那個cell則作為緩沖cell,比如向上拖動的時候,cell[0]會放回數組最下面,將那個上次沒有使用的cell拿出來,放在TableView下面。利用這種機制來達到重用的目的。
對於拖到到看不見的位置的cell,我們可以對他清除緩存(緩存就是cell.contentView上面的子view),那怎麼清除呢?方法很簡單
-(UITableViewCell *)tableView cellForRowAtIndexPath:(NSIndexPath *)indexPath
{
if(cell ! == nil)
{
NSArray *arr =[ [NSArray alloc] initWithArray :cell.contentView.subviews];
for (UIView *subView in arr){
[subView removeFromSuperView];
}
}
tip 60 : UITableView Cell 清除緩存 說白了就是將將要出現的cell的contentView上面的子視圖清除掉或銷毀
tableView表格中的cell有重用機制,這是一個很好的東西,可以避免開辟很多的空間內存。但是有時候我們不想讓它重用cell,,可以用以下的代碼解決。
將這個代碼放在:
- (UITableViewCell *)tableView:(UITableView *)tableView cellForRowAtIndexPath:(NSIndexPath *)indexPath{
// 這個函數中執行就好了。
//清楚cell的緩存
NSArray *subviews = [[NSArray alloc] initWithArray:cell.contentView.subviews];
for(UIView *subview in subviews) {
[subview removeFromSuperview];
}
tip 61 : 改變tabBarItem字體顏色
self.tabBar.tintColor= [UIColor colorWithHexString:BLUE_GREEN_COLOR];
UITabBarController*tabBarController = (UITabBarController*)self;
UITabBar*tabBar = tabBarController.tabBar;
UITabBarItem*trainEnquiryItem = [tabBar.itemsobjectAtIndex:0];
[trainEnquiryItem setTitle:@"查詢"];
[trainEnquiryItemsetImage:[UIImageimageNamed:@"tet"]];
[trainEnquiryItemsetSelectedImage:[UIImageimageNamed:@"tet_hover"]];
改變UITabBarItem 字體顏色
[[UITabBarItem appearance] setTitleTextAttributes:[NSDictionary dictionaryWithObjectsAndKeys:[UIColor whiteColor],UITextAttributeTextColor,nil] forState:UIControlStateNormal];
[[UITabBarItem appearance]setTitleTextAttributes:[NSDictionary dictionaryWithObjectsAndKeys:[UIColor colorWithHexString:"#00C8D3"],UITextAttributeTextColor,nil] forState:UIControlStateSelected];
tip 62 : UITextFiled 設置PlaceHolder字體顏色
tip 63 : 應用主題設置心得以及思路#pragma mark設置Placeholder顏色
UIColor*color = [UIColorwhiteColor];
_userNameTextField.attributedPlaceholder= [[NSAttributedStringalloc]initWithString:@"用戶名/郵箱"attributes:@{NSForegroundColorAttributeName: color}];
[tempUserNameImageViewaddSubview:_userNameTextField];
THEME是主題名稱
同理,所有涉及到界面的地方都要監聽THEME通知,
IOS有關主題的問題 ThemeManager 類
1.創建路徑:初始化時先從指定的plist文件中讀取主題文件
2.根據路徑初始化有關主題的數組
3.如果這個數組為空,初始化為0個對象
4.接口 :
-(BOOL)downLoad:(NSDictionary *)dic Block:(void (^) (BOOL))a
{
//1.保存block
//2.從字典中獲得主題名稱
//3.數組中保存這個主題文件: 根據名字判斷主題是否已經存在
[self.dataArray containsObject:self.tempTheme];
//4.1存在:NSUserDefault保存——>通知中心發送通知post——>結束返回
//4.2 根據url發起網絡請求——>
進行下載——>
下載完成保存文件——>
}
-(void)saveData:(NSData *)data
{
保存到指定文件——>
解壓縮文件——>
用NSUserDefault記錄主題名,啟動的時候方便讀取——>
//4.3主題持久化工作
將主題名字保存到數組中,將整個數組寫到初始化時的plist文件目錄中 ,(裡面包含所有的主題名稱) writeToFile
//4.4保存完發送主題廣播 post
//4.5發送廣播,調用回調函數
//4.6在MainTabBarController裡面配置界面,相當於設置主題,不同主題,裡面的圖片的名字是不一樣的
}
在某個類中使用新的主題文件 比如:MainViewController:
-(void)dealloc{
[ [NSNotificationCenter defaultCenter] removeObserver:self name:THEME object :nil];
}
-(void)viewDidLoad
{
//順序不可以顛倒
[self createTabBarItem];
//接收通知後一定要在第一次讀取默認主題創建好之後再接收 createTabBarItem是布局界面的方法
[ [NSNotification defaultCenter] addObserver:self selector:@selector(createTabBarItem) name:THEME object:nil];
}
-(void)createTabBarItem
{
//設置界面主題圖片
}
tip 64 : 設置UITabBarItem文字屬性
tip 65 : 設置UITabBarItem背景圖片//設置文字顏色
if(iOS7) {
[[UITabBarItem appearance]setTitleTextAttributes:@{NSForegroundColorAttributeName: [UIColorwhiteColor]}forState:UIControlStateSelected];
}else{
[[UITabBarItem appearance]setTitleTextAttributes:@{UITextAttributeTextColor: [UIColorwhiteColor]}forState:UIControlStateSelected];
}
tip 66 : 一個View旋轉一定角度if(iOS7) {
item = [iteminitWithTitle:title[i]
image:[unSelectImageimageWithRenderingMode:UIImageRenderingModeAlwaysOriginal]
selectedImage:[selectImageimageWithRenderingMode:UIImageRenderingModeAlwaysOriginal]];
}else{
itemsetFinishedSelectedImage:selectImagewithFinishedUnselectedImage:unSelectImage];
item.title= title[i];
}
//M_PI == 3.14 == 180
[btn setTransform:CGAffineTransformMakeRotation(M_PI/7.2)];//25
tip 67 : 一些crash崩潰原因
1、對象裡面沒有某個方法
2、自己建的類沒有NSCopying協議,就去copy
3、對某類的對象進行歸檔接檔,沒有實現NSCoding協議
4、下標越界
5、導航視圖控制器出棧時,某個vc不在
6、數據為空,沒有初始化
tip 68 : id類型不能用點語法
tip 69 : 設置睡眠 & 產生真正的隨機數
sleep(1.f); // 睡眠一秒
arc4random()%10; // 10以內的隨機數
tip 70 :參數要遵循某種協議的寫法
voidplay(id ins) // look at here
{
if([insrespondsToSelector:@selector(playMusic)]) {
[insplayMusic];
}
}
tip 71 : NSString的一些特殊情況
//__autoreleasing對象設置為這樣,要等到離自己最近的釋放池銷毀時才release
//__unsafe__unretained不安全不釋放,為了兼容過去而存在,跟__weak很像,但是這個對象被銷毀後還在,不像__weak那樣設置為nil
//__weak一創建完,要是沒有引用,馬上釋放,將對象置nil
//
__weakNSMutableString*str = [NSMutableStringstringWithFormat:@"%@",@"xiaobai"];
//__weak的話但是是alloc的對象,要交給autorelease管理
//arc下,不要release和autorelease因為
tip 72 : 判斷類,成員,調用方法
[obj isMemberOfClass:[runTime class]] //判斷是不是一個一個類的成員
[obj isKindOfClass:[NSObject class]]//是不是從屬一個類,包括父類
[objconformsToProtocol:@protocol(NSCoding)]//是不是支持這一個協議
[objperformSelector:@selector(showA:)withObject:[NSNumbernumberWithInt:8]]//給方法發送消息
tip 73 : 文件操作注意事項
//NSFileHandle * fh = [NSFileHandle fileHandleForReadingAtPath:@"/Users/qianfeng/Desktop/C考試准備"];
//[fh seekToFileOffset:2];//定位到某處開始執行操作,顯示的seek會更新文件指針
//NSData * data = [fh availableData];
//NSData *data = [fh readDataOfLength:2];
寫文件的注意事項
voidtestArchiver()//“支持nscopy的可以寫到文件”
{
NSString* str =@"123445788";
NSArray* array = [[NSArray alloc]initWithObjects:@"nihao",nil];
[strwriteToFile:@"/Users/qianfeng/Desktop/筆記本使用注意事項2.text"atomically:YES encoding:NSUTF8StringEncodingerror:nil];
[arraywriteToFile:@"djhfdj"atomically:YES];//讀寫保護
}
voidtest3()//NSCode是能將OC類型寫到文件的
{
Myfiler* mf = [[Myfileralloc]init];
NSArray* array = [NSArray arrayWithObject:mf];
[arraywriteToFile:@"djhfdjf"atomically:YES];//失敗,因為普通類Myfiler不支持nscopy協議
}