iOS高仿淘寶購物車,功能模塊應有盡有
剛做完一個淘寶的購物車,按著淘寶做的,換了個產品經理,人家喜歡JD的購物車,一句話,咱換個風格,好心酸有沒有,天天刷存在感,只有我們苦逼了,那麼既然需求來了,就要按著大爺的要求改了,為了紀念下,咱寫個Demo給大家分享下。
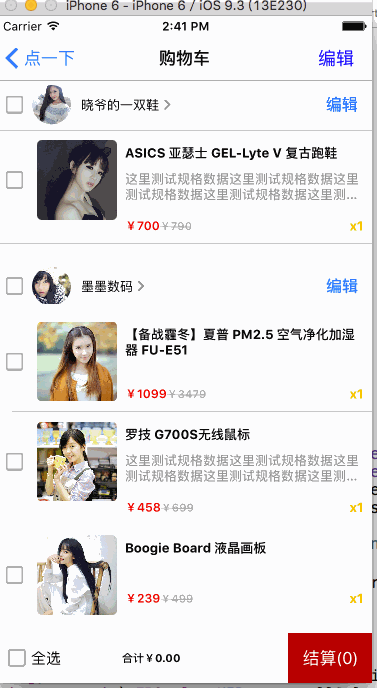
我擦,我一看代碼,我還是用AutoLayout做的,主界面代碼都能快接近800了,全加起來想想有點多啊,這簡直是用生命在寫Demo啊,該有的效果全有了,各位請看圖
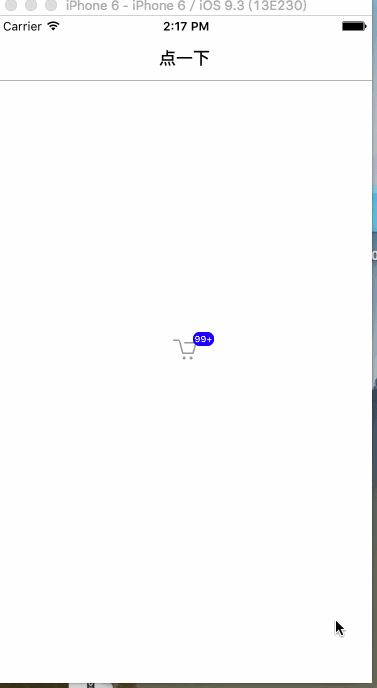
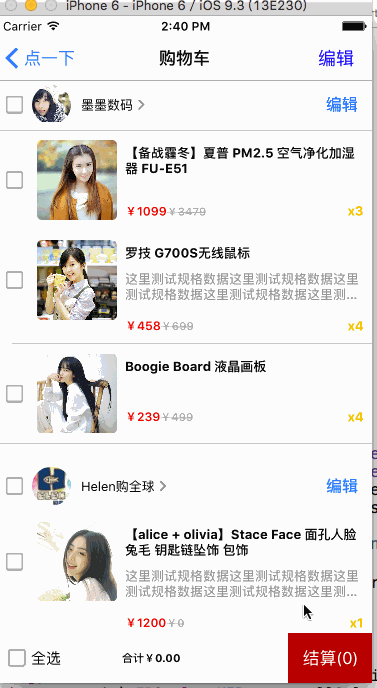
再來一組
簡單分析下功能
1.給UIKit控件增加Badge的擴展(這個擴展需要的去代碼裡面摳出來)
2.加入購物車的時候凹陷效果(這個效果我單獨開了個博客分析的)--->點擊打開鏈接
3.購物車純AutoLayout實現雙層Cell高度自適應(這個有點叼,沒用習慣的估計能看瞎)
4.購物車動態計算價格,多選或單選刪除,編輯切換Cell,簡單富文本等邏輯 (基礎邏輯展示)
5.給購物車底部增加相關商品推薦 (主要是給TableFooterView加了CollectionView)
6.一個展示圖片的組件 (JTSImageViewController)
7.為了不讓看的人無聊, 選了幾個妹子

簡單的看下代碼
1.進入購物車之前凹陷效果模擬添加購物車
- (void)show:(UITapGestureRecognizer *)tap
{
    if (!self.chooseVC){
        self.chooseVC = [[ChooseGoodsPropertyViewController alloc] init];
    }
    self.chooseVC.enterType = FirstEnterType;
    __weak typeof(self)weakSelf = self;
    self.chooseVC.block = ^{
        NSLog(@"點擊回調去購物車");
        // 下面一定要移除,不然你的控制器結構就亂了,基本邏輯層級我們已經寫在上面了,這個效果其實是addChildVC來的,最後的展示是在Window上的,一定要移除
        [weakSelf.chooseVC.view removeFromSuperview];
        [weakSelf.chooseVC removeFromParentViewController];
        weakSelf.chooseVC.view = nil;
        weakSelf.chooseVC = nil;
        MKJShoppingCartViewController *shop = [MKJShoppingCartViewController new];
        [weakSelf.navigationController pushViewController:shop animated:YES];
    };
    self.chooseVC.price = 256.0f;
    [self.navigationController presentSemiViewController:self.chooseVC withOptions:@{
                                                                                     KNSemiModalOptionKeys.pushParentBack    : @(YES),
                                                                                     KNSemiModalOptionKeys.animationDuration : @(0.6),
                                                                                     KNSemiModalOptionKeys.shadowOpacity     : @(0.3),
                                                                                     KNSemiModalOptionKeys.backgroundView : [[UIImageView alloc] initWithImage:[UIImage imageNamed:@"background_01"]]
                                                                                    }];
}
這種效果我已經單獨寫出來了,需要的朋友可以點擊打開鏈接
需要注意到的是他的層級關系,那麼如果你像我一樣要Push到下個界面的時候,務必把你的控制器和控制器的上View remove掉,最好直接把指針置nil,類似於上面的代碼這樣操作,不然你的界面就飛了
2.來看看我吊炸天的AutoLayout布局雙層Cell
先看看樹形結構
contentView
NormalView(包含了正常狀態下的控件)
EditBackView(包含了編輯狀態下的控件)
chooseButton
ProductImageView
需要看詳細布局的可以去下載Demo,感覺這種自適應的東西有點難講,我自己都懵逼了

這裡面有20來個控件,全約束好了,再配合FD一句代碼實現高度自適應而且能編輯非編
輯切換,這TM省了幾百行代碼有木有啊......爽啊
// 高度計算
- (CGFloat)tableView:(UITableView *)tableView heightForRowAtIndexPath:(NSIndexPath *)indexPath
{
    BuyerInfo *buyer = self.buyerLists[indexPath.section];
    if (buyer.buyerIsEditing)
    {
        return 100;
    }
    else
    {
        CGFloat actualHeight = [tableView fd_heightForCellWithIdentifier:shoppongID cacheByIndexPath:indexPath configuration:^(ShoppingCartCell *cell) {

            [self configCell:cell indexPath:indexPath];

        }];
        return actualHeight >= 100 ? actualHeight : 100;
    }
}
再設置一套代理,那麼這個Cell基本交互就解決了
@protocol ShoppingCartCellDelegate// 點擊單個商品選擇按鈕回調 - (void)productSelected:(ShoppingCartCell *)cell isSelected:(BOOL)choosed; // 點擊buyer選擇按鈕回調 - (void)buyerSelected:(NSInteger)sectionIndex; // 點擊buyer編輯回調按鈕 - (void)buyerEditingSelected:(NSInteger)sectionIdx; // 點擊垃圾桶刪除 - (void)productGarbageClick:(ShoppingCartCell *)cell; // 點擊編輯規格按鈕下拉回調 - (void)clickEditingDetailInfo:(ShoppingCartCell *)cell; // 商品的增加或者減少回調 - (void)plusOrMinusCount:(ShoppingCartCell *)cell tag:(NSInteger)tag; // 點擊圖片回調到主頁顯示 - (void)clickProductIMG:(ShoppingCartCell *)cell; @end @interface ShoppingCartCell : UITableViewCell @property (nonatomic,assign) id delegate;
3.簡單介紹下購物車裡面的交互功能
這裡功能的思路基本是一致的,我們給商品model和buyerModel分別添加BOOL字段來
進行開或者關,然後在加載cell的時候做進一步判斷
第一:例如計算總價(只需要更改商品的BOOL字段)
#pragma mark - 計算選出商品的總價
- (CGFloat)countTotalPrice
{
    CGFloat totalPrice = 0.0;
    for (BuyerInfo *buyer in self.buyerLists) {
        if (buyer.buyerIsChoosed) {
            for (ProductInfo *product in buyer.prod_list) {
                totalPrice += product.order_price * product.count;
            }
        }else{
            for (ProductInfo *product in buyer.prod_list) {
                if (product.productIsChoosed) {
                    totalPrice += product.order_price * product.count;
                }
            }
        }
    }
    return totalPrice;
}
第二:例如多選 刪除操作
這裡需要注意的是,當刪除批量的時候,一定不能再for循環裡面一個一個刪除,我們需要用一個臨時數組抱起來,然後再統一刪除,不然會越界崩掉
- (void)alertView:(UIAlertView *)alertView clickedButtonAtIndex:(NSInteger)buttonIndex
{
    // 單個刪除
    if (alertView.tag == 101) {
        if (buttonIndex == 1)
        {
            NSIndexPath *indexpath = [self.tableView indexPathForCell:self.tempCellArray.firstObject];
            BuyerInfo *buyer = self.buyerLists[indexpath.section];
            ProductInfo *product = buyer.prod_list[indexpath.row];
            if (buyer.prod_list.count == 1) {
                [self.buyerLists removeObject:buyer];
            }
            else
            {
                [buyer.prod_list removeObject:product];
            }
            // 這裡刪除之後操作涉及到太多東西了,需要
            [self updateInfomation];
        }
    }
    else if (alertView.tag == 102) // 多個或者單個
    {
        if (buttonIndex == 1)
        {
            // 買手數組
            NSMutableArray *buyerTempArr = [[NSMutableArray alloc] init];
            for (BuyerInfo *buyer in self.buyerLists)
            {
                if (buyer.buyerIsChoosed)
                {
                    // 如果買手都被選擇了,那麼直接刪除買手
                    [buyerTempArr addObject:buyer];
                }
                else
                {
                    // 商品數組
                    NSMutableArray *productTempArr = [[NSMutableArray alloc] init];
                    for (ProductInfo *product in buyer.prod_list)
                    {
                        if (product.productIsChoosed)
                        {
                            // 這裡注意,批量刪除商品別一次刪除一個,需要放到一個容器裡面一次性刪除
                            [productTempArr addObject:product];
                        }
                    }
                    if (![[MKJRequestHelper shareRequestHelper] isEmptyArray:productTempArr])
                    {
                        [buyer.prod_list removeObjectsInArray:productTempArr];
                    }
                }
            }
            [self.buyerLists removeObjectsInArray:buyerTempArr];
            [self updateInfomation];
        }
    }
}
第三:就是要注意的事項,當你操作刪除,選中,增加,減少的操作,都需要一並更新
價格 數量等UI
#pragma mark - 刪除之後一些列更新操作
- (void)updateInfomation
{
    // 會影響到對應的買手選擇
    for (BuyerInfo *buyer in self.buyerLists) {
        NSInteger count = 0;
        for (ProductInfo *product in buyer.prod_list) {
            if (product.productIsChoosed) {
                count ++;
            }
        }
        if (count == buyer.prod_list.count) {
            buyer.buyerIsChoosed = YES;
        }
    }
    // 再次影響到全部選擇按鈕
    self.allSelectedButton.selected = [self isAllProcductChoosed];

    // 總價選擇
    self.totalPriceLabel.text = [NSString stringWithFormat:@"合計¥%.2f",[self countTotalPrice]];

    // 結算UI
    [self.accountButton setTitle:[NSString stringWithFormat:@"結算(%ld)",[self countTotalSelectedNumber]] forState:UIControlStateNormal];

    // 刷新數據
    [self.tableView reloadData];

    // 如果刪除干淨了
    if ([[MKJRequestHelper shareRequestHelper] isEmptyArray:self.buyerLists]) {
        [self clickAllEdit:self.rightButton];
        self.rightButton.enabled = NO;
    }
}
4.給底部FooterView增加一個CollectionView,來應對各種需要增加的需求
// 請求相關商品數據
    [[MKJRequestHelper shareRequestHelper] requestMoreRecommandInfo:^(id obj, NSError *err) {

        [weakSelf.relatedProducts removeAllObjects];
        weakSelf.relatedProducts = [[NSMutableArray alloc] initWithArray:(NSArray *)obj];
        // 刷新數據
        [weakSelf.collectionView reloadData];
        // 根據刷新的數據,來獲取CollectionViewlayout對應布局contenSize的高度和寬度(我們需要高度)
        weakSelf.underFooterView.frame = CGRectMake(0, 0, [UIScreen mainScreen].bounds.size.width, weakSelf.collectionView.collectionViewLayout.collectionViewContentSize.height);
        // 現在再給FooterView進行UI賦值,避免出現不順暢的顯示
        weakSelf.tableView.tableFooterView = weakSelf.underFooterView;
    }];
5. 圖片的一個組件(JTSImageViewController)基本用法展示
#pragma mark - 點擊圖片展示Show
- (void)clickProductIMG:(ShoppingCartCell *)cell
{
    NSIndexPath *indexpath = [self.tableView indexPathForCell:cell];
    BuyerInfo *buyer = self.buyerLists[indexpath.section];
    ProductInfo *product = buyer.prod_list[indexpath.row];
    JTSImageInfo *imageInfo = [[JTSImageInfo alloc] init];
    NSString *imageURLStr = product.image;
    imageInfo.imageURL  = [NSURL URLWithString:imageURLStr];
    JTSImageViewController *imageViewer = [[JTSImageViewController alloc]
                                           initWithImageInfo:imageInfo
                                           mode:JTSImageViewControllerMode_Image
                                           backgroundStyle:JTSImageViewControllerBackgroundOption_Scaled];
    [imageViewer showFromViewController:self transition:JTSImageViewControllerTransition_FromOffscreen];
}
主要的代碼就這麼點,關鍵還是些邏輯的判斷,最後檢查下內存洩漏問題
- (void)dealloc
{
NSLog(@"%s____dealloc",object_getClassName(self));
}
打印了就OK了一個簡單的Demo就這麼寫完了,項目中就需要和服務器交互了,這裡是本地的數據,各位覺得需要可以下載Demo看看
Demo地址:點擊打開鏈接
其實寫這個需求之前我也去網上搜索了很多相關的購物車Demo,簡直不能看啊,處理很簡單,UI也很簡單,根本滿足不了我,最後還是自己寫了一個那麼詳細的留作紀念,可能還存在很多問題,畢竟只是個Deme,拋磚引玉,各位覺得不錯的可以下載研究下,覺得有幫到您的記得點個贊哦~~~~~~