實現iOS圖片等資源文件的熱更新化(二):自定義的動態 imageNamed
這篇文章,要解決的是,使用一個自定義的 imageNamed 函數來替代系統的 imageNamed 函數.內部邏輯,將貫穿對比論證 關於”合適”的圖片的定義.對iOS加載圖片的規則不是很熟悉的童鞋,可以著重看這篇.
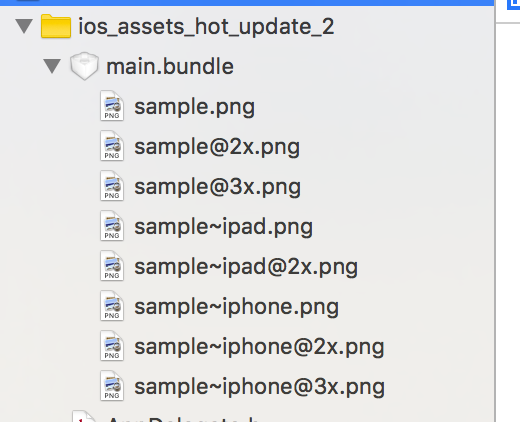
不同後綴圖片加載的優先級
iPhone 7 plus(iOS10.0): [email protected] > [email protected] > sample~iphone.png >sample.png 其他後綴的圖片總是不被加載.
iPad Pro 12.9 inch(iOS10.0): [email protected] > sample~ipad.png > sample.png 其他後綴的圖片總是不被加載.
可以使用同名不同內容的圖片來對比觀察.優先級從高到低.優先級較高的優先被加載,優先級為0的永遠不會被加載.僅以iPhone 7 plus 和 iPad Pro為例分析,其他情況可自行.所用驗證版本為iOS10,未來不同機型手機和系統可能會有差異.
想自己動手試一下的,可以下載示例: https://github.com/ios122/ios_assets_hot_update/raw/master/res/ios_assets_hot_update_2.zip 很小,只有100多K.編譯,我此時用的是 Xcode 8.
使用bundle包放置圖片等資源文件
資源把到一個bundle包中,便於保留資源的目錄結構,也方便整體管理與替換.iOS中的bundle包,就一個一個特殊的以.bunle結尾的文件夾.示例中,我使用的是main.bundle.另外,關於bundle保留資源目錄結構這個特點,是react-native中很依賴的一個特性,以後你的項目中或許也會需要.如果單單只是從原有 Images.xcassets 遷移代碼的話,此處都放於同一層級即可.
使用 imageWithContentsOfFile: 加載圖片
把圖片放到資源文件夾main.bundle後,再加載圖片,可以參考下面的代碼,這樣做的額外的好處就是可以適當減小圖片加載的內存占用問題:
NSString * bundlePath = [[NSBundle mainBundle].resourcePath stringByAppendingPathComponent:@"main.bundle"];
NSBundle * mainBundle = [NSBundle bundleWithPath:bundlePath];
NSString * imgPath = [mainBundle pathForResource:@"sample" ofType:@"png"];
self.sampleImageView.image = [UIImage imageWithContentsOfFile: imgPath];
使iPhone @3x 與iPad @2x 共用同一張圖片
首先是需要顯示加載 @3x 的圖片:
NSString * imgPath = [mainBundle pathForResource:@"sample@3x" ofType:@"png"];
此時代碼,在iPhone 7 / iPhone 7 plus/ iPad Pro,都能顯示圖片,直接輸出圖片本身的尺寸都為 原圖尺寸的 1/3.
NSLog(@"加載後的圖片尺寸:%@",[NSValue valueWithCGSize:self.sampleImageView.image.size]);
但是,此處有一個問題.@3x總是被解讀為三倍圖,在iPhone上,正是我們需要的尺寸,但是在iPad上,尺寸就有些偏小了.我們在iPad上,通常總是需要將此張圖按照@2x圖來顯示.這是一個規律!做過iPhone和iPad通用圖標尺寸適配的童鞋,應該早就注意到了.
所以,現在要解決的關鍵技術問題是:如何把 @3x圖,在iPad上按照@2x圖來解讀?相對完整代碼如下,最終輸出的圖片尺寸在iPhone上為原始尺寸的1/3,在iPad上為原始尺寸的1/2,正是我們需要的:
 NSString * bundlePath = [[NSBundle mainBundle].resourcePath stringByAppendingPathComponent:@"main.bundle"];
 NSBundle * mainBundle = [NSBundle bundleWithPath:bundlePath];
 NSString * imgPath = [mainBundle pathForResource:@"sample@3x" ofType:@"png"];

 UIImage * image;
 static NSString * model;

 if (!model) {
     model = [[UIDevice currentDevice]model];
 }

 if ([model isEqualToString:@"iPad"]) {
     NSData *imageData = [NSData dataWithContentsOfFile: imgPath];
     image = [UIImage imageWithData:imageData scale:2.0];
 }else{
     image = [UIImage imageWithContentsOfFile: imgPath];
 }

 self.sampleImageView.image = image;

 NSLog(@"加載後的圖片尺寸:%@",[NSValue valueWithCGSize:self.sampleImageView.image.size]);
封裝為類目(category),實現自定義的 imageNamed
此處實現了一個簡單夠用的類目方法,支持從指定bundle讀取指定名字的圖片:
#import "UIImage+imageNamed_bundle_.h"

@implementation UIImage (imageNamed_bundle_)
+ (UIImage *)imageNamed:(NSString *)imgName bundle:(NSString *)bundleName
{
    bundleName = [NSString stringWithFormat:@"%@.bundle",bundleName];
    imgName = [NSString stringWithFormat:@"%@@3x",imgName];

    NSString * bundlePath = [[NSBundle mainBundle].resourcePath stringByAppendingPathComponent: bundleName];
    NSBundle * mainBundle = [NSBundle bundleWithPath:bundlePath];
    NSString * imgPath = [mainBundle pathForResource:imgName ofType:@"png"];

    UIImage * image;
    static NSString * model;

    if (!model) {
        model = [[UIDevice currentDevice]model];
    }

    if ([model isEqualToString:@"iPad"]) {
        NSData *imageData = [NSData dataWithContentsOfFile: imgPath];
        image = [UIImage imageWithData:imageData scale:2.0];
    }else{
        image = [UIImage imageWithContentsOfFile: imgPath];
    }
    return  image;
}
@end
借助類目,原來的調用,可以簡化為:
UIImage * image = [UIImage imageNamed:@"sample" bundle:@"main"];
self.sampleImageView.image = image;
也支持有層級結構的圖片資源的讀取呦:
UIImage * image = [UIImage imageNamed:@"sub/sample" bundle:@"main"];
self.sampleImageView.image = image;