最簡單的iOS直播推流(三)使用系統接口捕獲音視頻數據
最簡單的iOS 推流代碼,視頻捕獲,軟編碼(faac,x264),硬編碼(aac,h264),美顏,flv編碼,rtmp協議,陸續更新代碼解析,你想學的知識這裡都有,願意懂直播技術的同學快來看!!
源代碼:https://github.com/hardman/AWLive
通過系統相機錄制視頻獲取音視頻數據,是推流的第一步。
源碼中提供2種獲取音視頻數據的方法:一是使用系統自帶接口;二是使用GPUImage。
本篇首先介紹第一種。
網絡上關於獲取視頻數據的代碼有不少,但是為了方便代碼閱讀,這裡簡要介紹一下。
[注意]請仔細閱讀代碼注釋
相關代碼入口
整套推流代碼的入口:AWAVCaptureManager,它是根據參數創建上述2種獲取數據方法的一個工廠類。
可以通過設置 captureType 來決定使用哪種數據獲取方式。
AWAVCaptureManager部分代碼如下:
typedef enum : NSUInteger {
    AWAVCaptureTypeNone,
    AWAVCaptureTypeSystem,
    AWAVCaptureTypeGPUImage,
} AWAVCaptureType;

@interface AWAVCaptureManager : NSObject
//視頻捕獲類型
@property (nonatomic, unsafe_unretained) AWAVCaptureType captureType;
@property (nonatomic, weak) AWAVCapture *avCapture;

//省略其他代碼
......
@end
設置了captureType之後,直接可以通過avCapture獲取到正確的捕獲視頻數據的對象了。
AWAVCapture 是一個虛基類(c++中的說法,不會直接產生對象,只用來繼承的類,java中叫做抽象類)。
它的兩個子類分別是 AWSystemAVCapture 和 AWGPUImageAVCapture。
這裡使用了多態。
如果 captureType設置的是 AWAVCaptureTypeSystem,avCapture獲取到的真實對象就是 AWSystemAVCapture類型;
如果 captureType設置的是 AWAVCaptureTypeGPUImage,avCapture獲取到的真實對象就是 AWGPUImageAVCapture類型。
AWSystemAVCapture類的功能只有一個:調用系統相機,獲取音視頻數據。
相機數據獲取的方法
分為3步驟:
1. 初始化輸入輸出設備。
2. 創建AVCaptureSession,用來管理視頻與數據的捕獲。
3. 創建預覽UI。
還包括一些其他功能:
1. 切換攝像頭
2. 更改fps
在代碼中對應的是 AWSystemAVCapture中的 onInit方法。只要初始化就會調用。
【注意】請仔細閱讀下文代碼中的注釋
初始化輸入設備
-(void) createCaptureDevice{
// 初始化前後攝像頭
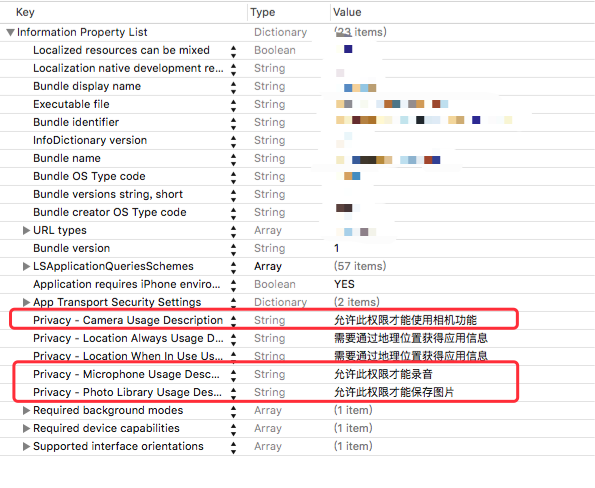
// 執行這幾句代碼後,系統會彈框提示:應用想要訪問您的相機。請點擊同意
// 另外iOS10 需要在info.plist中添加字段NSCameraUsageDescription。否則會閃退,具體請自行baidu。
NSArray *videoDevices = [AVCaptureDevice devicesWithMediaType:AVMediaTypeVideo];
self.frontCamera = [AVCaptureDeviceInput deviceInputWithDevice:videoDevices.firstObject error:nil];
self.backCamera =[AVCaptureDeviceInput deviceInputWithDevice:videoDevices.lastObject error:nil];
// 初始化麥克風
// 執行這幾句代碼後,系統會彈框提示:應用想要訪問您的麥克風。請點擊同意
// 另外iOS10 需要在info.plist中添加字段NSMicrophoneUsageDescription。否則會閃退,具體請自行baidu。
AVCaptureDevice *audioDevice = [AVCaptureDevice defaultDeviceWithMediaType:AVMediaTypeAudio];
self.audioInputDevice = [AVCaptureDeviceInput deviceInputWithDevice:audioDevice error:nil];
//省略其他代碼
...
}
初始化輸出設備
-(void) createOutput{
    //創建數據獲取線程
    dispatch_queue_t captureQueue = dispatch_get_global_queue(DISPATCH_QUEUE_PRIORITY_DEFAULT, 0);

    //視頻數據輸出
    self.videoDataOutput = [[AVCaptureVideoDataOutput alloc] init];
    //設置代理,需要當前類實現protocol:AVCaptureVideoDataOutputSampleBufferDelegate
    [self.videoDataOutput setSampleBufferDelegate:self queue:captureQueue];
    //拋棄過期幀,保證實時性
    [self.videoDataOutput setAlwaysDiscardsLateVideoFrames:YES];
    //設置輸出格式為 yuv420
    [self.videoDataOutput setVideoSettings:@{
                                             (__bridge NSString *)kCVPixelBufferPixelFormatTypeKey:@(kCVPixelFormatType_420YpCbCr8BiPlanarVideoRange)
                                             }];

    //音頻數據輸出
    self.audioDataOutput = [[AVCaptureAudioDataOutput alloc] init];
    //設置代理,需要當前類實現protocol:AVCaptureAudioDataOutputSampleBufferDelegate
    [self.audioDataOutput setSampleBufferDelegate:self queue:captureQueue];

    // AVCaptureVideoDataOutputSampleBufferDelegate 和 AVCaptureAudioDataOutputSampleBufferDelegate 回調方法名相同都是:
    // captureOutput:(AVCaptureOutput *)captureOutput didOutputSampleBuffer:(CMSampleBufferRef)sampleBuffer fromConnection:(AVCaptureConnection *)connection
    // 最終視頻和音頻數據都可以在此方法中獲取。
}
創建 captureSession
// AVCaptureSession 創建邏輯很簡單,它像是一個中介者,從音視頻輸入設備獲取數據,處理後,傳遞給輸出設備(數據代理/預覽layer)。
-(void) createCaptureSession{
    //初始化
    self.captureSession = [AVCaptureSession new];

    //修改配置
    [self.captureSession beginConfiguration];

    //加入視頻輸入設備
    if ([self.captureSession canAddInput:self.videoInputDevice]) {
        [self.captureSession addInput:self.videoInputDevice];
    }

    //加入音頻輸入設備
    if ([self.captureSession canAddInput:self.audioInputDevice]) {
        [self.captureSession addInput:self.audioInputDevice];
    }

    //加入視頻輸出
    if([self.captureSession canAddOutput:self.videoDataOutput]){
        [self.captureSession addOutput:self.videoDataOutput];
        [self setVideoOutConfig];
    }

    //加入音頻輸出
    if([self.captureSession canAddOutput:self.audioDataOutput]){
        [self.captureSession addOutput:self.audioDataOutput];
    }

    //設置預覽分辨率
    //這個分辨率有一個值得注意的點:
    //iphone4錄制視頻時 前置攝像頭只能支持 480*640 後置攝像頭不支持 540*960 但是支持 720*1280
    //諸如此類的限制,所以需要寫一些對分辨率進行管理的代碼。
    //目前的處理是,對於不支持的分辨率會拋出一個異常
    //但是這樣做是不夠、不完整的,最好的方案是,根據設備,提供不同的分辨率。
    //如果必須要用一個不支持的分辨率,那麼需要根據需求對數據和預覽進行裁剪,縮放。
    if (![self.captureSession canSetSessionPreset:self.captureSessionPreset]) {
        @throw [NSException exceptionWithName:@"Not supported captureSessionPreset" reason:[NSString stringWithFormat:@"captureSessionPreset is [%@]", self.captureSessionPreset] userInfo:nil];
    }

    self.captureSession.sessionPreset = self.captureSessionPreset;

    //提交配置變更
    [self.captureSession commitConfiguration];

    //開始運行,此時,CaptureSession將從輸入設備獲取數據,處理後,傳遞給輸出設備。
    [self.captureSession startRunning];
}
創建預覽UI
// 其實只有一句代碼:CALayer layer = [AVCaptureVideoPreviewLayer layerWithSession:self.captureSession];
// 它其實是 AVCaptureSession的一個輸出方式而已。
// CaptureSession會將從input設備得到的數據,處理後,顯示到此layer上。
// 我們可以將此layer變換後加入到任意UIView中。
-(void) createPreviewLayer{
    self.previewLayer = [AVCaptureVideoPreviewLayer layerWithSession:self.captureSession];
    self.previewLayer.frame = self.preview.bounds;
    [self.preview.layer addSublayer:self.previewLayer];
}
切換攝像頭
-(void)setVideoInputDevice:(AVCaptureDeviceInput *)videoInputDevice{
    if ([videoInputDevice isEqual:_videoInputDevice]) {
        return;
    }
    //captureSession 修改配置
    [self.captureSession beginConfiguration];
    //移除當前輸入設備
    if (_videoInputDevice) {
        [self.captureSession removeInput:_videoInputDevice];
    }
    //增加新的輸入設備
    if (videoInputDevice) {
        [self.captureSession addInput:videoInputDevice];
    }

    //提交配置,至此前後攝像頭切換完畢
    [self.captureSession commitConfiguration];

    _videoInputDevice = videoInputDevice;
}
設置fps
-(void) updateFps:(NSInteger) fps{
    //獲取當前capture設備
    NSArray *videoDevices = [AVCaptureDevice devicesWithMediaType:AVMediaTypeVideo];

    //遍歷所有設備(前後攝像頭)
    for (AVCaptureDevice *vDevice in videoDevices) {
        //獲取當前支持的最大fps
        float maxRate = [(AVFrameRateRange *)[vDevice.activeFormat.videoSupportedFrameRateRanges objectAtIndex:0] maxFrameRate];
        //如果想要設置的fps小於或等於做大fps,就進行修改
        if (maxRate >= fps) {
            //實際修改fps的代碼
            if ([vDevice lockForConfiguration:NULL]) {
                vDevice.activeVideoMinFrameDuration = CMTimeMake(10, (int)(fps * 10));
                vDevice.activeVideoMaxFrameDuration = vDevice.activeVideoMinFrameDuration;
                [vDevice unlockForConfiguration];
            }
        }
    }
}
至此,我們達到了所有目標:能夠錄制視頻,預覽,獲取音視頻數據,切換前後攝像頭,修改捕獲視頻的fps。

- 九,iOS圓形界面菜單的完成
- iOS開發中AVPlayer的簡單應用
- ios 簡單模仿隨便走的AR功能(原理)
- 基於 socket.io, 簡單實現多平台類似你猜我畫 socket 數據傳輸
- iOS 進度條、加載、安裝動畫的簡單實現
- iOS開發:Web應用簡單本地化
- 方便簡單 不越獄查看iPhone電池實際容量
- iphone6/6 plus怎麼貼膜? iphone6/6 plus簡單快捷貼膜圖文教程[多圖]
- 怎樣查詢蘋果手機微信聊天記錄?簡單方法[多圖]
- 蘋果iOS8越獄後簡單的終端安裝插件圖文教程[多圖]
- 超簡單!如何快速更新體驗蘋果iOS10開發者預覽版Beta1
- 蘋果iOS10.2開發者預覽版Beta1簡單上手體驗
- 越來越像:iOS9與Android M簡單上手對比
- 最簡潔的iPhone任務管理App:Task
- 升級iOS6最新教程 史上最簡單的升級iOS6安裝方法