UICollectionView動畫
作者:LiuChunGui
一、簡單使用
UICollectionView更新事件有四種分別是插入、刪除、刷新、移動, api使用起來和UITableView類似,具體可以自己在代碼中找,如果需要執行多個更新事件,可以放到performBatchUpdates中的updates閉包中作為一組動畫,然後全部執行完之後通過completion調回。
collectionView.performBatchUpdates({ () -> Void in
            collectionView.insertItemsAtIndexPaths(insertIndexPaths)
            collectionView.moveItemAtIndexPath(currentIndexPath, toIndexPath: toIndexPath)
            }, completion: { (isFinish) -> Void in
        })
二、UICollectionView動畫
四種不同的更新事件,系統默認會帶有動畫,不過是比較簡單的。我們可以自定義layout或者繼承flowLayout,在內部實現我們自己想要的動畫。下面,我們來說說動畫的流程,以及系統默認的四種動畫內部是如何的,並且通過代碼來修改達到自己想要的動畫。
CollectionView動畫流程
當我們在外部調用CollectionView相關的api去插入、刪除、刷新、移動cell時,首先會通過layout中的layoutAttributesForElementsInRect方法獲取更新以後的布局信息,然後通過prepareForCollectionViewUpdates方法來通知layout哪些內容將會發生改變。之後,通過調用layout中的initialLayoutAttributesForAppearingItemAtIndexPath、finalLayoutAttributesForDisappearingItemAtIndexPath方法獲取對應indexPath的剛出現時最初布局屬性和消失時最終布局屬性。而後形成兩個動畫過程分別是剛出現時最初布局->更新後布局的出現動畫和更新前布局->消失時最終布局的消失動畫,而collectionView中'插入'、'刪除'、'刷新'和'移動'動畫都是基於這兩個動畫組合形成的。最後,等這一系列動畫執行完之後,最後會調用layout中finalizeCollectionViewUpdates方法,這個方法仍然放在動畫塊中,我們可以在這個方法當中添加額外的動畫。
從上面流程可以看出,在更新的時候,由於更新前布局和更新後布局都是在更新動畫前已經設置好了,我們不能去胡亂更改布局,所以我們只能通過initialLayoutAttributesForAppearingItemAtIndexPath和finalLayoutAttributesForDisappearingItemAtIndexPath兩個方法來更改剛出現時最初布局屬性和消失時最終布局屬性,即我們只能更改出現動畫的起點和消失動畫的終點。
為了更方面的下面說明,引申出兩個名詞:
出現動畫:initialLayoutAttributesForAppearingItemAtIndexPath獲取對應indexPath的剛出現時最初布局->更新後布局變化過程
消失動畫:更新之前的布局->finalLayoutAttributesForDisappearingItemAtIndexPath方法獲取對應indexPath的消失時最終布局的變化過程
注意,出現動畫和消失動畫針對的是一個cell單元。
下面我們通過代碼示例來實現插入、刪除、刷新、移動動畫。 代碼示例工程:UICollectionViewAnimationDemo
在這個Demo工程中有一個BGSelectImageLayout,它是CollectionView的layout,它的布局方式是水平橫向滑動,並且只有一組,每一個普通的cell大小都是itemSize,而選中的cell則寬度是itemSize*2。
插入動畫:
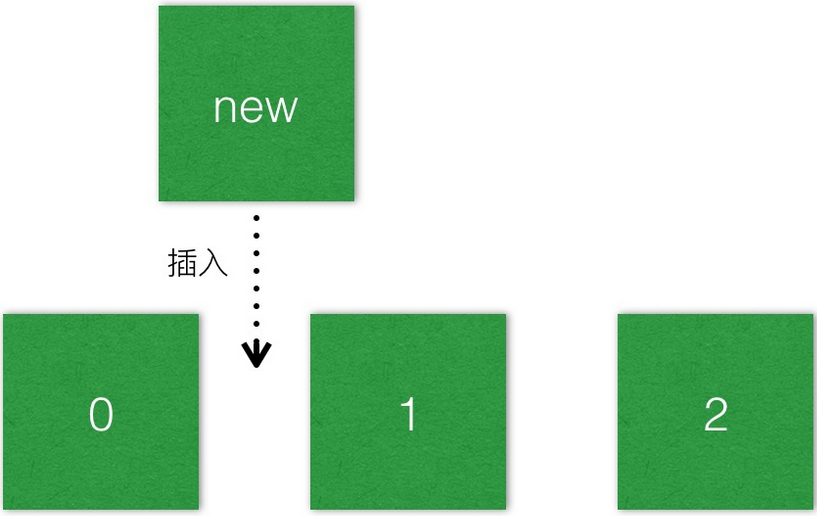
在當前的布局下,每插入一個cell時,都會影響它後面所有cell布局變化。
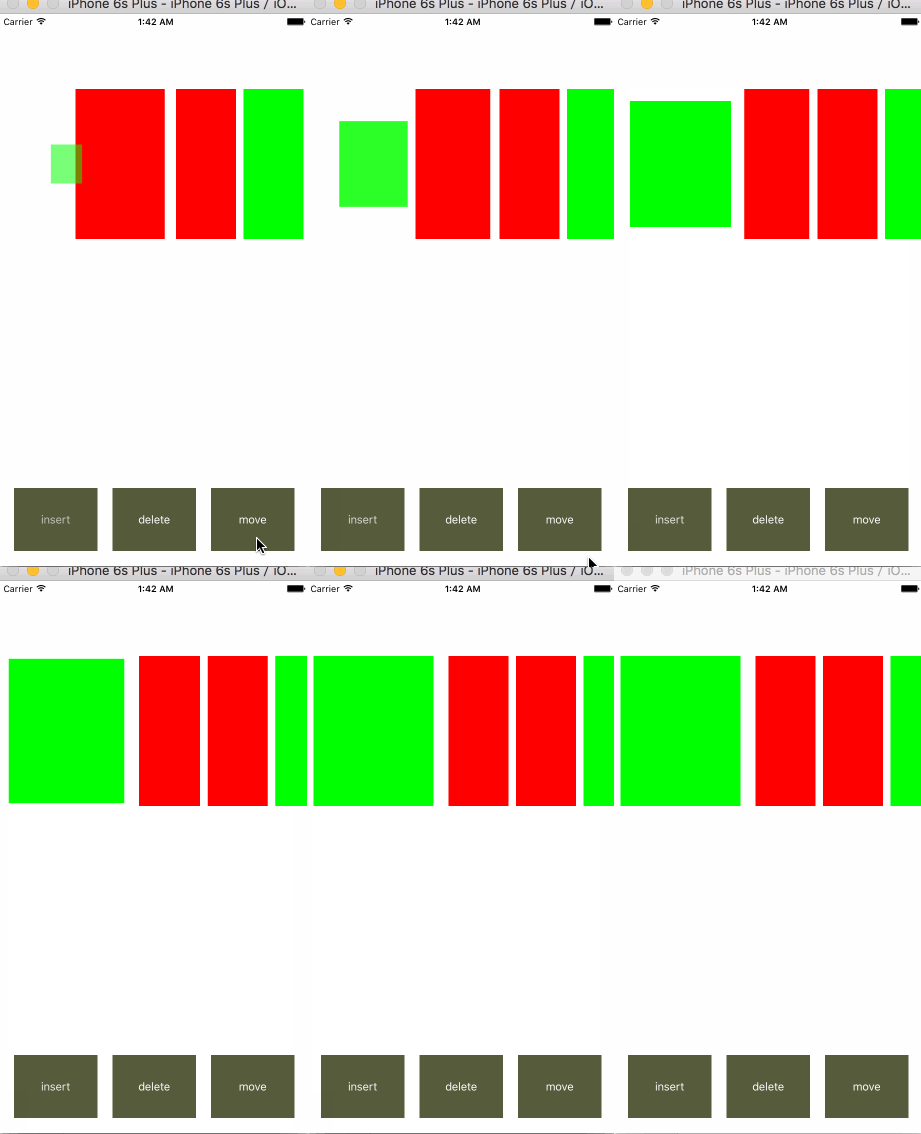
例如CollectionView有一行三個cell,為了更好的說明將indexPath是(0,0),(0,1),(0,2)標記為0,1,2。當在第1個位置插入一個cell時,如下圖:
而在這個插入過程中,視覺上會有三個動畫過程。new插入到位置1為過程1,1移動一個單位到2為過程2,2移動一個單位到一個新的位置3為過程3,如下圖:
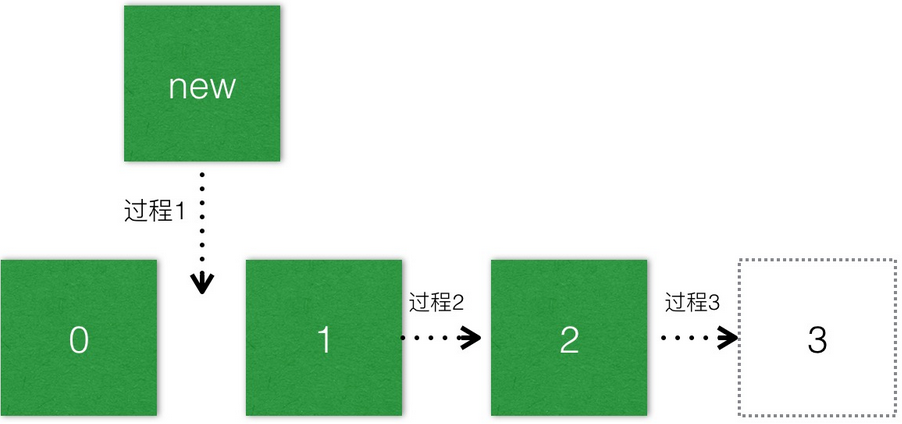
雖然視覺上只有三個動畫過程,但其實有五個動畫。其中,過程1是1位置的出現動畫;過程2是1位置的消失動畫和2位置的出現動畫重合而成;過程3是2位置的消失動畫和3位置的出現動畫。
其中值得注意的三點,一是除了最後一個,前面的cell消失動畫與它後面cell出現動畫重合,這樣看起來就是當前位置的cell向後平移了一個位置;二是最後一個cell只有出現動畫,沒有消失動畫,整個過程出現動畫會多一個;三是插入的cell的出現動畫是默認是alpha從0到1的淡入效果。
在代碼中,想獲得一個插入的cell從小變大的出現效果和其它cell整體向後移動一個位置的動畫效果,可以如下實現:
override func initialLayoutAttributesForAppearingItemAtIndexPath(itemIndexPath: NSIndexPath) -> UICollectionViewLayoutAttributes? {
    let attributes = super.initialLayoutAttributesForAppearingItemAtIndexPath(itemIndexPath)?.copy() as? UICollectionViewLayoutAttributes
    if self.insertIndexPathArr.contains(itemIndexPath) {
        attributes?.transform = CGAffineTransformMakeScale(0.0, 0.0)
        attributes?.alpha = 0
    }
    else {
        //設置為前一個item的frame
        attributes?.frame = self.currentFrameWithIndexPath(NSIndexPath(forRow: itemIndexPath.row-1, inSection: itemIndexPath.section))
    }
    return attributes
}
override func finalLayoutAttributesForDisappearingItemAtIndexPath(itemIndexPath: NSIndexPath) -> UICollectionViewLayoutAttributes? {
   let attributes = super.finalLayoutAttributesForDisappearingItemAtIndexPath(itemIndexPath)?.copy() as? UICollectionViewLayoutAttributes
     attributes?.frame = self.currentFrameWithIndexPath(NSIndexPath(forRow: itemIndexPath.row+1, inSection: itemIndexPath.section))
     return attributes
}
這裡為了看到效果,我在模擬器的Debug模式下勾選了Slow Animations調慢了動畫:
刪除動畫:
在上面的位置1插入一個cell後,cell的數量變成了4個,分別是0、1、2、3,它們對應的indexPath為(0,0)、(0,1)、(0,2)、(0,3)。當要刪除位置1的cell時,與插入類似,系統默認也會有三個動畫過程,如下圖:
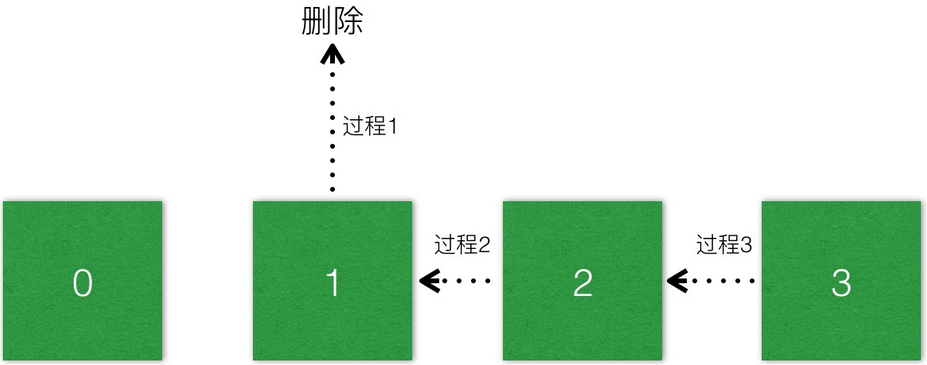
其中,動畫過程1是在位置1執行一個消失動畫;過程2是位置1的出現動畫和位置2的消失動畫重合而成;過程3是位置2的出現動畫和位置3的消失動畫重合而成。
需要注意的是,一是與插入不同,重合後的效果是cell向前平移了一個位置;二是最後一個位置只有消失動畫沒有出現動畫,整個過程消失動畫數會多一個;三是刪除的cell的出現動畫默認是從1到0的淡出效果。
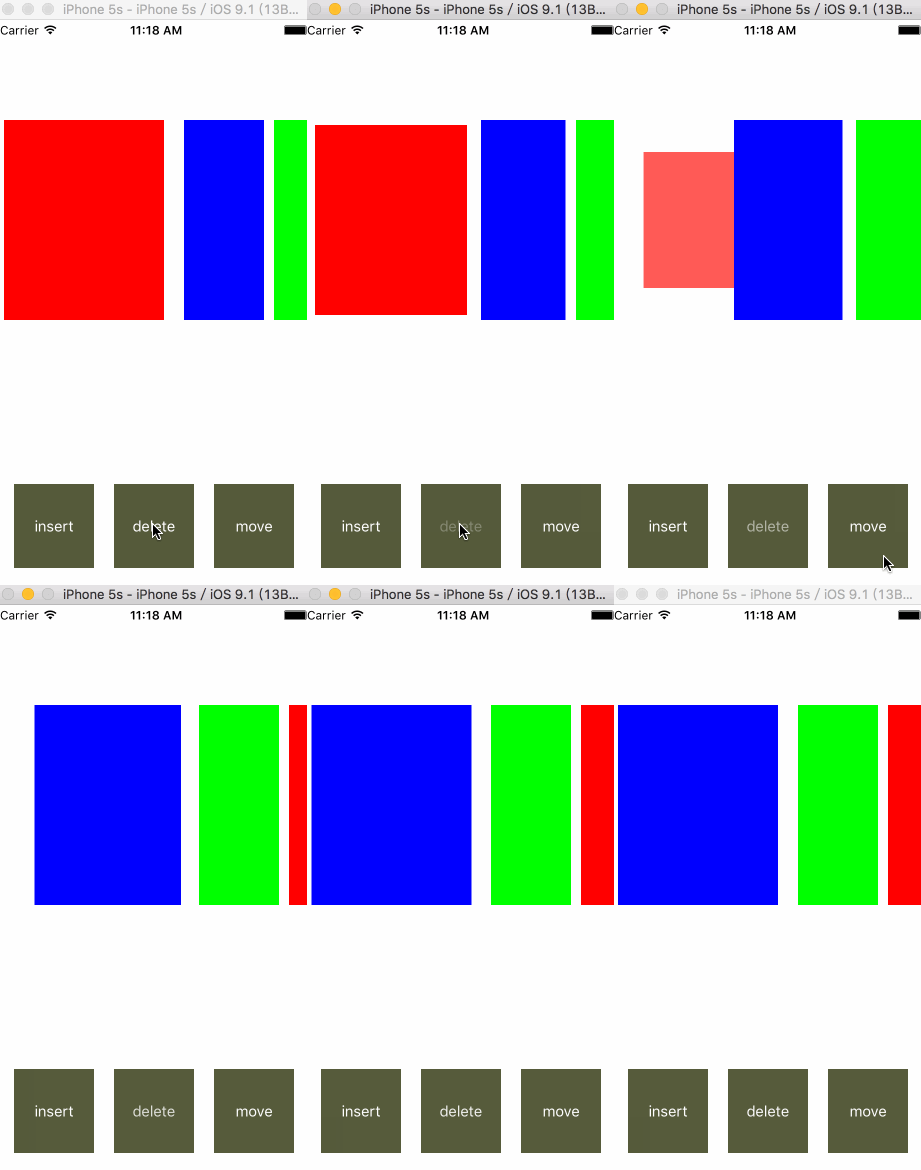
在代碼中,實現一個與插入相對應的動畫,即刪除的cell從大到小的淡出效果和其它cell整體向前移動一個位置的效果,可以如下實現:
override func initialLayoutAttributesForAppearingItemAtIndexPath(itemIndexPath: NSIndexPath) -> UICollectionViewLayoutAttributes? {
    let attributes = super.initialLayoutAttributesForAppearingItemAtIndexPath(itemIndexPath)?.copy() as? UICollectionViewLayoutAttributes
    attributes?.frame = self.currentFrameWithIndexPath(NSIndexPath(forRow: itemIndexPath.row+1, inSection: itemIndexPath.section))
    return attributes
}
override func finalLayoutAttributesForDisappearingItemAtIndexPath(itemIndexPath: NSIndexPath) -> UICollectionViewLayoutAttributes? {
        let attributes = super.finalLayoutAttributesForDisappearingItemAtIndexPath(itemIndexPath)?.copy() as? UICollectionViewLayoutAttributes
    if self.deleteIndexPathArr.contains(itemIndexPath) {
        //這裡寫成縮放成(0,0)直接就不見了
        attributes?.transform = CGAffineTransformMakeScale(0.1, 0.1)
        attributes?.alpha = 0.0
    }
    else {
        attributes?.frame = self.currentFrameWithIndexPath(NSIndexPath(forRow: itemIndexPath.row-1, inSection: itemIndexPath.section))
    }
    return attributes
}
效果如下:
刷新動畫:
在官方的解釋中,刷新是先刪除然後插入。其實它就是先執行所有cell的消失動畫;在此之後,它又會執行所有cell的出現動畫。 在系統當中,需要注意的是默認出現動畫是一個alpha從0到1的淡入效果,而消失動畫則是alpha從1到0的淡入效果;與插入動畫和刪除動畫不同的是,刷新動畫會成對存在,即消失動畫與出現動畫數量相等。
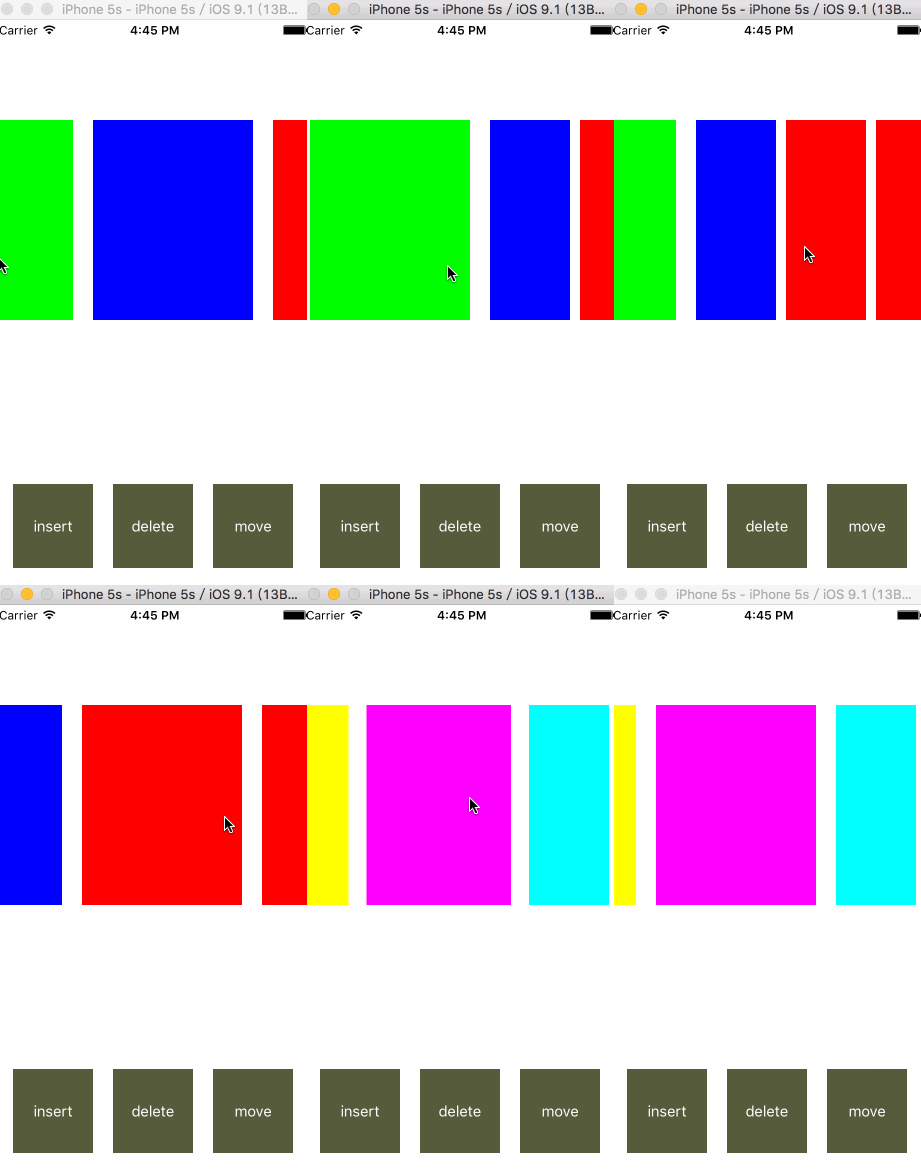
在這裡,實現一個點擊某個cell時,當前選中的cell變大的效果,而它旁邊的cell被推開的動畫效果。在這裡我不需要淡入和淡出效果,所以修改了消失時alpha為1.0,代碼如下:
override func initialLayoutAttributesForAppearingItemAtIndexPath(itemIndexPath: NSIndexPath) -> UICollectionViewLayoutAttributes? {
    let attributes = super.initialLayoutAttributesForAppearingItemAtIndexPath(itemIndexPath)?.copy() as? UICollectionViewLayoutAttributes
    attributes?.frame = self.lastFrameWithIndexPath(itemIndexPath)
    return attributes
}
override func finalLayoutAttributesForDisappearingItemAtIndexPath(itemIndexPath: NSIndexPath) -> UICollectionViewLayoutAttributes? {
    let attributes = super.finalLayoutAttributesForDisappearingItemAtIndexPath(itemIndexPath)?.copy() as? UICollectionViewLayoutAttributes
    //注意,這裡alpha設置為不透明,系統默認返回是0,即一個淡出的效果
    attributes?.alpha = 1.0
    attributes?.frame = self.currentFrameWithIndexPath(itemIndexPath)
    return attributes
}
效果如下:
移動動畫:
移動一個cell到另一個位置時,會引起當前cell到目標位置之間所有cell布局發生變化,從而形成一系列的動畫。在這個動畫過程中,每個indexPath都會有一個出現動畫和一個消失動畫。
例如,在系統默認情況下,0位置cell移動到2位置cell的時候,我們會看到三個動畫過程,如下圖:
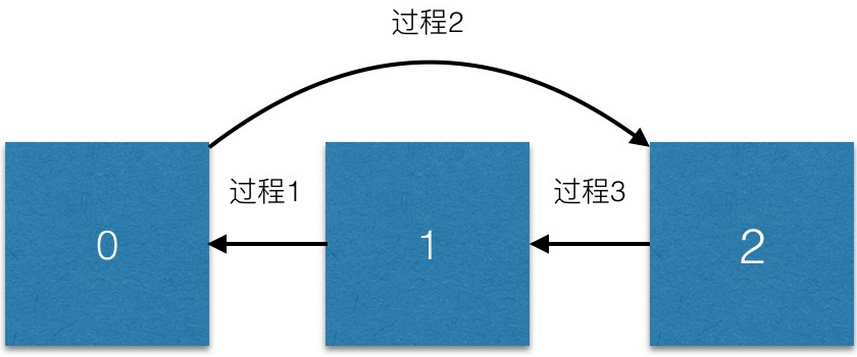
但是,其實它內部執行了六個動畫,只是其中兩兩之間動畫重合了而已。其中動畫過程1是1位置的消失動畫和0位置出現動畫重合;動畫過程2是0位置的消失動畫和2位置的出現動畫重合;動畫過程3是2位置的消失動畫和1位置的出現動畫重合。
其中值得注意的有兩點:
1、消失動畫和出現動畫數量相等
2、動畫的重合與刷新動畫不同,與插入和刪除動畫類似,它們不同位置之間的消失動畫與出現動畫重合。
在這裡,實現一個移動cell時旋轉180°到目標位置效果,實現如下:
override func initialLayoutAttributesForAppearingItemAtIndexPath(itemIndexPath: NSIndexPath) -> UICollectionViewLayoutAttributes? {
   let attributes = super.initialLayoutAttributesForAppearingItemAtIndexPath(itemIndexPath)?.copy() as? UICollectionViewLayoutAttributes
   if itemIndexPath == self.afterMoveIndexPath {
       //afterMoveIndexPath的消失動畫和beforeMoveIndexPath的出現動畫重合
       //init是設置起點,而final設置終點,理論是不重合的
       attributes?.transform3D = CATransform3DMakeRotation(-1*CGFloat(M_PI), 0, 0, -1)
   }
   return attributes
}
override func finalLayoutAttributesForDisappearingItemAtIndexPath(itemIndexPath: NSIndexPath) -> UICollectionViewLayoutAttributes? {
   let attributes = super.finalLayoutAttributesForDisappearingItemAtIndexPath(itemIndexPath)?.copy() as? UICollectionViewLayoutAttributes
   if self.beforeMoveIndexPath == itemIndexPath {
       //afterMoveIndexPath的消失動畫和beforeMoveIndexPath的出現動畫重合,設置他們旋轉的角度一樣,方向相反
       attributes?.transform3D = CATransform3DMakeRotation(-1*CGFloat(M_PI), 0, 0, -1)
   }
   return attributes
}
效果如下:
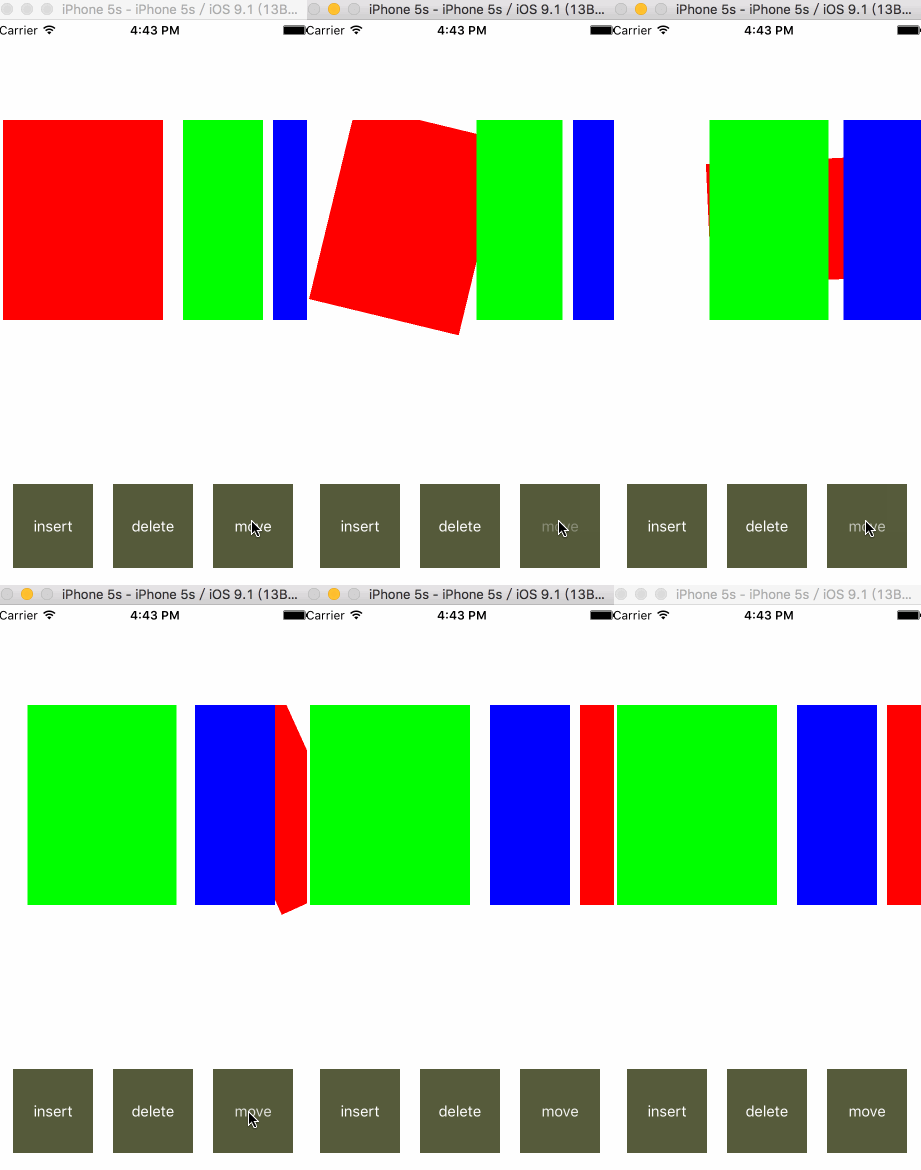
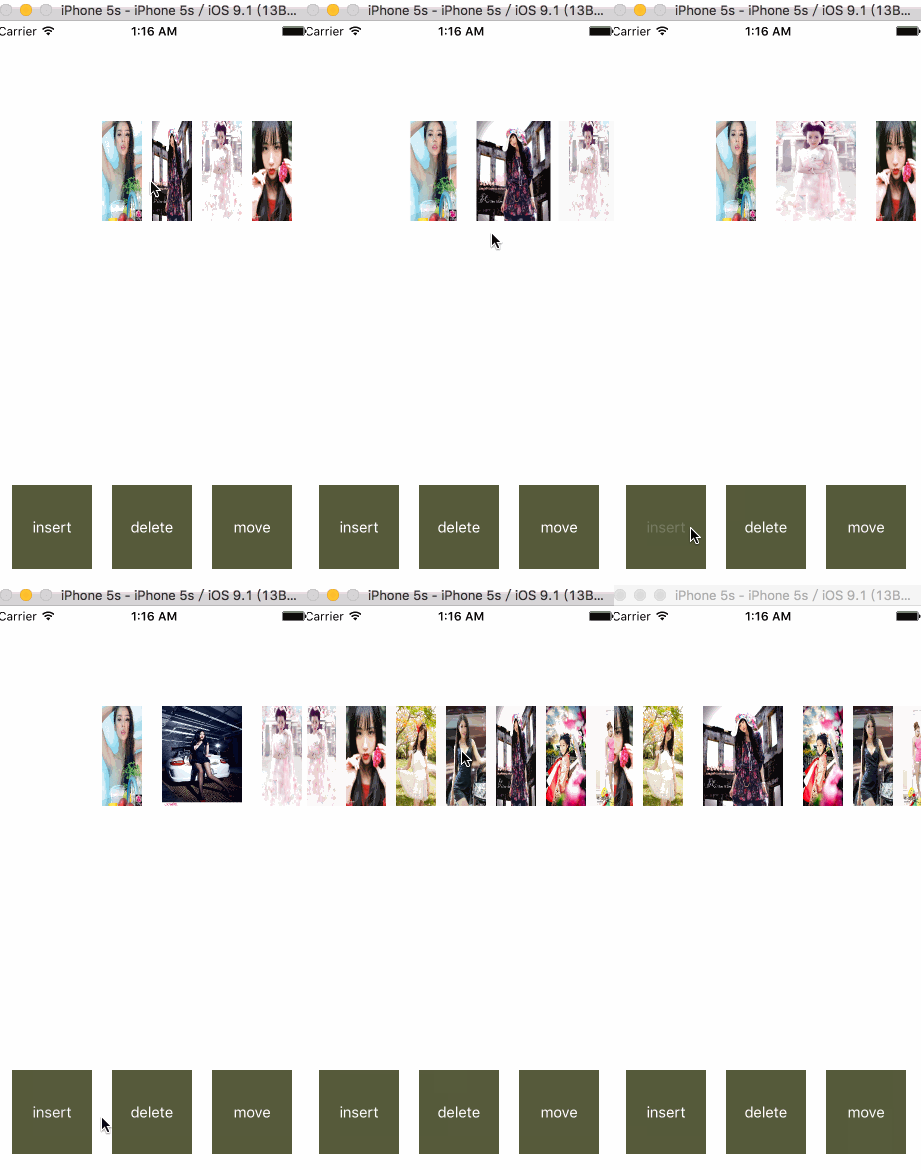
上面都是純顏色,在示例工程UICollectionViewAnimationDemo中,我還添加了一個圖片的BGSimpleImageSelectCollectionViewDemo2。布局基本上相同,唯一不同的是圖片因為上下不可以倒轉,沒辦法做到統一的旋轉180°。
效果如下:
總結:
CollectionView更新時,執行動畫的時候會訪問layout中哪些api,整個流程是如何形成的
修改CollectionView動畫就是修改出現動畫的起點和消失動畫的終點,即layout當中的initialLayoutAttributesForAppearingItemAtIndexPath和finalLayoutAttributesForDisappearingItemAtIndexPath方法進行修改。
插入、刪除、刷新、移動內部執行哪些動畫,我們如何去修改。
參考:
Collection View 動畫
- iOS9與XCode7中不克不及應用http銜接的疾速處理方法
- iOS開源一個簡略的訂餐app UI框架
- xcode8 封閉掌握台不打印不信息的處理辦法(圖文詳解)
- 史上最具體的CocoaPods裝置教程(圖文)
- IOS Xcode中快捷鍵年夜全
- iOS中處理Xcode 8掌握台亂碼的方法
- IOS開辟之適配iOS10及Xcode8的留意點
- xcode8提交ipa掉敗沒法構建版本成績的處理計劃
- XCode 加速編譯鏈接速度的辦法
- 2016 cocoapods的裝置和應用辦法和版本進級碰到的成績
- 在uiview 的tableView中點擊cell進入跳轉到另外一個界面的完成辦法
- IOS 陀螺儀開辟(CoreMotion框架)實例詳解
- iOS開辟之UIScrollView控件詳解
- 進修iOS自界說導航掌握器UINavigationController
- Xcode 8打印log日記的成績小結及處理辦法


