初識Core Data(4):批量操作、聚合操作、WWDC 2015新特性

這其實是一篇 WWDC 2015 Session 220 的學習筆記,順便整理了下 Core Data 批量操作和聚合操作的小技巧.
批量操作
Core Data 把數據庫封裝成了”object graph(對象圖)”,雖然對於面向對象編程來說有了管理 Model 間繼承與關系的便利性,但同樣也犧牲了性能.比如批量操作時就需要將每條記錄作為 NSManagedObject 對象讀取到內存中,修改之後再存入數據庫.然而用 SQL 語句執行既方便又高效.
於是蘋果在 iOS8 發布時順便弄了個”Batch Updates”,在 iOS9 發布時又弄了個”Batch Deletions”.這兩個”新技術”說白了就是直接操作持久層數據庫,然後還需要手動更新/刪除內存中的 context 好使得我們的 UI 從 context 讀取的內容不會出錯.這樣做的好處就是省去了向內存的一次寫操作和查找操作,而越過 context 直接操作持久層,最後我們需要自己手動將持久層的變更結果(BatchResult)重新寫入 context.只有當需要更新/刪除大批量數據的時候才需要用到這兩個技術.
然而蘋果至今未提供二者的文檔,關於”Batch Updates”我在CoreData處理海量數據中給出了用法和例子.看了 WWDC2015 Session 220 後覺得 “Batch Deletions” 應該與 “Batch Updates” 用法類似,並且坑爹. PS: 我在 iOS9 上測試 “Batch Updates” 發現了一個 bug, 每次更新 context 都會漏掉一條記錄,這讓我十分郁悶.
聚合操作
說完了批量操作,再談談聚合操作.在 SQL 語法中有一類聚合函數,比如 count(),sum(),max(),min(),avg() 等,它們一般搭配著 group by 甚至 having 來使用.然而在號稱”object graph”的 Core Data 中,這種聚合操作在 NSFetchRequest 中也是有替代品的.下面的例子取自CORE DATA AND AGGREGATE FETCHES IN SWIFT:

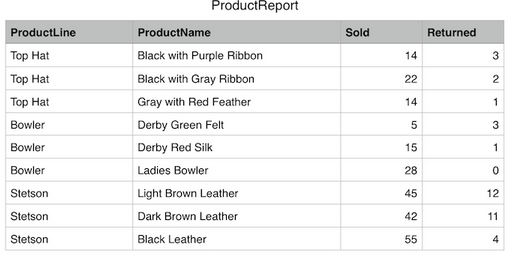
我們想計算出每條產品線的銷售量和退貨量,可以用下面的 SQL 語句搞定:
SELECT ProductLine, SUM(Sold) as SoldCount, SUM(Returned) as ReturnedCount FROM Products GROUP BY ProductLine
NSFetchRequest 有個 propertiesToGroupBy 屬性,正好對應著 group by 語句:
// Build out our fetch request the usual way
let request = NSFetchRequest(entityName: self.entityName)
// This is the column we are grouping by. Notice this is the only non aggregate column.
request.propertiesToGroupBy = ["productLine"]
下面還需要映射 SQL 語句中聚合函數及其計算後的結果,此時我們需要用到 NSExpressionDescription 和 NSExpression 來替換 SQL 中的 ProductLine, SUM(Sold) as SoldCount, SUM(Returned) as ReturnedCount:
// Create an array of AnyObject since it needs to contain multiple types--strings and
// NSExpressionDescriptions
var expressionDescriptions = [AnyObject]()

// We want productLine to be one of the columns returned, so just add it as a string
expressionDescriptions.append("productLine")

// Create an expression description for our SoldCount column
var expressionDescription = NSExpressionDescription()
// Name the column
expressionDescription.name = "SoldCount"
// Use an expression to specify what aggregate action we want to take and
// on which column. In this case sum on the sold column
expressionDescription.expression = NSExpression(format: "@sum.sold")
// Specify the return type we expect
expressionDescription.expressionResultType = .Integer32AttributeType
// Append the description to our array
expressionDescriptions.append(expressionDescription)

// Create an expression description for our ReturnedCount column
expressionDescription = NSExpressionDescription()
// Name the column
expressionDescription.name = "ReturnedCount"
// Use an expression to specify what aggregate action we want to take and
// on which column. In this case sum on the returned column
expressionDescription.expression = NSExpression(format: "@sum.returned")
// Specify the return type we expect
expressionDescription.expressionResultType = .Integer32AttributeType
// Append the description to our array
expressionDescriptions.append(expressionDescription)
NSExpressionDescription 是用於表示那些抓取結果中實體中不存在的列名,比如我們這次用的聚合函數所計算的結果並不能在實體中找到對應的列,於是我們就得給它起個新名字,這就相當於 SQL 中的 as,這裡對應著 NSExpressionDescription 的 name 屬性.而聚合函數表達式就需要用 NSExpression 對象來表示,比如 NSExpression(format: "@sum.returned") 就是對”returned”這列求和.
像本例中這樣初始化 NSExpression 需要對格式化語法較為熟悉(比如"@sum.returned"),初學者建議看看官方的例子,使用容易理解的構造方法一步步拼湊成想要的結果:Core Data Programming Guide
將以上這三個”列描述”依次添加到 expressionDescriptions 數組中,最後要賦值給 NSFetchRequest 的 propertiesToFetch 屬性:
// Hand off our expression descriptions to the propertiesToFetch field. Expressed as strings
// these are ["productLine", "SoldCount", "ReturnedCount"] where productLine is the value
// we are grouping by.
request.propertiesToFetch = expressionDescriptions
propertiesToFetch 屬性其實是個 NSPropertyDescription 類型數組,能表示屬性,一對一關系和表達式.既然是個大雜燴,NSPropertyDescription 也就有一些子類:NSAttributeDescription,NSExpressionDescription,NSFetchedPropertyDescription,NSRelationshipDescription.我們這裡用到的便是 NSExpressionDescription.
在設定 propertiesToFetch 屬性之前必需要設定好 NSFetchRequest 的 entity 屬性,否則會拋出 NSInvalidArgumentException 類型的異常.並且只有當 resultType 類型設為 NSDictionaryResultType 時才生效:
// Specify we want dictionaries to be returned
request.resultType = .DictionaryResultType
最終結果:
[
    ["SoldCount": 48, "productLine": Bowler, "ReturnedCount": 4],
    ["SoldCount": 142, "productLine": Stetson, "ReturnedCount": 27],
    ["SoldCount": 50, "productLine": Top Hat, "ReturnedCount": 6]
]
WWDC2015 Core Data 的一些新特性
蘋果號稱有超過40萬個 APP 使用 Core Data,並能讓開發者少寫50%~70%的代碼.並在內存性能上強調卓越的內存拓展和主動式惰性加載,炫耀了它跟 UI 良好的綁定機制,還提供了幾種多重寫入的合並策略.然而這不能阻止開發者對 Core Data 的吐槽,畢竟建立於持久層之上的”object graph”還做不到像 SQL 那樣面面俱到,於是今年針對 Core Data 新增的 API 更像是查缺補漏,並沒有帶來重大功能更新.
NSManagedObject 新增 API
hasPersistentChangedValues
var hasPersistentChangedValues: Bool { get }用此屬性可確定 NSManagedObject 的值與 “persistent store” 是否相同.
objectIDsForRelationshipNamed
func objectIDsForRelationshipNamed(_ key: String) -> [NSManagedObjectID]
適用於大量的多對多關系.由於我們不想將整個關系網絡加載到內存中,所以這個方法僅返回相關聯的 ID.下面是一個例子:
let relations = person.objectIDsForRelationshipNamed("family")
let fetchFamily = NSFetchRequest(entityName:"Person")
fetchFamily.fetchBatchSize = 100
fetchFamily.predicate = NSPredicate(format: "self IN %@", relations)
let batchedRelations = managedObjectContext.executeFetchRequest(fetchFamily)
for relative in batchedRelations {
//work with relations 100 rows at a time
}
通過給出的關系名稱 “family” 來獲取對應的 ID, 並每次遍歷100行記錄,實現了內存占用的可控性.
NSManagedObjectContext 新增 API
refreshAllObjects
func refreshAllObjects()
正如其名字所描述的那樣,它的功能就是刷新 context 中所有對象,但會保留未保存的變更.相比reset 方法不同的是它會依然保留 NSManagedObject 對象的有效性,我們無需重新抓取任何對象.正因如此,它很適用於打破一些因遍歷雙向關系循環而產生的保留環.
mergeChangesFromRemoteContextSave
class func mergeChangesFromRemoteContextSave(_ changeNotificationData: [NSObject : AnyObject], intoContexts contexts: [NSManagedObjectContext])
在 store 中使用多個 coordinator 時,這個方法將會從一個 coordinator 接受一個通知,並將其應用到另一個 coordinator 中的 context 上.這使得我們可以在所有 context 中存有最新的數據,Core Data 會維護好所有的 context.
shouldDeleteInaccessibleFaults
var shouldDeleteInaccessibleFaults: Bool
Core Data 偶爾會拋異常,但Core Data 不能加載故障, 因為它的主動式惰性加載對象使得內存中只保留對象圖中的一部分.所以很有可能當我遍歷關系時要試圖回到磁盤上查找,但此時對象早已被刪除了.於是 shouldDeleteInaccessibleFaults 屬性應運而生,默認值為 YES.
如果我們在某處遇到了故障,我們會將其標記為已刪除.任何丟失的屬性將會被設為null,nil或0.這就使得我們的 app 繼續運行,並認為發生故障的對象已被刪除.這樣程序就不會再崩潰.
NSPersistentStoreCoordinator 新增 API
增加這兩個新的 API 的原因是很多開發者繞過 Core Data 的 API 來直接操作底層數據庫文件.因為NSFileManager 和 POSIX 對數據庫都不友好,並且如果此時文件的 open 連接沒關閉的話會損壞文件.
destroyPersistentStoreAtURL
func destroyPersistentStoreAtURL(_ url: NSURL, withType storeType: String, options options: [NSObject : AnyObject]?) throws
傳入的選項與 addPersistentStoreWithType 方法要一樣,刪除對應類型的 persistent store.
replacePersistentStoreAtURL
func replacePersistentStoreAtURL(_ destinationURL: NSURL, destinationOptions destinationOptions: [NSObject : AnyObject]?, withPersistentStoreFromURL sourceURL: NSURL, sourceOptions sourceOptions: [NSObject : AnyObject]?, storeType storeType: String) throws
與上面的 destroy 一個套路,就是 replace 而已.如果目標位置不存在數據庫,那麼這個 replace 就相當於拷貝操作了.
Unique Constraints
很多時候我們在創建一個對象之前會查看它是否已經存在,如果存在的話就會更新它,否則就創建對象.這很可能產生一個競態條件,如果多線程同時執行下面這段代碼, 很可能就創建了多個重復的對象:
managedObjectContext.performBlock {
let createRequest = NSFetchRequest(entityName: "Recipe")
createRequest.resultType = ManagedObjectIDResultType
let predicate = NSPredicate(format: "source = %@", source)
let results = managedObjectContext.executeFetchRequest(createRequest)
if (results.count) {
//update it!
} else {
//create it!
}
}
現在 Core Data 可以搞定這個事情了.我們設定屬性的值唯一,類似於 SQL 中的 unique 約束.諸如電子郵件,電話號, ISBN 等場景都適用此.同時別忘了 Core Data 的對象圖中實體的繼承關系,這裡規定子類會從父類繼承到具有 Unique 約束的屬性,並可以將更多的屬性設為 Unique.
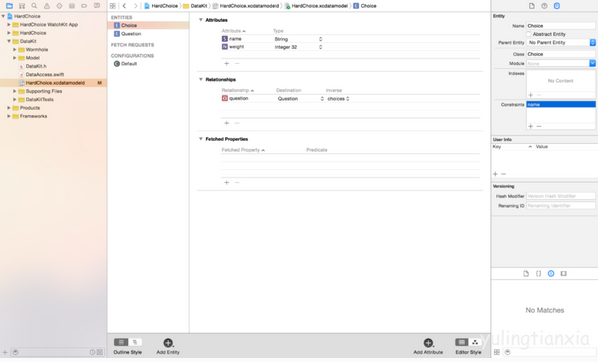
為實體設置 Unique 屬性十分簡單,只需要在 Xcode 中選中對應的實體,打開 “Data Model inspector” 就可以看到 “Constraints”, 點擊加號添加就好:

Model Caching
這是個輕量級的數據版本自動遷移解決方案.它會緩存舊版本數據中已創建的 NSManagedObject 對象會被緩存到 store 中,並被遷移到合適的 store 中.
Generated Subclasses
在 Xcode7 中,自動創建 NSManagedObject 子類時將不再在對應實體子類文件中自動填充模板代碼,而是同時創建Category(Objective-C文件) 或 extension(Swift文件),並將模板代碼自動填寫進去.這樣帶來的好處是將我們自己寫的代碼跟 Xcode 生成的模板代碼分開,更易於更新維護.
- iOS9與XCode7中不克不及應用http銜接的疾速處理方法
- xcode8 封閉掌握台不打印不信息的處理辦法(圖文詳解)
- 史上最具體的CocoaPods裝置教程(圖文)
- IOS Xcode中快捷鍵年夜全
- iOS中處理Xcode 8掌握台亂碼的方法
- IOS開辟之適配iOS10及Xcode8的留意點
- xcode8提交ipa掉敗沒法構建版本成績的處理計劃
- XCode 加速編譯鏈接速度的辦法
- 2016 cocoapods的裝置和應用辦法和版本進級碰到的成績
- IOS 陀螺儀開辟(CoreMotion框架)實例詳解
- 進修iOS自界說導航掌握器UINavigationController
- Xcode 8打印log日記的成績小結及處理辦法
- iOS10 適配和Xcode8設置裝備擺設總結
- iOS Xcode8更新後輸入log日記封閉的辦法
- Xcode8、iOS10進級成績記載


