iOS學習筆記32-iCloud入門
編輯:IOS編程技術
一、iCloud雲服務
iCloud是蘋果提供的雲端服務,用戶可以將通訊錄、備忘錄、郵件、照片、音樂、視頻等備份到雲服務器並在各個蘋果設備間直接進行共享而無需關心數據同步問題,甚至即使你的設備丟失後在一台新的設備上也可以通過Apple ID登錄同步。
蘋果已經將雲端存儲功能開放給開發者,可以存儲兩類數據:
key-value data:
分享小量的非關鍵配置數據到應用的多個實例,使用類似於NSUserDefaultdocument:
存儲用戶文檔和應用數據到用戶的iCloud賬戶
進行iCloud開發的准備工作:
- 在開發者中心上創建AppleID,啟用iCloud服務
- 生成對應的配置文件(
Provisioning Profile),這裡可以使用通配Bundle ID - 以上2步是針對真機的,調試模擬器可以忽略
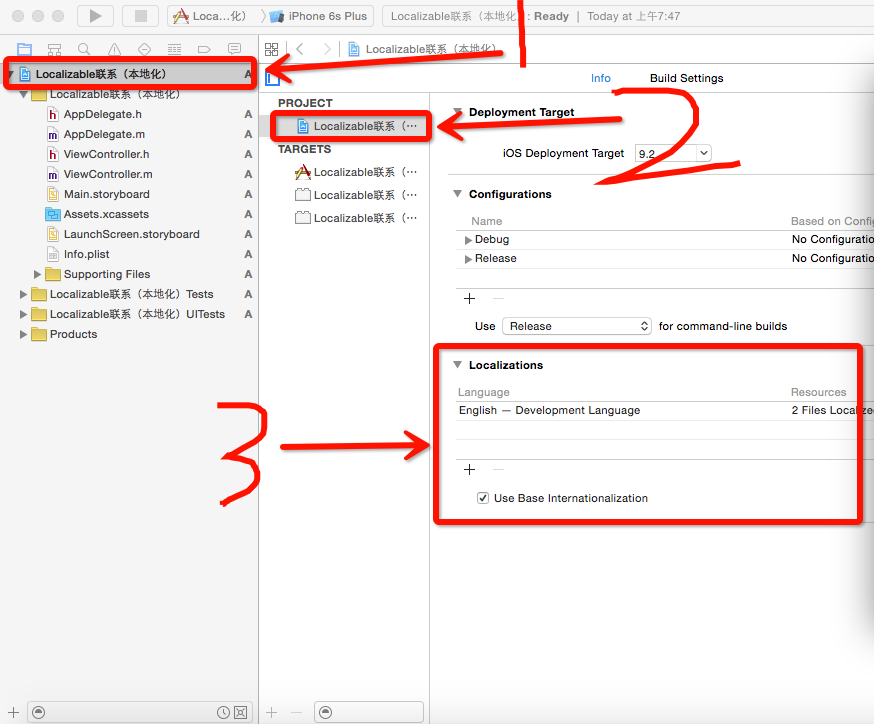
- 打開項目的
Capabilities,找到iCloud服務並開啟它 - 在iCloud服務的
Service中勾選Key-value storae和iCloud Documents

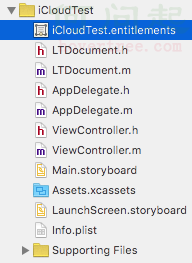
- 你的項目中就會多出一個
entitlements文件
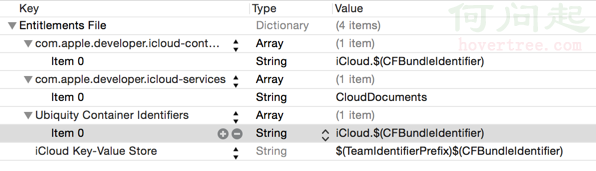
- 裡面的內容是自動生成的,就像這樣的
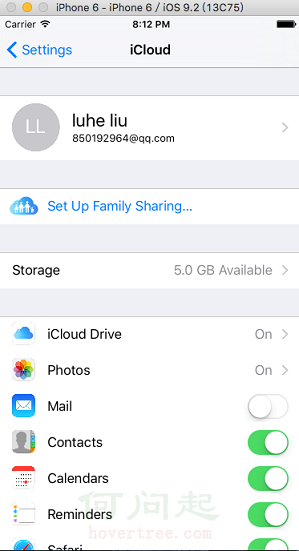
- 無論真機還是模擬器,都需要進入手機的設置中登陸iCloud賬號
二、Key-Value的iCloud存儲
使用和NSUserDefault差不多,都是以鍵值對的形式存儲。
使用實例:
#import "iCloudKeysViewController.h"

@interface iCloudKeysViewController()
@property (strong, nonatomic) NSUbiquitousKeyValueStore *keyStore;
@property (strong, nonatomic) IBOutlet UILabel *textLabel;
@end

@implementation iCloudKeysViewController
- (void)viewDidLoad
{
    [super viewDidLoad];
    self.textLabel.text = @"Ready Go";
    //獲取iCloud配置首選項
    self.keyStore = [NSUbiquitousKeyValueStore defaultStore];
    //注冊通知中心,當配置發生改變的時候,發生通知
    NSNotificationCenter *center = [NSNotificationCenter defaultCenter];
    [center addObserver:self
               selector:@selector(ubiquitousKeyValueStoreDidChange:)
                   name:NSUbiquitousKeyValueStoreDidChangeExternallyNotification
                 object:keyStore];
}
/* UI點擊,點擊改變按鈕 */
- (IBAction)changeKey
{
    [self.keyStore setString:@"Hello World" forKey:@"MyString"];
    [self.keyStore synchronize];
    NSLog(@"Save key");
}
/* 監聽通知,當配置發生改變的時候會調用 */
- (void)ubiquitousKeyValueStoreDidChange:(NSNotification *)notification
{
    NSLog(@"External Change detected");
    UIAlertView *alert = [[UIAlertView alloc] initWithTitle:@"Change detected"
                                                    message:@"Change detected"
                                                   delegate:nil
                                          cancelButtonTitle:@"Ok"
                                          otherButtonTitles:nil, nil];
    [alert show];
    //顯示改變的信息
    textLabel.text = [keyStore stringForKey:@"MyString"];
}
@end
三、Document的iCloud存儲
核心類UIDocument
- 文檔存儲主要是使用
UIDocument類來完成,這個類提供了新建、修改、查詢文檔、打開文檔、刪除文檔的功能。 UIDocument對文檔的新增、修改、刪除、讀取全部基於一個雲端URL來完成,對於開發者而言沒有本地和雲端之分,這樣大大簡化了開發過程。
雲端URL的獲取方式:
調用
NSFileManager的對象方法-(NSURL *)URLForUbiquityContainerIdentifier:(NSString *)identifier;上面需要傳遞一個雲端存儲容器的唯一標示,這個可以去自動生成的
entitlements文件查看Ubiquity Container Identifiers字段獲得,如果傳nil,代表第一個容器
補充知識 :
默認的第一個容器標識是
iCloud.$(CFBundleIdentifier),
其中$(CFBundleIdentifier)代表Bundle ID,那麼根據應用的Bundle ID就可以得知我的第一個容器的標識是iCloud.com.liuting.icloud.iCloudTest
UIDocument的對象方法:
/* 將指定URL的文檔保存到iCloud(可以是新增或者覆蓋,通過saveOperation參數設定)*/
- (void)saveToURL:(NSURL *)url
 forSaveOperation:(UIDocumentSaveOperation)saveOperation
completionHandler:(void (^)(BOOL success))completionHandler;
/* 保存操作option */
typedef NS_ENUM(NSInteger, UIDocumentSaveOperation) {
    UIDocumentSaveForCreating,/* 創建 */
    UIDocumentSaveForOverwriting/* 覆蓋寫入 */
};
/* 打開文檔,參數是打開文檔成功回調 */
- (void)openWithCompletionHandler:(void (^)(BOOL success))completionHandler;
刪除文檔使用的是NSFileManager的對象方法:
/* 刪除指定URL下的文件 */
- (BOOL)removeItemAtURL:(NSURL *)URL
                  error:(NSError **)error;
注意事項:
UIDocument在設計的時候,沒有提供統一的存儲方式來存儲數據,需要我們去繼承它,重寫2個對象方法自己操作數據/* 保存文檔時調用 @param typeName 文檔文件類型 @param outError 錯誤信息輸出 @return 文檔數據 */ -(id)contentsForType:(NSString *)typeName error:(NSError **)outError; /* 讀取數據時調用 @param contents 文檔數據 @param typeName 文檔文件類型 @param outError 錯誤信息輸出 @return 讀取是否成功 */ -(BOOL)loadFromContents:(id)contents ofType:(NSString *)typeName error:(NSError **)outError;UIDocument保存數據的本質:
將A對應類型的數據轉化為雲端存儲的NSData或者NSFileWrapper數據UIDocument讀取數據的本質:
將雲端下載的NSData或者NSFileWrapper數據轉化為A對應類型的數據
下面是我自定義的Document類,繼承於UIDocument:
LTDocument.h文件
#import <UIKit/UIKit.h>
@interface LTDocument : UIDocument
@property (strong, nonatomic) NSData *data;/*< 文檔數據 */
@end
LTDocument.m文件
#import "LTDocument.h"
@implementation LTDocument
#pragma mark - 重寫父類方法
/**
 *  保存時調用
 *  @param typeName 文檔文件類型後綴
 *  @param outError 錯誤信息輸出
 *  @return 文檔數據
 */
- (id)contentsForType:(NSString *)typeName
                error:(NSError *__autoreleasing *)outError
{
    if (!self.data) {
        self.data = [NSData data];
    }
    return self.data;
}
/**
 *  讀取數據時調用
 *  @param contents 文檔數據
 *  @param typeName 文檔文件類型後綴
 *  @param outError 錯誤信息輸出
 *  @return 讀取是否成功
 */
- (BOOL)loadFromContents:(id)contents
                  ofType:(NSString *)typeName
                   error:(NSError *__autoreleasing *)outError
{
    self.data = [contents copy];
    return true;
}
@end- 如果要加載iCloud中的文檔列表,就需要使用另一個類
NSMetadataQuery - 通常考慮到網絡的原因並不會一次性加載所有數據,而利用
NSMetadataQuery並指定searchScopes為NSMetadataQueryUbiquitousDocumentScope來限制查找iCloud文檔數據。 - 使用
NSMetadataQuery還可以通過謂詞限制搜索關鍵字等信息,並在搜索完成之後通過通知的形式通知客戶端搜索的情況。
下面是使用示例:
1. 屬性定義和宏定義:
#import "ViewController.h"
#import "LTDocument.h"

#define kContainerIdentifier @"iCloud.com.liuting.icloud.iCloudTest"

@interface ViewController () <UITableViewDataSource,UITableViewDelegate>
@property (weak, nonatomic) IBOutlet UITextField *documentField;/*< 輸入框 */
@property (weak, nonatomic) IBOutlet UILabel *documentShowLable;/*< 顯示欄 */
@property (weak, nonatomic) IBOutlet UITableView *documentTableView;/* 文檔列表 */
/* 文檔文件信息,鍵為文件名,值為創建日期 */
@property (strong, nonatomic) NSMutableDictionary *files;
@property (strong, nonatomic) NSMetadataQuery *query;/*< 查詢文檔對象 */
@property (strong, nonatomic) LTDocument *document;/*< 當前選中文檔 */

@end
2. 獲取雲端URL方法:
/**
 *  取得雲端存儲文件的地址
 *  @param fileName 文件名,如果文件名為nil,則重新創建一個URL
 *  @return 文件地址
 */
- (NSURL *)getUbiquityFileURL:(NSString *)fileName{
    //取得雲端URL基地址(參數中傳入nil則會默認獲取第一個容器),需要一個容器標示
    NSFileManager *manager = [NSFileManager defaultManager];
    NSURL *url = [manager URLForUbiquityContainerIdentifier:kContainerIdentifier];
    //取得Documents目錄
    url = [url URLByAppendingPathComponent:@"Documents"];
    //取得最終地址
    url = [url URLByAppendingPathComponent:fileName];
    return url;
}
3. 查詢文檔列表方法
/* 從iCloud上加載所有文檔信息 */
- (void)loadDocuments
{
    if (!self.query) {
        self.query = [[NSMetadataQuery alloc] init];
        self.query.searchScopes = @[NSMetadataQueryUbiquitousDocumentsScope];
        //注意查詢狀態是通過通知的形式告訴監聽對象的
        NSNotificationCenter *center = [NSNotificationCenter defaultCenter];
        [center addObserver:self
                   selector:@selector(metadataQueryFinish:)
                       name:NSMetadataQueryDidFinishGatheringNotification
                     object:self.query];//數據獲取完成通知
        [center addObserver:self
                   selector:@selector(metadataQueryFinish:)
                       name:NSMetadataQueryDidUpdateNotification
                     object:self.query];//查詢更新通知
    }
    //開始查詢
    [self.query startQuery];
}
/* 查詢更新或者數據獲取完成的通知調用 */
- (void)metadataQueryFinish:(NSNotification *)notification
{
    NSLog(@"數據獲取成功!");
    NSArray *items = self.query.results;//查詢結果集
    self.files = [NSMutableDictionary dictionary];
    //變量結果集,存儲文件名稱、創建日期
    [items enumerateObjectsUsingBlock:^(id obj, NSUInteger idx, BOOL *stop) {
        NSMetadataItem *item = obj;
        //獲取文件名
        NSString *fileName = [item valueForAttribute:NSMetadataItemFSNameKey];
        //獲取文件創建日期
        NSDate *date = [item valueForAttribute:NSMetadataItemFSContentChangeDateKey];
        NSDateFormatter *dateformate = [[NSDateFormatter alloc]init];
        dateformate.dateFormat = @"YY-MM-dd HH:mm";
        NSString *dateString = [dateformate stringFromDate:date];
        //保存文件名和文件創建日期
        [self.files setObject:dateString forKey:fileName];
    }];
    //表格刷新
    self.documentShowLable.text = @"";
    [self.documentTableView reloadData];
}
4. UI點擊事件
#pragma mark - UI點擊事件
/* 點擊添加文檔 */
- (IBAction)addDocument:(id)sender {
//提示信息
if (self.documentField.text.length <= 0) {
NSLog(@"請輸入要創建的文檔名");
self.documentField.placeholder = @"請輸入要創建的文檔名";
return;
}
//創建文檔URL
NSString *text = self.documentField.text;
NSString *fileName = [NSString stringWithFormat:@"%@.txt",text];
NSURL *url = [self getUbiquityFileURL:fileName];
//創建雲端文檔對象
LTDocument *document = [[LTDocument alloc] initWithFileURL:url];
//設置文檔內容
NSString *dataString = @"hallo World";
document.data = [dataString dataUsingEncoding:NSUTF8StringEncoding];
//保存或創建文檔,UIDocumentSaveForCreating是創建文檔
[document saveToURL:url
forSaveOperation:UIDocumentSaveForCreating
completionHandler:^(BOOL success)
{
if (success) {
NSLog(@"創建文檔成功.");
self.documentField.text = @"";
//從iCloud上加載所有文檔信息
[self loadDocuments];
}else{
NSLog(@"創建文檔失敗.");
}
}];
}
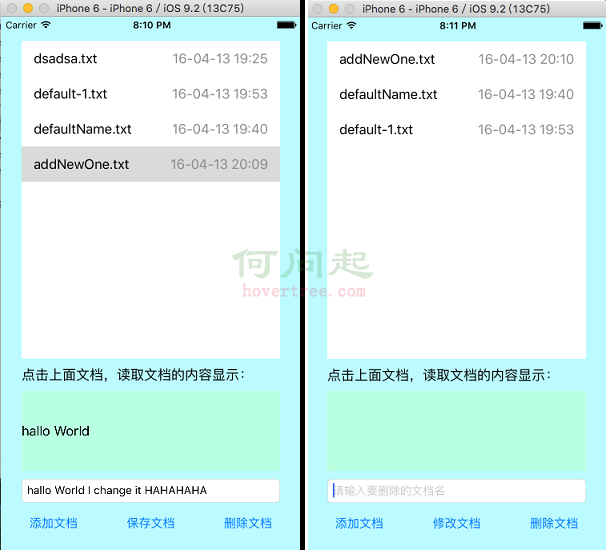
/* 點擊修改文檔 */
- (IBAction)saveDocument:(UIButton *)sender {
if ([sender.titleLabel.text isEqualToString:@"修改文檔"]) {
self.documentField.text = self.documentShowLable.text;
[sender setTitle:@"保存文檔" forState:UIControlStateNormal];
} else if([sender.titleLabel.text isEqualToString:@"保存文檔"]) {
[sender setTitle:@"修改文檔" forState:UIControlStateNormal];
self.documentField.placeholder = @"請輸入修改的文檔內容";
//要保存的文檔內容
NSString *dataText = self.documentField.text;
NSData *data = [dataText dataUsingEncoding:NSUTF8StringEncoding];
self.document.data = data;
//保存或創建文檔,UIDocumentSaveForOverwriting是覆蓋保存文檔
[self.document saveToURL:self.document.fileURL
forSaveOperation:UIDocumentSaveForOverwriting
completionHandler:^(BOOL success)
{
NSLog(@"保存成功!");
self.documentShowLable.text = self.documentField.text;
self.documentField.text = @"";
}];
}
}
/* 點擊刪除文檔 */
- (IBAction)removeDocument:(id)sender {
//提示信息
if (self.documentField.text.length <= 0) {
self.documentField.placeholder = @"請輸入要刪除的文檔名";
return;
}
//判斷要刪除的文檔是否存在
NSString *text = self.documentField.text;
NSString *fileName = [NSString stringWithFormat:@"%@.txt",text];
NSArray *fileNames = [self.files allKeys];
if (![fileNames containsObject:fileName]) {
NSLog(@"沒有要刪除的文檔");
return;
}
//創建要刪除的文檔URL
NSURL *url = [self getUbiquityFileURL:fileName];
NSError *error = nil;
//刪除文檔文件
[[NSFileManager defaultManager] removeItemAtURL:url error:&error];
if (error) {
NSLog(@"刪除文檔過程中發生錯誤,錯誤信息:%@",error.localizedDescription);
return;
}
//從集合中刪除
[self.files removeObjectForKey:fileName];
self.documentField.text = @"";
}5. 視圖控制器初始化和列表顯示
@implementation ViewController
- (void)viewDidLoad {
    [super viewDidLoad];
    self.documentTableView.delegate = self;
    self.documentTableView.dataSource = self;
    /* 從iCloud上加載所有文檔信息 */
    [self loadDocuments];
}
#pragma mark - UITableView數據源
- (NSInteger)numberOfSectionsInTableView:(UITableView *)tableView {
    return 1;
}
- (NSInteger)tableView:(UITableView *)tableView
 numberOfRowsInSection:(NSInteger)section
{
    return self.files.count;
}
- (UITableViewCell *)tableView:(UITableView *)tableView
         cellForRowAtIndexPath:(NSIndexPath *)indexPath
{
    static NSString *identtityKey = @"myTableViewCellIdentityKey1";
    UITableViewCell *cell =
        [self.documentTableView dequeueReusableCellWithIdentifier:identtityKey];
    if(cell == nil){
        cell = [[UITableViewCell alloc] initWithStyle:UITableViewCellStyleValue1
                                      reuseIdentifier:identtityKey];
    }
    //顯示文檔名和文檔創建日期
    NSArray *fileNames = self.files.allKeys;
    NSString *fileName = fileNames[indexPath.row];
    cell.textLabel.text = fileName;
    cell.detailTextLabel.text = [self.files valueForKey:fileName];
    return cell;
}
#pragma mark - UITableView代理方法
/* 點擊文檔列表的其中一個文檔調用 */
- (void)tableView:(UITableView *)tableView
        didSelectRowAtIndexPath:(NSIndexPath *)indexPath
{
    UITableViewCell *cell = [self.documentTableView cellForRowAtIndexPath:indexPath];
    //獲取文檔URL
    NSURL *url = [self getUbiquityFileURL:cell.textLabel.text];
    //創建文檔操作對象
    LTDocument *document = [[LTDocument alloc] initWithFileURL:url];
    self.document = document;
    //打開文檔並讀取文檔內容
    [document openWithCompletionHandler:^(BOOL success) {
        if(success){
            NSLog(@"讀取數據成功.");
            NSString *dataText = [[NSString alloc] initWithData:document.data
                                                       encoding:NSUTF8StringEncoding];
            self.documentShowLable.text = dataText;
        }else{
            NSLog(@"讀取數據失敗.");
        }
    }];
}
@end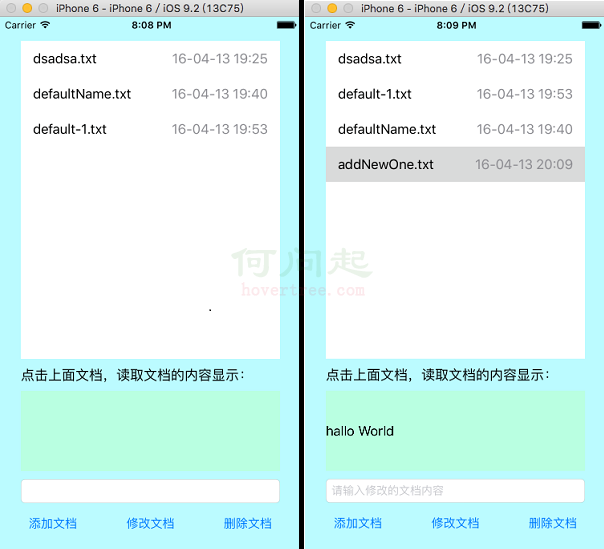
上面的代碼Demo點這裡:LearnDemo裡面的iCloudDemo
這個代碼Demo只有Document的實例代碼
如果有什麼問題請在下方評論區中提出!O(∩_∩)O哈!
- 上一頁:iOS手勢沖突問題
- 下一頁:關於tableView中tableHeaderView/tableFooterView/sectionHeader/sectionFooter/contentInset的理解

- iOS8首個第三方輸入法安裝指南及試用視頻
- iphone6美版v版是什麼意思?值得買麼?蘋果6美版v版參數詳解[圖]
- 蘋果iphone6/plus香槟金深度體驗圖文報告!(包含軟件、外觀、殼等)[多圖]
- 只是因為剛剛上路嗎?蘋果HomeKit太沒存在感
- iOS8.4升級後App Store打不開怎麼辦?
- 輕松學習之 最簡化原生效果集成UITableViewCell左滑多個按鈕
- iPhone6支持AirPlay嗎?iOS8 AirPlay使用方法
- iPhone存儲空間不夠怎麼辦?iPhone刪除7種文件省存儲空間
- iPhone6怎麼更換電話鈴聲
- 讓iPhone用上Apple Watch的通知樣式
相關文章
+