
ReactiveCocoa源碼解讀(一)
本著飲水思源的想法,面對ReactiveCocoa的強大功能,按捺不住心中的好奇心,於是走進其源碼之中,一探ReactiveCocoa的魅力所在。雖然,耳聞其強大功能的核心是:信號,但一直不知道這個信號是如何產生、如何傳遞,又是如何被處理的。曾經以為信號傳遞是通知,但是真正讀了源碼後,才發現之前的想法有多不妥,而人家的實現又是多巧妙。
本文主要從ReactiveCocoa的主要類入手,通過剖析其整個應用過程中,信號的生命周期來領略其編程之美。
一、RACSignal
1. 應用
// 1.創建信號
RACSignal *siganl = [RACSignal createSignal:^RACDisposable *(id subscriber) {
    // 注:block在此僅僅是個參數,未被調用,
    //當有訂閱者訂閱信號時會調用block。

    // 2.發送信號
    [subscriber sendNext:@1];
    // 如果不在發送數據,最好發送信號完成,內部會自動調用[RACDisposable disposable]取消訂閱信號。
    return nil;
}];

// 3.訂閱信號,才會激活信號.
[siganl subscribeNext:^(id x) {
    // block調用時刻:每當有信號發出數據,就會調用block.
    NSLog(@"接收到數據:%@",x);
}];
2.源碼實現
-
創建信號
+(RACSignal *)createSignal:(RACDisposable * (^)(id<RACSubscriber> subscriber))didSubscribe;
// RACDynamicSignal.m

+ (RACSignal *)createSignal:(RACDisposable * (^)(id subscriber))didSubscribe {
    //創建了一個RACDynamicSignal類的信號
    RACDynamicSignal *signal = [[self alloc] init];
    //將代碼塊保存到信號裡面(但此時僅僅是保存,沒有調用),所以信號還是冷信號
    signal->_didSubscribe = [didSubscribe copy];
    return [signal setNameWithFormat:@"+createSignal:"];
}-
訂閱信號
(RACDisposable *)subscribeNext:(void (^ )(id x))nextBlock;// RACSignal.m
- (RACDisposable *)subscribeNext:(void (^)(id x))nextBlock {
NSCParameterAssert(nextBlock != NULL);
// 內部創建了RACSubscriber(訂閱者)類的實例對象o,並且將nextBlock保存到o中,在返回值出執行o,實際也是執行了nextBlock。
RACSubscriber *o = [RACSubscriber subscriberWithNext:nextBlock error:NULL completed:NULL];
return [self subscribe:o];
}
// RACSubscriber.m
+ (instancetype)subscriberWithNext:(void (^)(id x))next error:(void (^)(NSError *error))error completed:(void (^)(void))completed {
RACSubscriber *subscriber = [[self alloc] init];
// 將block保存到subscriber中
subscriber->_next = [next copy];
subscriber->_error = [error copy];
subscriber->_completed = [completed copy];
return subscriber;
}
// RACDynamicSignal.m
- (RACDisposable *)subscribe:(id<RACSubscriber>)subscriber {
NSCParameterAssert(subscriber != nil);
RACCompoundDisposable *disposable = [RACCompoundDisposable compoundDisposable];
subscriber = [[RACPassthroughSubscriber alloc] initWithSubscriber:subscriber signal:self disposable:disposable];
//判斷有無self.didSubscribe,有則執行該self.didSubscribe,意味著將訂閱者subscriber發送過去
if (self.didSubscribe != NULL) {
RACDisposable *schedulingDisposable = [RACScheduler.subscriptionScheduler schedule:^{
RACDisposable *innerDisposable = self.didSubscribe(subscriber);
[disposable addDisposable:innerDisposable];
}];
[disposable addDisposable:schedulingDisposable];
}
return disposable;
}
// RACPassthroughSubscriber.m
- (instancetype)initWithSubscriber:(id)subscriber signal:(RACSignal *)signal disposable:(RACCompoundDisposable *)disposable {
NSCParameterAssert(subscriber != nil);
self = [super init];
if (self == nil) return nil;
// 保存訂閱者,信號,處理操作
_innerSubscriber = subscriber;
_signal = signal;
_disposable = disposable;
[self.innerSubscriber didSubscribeWithDisposable:self.disposable];
return self;
}-
發送信號
[subscriber sendNext:@1]// RACPassthroughSubscriber.m
- (void)sendNext:(id)value {
if (self.disposable.disposed) return;
if (RACSIGNAL_NEXT_ENABLED()) {
RACSIGNAL_NEXT(cleanedSignalDescription(self.signal), cleanedDTraceString(self.innerSubscriber.description), cleanedDTraceString([value description]));
}
[self.innerSubscriber sendNext:value];
}
// RACSubscriber.m
- (void)sendNext:(id)value {
@synchronized (self) {
void (^nextBlock)(id) = [self.next copy];
if (nextBlock == nil) return;
// 名為next的block是返回值為void,參數為id類型的value,在sendNext:內部,將next復制給nextBlock,執行該方法後,subscribeNext:的block參數才會被調用。
nextBlock(value);
}
}3.流程圖
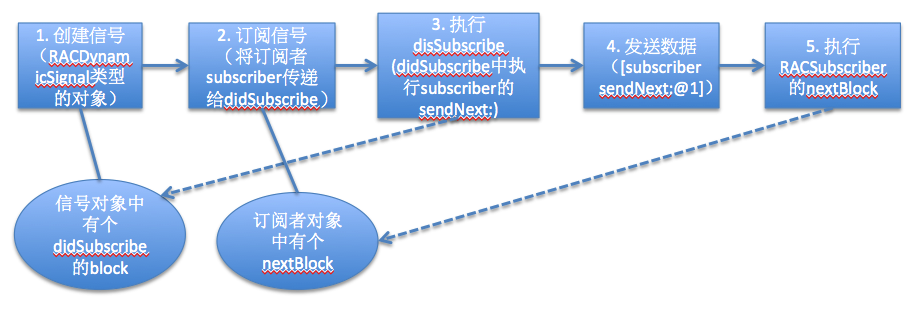
4.總結
先創建信號,然後訂閱信號,最後執行didSubscribe內部的方法,順序是不能變的
RACSignal底層實現
* 1.創建信號,首先把didSubscribe保存到信號中,還不會觸發。
* 2.當信號被訂閱,也就是調用signal的subscribeNext:nextBlock
    2.1 subscribeNext內部會創建訂閱者subscriber,並且把nextBlock保存到subscriber中。
    2.2 subscribeNext內部會調用siganl的didSubscribe
* 3.siganl的didSubscribe中調用[subscriber sendNext:@1];
    3.1 sendNext底層其實就是執行subscriber的nextBlock
二、RACSubject
1. 應用
// 創建信號
RACSubject *subject = [RACSubject subject];

// 訂閱
[subject subscribeNext:^(id x) {
    NSLog(@"第一個訂閱者:%@", x);
}];

// 發送信號
[subject sendNext:@"1"];
2.源碼實現
-
創建信號
// RACSubject.m
+ (instancetype)subject {
    return [[self alloc] init];
}

- (id)init {
    self = [super init];
    if (self == nil) return nil;

    _disposable = [RACCompoundDisposable compoundDisposable];
    _subscribers = [[NSMutableArray alloc] initWithCapacity:1];

    return self;
}-
訂閱信號
RACSubject訂閱信號的實質就是將內部創建的訂閱者保存在訂閱者數組self.subscribers中,僅此而已。訂閱者對象有一個名為nextBlock的block參數
// RACSignal.m
- (RACDisposable *)subscribeNext:(void (^)(id x))nextBlock {
    NSCParameterAssert(nextBlock != NULL);

    RACSubscriber *o = [RACSubscriber subscriberWithNext:nextBlock error:NULL completed:NULL];
    return [self subscribe:o];
}

// RACSubscriber.m
+ (instancetype)subscriberWithNext:(void (^)(id x))next error:(void (^)(NSError *error))error completed:(void (^)(void))completed {
    RACSubscriber *subscriber = [[self alloc] init];

    subscriber->_next = [next copy];
    subscriber->_error = [error copy];
    subscriber->_completed = [completed copy];

    return subscriber;
}

// RACSubject.m
- (RACDisposable *)subscribe:(id<RACSubscriber>)subscriber {
    NSCParameterAssert(subscriber != nil);

    RACCompoundDisposable *disposable = [RACCompoundDisposable compoundDisposable];
    subscriber = [[RACPassthroughSubscriber alloc] initWithSubscriber:subscriber signal:self disposable:disposable];

    NSMutableArray *subscribers = self.subscribers;
    @synchronized (subscribers) {
        [subscribers addObject:subscriber];
    }

    return [RACDisposable disposableWithBlock:^{
        @synchronized (subscribers) {
            // Since newer subscribers are generally shorter-lived, search
            // starting from the end of the list.
            NSUInteger index = [subscribers indexOfObjectWithOptions:NSEnumerationReverse passingTest:^ BOOL (id<RACSubscriber> obj, NSUInteger index, BOOL *stop) {
                return obj == subscriber;
            }];

            if (index != NSNotFound) [subscribers removeObjectAtIndex:index];
        }
    }];
}-
發送信號
底層實現:
1. 先遍歷訂閱者數組中的訂閱者;
2. 後執行訂閱者中的nextBlock;
3. 最後讓訂閱者發送信號
// RACSubject.m
- (void)sendNext:(id)value {
[self enumerateSubscribersUsingBlock:^(id subscriber) {
[subscriber sendNext:value];
}];
}
- (void)enumerateSubscribersUsingBlock:(void (^)(id subscriber))block {
NSArray *subscribers;
@synchronized (self.subscribers) {
subscribers = [self.subscribers copy];
}
for (id subscriber in subscribers) {
block(subscriber);
}
}3.流程圖
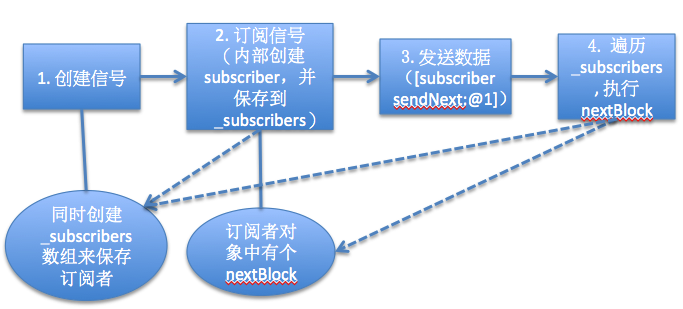
4.總結
RACSubscriber:表示訂閱者的意思,用於發送信號,這是一個協議,不是一個類,只要遵守這個協議,並且實現方法才能成為訂閱者。通過create創建的信號,都有一個訂閱者,幫助他發送數據。
RACDisposable:用於取消訂閱或者清理資源,當信號發送完成或者發送錯誤的時候,就會自動觸發它。
RACSubject的底層與RACSignal不一樣:
-
調用subscribeNext訂閱信號,只是把訂閱者保存起來,並且訂閱者的nextBlock已經賦值了
調用sendNext發送信號,遍歷剛剛保存的所有訂閱者,一個一個調用訂閱者的nextBlock
由於本質是將訂閱者保存到數組中,所以可以有多個訂閱者訂閱信息。
必須先訂閱,後發送信息。訂閱信號就是創建訂閱者的過程,如果不先訂閱,數組中就沒有訂閱者對象,那就通過訂閱者發送消息
三、RACReplaySubject
1.應用
RACReplaySubject即可以先訂閱後發送信號,也可以反過來
RACReplaySubject *subject = [RACReplaySubject subject];

// 第一次訂閱
[subject subscribeNext:^(id x) {
    NSLog(@"%@", x);
}];

// 發送信號
[subject sendNext:@"1"];

// 第一次訂閱
[subject subscribeNext:^(id x) {
    NSLog(@"%@", x);
}];
2.源碼實現
-
創建信號
// RACSubject.m
+ (instancetype)subject {
    return [[self alloc] init];
}

// RACReplaySubject.m
- (instancetype)init {
    return [self initWithCapacity:RACReplaySubjectUnlimitedCapacity];
}

- (instancetype)initWithCapacity:(NSUInteger)capacity {
    self = [super init];
    if (self == nil) return nil;

    _capacity = capacity;
    // 會用這個數組保存值value
    _valuesReceived = (capacity == RACReplaySubjectUnlimitedCapacity ? [NSMutableArray array] : [NSMutableArray arrayWithCapacity:capacity]);

    return self;
}-
訂閱信號
// RACSignal.m
- (RACDisposable *)subscribeNext:(void (^)(id x))nextBlock {
    NSCParameterAssert(nextBlock != NULL);

    RACSubscriber *o = [RACSubscriber subscriberWithNext:nextBlock error:NULL completed:NULL];
    return [self subscribe:o];
}

// RACReplaySubject.m
- (RACDisposable *)subscribe:(id<RACSubscriber>)subscriber {
    RACCompoundDisposable *compoundDisposable = [RACCompoundDisposable compoundDisposable];

    RACDisposable *schedulingDisposable = [RACScheduler.subscriptionScheduler schedule:^{
        @synchronized (self) {
            for (id value in self.valuesReceived) {
                if (compoundDisposable.disposed) return;

                [subscriber sendNext:(value == RACTupleNil.tupleNil ? nil : value)];
            }

            if (compoundDisposable.disposed) return;

            if (self.hasCompleted) {
                [subscriber sendCompleted];
            } else if (self.hasError) {
                [subscriber sendError:self.error];
            } else {
                RACDisposable *subscriptionDisposable = [super subscribe:subscriber];
                [compoundDisposable addDisposable:subscriptionDisposable];
            }
        }
    }];

    [compoundDisposable addDisposable:schedulingDisposable];

    return compoundDisposable;
}-
發送信號
// RACReplaySubject.m
- (void)sendNext:(id)value {
    @synchronized (self) {
        //重點:發送信號的時候,會先將值value保存到數組中
        [self.valuesReceived addObject:value ?: RACTupleNil.tupleNil];
        //調用父類發送(先遍歷訂閱者,然後發送值value)
        [super sendNext:value];

        if (self.capacity != RACReplaySubjectUnlimitedCapacity && self.valuesReceived.count > self.capacity) {
            [self.valuesReceived removeObjectsInRange:NSMakeRange(0, self.valuesReceived.count - self.capacity)];
        }
    }
}
3.原理圖
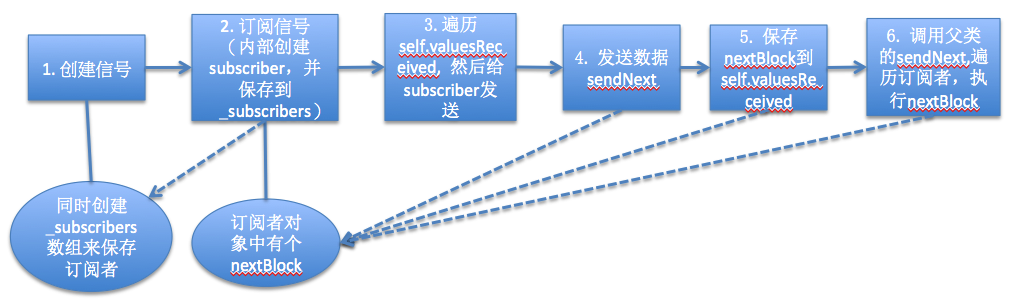
4.總結
RACReplaySubject是RACSubject的子類
由於每次發送信號時,會先保存nextBlock,然後調用父類的sendNext方法,遍歷訂閱者,執行信號;而每次訂閱信號時,會從valuesReceived中取值,然後調用sendNext方法,遍歷訂閱者,執行信號。所以,訂閱和發送沒有先後順序。
未完待續 ......


- 如何隱藏iPhone主屏幕上的iTunes Store應用
- 如何關閉App Store更新提醒
- ReactiveCocoa源碼解讀(二)
- iOS 11 的 App Store 大變樣,對我們有什麼影響?
- mac上mysql root密碼忘記或權限錯誤的解決辦法
- iOS 11和macOS High Sierra第三個公測版發布
- iOS 11第六個開發者測試版發布 App Store換新裝
- faceu激萌為什麼無法拍照?faceu激萌無法拍照怎麼辦[多圖]
- 程序猿淚奔:iOS10.3正式版終於支持開發者回復App Store評論(附教程)
- 蘋果iOS10.3/macOS10.12.4/watchOS3.2輕體驗
- 蘋果App Store應用更新死循環怎麼解決
- React
- iOS 真機測試錯誤“The application bundle does not contain a valid identifier”
- iOS 程序從開發完到上 AppStore 那點事兒
- Win10 Creator創意者集成Paint 3D,怎麼使用?

- iPhone6怎麼連接itunes? iPhone6連接itunes方法
- 蘋果iPhone6s隱藏的3D Touch縮放功能怎麼使用?
- Pinyin Comparison 拼音辨別 V1.1
- iPhone6指紋識別不靈 幾招輕松讓iPhone6指紋識別更靈敏
- iPhone6連不上wifi怎麼解決?iPhone手機連不上wifi解決辦法!
- IPHONE控制蘋果電腦上Keynote演示PPT教程
- ios9連不上wifi怎麼解決?ios9連不上wifi解決方法
- 蘋果iMovie資源庫打不開怎麼辦 蘋果iMovie資源庫打不開解決辦法
- 流量監測儀iPhone版(很不錯的監測手機流量的應用)
- Swift 設置navigationbar屬性相關