IOS開發之語音合成(科大訊飛)詳解
編輯:IOS技巧綜合
如何實現語音合成呢?
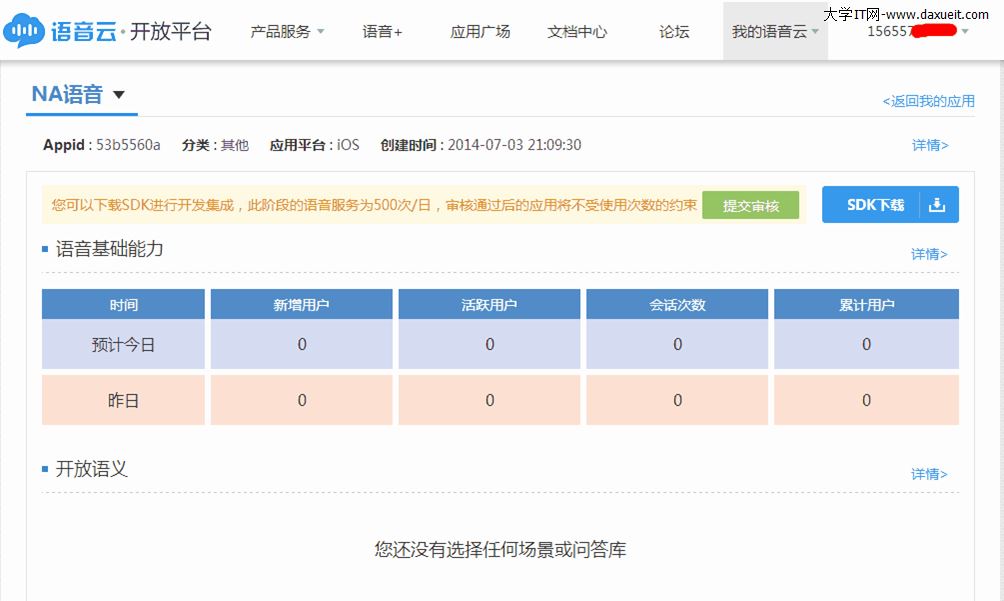
1、注冊訊飛賬號,申請APPID(注意選擇IOS平台) 2、加載所需要的類庫 3、導入所需要的類庫文件頭 4、調用申請的APPID以及所需函數,完成語音合成(需要參考官方給出的SDK文件) 詳細步驟:一、首先到科大訊飛官網注冊賬號(http://open.voicecloud.cn/),並創建應用獲取appid,下載sdk文件
二、代碼實現api調用
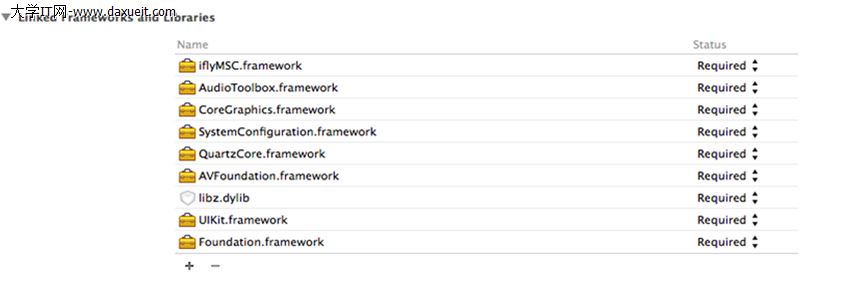
1.先用xcode(我這裡使用的是xcode 5.1)新建好一個項目,然後在項目添加要用的類庫。其中有一個是訊飛語音的類庫iflyMSC,在下載的sdk文件裡有,導入就行了。導入的時候要注意把iflyMSC類庫拷貝到你的工程目錄裡,不然後果很嚴重!
2.導完類庫之後,在建好的工程裡添加好要用的頭文件。
MainViewController.h
 #import <UIKit/UIKit.h>
 #import "iflyMSC/IFlySpeechSynthesizerDelegate.h"
MainViewController.m
 #import "MainViewController.h"
 #import <QuartzCore/QuartzCore.h>
 #import <AVFoundation/AVAudioSession.h>
 #import <AudioToolbox/AudioSession.h>
 #import "iflyMSC/IFlySpeechConstant.h"
 #import "iflyMSC/IFlySpeechUtility.h"
 #import "iflyMSC/IFlySpeechSynthesizer.h"
3.完成這些准備工作之後,接下來就是堆代碼的工作了。為了方便,筆者只用了兩個控件:一個UITextField、一個UIButton,然後給這兩個控件分別做一個Outlet和Action連接。
MainViewController.h
 #import <UIKit/UIKit.h>
 #import "iflyMSC/IFlySpeechSynthesizerDelegate.h"
 //引入語音合成類
 @class IFlySpeechSynthesizer;
 @class IFlyDataUploader;
 //注意要添加語音合成代理
 @interface MainViewController : UIViewController<IFlySpeechSynthesizerDelegate>
 //聲明語音合成的對象
 @property (nonatomic, strong) IFlySpeechSynthesizer *iFlySpeechSynthesizer;
 @property (strong, nonatomic) IBOutlet UITextField *content;

 - (IBAction)Start:(id)sender;
 @end
MainViewController.m
 #import "MainViewController.h"
 #import <QuartzCore/QuartzCore.h>
 #import <AVFoundation/AVAudioSession.h>
 #import <AudioToolbox/AudioSession.h>
 #import "iflyMSC/IFlySpeechConstant.h"
 #import "iflyMSC/IFlySpeechUtility.h"
 #import "iflyMSC/IFlySpeechSynthesizer.h"

 @interface MainViewController ()

 @end

 @implementation MainViewController

 - (void)viewDidLoad
 {
     [super viewDidLoad];
     //通過appid連接訊飛語音服務器,把@"53b5560a"換成你申請的appid
     NSString *initString = [[NSString alloc] initWithFormat:@"appid=%@,timeout=%@",@"53b5560a",@"20000"];
     //所有服務啟動前,需要確保執行createUtility
     [IFlySpeechUtility createUtility:initString];

     //創建合成對象,為單例模式
     _iFlySpeechSynthesizer = [IFlySpeechSynthesizer sharedInstance];
     _iFlySpeechSynthesizer.delegate = self;

     //設置語音合成的參數
     //合成的語速,取值范圍 0~100
     [_iFlySpeechSynthesizer setParameter:@"50" forKey:[IFlySpeechConstant SPEED]];
     //合成的音量;取值范圍 0~100
     [_iFlySpeechSynthesizer setParameter:@"50" forKey:[IFlySpeechConstant VOLUME]];
     //發音人,默認為”xiaoyan”;可以設置的參數列表可參考個性化發音人列表
     [_iFlySpeechSynthesizer setParameter:@"xiaoyan" forKey:[IFlySpeechConstant VOICE_NAME]];
     //音頻采樣率,目前支持的采樣率有 16000 和 8000
     [_iFlySpeechSynthesizer setParameter:@"8000" forKey:[IFlySpeechConstant SAMPLE_RATE]];
     ////asr_audio_path保存錄音文件路徑,如不再需要,設置value為nil表示取消,默認目錄是documents
     [_iFlySpeechSynthesizer setParameter:"tts.pcm" forKey:[IFlySpeechConstant TTS_AUDIO_PATH]];

     //隱藏鍵盤,點擊空白處
     UITapGestureRecognizer *tapGr = [[UITapGestureRecognizer alloc] initWithTarget:self action:@selector(viewTapped:)];
     tapGr.cancelsTouchesInView = NO;
     [self.view addGestureRecognizer:tapGr];
 }

 -(void)viewTapped:(UITapGestureRecognizer*)tapGr
 {
     [self.content resignFirstResponder];
 }

 - (void)didReceiveMemoryWarning
 {
     [super didReceiveMemoryWarning];
     // Dispose of any resources that can be recreated.
 }

 - (IBAction)Start:(id)sender
 {
     //啟動合成會話
     [_iFlySpeechSynthesizer startSpeaking:self.content.text];
 }

 #pragma mark - IFlySpeechSynthesizerDelegate
 //開始播放
 - (void) onSpeakBegin
 {

 }

 //緩沖進度
 - (void) onBufferProgress:(int) progress message:(NSString *)msg
 {
     NSLog(@"bufferProgress:%d,message:%@",progress,msg);
 }

 //播放進度
 - (void) onSpeakProgress:(int) progress
 {
     NSLog(@"play progress:%d",progress);
 }

  //暫停播放
 - (void) onSpeakPaused
 {

 }

 //恢復播放
 - (void) onSpeakResumed
 {

 }

 //結束回調
 - (void) onCompleted:(IFlySpeechError *) error
 {

 }
 @end
4.以上的代理方法其實是可以不寫的,但是官方給出的說明是需要加上的。若是在運行過程中出現錯誤,可以查看開發者文檔的錯誤碼列表,找出相應的錯誤。如果大家對以上的講解還有不懂的地方,請仔細閱讀官方提供的sdk文件,裡面有詳細的說明,也可以給我留言。

相關文章
+