
plist基本操作(1)
編輯:IOS技巧綜合
重要概念:某些路徑下“只能讀,不能寫”的原因
iPhone、ipad真機上
Resouces文件夾:是只讀的,無法寫入。
document 和temp文件夾:可讀,可寫。
一、工程結構
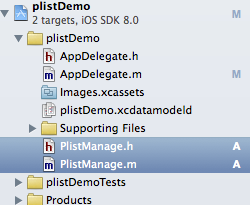
二、源代碼
1、頭文件:PlistManage.h
@interface PlistManage : NSObject

-(void)resourcePathFileRead;//當前工程資源目錄,不同於真機“沙箱”中的路徑

-(NSString *)docPath;//獲取document文件夾路徑

-(BOOL)isDirNeedCreate:(NSString *)dirPath;//判斷目錄是否需要新創建

-(BOOL)isFileNeedCreate:(NSString *)filePath;//判斷文件是否需要創建

-(void) doAdd;

-(void) doRead;

-(void) doModify;

-(void) doDelete;
@end
2、一些基本函數的實現:
//獲取document目錄路徑
-(NSString *)docPath
{
    NSArray * paths = NSSearchPathForDirectoriesInDomains(NSDocumentDirectory, NSUserDomainMask, YES);
    return [paths objectAtIndex:0];
}
//路徑是否需要創建
-(BOOL)isDirNeedCreate:(NSString *)dirPath
{
    if ( NO == [[NSFileManager defaultManager] fileExistsAtPath:dirPath] )
    {
        return [[NSFileManager defaultManager] createDirectoryAtPath:dirPath
                                         withIntermediateDirectories:YES
                                                          attributes:nil
                                                               error:NULL];
    }

    return NO;
}
//文件是否需要創建
-(BOOL)isFileNeedCreate:(NSString *)filePath{
    if ( NO == [[NSFileManager defaultManager] fileExistsAtPath:filePath] )
    {
        return [[NSFileManager defaultManager] createFileAtPath:filePath contents:nil attributes:nil];
    }

    return NO;
}
3、添加:包括創建不存在的空文件
-(void) doAdd{
NSString *docPath=[self docPath];
NSLog(@"當前docment路徑:\n%@",docPath);
NSString *dataFile=[docPath stringByAppendingPathComponent:@"docData.plist"];
if (YES==[self isFileNeedCreate:dataFile]) {
NSLog(@"文件原先不存在,現已新建空文件!");
}else{
NSLog(@"文件已存在,無需創建!");
}
NSMutableDictionary *plistDic = [[NSMutableDictionary alloc ] init];
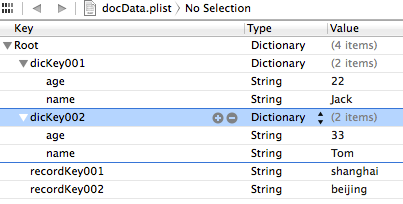
// 添加2個“單條記錄”
[plistDic setObject:@"shanghai" forKey:@"recordKey001"];
[plistDic setObject:@"beijing" forKey:@"recordKey002"];
// 添加2個“字典記錄”
[plistDic setObject:[NSDictionary dictionaryWithObjectsAndKeys:@"Jack",@"name",@"22",@"age",nil] forKey:@"dicKey001"];
[plistDic setObject:[NSDictionary dictionaryWithObjectsAndKeys:@"Tom",@"name",@"33",@"age",nil] forKey:@"dicKey002"];
[plistDic writeToFile:dataFile atomically:YES];//完全覆蓋
NSLog(@"添加內容完成!!");
}
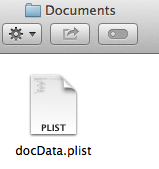
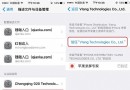
運行結果:

對應路徑下生成了新文件:
內容如下:
4、讀取
-(void) doRead{
    NSString *dataFile=[[self docPath] stringByAppendingPathComponent:@"docData.plist"];

    //讀取所有內容
    NSDictionary* dic = [NSDictionary dictionaryWithContentsOfFile:dataFile];
    NSLog(@"完整內容:\n%@",dic);

    //讀取第一層“字典記錄”
    NSDictionary* dicValue=[dic objectForKey:@"dicKey001"];
    NSLog(@"讀取第一層“字典記錄”:\n%@",dicValue);

    //讀取第一層“字典記錄”中的“子元素”
    NSLog(@"讀取第一層“字典記錄”中的“子元素”:\nname=%@",[dicValue objectForKey:@"name" ]);

    //讀取第一層“單條記錄”
    NSLog(@"讀取第一層“單條記錄”:\nrecordKey001=%@",[dic objectForKey:@"recordKey001"]);
}
運行結果:

相關文章
+- iOS開辟之UIScrollView控件詳解
- IOS裝備上給body綁定click事宜不失效的緣由及處理方法
- iOS簡略登錄LoginViewController、注冊RegisterViewController等功效完成辦法
- ISO7 二維碼具體引見及應用辦法
- iOS法式開辟之應用PlaceholderImageView完成優雅的圖片加載後果
- iOS中應用UISearchBar控件限制輸出字數的完成辦法
- iOS 9 Core Spotlight搜刮實例代碼
- iOS App開辟中的UIStackView堆疊視圖應用教程
- iOS App開辟中的UISegmentedControl分段組件用法總結
- IOS代碼筆記UIView的placeholder的後果
- iOS App應用SQLite之句柄的界說及數據庫的根本操作
- iOS中的音頻辦事和音頻AVAudioPlayer音頻播放器應用指南
- 經由過程UIKit坐標系來周全控制iOS中的UIScrollView組件
- iOS中的UISearchBar搜刮框組件基本應用指南
- 詳解iOS App中UISwitch開關組件的根本創立及應用辦法

- CocoaPods的安裝、使用、以及遇到的問題
- iPhone可降回舊版iOS 全新iOS降級工具面世 附下載地址
- iOS 8.1如何優化?iOS 8.1優化攻略教程
- Launcher怎麼用 iOS8安裝launcher使用方法大全
- iOS8藍牙怎麼關 iPhone6關閉藍牙教程
- iOS9.2 Beta2更新了什麼 iOS9.2 Beta2更新內容解析
- ios10支付寶提現卡死怎麼辦?ios10支付寶卡閃退解決方法
- iOS10 GM版/iOS10.1開發者預覽版Beta1更新升級攻略
- 如何分辨蘋果6手機正品?iPhone6真機辨別圖文教程
- iPhone應用圖標大小怎麼設置 蘋果IOS9系統應用圖標大小設置圖文教程