(20160601)開源第三方學習之SVProgressHUD
SVProgressHUD相信在很多項目中都有運用,運用於彈出窗提示效果;
地址:https://github.com/SVProgressHUD/SVProgressHUD
一:插件的運用
1.1 首先SVProgressHUD是一個單例([SVProgressHUD method]),所以可以使用起來也相當方便跟簡單,可以寫在任意位置;但必須在主線程中進行顯示,或則會報閃退;也可以用於顯示一個提示信息。所述顯示時間取決於給定的字符串的長度( 0.5至5秒)
其中幾種展現:
+ (void)showInfoWithStatus:(NSString *)string;
+ (void)showSuccessWithStatus:(NSString*)string;
+ (void)showErrorWithStatus:(NSString *)string;
+ (void)showImage:(UIImage*)image status:(NSString*)string;
+ (void)showProgress:(float)progress status:(NSString*)status;

簡單HUD銷毀:
+ (void)dismiss;
+ (void)dismissWithDelay:(NSTimeInterval)delay;
+ (void)dismissWithCompletion:(SVProgressHUDDismissCompletion)completion;
+ (void)dismissWithDelay:(NSTimeInterval)delay completion:(SVProgressHUDDismissCompletion)completion;

批量HUD銷毀
+ (void)popActivity;
1.2 SVProgressHUD可通過下列方法進行個性化定制:
+ (void)setDefaultStyle:(SVProgressHUDStyle)style;                  // 默認是SVProgressHUDStyleLight
+ (void)setDefaultMaskType:(SVProgressHUDMaskType)maskType;         // 默認是SVProgressHUDMaskTypeNone
+ (void)setDefaultAnimationType:(SVProgressHUDAnimationType)type;   // 默認是 SVProgressHUDAnimationTypeFlat
+ (void)setRingThickness:(CGFloat)width;                            // 默認是 2 pt
+ (void)setCornerRadius:(CGFloat)cornerRadius;                      // 默認是 14 pt
+ (void)setFont:(UIFont*)font;                                      // 默認是 [UIFont preferredFontForTextStyle:UIFontTextStyleSubheadline]
+ (void)setForegroundColor:(UIColor*)color;                         // 默認是 [UIColor blackColor], 僅對 SVProgressHUDStyleCustom 有效
+ (void)setBackgroundColor:(UIColor*)color;                         // 默認是 [UIColor whiteColor], 僅對 SVProgressHUDStyleCustom 有效
+ (void)setInfoImage:(UIImage*)image;                               //默認是bundle文件夾中的提示圖片.
+ (void)setSuccessImage:(UIImage*)image;                            // 默認是bundle文件夾中的成功圖片.
+ (void)setErrorImage:(UIImage*)image;                              // 默認是bundle文件夾中的錯誤圖片.
+ (void)setViewForExtension:(UIView*)view;                          // 默認是nil,僅當設置了 #define SV_APP_EXTENSIONS 時有效.
所以我們可以對於SVProgressHUD做一些調整,比如圖標跟文字的顯示,背景色等;已經是相當的靈活;
1.3 SVProgressHUD帶的四個通知,通過NSNotificationCenter 注冊4份通知,以響應正在顯示/消失:
SVProgressHUDWillAppearNotification 提示框即將出現
SVProgressHUDDidAppearNotification 提示框已經出現
SVProgressHUDWillDisappearNotification 提示框即將消失
SVProgressHUDDidDisappearNotification 提示框已經消失
每個通知傳遞一個userInfo字典,字典中包含HUD的狀態字符串(如果有的話) ,可通過SVProgressHUDStatusUserInfoKey作為鍵來獲取。
SVProgressHUD還發送通知:
SVProgressHUDDidReceiveTouchEventNotification當用戶觸摸整體屏幕上 和
' SVProgressHUDDidTouchDownInsideNotification當用戶直接在HUD接觸。這兩個通知沒有 userInfo參數,但包含了有關的觸摸的UIEvent` 參數.
實例:

- (void)viewWillAppear:(BOOL)animated {
    [super viewWillAppear:animated];

    [[NSNotificationCenter defaultCenter] addObserver:self
                                             selector:@selector(handleNotification:)
                                                 name:SVProgressHUDWillAppearNotification
                                               object:nil];

    [[NSNotificationCenter defaultCenter] addObserver:self
                                             selector:@selector(handleNotification:)
                                                 name:SVProgressHUDDidAppearNotification
                                               object:nil];

    [[NSNotificationCenter defaultCenter] addObserver:self
                                             selector:@selector(handleNotification:)
                                                 name:SVProgressHUDWillDisappearNotification
                                               object:nil];

    [[NSNotificationCenter defaultCenter] addObserver:self
                                             selector:@selector(handleNotification:)
                                                 name:SVProgressHUDDidDisappearNotification
                                               object:nil];
}

- (void)handleNotification:(NSNotification *)notification {
    NSLog(@"Notification recieved: %@", notification.name);
    NSLog(@"Status user info key: %@", notification.userInfo[SVProgressHUDStatusUserInfoKey]);
}

輸出的內容為,其中Useful Information為提示的文本內容:

SVProgressHUD[793:34162] Notification recieved: SVProgressHUDWillAppearNotification
2016-06-09 21:00:13.285 SVProgressHUD[793:34162] Status user info key: Useful Information.
1.4 相關屬性介紹
1.4.1 SVProgressHUDAnimationType 動作類型
[SVProgressHUD setDefaultAnimationType:SVProgressHUDAnimationTypeFlat]; 圓圈的轉動動作
[SVProgressHUD setDefaultAnimationType:SVProgressHUDAnimationTypeNative]; 菊花型的轉動動作
1.4.2 SVProgressHUDMaskType 彈出窗後面的背景效果類型:
SVProgressHUDMaskTypeNone :當提示顯示的時間,用戶仍然可以做其他操作,比如View 上面的輸入等
SVProgressHUDMaskTypeClear : 用戶不可以做其他操作
SVProgressHUDMaskTypeBlack : 用戶不可以做其他操作,並且背景色是黑色
SVProgressHUDMaskTypeGradient :用戶不可以做其他操作,並且背景色是漸變的

除了插件自帶的幾種效果,還可以自定義背景色的效果
[SVProgressHUD setBackgroundLayerColor:[[UIColor redColor] colorWithAlphaComponent:0.4]];
[SVProgressHUD setDefaultMaskType:SVProgressHUDMaskTypeCustom];
1.4.3 SVProgressHUDStyle 彈出窗的樣式
 [SVProgressHUD setDefaultStyle:SVProgressHUDStyleLight]; 窗的背景塊是白色,字跟圓圈是黑色
 [SVProgressHUD setDefaultStyle:SVProgressHUDStyleDark]; 窗的背景塊是黑色,字跟圓圈是白色

若要自定義必須先設setDefaultStyle為SVProgressHUDStyleCustom,再進行setForegroundColor,setBackgroundColor的配置.
1.5:相關代碼
1.5.1 SVProgressHUD消息的時間
+ (NSTimeInterval)displayDurationForString:(NSString*)string {
    return MAX((float)string.length * 0.06 + 0.5, [self sharedView].minimumDismissTimeInterval);
}
設置一個最大值,至少是0.5秒,其它時間按提示的文本字數長度決定;
1.5.2 設定某個效果不影響全局屬性
+ (void)showSuccessWithStatus:(NSString*)status maskType:(SVProgressHUDMaskType)maskType {
    SVProgressHUDMaskType existingMaskType = [self sharedView].defaultMaskType;
    [self setDefaultMaskType:maskType];
    [self showSuccessWithStatus:status];
    [self setDefaultMaskType:existingMaskType];
}
首先保存全局的效果值,然後顯示當前的效果,完成後又把當前的效果值換成剛才的全局效果,這樣就可以兼容全局效果跟本次效果的轉換;
1.5.3通知並傳遞內容
創建消息通知:

    [[NSNotificationCenter defaultCenter] postNotificationName:SVProgressHUDDidReceiveTouchEventNotification
                                                        object:self
                                                      userInfo:[self notificationUserInfo]];

傳遞的內容:

- (NSDictionary*)notificationUserInfo{
    return (self.statusLabel.text ? @{SVProgressHUDStatusUserInfoKey : self.statusLabel.text} : nil);
}
把當前提示的內容傳遞給通知,方便後面在接收到消息時可以做處理;
二:知識點
2.1 使用 __attribute__, deprecated 關鍵字表示已過時的API
+ (void)showWithMaskType:(SVProgressHUDMaskType)maskType __attribute__((deprecated("Use show and setDefaultMaskType: instead.")));
此方法已經過時了,如果在項目中有運用到此方法編譯器就會報出相應的警告;如下面截圖,就是用到此方法時報的警告;

知識點擴展(其它可以見__attribute__是GNU C特色之一,在iOS用的比較廣泛):
a:unavailable告訴編譯器該方法不可用
作用:告訴編譯器該方法不可用,如果強行調用編譯器會提示錯誤。比如某個類在構造的時候不想直接通過init來初始化,只能通過特定的初始化方法,就可以將init方法標記為unavailable。用法:__attribute__((unavailable))
例子:

#define UNAVAILABLE_ATTRIBUTE __attribute__((unavailable))
#define NS_UNAVAILABLE UNAVAILABLE_ATTRIBUTE

#import <Foundation/Foundation.h>

@interface Person : NSObject
@property(nonatomic,copy) NSString *name;
@property(nonatomic,assign) NSUInteger age;

- (instancetype)init NS_UNAVAILABLE;
- (instancetype)initWithName:(NSString *)name age:(NSUInteger)age;

@end

b:屬性後面加UI_APPEARANCE_SELECTOR表示這個是影響全局
@property (assign, nonatomic) SVProgressHUDStyle defaultStyle UI_APPEARANCE_SELECTOR;                   // default is SVProgressHUDStyleLight
@property (assign, nonatomic) SVProgressHUDMaskType defaultMaskType UI_APPEARANCE_SELECTOR;             // default is SVProgressHUDMaskTypeNone
@property (assign, nonatomic) SVProgressHUDAnimationType defaultAnimationType UI_APPEARANCE_SELECTOR;   // default is SVProgressHUDAnimationTypeFlat
@property (assign, nonatomic) CGSize minimumSize UI_APPEARANCE_SELECTOR;            // default is CGSizeZero, can be used to avoid resizing for a larger message
2.2 關鍵字extern 用於修飾常量可以讓外面的引用文件應用
在頭文件中使用extern來聲明全局常量,並在相關實現文件中定義其值,這種常量要出現在全局符號表中,所以其名稱應加以區別,通常用與之相關的類名做前綴;
在SVProgressHUD.h文件中定義的這些const
extern NSString * const SVProgressHUDDidReceiveTouchEventNotification;
extern NSString * const SVProgressHUDDidTouchDownInsideNotification;
extern NSString * const SVProgressHUDWillDisappearNotification;
extern NSString * const SVProgressHUDDidDisappearNotification;
extern NSString * const SVProgressHUDWillAppearNotification;
extern NSString * const SVProgressHUDDidAppearNotification;
extern NSString * const SVProgressHUDStatusUserInfoKey;

@interface SVProgressHUD : UIView
@end
然後在SVProgressHUD.m
NSString * const SVProgressHUDDidReceiveTouchEventNotification = @"SVProgressHUDDidReceiveTouchEventNotification";
NSString * const SVProgressHUDDidTouchDownInsideNotification = @"SVProgressHUDDidTouchDownInsideNotification";
NSString * const SVProgressHUDWillDisappearNotification = @"SVProgressHUDWillDisappearNotification";
NSString * const SVProgressHUDDidDisappearNotification = @"SVProgressHUDDidDisappearNotification";
NSString * const SVProgressHUDWillAppearNotification = @"SVProgressHUDWillAppearNotification";
NSString * const SVProgressHUDDidAppearNotification = @"SVProgressHUDDidAppearNotification";
NSString * const SVProgressHUDStatusUserInfoKey = @"SVProgressHUDStatusUserInfoKey";


@interface SVProgressHUD ()
@end
就可以在其它地方進行運用:
- (void)viewWillAppear:(BOOL)animated {
    [super viewWillAppear:animated];

    [[NSNotificationCenter defaultCenter] addObserver:self
                                             selector:@selector(handleNotification:)
                                                 name:SVProgressHUDWillAppearNotification
                                               object:nil];

    [[NSNotificationCenter defaultCenter] addObserver:self
                                             selector:@selector(handleNotification:)
                                                 name:SVProgressHUDDidAppearNotification
                                               object:nil];

    [[NSNotificationCenter defaultCenter] addObserver:self
                                             selector:@selector(handleNotification:)
                                                 name:SVProgressHUDWillDisappearNotification
                                               object:nil];

    [[NSNotificationCenter defaultCenter] addObserver:self
                                             selector:@selector(handleNotification:)
                                                 name:SVProgressHUDDidDisappearNotification
                                               object:nil];
}

- (void)handleNotification:(NSNotification *)notification {
    NSLog(@"Notification recieved: %@", notification.name);
    NSLog(@"Status user info key: %@", notification.userInfo[SVProgressHUDStatusUserInfoKey]);
}
2.3生成Bundle包及運用
Bundle簡單理解,就是資源文件包。我們將許多圖片、XIB、文本文件組織在一起,打包成一個Bundle文件。方便在其他項目中引用包內的資源。Bundle是靜態的,也就是說,我們包含到包中的資源文件作為一個資源包是不參加項目編譯的。也就意味著,bundle包中不能包含可執行的文件。它僅僅是作為資源,被解析成為特定的2進制數據。默認生成的配置跟strings文件都是可以刪除;將要使用的bundle集成到項目中後,就可以使用了。需要注意的就是,bundle是靜態的,不進行編譯的資源文件。所以,要使用bundle中的資源,就需要找到相應的資源路徑。
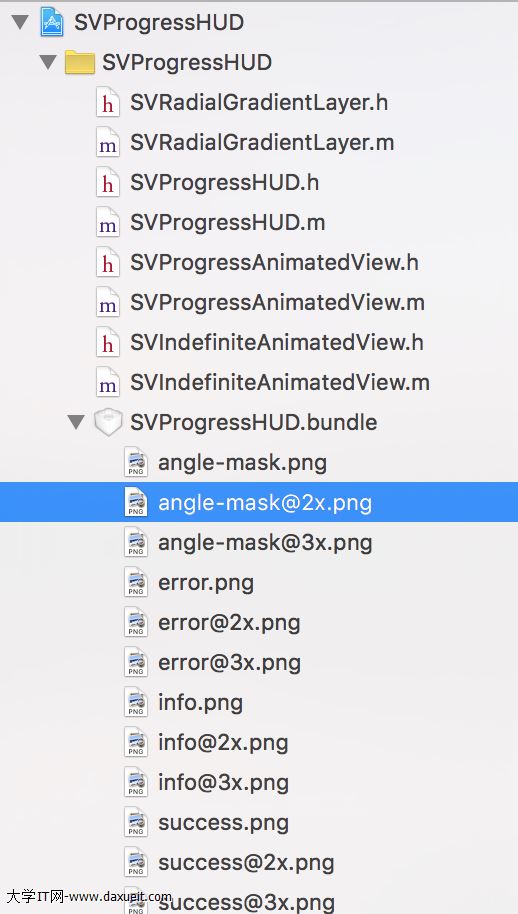
        NSBundle *bundle = [NSBundle bundleForClass:[SVProgressHUD class]];
        NSURL *url = [bundle URLForResource:@"SVProgressHUD" withExtension:@"bundle"];
        NSBundle *imageBundle = [NSBundle bundleWithURL:url];

        UIImage* infoImage = [UIImage imageWithContentsOfFile:[imageBundle pathForResource:@"info" ofType:@"png"]];
        UIImage* successImage = [UIImage imageWithContentsOfFile:[imageBundle pathForResource:@"success" ofType:@"png"]];
        UIImage* errorImage = [UIImage imageWithContentsOfFile:[imageBundle pathForResource:@"error" ofType:@"png"]];
當然也可以定義宏來簡化代碼:
#define MYBUNDLE_NAME @ "SVProgressHUD.bundle"
#define MYBUNDLE_PATH [[[NSBundle mainBundle] resourcePath] stringByAppendingPathComponent: MYBUNDLE_NAME]
#define MYBUNDLE [NSBundle bundleWithPath: MYBUNDLE_PATH]
其它一些擴展:
NSString * bundlePath = [[ NSBundle mainBundle] pathForResource: @ "MyBundle" ofType :@ "bundle"];
NSBundle *resourceBundle = [NSBundle bundleWithPath:bundlePath];
UIViewController *vc = [[UIViewController alloc] initWithNibName:@"vc_name" bundle:resourceBundle];

圖片獲得bundle中的資源

UIImageView *imgView=[[UIImageView alloc] initWithFrame:CGRectMake(50, 50, 50, 50)];
UIImage *image = [UIImage imageNamed:@"MyBundle.bundle/img_collect_success"];
[imgView setImage:image];

或者

UIImageView *imgView=[[UIImageView alloc] initWithFrame:CGRectMake(50, 50, 50, 50)];
NSString *imgPath= [bundlePath stringByAppendingPathComponent :@"img_collect_success.png"];
UIImage *image_1=[UIImage imageWithContentsOfFile:imgPath];
[imgView setImage:image_1];
2.4 UIView的Tint Color屬性
在iOS 7後,UIView新增加了一個tintColor屬性,這個屬性定義了一個非默認的著色顏色值,其值的設置會影響到以視圖為根視圖的整個視圖層次結構。它主要是應用到諸如app圖標、導航欄、按鈕等一些控件上,以獲取一些有意思的視覺效果。
默認情況下,一個視圖的tintColor是為nil的,這意味著視圖將使用父視圖的tint color值。當我們指定了一個視圖的tintColor後,這個色值會自動傳播到視圖層次結構(以當前視圖為根視圖)中所有的子視圖上。如果系統在視圖層次結構中沒有找到一個非默認的tintColor值,則會使用系統定義的顏色值(藍色,RGB值為[0,0.478431,1],我們可以在IB中看到這個顏色)。因此,這個值總是會返回一個顏色值,即我們沒有指定它。
如果我們想指定整個App的tint color,則可以通過設置window的tint color。這樣同一個window下的所有子視圖都會繼承此tint color。
若想了解關於Tint Color屬性可以查看這篇文章
2.5 UIImage的渲染模式:UIImage.renderingMode
正如2.4點所介紹那些,在IOS7以後UIImage也會受到Tint Color的影響,著色(Tint Color)是iOS7界面中的一個.設置UIImage的渲染模式:UIImage.renderingMode重大改變,你可以設置一個UIImage在渲染時是否使用當前視圖的Tint Color。UIImage新增了一個只讀屬性:renderingMode,對應的還有一個新增方法:imageWithRenderingMode:,它使用UIImageRenderingMode枚舉值來設置圖片的renderingMode屬性。該枚舉中包含下列值:
UIImageRenderingModeAutomatic  // 根據圖片的使用環境和所處的繪圖上下文自動調整渲染模式(默認)。
UIImageRenderingModeAlwaysOriginal   // 始終繪制圖片原始狀態,不使用Tint Color。
UIImageRenderingModeAlwaysTemplate   // 始終根據Tint Color繪制圖片,忽略圖片的顏色信息。
運用:
UIImage *img = [UIImage imageNamed:@ "myimage" ];
img = [img imageWithRenderingMode:UIImageRenderingModeAlwaysTemplate];
當然也可以兼容,是否有imageWithRenderingMode再做處理:
        if ([[UIImage class] instancesRespondToSelector:@selector(imageWithRenderingMode:)]) {
            _infoImage = [infoImage imageWithRenderingMode:UIImageRenderingModeAlwaysTemplate];
            _successImage = [successImage imageWithRenderingMode:UIImageRenderingModeAlwaysTemplate];
            _errorImage = [errorImage imageWithRenderingMode:UIImageRenderingModeAlwaysTemplate];
        } else {
            _infoImage = infoImage;
            _successImage = successImage;
            _errorImage = errorImage;
        }
2.6UIControl
在開發應用的時候,經常會用到各種各樣的控件,諸如按鈕(UIButton)、滑塊(UISlider)、分頁控件(UIPageControl)等。這些控件用來與用戶進行交互,響應用戶的操作。我們查看這些類的繼承體系,可以看到它們都是繼承於UIControl類。UIControl是控件類的基類,它是一個抽象基類,我們不能直接使用UIControl類來實例化控件,它只是為控件子類定義一些通用的接口,並提供一些基礎實現,以在事件發生時,預處理這些消息並將它們發送到指定目標對象上。UIControl也是UIView的子類;想詳細了解UIControl可以查看這文章;下面創建一個控件實例:
#import <UIKit/UIKit.h>

@interface ImageControl : UIControl

- (instancetype)initWithFrame:(CGRect)frame title:(NSString *)title image:(UIImage *)image;

@end
#import "ImageControl.h"

@implementation ImageControl {

    UILabel     *_label;
    UIImageView *_imageView;
}

- (instancetype)initWithFrame:(CGRect)frame title:(NSString *)title image:(UIImage *)image {

    self = [super initWithFrame:frame];

    if (self) {

        self.backgroundColor = [UIColor clearColor];
        self.layer.borderWidth = 1.0f;
        self.layer.borderColor = [UIColor grayColor].CGColor;
        self.layer.cornerRadius = 5.0f;
        self.layer.masksToBounds = YES;

        CGFloat width = CGRectGetWidth(self.bounds);
        CGFloat height = CGRectGetHeight(self.bounds);

        [self addSubview:({

            _imageView = [[UIImageView alloc] initWithFrame:self.bounds];
            _imageView.image = image;
            _imageView;
        })];


        [self addSubview:({
            _label = [[UILabel alloc] initWithFrame:(CGRect){0.0f, height - 30.0f, width, 30.0f}];
            _label.textAlignment = NSTextAlignmentCenter;
            _label.textColor = [UIColor whiteColor];
            _label.text = title;
            _label;
        })];
    }

    return self;
}

- (void)sendAction:(SEL)action to:(id)target forEvent:(UIEvent *)event {

    // 由對象本身來處理事件
    [super sendAction:@selector(handleAction:) to:self forEvent:event];
}

- (BOOL)beginTrackingWithTouch:(UITouch *)touch withEvent:(UIEvent *)event {
    [super beginTrackingWithTouch:touch withEvent:event];

    NSLog(@"Begin %d", self.tracking);

    return YES;
}

- (BOOL)continueTrackingWithTouch:(UITouch *)touch withEvent:(UIEvent *)event {
    [super continueTrackingWithTouch:touch withEvent:event];

    NSLog(@"Continue %d %@", self.tracking, (self.touchInside ? @"YES" : @"NO"));

    return YES;
}

- (void)endTrackingWithTouch:(UITouch *)touch withEvent:(UIEvent *)event {
    [super endTrackingWithTouch:touch withEvent:event];

    CGPoint position = [touch locationInView:self];

    if (CGRectContainsPoint(_label.frame, position)) {

        // 在此觸發一個UIControlEventTouchUpInside事件行為
        [self sendActionsForControlEvents:UIControlEventTouchUpInside];
    }

    NSLog(@"End %d", self.tracking);
}

- (void)cancelTrackingWithEvent:(UIEvent *)event {
    [super cancelTrackingWithEvent:event];

    NSLog(@"Cancel");
}

- (void)handleAction:(id)sender {

    NSLog(@"handle Action");

    NSLog(@"target-actoin: %@", self.allTargets);
}

//- (void)touchesBegan:(NSSet<UITouch *> *)touches withEvent:(UIEvent *)event {
//    [super touchesBegan:touches withEvent:event];
//
//    NSLog(@"Touch began");
//}
//
//- (void)touchesMoved:(NSSet<UITouch *> *)touches withEvent:(UIEvent *)event {
//
//    [super touchesMoved:touches withEvent:event];
//
//    NSLog(@"Touch Moved");
//}
//
//- (void)touchesEnded:(NSSet<UITouch *> *)touches withEvent:(UIEvent *)event {
//    [super touchesEnded:touches withEvent:event];
//
//    NSLog(@"Touch End");
//}
//
//- (void)touchesCancelled:(NSSet<UITouch *> *)touches withEvent:(UIEvent *)event {
//
//    [super touchesCancelled:touches withEvent:event];
//
//    NSLog(@"Touch Cancel");
//}

@end
而在SVProgressHUD中的運用如下:
- (UIControl*)overlayView {
    if(!_overlayView) {
#if !defined(SV_APP_EXTENSIONS)
        CGRect windowBounds = [[[UIApplication sharedApplication] delegate] window].bounds;
        _overlayView = [[UIControl alloc] initWithFrame:windowBounds];
#else
        _overlayView = [[UIControl alloc] initWithFrame:[UIScreen mainScreen].bounds];
#endif
        _overlayView.autoresizingMask = UIViewAutoresizingFlexibleWidth | UIViewAutoresizingFlexibleHeight;
        _overlayView.backgroundColor = [UIColor clearColor];
        [_overlayView addTarget:self action:@selector(overlayViewDidReceiveTouchEvent:forEvent:) forControlEvents:UIControlEventTouchDown];
    }
    return _overlayView;
}
- 2016 cocoapods的裝置和應用辦法和版本進級碰到的成績
- IOS中應用 CocoaAsyncSocket
- 詳解2016 cocoapods的裝置和運用以及版本晉級遇到的問題
- iOS 微信領取 SDK版本1.7.5(2016年12月27日)
- 搜集2016年值得學習的源碼、第三方和插件
- iOS開源項目周報0105
- 2016年iOS地下可應用破綻總結
- iOS開源項目周報0112
- UIScrollView分頁滑動寬度小於320的完成
- 圖書連載16:字典
- cocoapod晉級遇到的那些坑2017
- iOS開源項目周報0119
- 2017年第一篇博客
- 向2016年說拜拜,持續我的平安開發
- 自定制cell時,獲取到的cell的size.width和height分別是320和44