
多線程在iOS開發中的應用
編輯:IOS技巧綜合
多線程基本概念
01 進程
    進程是指在系統中正在運行的一個應用程序。每個進程之間是獨立的,每個進程均運行在其專用且受保護的內存空間內。

02 線程

    2-1 基本概念
        1個進程要想執行任務,必須得有線程(每1個進程至少要有1條線程),線程是進程的基本執行單元,一個進程(程序)的所有任務都在線程中執行。
    2-2 線程的串行
        1個線程中任務的執行是串行的,如果要在1個線程中執行多個任務,那麼只能一個一個地按順序執行這些任務。也就是說,在同一時間內,1個線程只能執行1個任務。
03 多線程
    3-1 基本概念
        即1個進程中可以開啟多條線程,每條線程可以並行(同時)執行不同的任務。
    3-2 線程的並行
        並行即同時執行。比如同時開啟3條線程分別下載3個文件(分別是文件A、文件B、文件C。
    3-3 多線程並發執行的原理
        在同一時間裡,CPU只能處理1條線程,只有1條線程在工作(執行)。多線程並發(同時)執行,其實是CPU快速地在多條線程之間調度(切換),如果CPU調度線程的時間足夠快,就造成了多線程並發執行的假象
    3-4 多線程優缺點
        優點
            1)能適當提高程序的執行效率。
            2)能適當提高資源利用率(CPU、內存利用率)
        缺點
            1)開啟線程需要占用一定的內存空間(默認情況下,主線程占用1M,子線程占用512KB),如果開啟大量的線程,會占用大量的內存空間,降低程序的性能。
            2)線程越多,CPU在調度線程上的開銷就越大。
            3)程序設計更加復雜:比如線程之間的通信、多線程的數據共享

04 多線程在iOS開發中的應用
    4-1 主線程
        1)一個iOS程序運行後,默認會開啟1條線程,稱為“主線程”或“UI線程”。
        2)作用。刷新顯示UI,處理UI事件。
    4-2 使用注意
        1)不要將耗時操作放到主線程中去處理,會卡住線程。
        2)和UI相關的刷新操作必須放到主線程中進行處理。
多線程實現方案
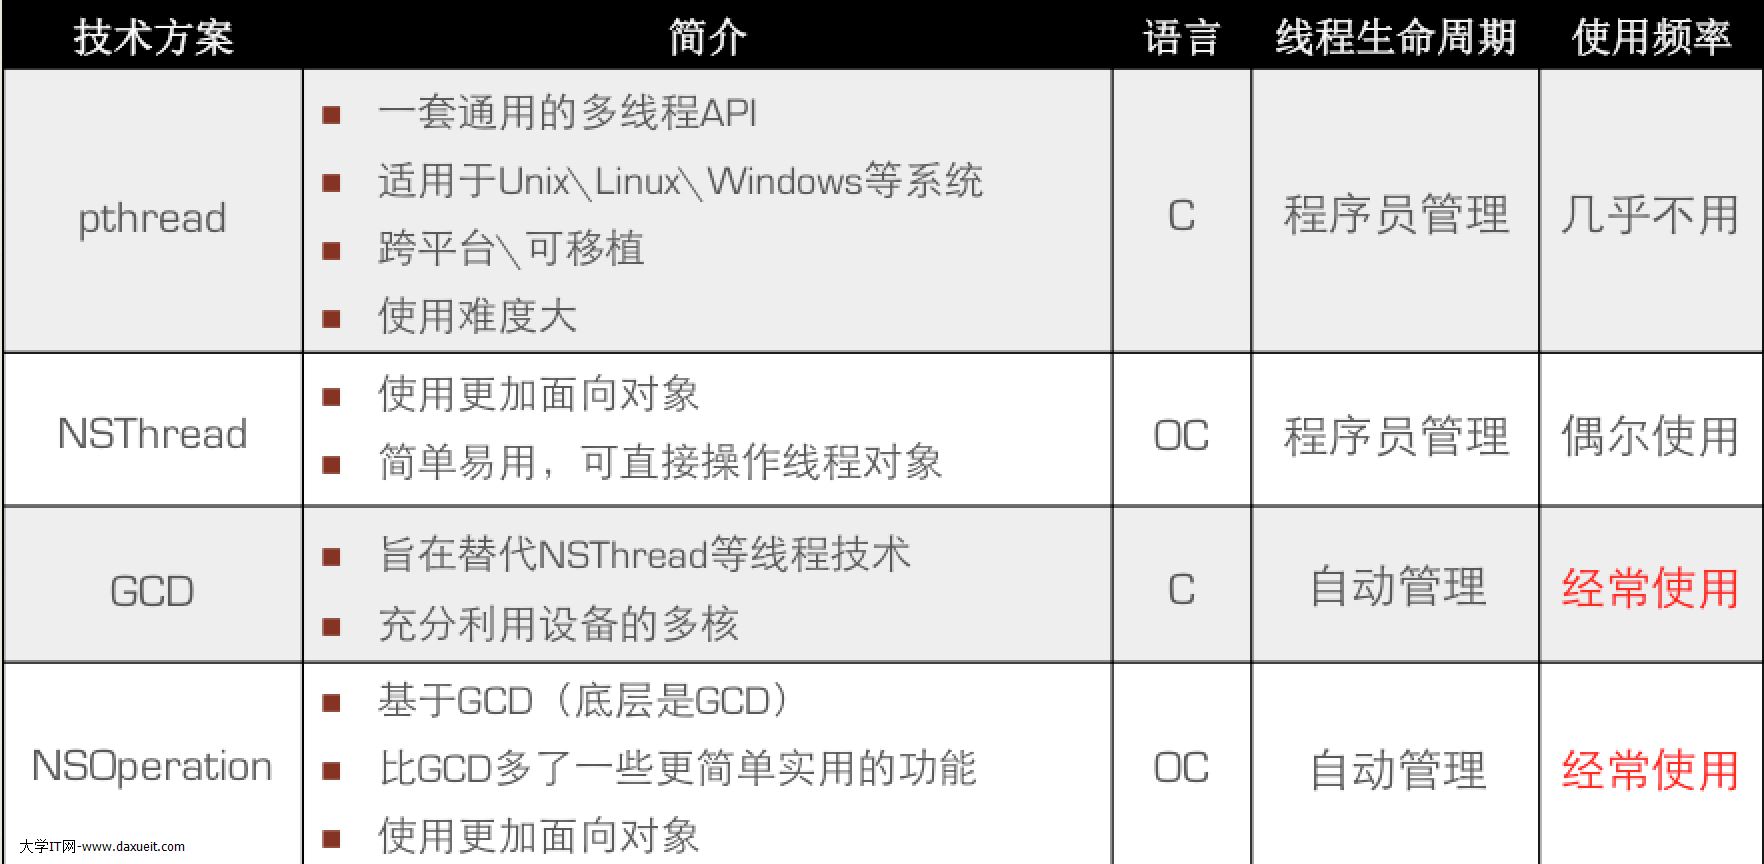
1.pthread
    //pthread需要包含頭文件
    //1.創建線程對象
    pthread_t thread;
    NSString *name = @"線程";
    //2.使用pthread創建線程
    //第一個參數:線程對象地址
    //第二個參數:線程屬性
    //第三個參數:指向函數的指針
    //第四個參數:傳遞給該函數的參數
    pthread_create(&thread, NULL, run, (__bridge void *)(name));
2.NSThread
(1)基本使用
**第一種:alloc init**
需要手動開啟線程,可以拿到線程對象進行詳細設置

//1.創建線程
NSThread *thread = [[NSThread alloc]initWithTarget:self selector:@selector(run:) object:@"線程"];
//2.啟動線程
[thread start];

**第二種:分離(detach)出一條子線程**
自動啟動線程,無法對線程進行更詳細的設置

[NSThread detachNewThreadSelector:@selector(run:) toTarget:self withObject:@"分離出的子線程"];

**第三種:後台線程**
自啟動,不能詳細設置

[self performSelectorInBackground:@selector(run:) withObject:@"後台線程"];
(2)設置線程屬性
//線程名稱
thread.name = @"線程A";

//線程的優先級,取值范圍0.0~1.0,1.0的優先級最高,默認0.5
thread.threadPriority = 1.0;
(3)線程的狀態
//線程的各種狀態:新建-就緒-運行-阻塞-死亡
//常用的控制線程狀態的方法
[NSThread exit];//退出當前線程
[NSThread sleepForTimeInterval:2.0];//阻塞線程
[NSThread sleepUntilDate:[NSDate dateWithTimeIntervalSinceNow:2.0]];//阻塞線程
//注意:線程死了不能復生
(4)線程安全
01 前提:多個線程訪問同一塊資源會發生數據安全問題
02 解決方案:加互斥鎖
03 相關代碼:@synchronized(self){}
04 專業術語-線程同步
05 原子和非原子屬性(是否對setter方法加鎖)
(5)線程間通信
-(void)touchesBegan:(nonnull NSSet<UITouch *> *)touches withEvent:(nullable UIEvent *)event
{
    //開啟子線程下載圖片
    [NSThread detachNewThreadSelector:@selector(downloadImage) toTarget:self withObject:nil];
}

-(void)downloadImage
{
    //1.確定圖片url
    NSURL *url = [NSURL URLWithString:@"http://p6.qhimg.com/t01d2954e2799c461ab.jpg"];

    //2.根據url地址下載圖片數據到本地(二進制數據)
    NSData *data = [NSData dataWithContentsOfURL:url];

    //3.把下載到本地的二進制數據轉換成圖片
    UIImage *image = [UIImage imageWithData:data];

    //4.回到主線程刷新UI
    //4.1 第一種方式
//    [self performSelectorOnMainThread:@selector(showImage:) withObject:image waitUntilDone:YES];

    //4.2 第二種方式
    [self.imageView performSelectorOnMainThread:@selector(setImage:) withObject:image waitUntilDone:YES];

    //4.3 第三種方式
//    [self.imageView performSelector:@selector(setImage:) onThread:[NSThread mainThread] withObject:image waitUntilDone:YES];
}
(6)如何計算代碼段的執行時間
//第一種方法
NSDate *start = [NSDate date];
//2.根據url地址下載圖片數據到本地(二進制數據)
NSData *data = [NSData dataWithContentsOfURL:url];
NSDate *end = [NSDate date];
NSLog(@"第二步操作花費的時間為%f",[end timeIntervalSinceDate:start]);
//第二種方法
CFTimeInterval start = CFAbsoluteTimeGetCurrent();
NSData *data = [NSData dataWithContentsOfURL:url];
CFTimeInterval end = CFAbsoluteTimeGetCurrent();
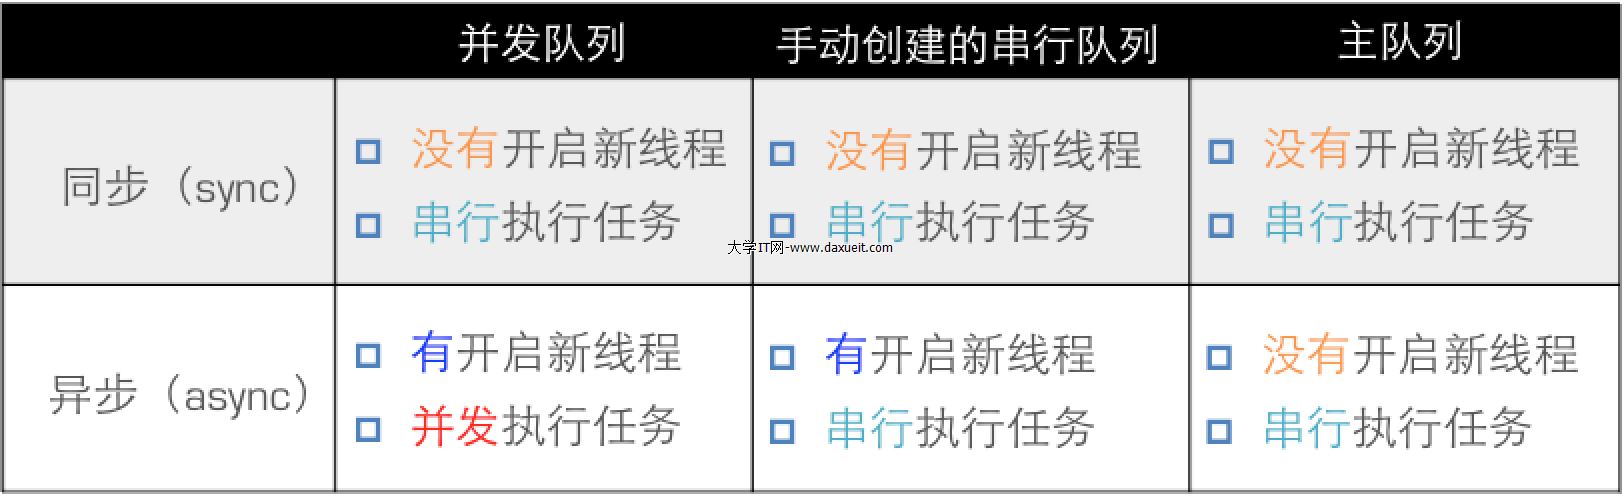
NSLog(@"第二步操作花費的時間為%f",end - start);3.GCD
(1)GCD基本知識
-
兩個核心概念 隊列和任務
同步函數和異步函數
(2)GCD基本使用【重點】
(3)GCD線程間通信
 //0.獲取一個全局的隊列
    dispatch_queue_t queue = dispatch_get_global_queue(0, 0);

    //1.先開啟一個線程,把下載圖片的操作放在子線程中處理
    dispatch_async(queue, ^{

       //2.下載圖片
        NSURL *url = [NSURL URLWithString:@"http://h.hiphotos.baidu.com/zhidao/pic/item/6a63f6246b600c3320b14bb3184c510fd8f9a185.jpg"];
        NSData *data = [NSData dataWithContentsOfURL:url];
        UIImage *image = [UIImage imageWithData:data];

        NSLog(@"下載操作所在的線程--%@",[NSThread currentThread]);

        //3.回到主線程刷新UI
        dispatch_async(dispatch_get_main_queue(), ^{
           self.imageView.image = image;
           //打印查看當前線程
            NSLog(@"刷新UI---%@",[NSThread currentThread]);
        });

    });
(4)GCD其它常用函數
    01 柵欄函數(控制任務的執行順序)
    dispatch_barrier_async(queue, ^{
        NSLog(@"--dispatch_barrier_async-");
    });

    02 延遲執行(延遲·控制在哪個線程執行)
      dispatch_after(dispatch_time(DISPATCH_TIME_NOW, (int64_t)(2.0 * NSEC_PER_SEC)), dispatch_get_global_queue(DISPATCH_QUEUE_PRIORITY_DEFAULT, 0), ^{
        NSLog(@"---%@",[NSThread currentThread]);
    });

    03 一次性代碼(注意不能放到懶加載)
    -(void)once
    {
        //整個程序運行過程中只會執行一次
        //onceToken用來記錄該部分的代碼是否被執行過
        static dispatch_once_t onceToken;
        dispatch_once(&onceToken, ^{

            NSLog(@"-----");
        });
    }

    04 快速迭代(開多個線程並發完成迭代操作)
       dispatch_apply(subpaths.count, queue, ^(size_t index) {
    });

    05 隊列組(同柵欄函數)
    //創建隊列組
    dispatch_group_t group = dispatch_group_create();
    //隊列組中的任務執行完畢之後,執行該函數
    dispatch_group_notify(dispatch_group_t group,
    dispatch_queue_t queue,
    dispatch_block_t block);
4.NSOperation
(1)概念
-
NSOperation是對GCD的包裝
兩個核心概念【隊列+操作】
(2)使用
-
NSOperation本身是抽象類,只能只有它的子類
三個子類分別是:NSBlockOperation、NSInvocationOperation以及自定義繼承自NSOperation的類
NSOperation和NSOperationQueue結合使用實現多線程並發
(3)代碼
// 1.NSInvocationOperation
    //1.封裝操作
    NSInvocationOperation *operation = [[NSInvocationOperation alloc] initWithTarget:self selector:@selector(run) object:nil];

    //2.啟動操作
    [operation start];
-------------------------------------------------
// 2.NSBlockOperation
    //1.封裝操作
    /*
     NSBlockOperation提供了一個類方法,在該類方法中封裝操作
     */
    NSBlockOperation *operation = [NSBlockOperation blockOperationWithBlock:^{
        //在主線程中執行
        NSLog(@"---download1--%@",[NSThread currentThread]);
    }];

    //2.追加操作,追加的操作在子線程中執行
    [operation addExecutionBlock:^{
        NSLog(@"---download2--%@",[NSThread currentThread]);
    }];

    [operation addExecutionBlock:^{
         NSLog(@"---download3--%@",[NSThread currentThread]);
    }];

    //3.啟動執行操作
    [operation start];

----------------------------------------------
// 3.自定義NSOperation
    //如何封裝操作?
    //自定義的NSOperation,通過重寫內部的main方法實現封裝操作
    -(void)main
    {
        NSLog(@"--main--%@",[NSThread currentThread]);
    }

    //如何使用?
    //1.實例化一個自定義操作對象
    ZCOperation *op = [[ZCOperation alloc]init];

    //2.執行操作
    [op start];
NSOperationQueue
(1)NSOperation中的兩種隊列
-
主隊列 通過mainQueue獲得,凡是放到主隊列中的任務都將在主線程執行
非主隊列 直接alloc init出來的隊列。非主隊列同時具備了並發和串行的功能,通過設置最大並發數屬性來控制任務是並發執行還是串行執行
(2)代碼
//自定義NSOperation
-(void)customOperation
{
    //1.創建隊列
    NSOperationQueue *queue = [[NSOperationQueue alloc]init];

    //2.封裝操作
    //好處:1.信息隱蔽
    //2.代碼復用

    ZCOperation *op1 = [[ZCOperation alloc]init];
    ZCOperation *op2 = [[ZCOperation alloc]init];

    //3.添加操作到隊列中
    [queue addOperation:op1];
    [queue addOperation:op2];
}

//NSBlockOperation
- (void)block
{
    //1.創建隊列
    NSOperationQueue *queue = [[NSOperationQueue alloc]init];

    //2.封裝操作
    NSBlockOperation *op1 = [NSBlockOperation blockOperationWithBlock:^{
        NSLog(@"1----%@",[NSThread currentThread]);
    }];

    NSBlockOperation *op2 = [NSBlockOperation blockOperationWithBlock:^{
        NSLog(@"2----%@",[NSThread currentThread]);

    }];

    [op2 addExecutionBlock:^{
        NSLog(@"3----%@",[NSThread currentThread]);
    }];

    [op2 addExecutionBlock:^{
        NSLog(@"4----%@",[NSThread currentThread]);
    }];

    //3.添加操作到隊列中
    [queue addOperation:op1];
    [queue addOperation:op2];

    //補充:簡便方法
    [queue addOperationWithBlock:^{
        NSLog(@"5----%@",[NSThread currentThread]);
    }];

}

//NSInvocationOperation
- (void)invocation
{
    /*
     GCD中的隊列:
     串行隊列:自己創建的,主隊列
     並發隊列:自己創建的,全局並發隊列

     NSOperationQueue
     主隊列:[NSOperationQueue mainqueue];凡事放在主隊列中的操作都在主線程中執行
     非主隊列:[[NSOperationQueue alloc]init],並發和串行,默認是並發執行的
     */

    //1.創建隊列
    NSOperationQueue *queue = [[NSOperationQueue alloc]init];

    //2.封裝操作
    NSInvocationOperation *op1 = [[NSInvocationOperation alloc]initWithTarget:self selector:@selector(download1) object:nil];

    NSInvocationOperation *op2 = [[NSInvocationOperation alloc]initWithTarget:self selector:@selector(download2) object:nil];


    NSInvocationOperation *op3 = [[NSInvocationOperation alloc]initWithTarget:self selector:@selector(download3) object:nil];


    //3.把封裝好的操作添加到隊列中
    [queue addOperation:op1];//[op1 start]
    [queue addOperation:op2];
    [queue addOperation:op3];
}
(3)NSOperation其它用法
設置最大並發數【控制任務並發和串行】
//1.創建隊列
    NSOperationQueue *queue = [[NSOperationQueue alloc]init];

    //2.設置最大並發數
    //注意點:該屬性需要在任務添加到隊列中之前進行設置
    //該屬性控制隊列是串行執行還是並發執行
    //如果最大並發數等於1,那麼該隊列是串行的,如果大於1那麼是並行的
    //系統的最大並發數有個默認的值,為-1,如果該屬性設置為0,那麼不會執行任何任務
    queue.maxConcurrentOperationCount = 2;
暫停和恢復以及取消
    //設置暫停和恢復
    //suspended設置為YES表示暫停,suspended設置為NO表示恢復
    //暫停表示不繼續執行隊列中的下一個任務,暫停操作是可以恢復的
    if (self.queue.isSuspended) {
        self.queue.suspended = NO;
    }else
    {
        self.queue.suspended = YES;
    }

    //取消隊列裡面的所有操作
    //取消之後,當前正在執行的操作的下一個操作將不再執行,而且永遠都不在執行,就像後面的所有任務都從隊列裡面移除了一樣
    //取消操作是不可以恢復的
    [self.queue cancelAllOperations];

---------自定義NSOperation取消操作--------------------------
-(void)main
{
    //耗時操作1
    for (int i = 0; i<1000; i++) {
        NSLog(@"任務1-%d--%@",i,[NSThread currentThread]);
    }
    NSLog(@"+++++++++++++++++++++++++++++++++");

    //蘋果官方建議,每當執行完一次耗時操作之後,就查看一下當前隊列是否為取消狀態,如果是,那麼就直接退出
    //好處是可以提高程序的性能
    if (self.isCancelled) {
        return;
    }

    //耗時操作2
    for (int i = 0; i<1000; i++) {
        NSLog(@"任務1-%d--%@",i,[NSThread currentThread]);
    }

    NSLog(@"+++++++++++++++++++++++++++++++++");
}
(3)NSOperation實現線程間通信
開子線程下載圖片
 //1.創建隊列
    NSOperationQueue *queue = [[NSOperationQueue alloc]init];

    //2.使用簡便方法封裝操作並添加到隊列中
    [queue addOperationWithBlock:^{

        //3.在該block中下載圖片
        NSURL *url = [NSURL URLWithString:@"http://news.51sheyuan.com/uploads/allimg/111001/133442IB-2.jpg"];
        NSData *data = [NSData dataWithContentsOfURL:url];
        UIImage *image = [UIImage imageWithData:data];
        NSLog(@"下載圖片操作--%@",[NSThread currentThread]);

        //4.回到主線程刷新UI
        [[NSOperationQueue mainQueue] addOperationWithBlock:^{
            self.imageView.image = image;
            NSLog(@"刷新UI操作---%@",[NSThread currentThread]);
        }];
    }];
下載多張圖片合成綜合案例(設置操作依賴)
//02 綜合案例
- (void)download2
{
    NSLog(@"----");
    //1.創建隊列
    NSOperationQueue *queue = [[NSOperationQueue alloc]init];

    //2.封裝操作下載圖片1
    NSBlockOperation *op1 = [NSBlockOperation blockOperationWithBlock:^{

        NSURL *url = [NSURL URLWithString:@"http://h.hiphotos.baidu.com/zhidao/pic/item/6a63f6246b600c3320b14bb3184c510fd8f9a185.jpg"];
        NSData *data = [NSData dataWithContentsOfURL:url];

        //拿到圖片數據
        self.image1 = [UIImage imageWithData:data];
    }];


    //3.封裝操作下載圖片2
    NSBlockOperation *op2 = [NSBlockOperation blockOperationWithBlock:^{
        NSURL *url = [NSURL URLWithString:@"http://pic.58pic.com/58pic/13/87/82/27Q58PICYje_1024.jpg"];
        NSData *data = [NSData dataWithContentsOfURL:url];

        //拿到圖片數據
        self.image2 = [UIImage imageWithData:data];
    }];

    //4.合成圖片
    NSBlockOperation *combine = [NSBlockOperation blockOperationWithBlock:^{

        //4.1 開啟圖形上下文
        UIGraphicsBeginImageContext(CGSizeMake(200, 200));

        //4.2 畫image1
        [self.image1 drawInRect:CGRectMake(0, 0, 200, 100)];

        //4.3 畫image2
        [self.image2 drawInRect:CGRectMake(0, 100, 200, 100)];

        //4.4 根據圖形上下文拿到圖片數據
        UIImage *image = UIGraphicsGetImageFromCurrentImageContext();
//        NSLog(@"%@",image);

        //4.5 關閉圖形上下文
        UIGraphicsEndImageContext();

        //7.回到主線程刷新UI
        [[NSOperationQueue mainQueue]addOperationWithBlock:^{
            self.imageView.image = image;
            NSLog(@"刷新UI---%@",[NSThread currentThread]);
        }];

    }];

    //5.設置操作依賴
    [combine addDependency:op1];
    [combine addDependency:op2];

    //6.添加操作到隊列中執行
    [queue addOperation:op1];
    [queue addOperation:op2];
    [queue addOperation:combine];
    }
補充
使用create函數創建的並發隊列和全局並發隊列的主要區別:
1.全局並發隊列在整個應用程序中本身是默認存在的,並且對應有高優先級、默認優先級、低優先級和後台優先級一共四個並發隊列,我們只是選擇其中的一個直接拿來用。而create函數是實打實的從頭開始去創建一個隊列。
2.在iOS6.0之前,在GCD中凡是使用了帶create和retain的函數在最後都需要做一次release操作。而主隊列和全局並發隊列不需要我們手動release。當然了,在iOS6.0之後GCD已經被納入到了ARC的內存管理范疇中,即便是使用retain或者create函數創建的對象也不再需要開發人員手動釋放,我們像對待普通OC對象一樣對待GCD就OK。
3.在使用柵欄函數的時候,蘋果官方明確規定柵欄函數只有在和使用create函數自己的創建的並發隊列一起使用的時候才有效(沒有給出具體原因)
4.其它區別涉及到XNU內核的系統級線程編程,不一一列舉。
5.給出一些參考資料(可以自行研究):

GCDAPI:https://developer.apple.com/library/ios/documentation/Performance/Reference/GCD_libdispatch_Ref/index.html#//apple_ref/c/func/dispatch_queue_create

Libdispatch版本源碼:http://www.opensource.apple.com/source/libdispatch/libdispatch-187.5/


相關文章
+- iOS多線程開辟——NSThread淺析
- iOS運用法式中經由過程dispatch隊列掌握線程履行的辦法
- IOS多線程完成多圖片下載(二)
- IOS多線程完成多圖片下載(一)
- 實例解析iOS運用多線程開辟中NSthread類的用法
- 詳解iOS多線程GCD的應用
- Objective-C的NSOperation多線程類根本應用指南
- 詳解iOS中多線程app開辟的GCD隊列的應用
- iOS多線程運用開辟中自界說NSOperation類的實例解析
- IOS多線程開辟之線程的狀況
- 在IOS中為何應用多線程及多線程完成的三種辦法
- IOS多線程編程的3種完成辦法
- 淺析iOS運用開辟中線程間的通訊與線程平安成績
- 懂得iOS多線程運用的開辟和線程的創立辦法
- iOS多線程運用開辟中應用NSOperation類的根本辦法

- Iphone Airdrop怎麼用?iOS7共享工具Airdrop使用方法
- iPhone6鎖屏密碼忘記怎麼辦?如何破解iPhone6鎖屏密碼
- 七牛直播收獲分享
- 蘋果IOS 7.0之後怎麼設置assistive touch?
- 玩轉Apple Music 12個Apple Music使用技巧
- 蘋果iPhone6怎麼截屏?iPhone6屏幕截圖快捷鍵截圖兩種方法
- iOS微信6.3.7更新了什麼 iOS微信6.3.7下載地址
- iOS9 Safari中怎麼開啟夜間模式?Safari夜間模式開啟教程
- 十問蘋果iPhone6s免費換電池服務:港版機器也能換
- iPhone7人像模式在哪?iPhone7有背景虛化拍照功能嗎?