Swift之 tableView單元格圖片寬度固定,高度自適應例子

2,實現步驟
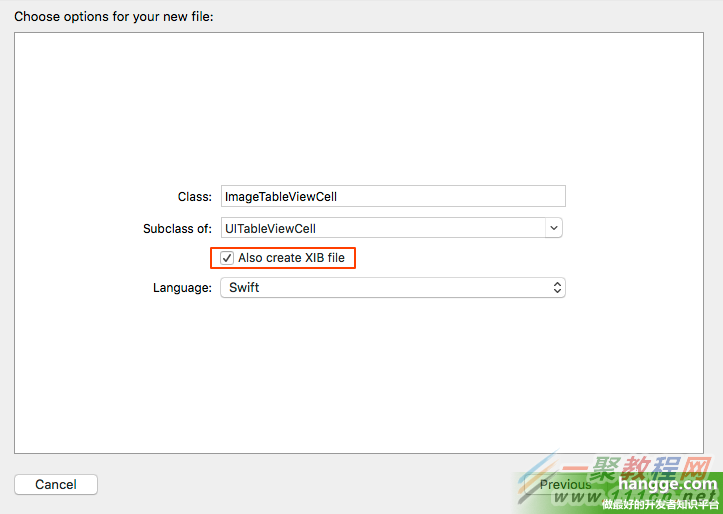
(1)我們先創建一個自定義的單元格類(ImageTableViewCell.swift),同時創建其對應的 XIB 文件(ImageTableViewCell.xib)。
 (2)打開 ImageTableViewCell.xib,在裡面添加一個 Label(用來顯示標題文字),和一個 ImageView(用來顯示內容圖片)。並將它們在對應類中做關聯引用。
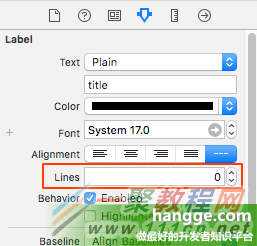
 (3)為了讓 Label 標簽能自動增長,將其 Lines 屬性設置為 0。
 (4)對 Label 設置上下左右 4 個約束。
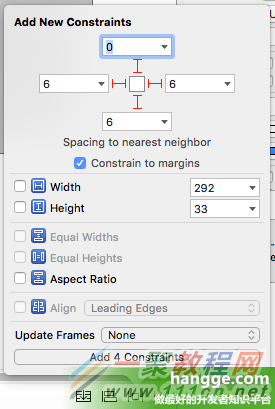
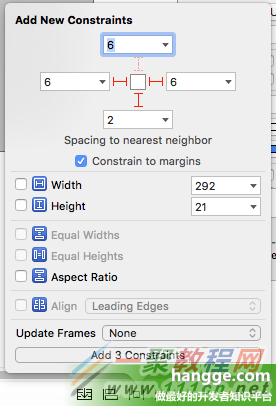
(5)對 ImageView 設置左右下 3 個約束。
(6)ImageTableViewCell.swift 代碼
上面約束設置後,imageView 的寬度就固定下來了。為了讓其高度自適應,我們需要在代碼中通過獲取其內部顯示圖片的寬高比,來動態地設置 imageView 的寬高比約束。保證 imageView 與原始圖片的比例是一樣的。
import UIKit
class ImageTableViewCell: UITableViewCell {
//標題文本標簽
@IBOutlet weak var titleLabel: UILabel!
//內容圖片
@IBOutlet weak var contentImageView: UIImageView!
//內容圖片的寬高比約束
internal var aspectConstraint : NSLayoutConstraint? {
didSet {
if oldValue != nil {
contentImageView.removeConstraint(oldValue!)
}
if aspectConstraint != nil {
contentImageView.addConstraint(aspectConstraint!)
}
}
}
override func awakeFromNib() {
super.awakeFromNib()
}
override func prepareForReuse() {
super.prepareForReuse()
//清除內容圖片的寬高比約束
aspectConstraint = nil
}
//加載內容圖片(並設置高度約束)
func loadImage(name: String) {
if let image = UIImage(named: name) {
//計算原始圖片的寬高比
let aspect = image.size.width / image.size.height
//設置imageView寬高比約束
aspectConstraint = NSLayoutConstraint(item: contentImageView,
attribute: .Width, relatedBy: .Equal,
toItem: contentImageView, attribute: .Height,
multiplier: aspect, constant: 0.0)
//加載圖片
contentImageView.image = image
}else{
//去除imageView裡的圖片和寬高比約束
aspectConstraint = nil
contentImageView.image = nil
}
}
override func setSelected(selected: Bool, animated: Bool) {
super.setSelected(selected, animated: animated)
}
}
(7)ViewController.swit
在首頁中我們創建一個 tabbleView 來測試上面我們自定義的單元格。這裡沒什麼特別的,同前文差不多。
import UIKit
class ViewController: UIViewController , UITableViewDelegate, UITableViewDataSource {
var catalog = [[String]]()
var tableView:UITableView!
override func viewDidLoad() {
super.viewDidLoad()
//初始化列表數據
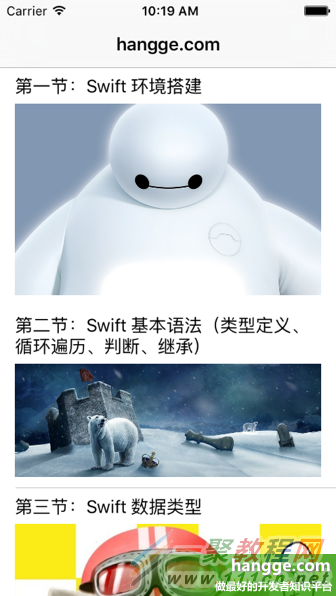
catalog.append(["第一節:Swift 環境搭建", "img1.jpg"])
catalog.append(["第二節:Swift 基本語法(類型定義、循環遍歷、判斷、繼承)", "img2.jpg"])
catalog.append(["第三節:Swift 數據類型", "img3.jpg"])
//創建表視圖
self.tableView = UITableView(frame: self.view.frame, style: .Plain)
self.tableView.delegate = self
self.tableView.dataSource = self
//創建一個重用的單元格
self.tableView!.registerNib(UINib(nibName:"ImageTableViewCell", bundle:nil),
forCellReuseIdentifier:"myCell")
//設置estimatedRowHeight屬性默認值
self.tableView.estimatedRowHeight = 44.0;
//rowHeight屬性設置為UITableViewAutomaticDimension
self.tableView.rowHeight = UITableViewAutomaticDimension;
self.view.addSubview(self.tableView!)
}
//在本例中,只有一個分區
func numberOfSectionsInTableView(tableView: UITableView) -> Int {
return 1;
}
//返回表格行數(也就是返回控件數)
func tableView(tableView: UITableView, numberOfRowsInSection section: Int) -> Int {
return self.catalog.count
}
//創建各單元顯示內容(創建參數indexPath指定的單元)
func tableView(tableView: UITableView, cellForRowAtIndexPath indexPath: NSIndexPath)
-> UITableViewCell {
//同一形式的單元格重復使用
let cell = tableView.dequeueReusableCellWithIdentifier("myCell",
forIndexPath: indexPath) as! ImageTableViewCell
//獲取對應的條目內容
let entry = catalog[indexPath.row]
//單元格標題和內容設置
cell.titleLabel.text = entry[0]
cell.loadImage(entry[1])
return cell
}
override func didReceiveMemoryWarning() {
super.didReceiveMemoryWarning()
}
}
3,從網絡獲取圖片
上面的樣例我們是直接加載本地圖片的。在實際項目中,我們通常會通過 url 地址加載網絡上的圖片並顯示。
原文:Swift - tableView單元格高度自適應3(圖片寬度固定,高度自適應)
只需要將 ImageTableViewCell 類做如下修改可以滿足需求,同樣支持圖片的高度自適應。
import UIKit
class ImageTableViewCell: UITableViewCell {
//標題文本標簽
@IBOutlet weak var titleLabel: UILabel!
//內容圖片
@IBOutlet weak var contentImageView: UIImageView!
//內容圖片的寬高比約束
internal var aspectConstraint : NSLayoutConstraint? {
didSet {
if oldValue != nil {
contentImageView.removeConstraint(oldValue!)
}
if aspectConstraint != nil {
contentImageView.addConstraint(aspectConstraint!)
}
}
}
override func awakeFromNib() {
super.awakeFromNib()
}
override func prepareForReuse() {
super.prepareForReuse()
//清除內容圖片的寬高比約束
aspectConstraint = nil
}
//加載內容圖片(並設置高度約束)
func loadImage(urlString: String) {
//定義NSURL對象
let url = NSURL(string: urlString)
//從網絡獲取數據流,再通過數據流初始化圖片
if let data = NSData(contentsOfURL: url!), image = UIImage(data: data) {
//計算原始圖片的寬高比
let aspect = image.size.width / image.size.height
//設置imageView寬高比約束
aspectConstraint = NSLayoutConstraint(item: contentImageView,
attribute: .Width, relatedBy: .Equal,
toItem: contentImageView, attribute: .Height,
multiplier: aspect, constant: 0.0)
//加載圖片
contentImageView.image = image
}else{
//去除imageView裡的圖片和寬高比約束
aspectConstraint = nil
contentImageView.image = nil
}
}
override func setSelected(selected: Bool, animated: Bool) {
super.setSelected(selected, animated: animated)
}
}
使用時,由原來的圖片名稱改成圖片 url 地址即可。
//初始化列表數據
catalog.append(["iPhone 6的故障率達26% 穩超安卓", "http://www.111cn.net /img1.png"])
catalog.append(["不用導航 這款無人機能夠“自制”地圖飛行", "http://www.111cn.net /img2.png"])
catalog.append(["無人汽車如何應對道德困境?谷歌表示不知道", "http://www.111cn.net /img33.png"])


- iOS10告訴框架UserNotification懂得與運用
- iOS Webview自順應現實內容高度的4種辦法詳解
- iOS10 App適配權限 Push Notifications 字體Frame 碰到的成績
- iOS獲得以後裝備WiFi信息的辦法
- iPhone/iPad開辟經由過程LocalNotification完成iOS准時當地推送功效
- iOS推送之當地告訴UILocalNotification
- iOS開辟之widget完成詳解
- iOS10添加當地推送(Local Notification)實例
- iOS Remote Notification長途新聞推送處置
- IOS上iframe的轉動條掉效的處理方法
- Swift 同享文件操作小結(iOS 8 +)
- Swift 2.1 為 UIView 添加點擊事宜和點擊後果
- 在Swift中應用JSONModel 實例代碼
- 應用Swift代碼完成iOS手勢解鎖、指紋解鎖實例詳解
- 詳解iOS App中UISwitch開關組件的根本創立及應用辦法