
Swift實現自由調整圖標按鈕中的圖標和文字位置(擴展UIButton)
按鈕UIButton是ios開發中最常見的控件之一,下面來介紹UIButton的詳細內容,及開發中需要注意的問題。
UIButton簡介:
使用目標動作設計模式,target-action模式,3種回調的模式之一。
實現原理:
使用下面的方法封裝,根據用戶的點擊移動等動作
- (void)touchesBegan:(NSSet *)touches withEvent:(UIEvent *)event;
- (void)touchesMoved:(NSSet *)touches withEvent:(UIEvent *)event;
- (void)touchesEnded:(NSSet *)touches withEvent:(UIEvent *)event;
- (void)touchesCancelled:(NSSet *)touches withEvent:(UIEvent *)event;創建按鈕:
//構造器方法,調用該方法創建某個樣式的按鈕對象
+ (id)buttonWithType:(UIButtonType)buttonType
參數:
buttonType:按鈕樣式
枚舉值:
UIButtonTypeCustom = 0, 自定義風格UIButtonTypeRoundedRect, 圓角矩形
UIButtonTypeDetailDisclosure, 藍色小箭頭按鈕,主要做詳細說明用
UIButtonTypeInfoLight, 亮色感歎號
UIButtonTypeInfoDark, 暗色感歎號
UIButtonTypeContactAdd, 十字加號按鈕UIButtonTypeSystem ,系統默認樣式,若使用此樣式,在使用setImage時會顯示異常
示例:
UIButton *button = [UIButton buttonWithType:UIButtonTypeRoundedRect];
配置按鈕標題
//獲取按鈕的標題文字,只讀屬性
@property(nonatomic, readonly, retain) UILabel *titleLabel,注意請勿直接使用titleLabel來修改title
//返回在某個狀態下,按鈕的標題文字
- (NSString *)titleForState:(UIControlState)state
參數:
state:控件狀態
枚舉值:
UIControlStateNormal //常規狀態顯現
UIControlStateHighlighted //高亮狀態顯現
UIControlStateDisabled //禁用的狀態才會顯現
UIControlStateSelected //選中狀態 UIControlStateApplication //當應用程序標志時
UIControlStateReserved //為內部框架預留,可以不管他
返回值:此狀態下按鈕的標題文字
示例:
NSString *title = [button titleForState:UIControlStateNormal];
//設置按鈕在某個狀態下的標題文字
- (void)setTitle:(NSString *)title
forState:(UIControlState)state
示例:
[button setTitle:@"按鈕" forState:UIControlStateNormal];
//返回在某個狀態下,按鈕標題的富文本
- (NSAttributedString *)attributedTitleForState:(UIControlState)state
參數:
state:控件的狀態
返回值:富文本
NSAttirbutedString 為富文本,詳情參見NSAttirbutedString文檔
示例:
NSAttributedString *attributedString = [button attributedTitleForState:UIControlStateNormal];
//設值按鈕在某個狀態下的富文本標題
- (void)setAttributedTitle:(NSAttributedString *)title
forState:(UIControlState)state
//返回按鈕在某個狀態下的標題顏色
- (UIColor *)titleColorForState:(UIControlState)state
參數:
state:狀態
返回值:顏色
示例:
UIColor *color = [button titleColorForState:UIControlStateNormal];
//設置按鈕標題的顏色
- (void)setTitleColor:(UIColor *)color
forState:(UIControlState)state
參數:
color:顏色描述對象
state:狀態
示例:
[button setTitleColor:[UIColor redColor] forState:UIControlStateNormal];
//返回某個狀態下按鈕標題的陰影顏色
- (UIColor *)titleShadowColorForState:(UIControlState)state
//設置某個狀態下按鈕標題的陰影顏色
- (void)setTitleShadowColor:(UIColor *)color
forState:(UIControlState)state
參數:
color:顏色描述對象
state:狀態
示例:
[button setTitleShadowColor:[UIColor grayColor] forState:UIControlStateNormal];
//標題的陰影改變時,按鈕是否高亮顯示。默認為NO
@property(nonatomic) BOOL reversesTitleShadowWhenHighlighted
配置按鈕演示
//按鈕高亮的情況下,圖像的顏色是否要加深一點。默認是YES
@property(nonatomic) BOOL adjustsImageWhenHighlighted
//按鈕禁用的情況下,圖像的顏色是否要加深一點。默認是YES
@property(nonatomic) BOOL adjustsImageWhenDisabled
//按下按鈕是否會發光。默認是NO
@property(nonatomic) BOOL showsTouchWhenHighlighted
//返回按鈕在某個狀態下的背景圖片
- (UIImage *)backgroundImageForState:(UIControlState)state
參數:
state:狀態
返回值:背景圖像
示例:
UIImage *image = [button backgroundImageForState:UIControlStateNormal];
//獲取按鈕的填充圖片
- (UIImage *)imageForState:(UIControlState)state
//設置按鈕的背景圖片
- (void)setBackgroundImage:(UIImage *)image
forState:(UIControlState)state
參數:
image:背景圖片
state:狀態
示例:
[button setBackgroundImage:image forState:UIControlStateNormal];
//設置按鈕的填充圖片
- (void)setImage:(UIImage *)image
forState:(UIControlState)state
配置按鈕邊框效果
//設置按鈕的內部內容(包含按鈕圖片和標題)離按鈕邊緣上下左右的距離。
@property(nonatomic) UIEdgeInsets contentEdgeInsets
結構體:
CGFloat top, left, bottom, right;
四個值,分別是上左下右
//設置按鈕的內部標題離按鈕邊緣上下左右的距離
@property(nonatomic) UIEdgeInsets titleEdgeInsets
//設置按鈕的內部圖片離按鈕邊緣上下左右的距離
@property(nonatomic) UIEdgeInsets imageEdgeInsets
獲取按鈕當前狀態(只讀)
//獲取按鈕狀態,只讀屬性
@property(nonatomic, readonly) UIButtonType buttonType
//獲取按鈕當前標題,只讀屬性
@property(nonatomic, readonly, retain) NSString *currentTitle
//獲取按鈕當前的富文本標題
@property(nonatomic, readonly, retain) NSAttributedString *currentAttributedTitle
//獲取當前標題的顏色
@property(nonatomic, readonly, retain) UIColor *currentTitleColor
//獲取當前標題的陰影顏色
@property(nonatomic, readonly, retain) UIColor *currentTitleShadowColor
//獲取當前按鈕的圖片
@property(nonatomic, readonly, retain) UIImage *currentImage
//獲取當前按鈕的背景圖片
@property(nonatomic, readonly, retain) UIImage *currentBackgroundImage
//獲取當前按鈕的圖片框對象
@property(nonatomic, readonly, retain) UIImageView *imageView
重寫繪制行為
你可以通過子類化按鈕來定制屬於你自己的按鈕類。在子類化的時候你可以重載下面這些方法,這些方法返回CGRect結構,指明了按鈕每一組成部分的邊界。
注意:不要直接調用這些方法, 這些方法是你寫給系統調用的。
//指定背景邊界
- (CGRect)backgroundRectForBounds:(CGRect)bounds
//指定內容邊界
- (CGRect)contentRectForBounds:(CGRect)bounds
//指定文字標題邊界
- (CGRect)titleRectForContentRect:(CGRect)contentRect
//指定按鈕圖像邊界
- (CGRect)imageRectForContentRect:(CGRect)contentRect
示例:
- (CGRect)imageRectForContentRect:(CGRect)bounds{
return CGRectMake(0.0, 0.0, 44, 44);
}
事件
//給按鈕添加點擊事件
[button addTarget:self action:@selector(action:) forControlEvents:UIControlEventTouchUpInside];
枚舉值:
UIControlEventTouchDown // 單點觸摸按下事件:用戶點觸屏幕,或者又有新手指落下的時候。
UIControlEventTouchDownRepeat // 多點觸摸按下事件,點觸計數大於1:用戶按下第二、三、或第四根手指的時候。
UIControlEventTouchDragInside // 當一次觸摸在控件窗口內拖動時。
UIControlEventTouchDragOutside // 當一次觸摸在控件窗口之外拖動時。
UIControlEventTouchDragEnter // 當一次觸摸從控件窗口之外拖動到內部時
UIControlEventTouchDragExit // 當一次觸摸從控件窗口內部拖動到外部時。
UIControlEventTouchUpInside // 所有在控件之內觸摸抬起事件
UIControlEventTouchUpOutside // 所有在控件之外觸摸抬起事件(點觸必須開始與控件內部才會發送通知)。
UIControlEventTouchCancel //所有觸摸取消事件,即一次觸摸因為放上了太多手指而被取消,或者被上鎖或者電話呼叫打斷。
UIControlEventValueChanged // 當控件的值發生改變時,發送通知。用於滑塊、分段控件、以及其他取值的控件。你可以配置滑塊控件何時發送通知,在滑塊被放下時發送,或者在被拖動時發送。
UIControlEventEditingDidBegin // 當文本控件中開始編輯時發送通知
UIControlEventEditingChanged // 當文本控件中的文本被改變時發送通知。
UIControlEventEditingDidEnd // 當文本控件中編輯結束時發送通知。
UIControlEventEditingDidEndOnExit // 當文本控件內通過按下回車鍵(或等價行為)結束編輯時,發送通知。
UIControlEventAllTouchEvents // 通知所有觸摸事件。
UIControlEventAllEditingEvents // 通知所有關於文本編輯的事件。
UIControlEventApplicationReserved // range available for application use
UIControlEventSystemReserved // range reserved for internal framework use
UIControlEventAllEvents // 通知所有事件
復選框checkBox的實現:
首先給選中,何不選中的時候設置背景圖片
點擊按鈕的時候,取反selected值即可
利用selected狀態,反選即可
示例代碼:
-(void)checkboxClick:(UIButton *)btn
{
btn.selected = !btn.selected;
}
- (void)viewDidLoad {
UIButton *checkbox = [UIButton buttonWithType:UIButtonTypeCustom];
CGRect checkboxRect = CGRectMake(135,150,36,36);
[checkbox setFrame:checkboxRect];
[checkbox setImage:[UIImage imageNamed:@"checkbox_off.png"] forState:UIControlStateNormal];
[checkbox setImage:[UIImage imageNamed:@"checkbox_on.png"] forState:UIControlStateSelected];
[checkbox addTarget:self action:@selector(checkboxClick:) forControlEvents:UIControlEventTouchUpInside];
[self.view addSubview:checkbox];
}
自由調整圖標按鈕中的圖標和文字位置(擴展UIButton)
1,Custom類型的UIButton
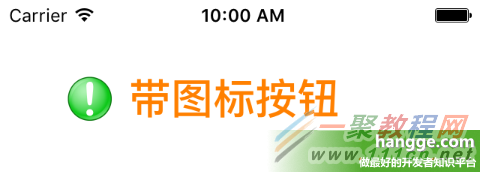
我們使用定制類型(Custom)的按鈕就可以設置文字前面的圖標。但是圖片和文字的相對位置是固定的(按鈕在前,文字在後)。
(1)我們用下面的左圖(64*64)制作一個帶圖標的按鈕

//創建一個圖片加文字的按鈕
let btn1:UIButton = UIButton(frame: CGRect(x: 50, y: 50, width: 180, height: 32))
btn1.setImage(UIImage(named: "alert"), forState: UIControlState.Normal) //按鈕圖標
btn1.titleLabel?.font = UIFont.boldSystemFontOfSize(28) //文字大小
btn1.setTitle("帶圖標按鈕", forState: UIControlState.Normal) //按鈕文字
btn1.setTitleColor(UIColor.orangeColor(), forState: UIControlState.Normal) //文字顏色
self.view.addSubview(btn1)
(2)圖片與文字間的間距方式1 - 設置圖片偏移量(imageEdgeInsets)
 1
1
btn1.imageEdgeInsets = UIEdgeInsets(top: 0, left: -20, bottom: 0, right: 0)
(3)圖片與文字間的間距方式2 - 設置文字偏移量(titleEdgeInsets)
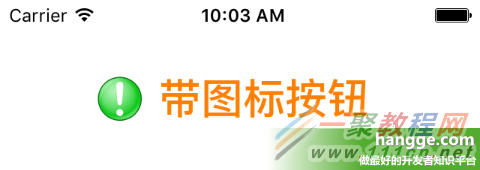
btn1.titleEdgeInsets= UIEdgeInsets(top: 0, left: 20, bottom: 0, right: 0)
2,擴展UIButton
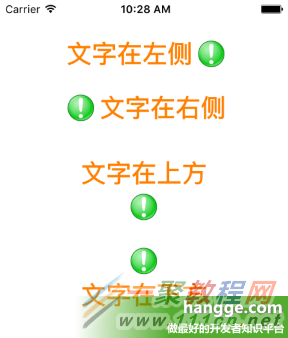
如果我們想要把文字和圖片位置調換下(即文字在前、圖片在後),或者文字和圖片改成上下排列,那麼同樣通過設置 titleEdgeInsets 和 imageEdgeInsets 即可實現。
為方便快速的設置圖片和文字的相對位置,以及間距,這裡對UIButton進行擴展。
(1)擴展代碼如下:
import UIKit
extension UIButton {
@objc func set(image anImage: UIImage?, title: String,
titlePosition: UIViewContentMode, additionalSpacing: CGFloat, state: UIControlState){
self.imageView?.contentMode = .Center
self.setImage(anImage, forState: state)
positionLabelRespectToImage(title, position: titlePosition, spacing: additionalSpacing)
self.titleLabel?.contentMode = .Center
self.setTitle(title, forState: state)
}
private func positionLabelRespectToImage(title: String, position: UIViewContentMode,
spacing: CGFloat) {
let imageSize = self.imageRectForContentRect(self.frame)
let titleFont = self.titleLabel?.font!
let titleSize = title.sizeWithAttributes([NSFontAttributeName: titleFont!])
var titleInsets: UIEdgeInsets
var imageInsets: UIEdgeInsets
switch (position){
case .Top:
titleInsets = UIEdgeInsets(top: -(imageSize.height + titleSize.height + spacing),
left: -(imageSize.width), bottom: 0, right: 0)
imageInsets = UIEdgeInsets(top: 0, left: 0, bottom: 0, right: -titleSize.width)
case .Bottom:
titleInsets = UIEdgeInsets(top: (imageSize.height + titleSize.height + spacing),
left: -(imageSize.width), bottom: 0, right: 0)
imageInsets = UIEdgeInsets(top: 0, left: 0, bottom: 0, right: -titleSize.width)
case .Left:
titleInsets = UIEdgeInsets(top: 0, left: -(imageSize.width * 2), bottom: 0, right: 0)
imageInsets = UIEdgeInsets(top: 0, left: 0, bottom: 0,
right: -(titleSize.width * 2 + spacing))
case .Right:
titleInsets = UIEdgeInsets(top: 0, left: 0, bottom: 0, right: -spacing)
imageInsets = UIEdgeInsets(top: 0, left: 0, bottom: 0, right: 0)
default:
titleInsets = UIEdgeInsets(top: 0, left: 0, bottom: 0, right: 0)
imageInsets = UIEdgeInsets(top: 0, left: 0, bottom: 0, right: 0)
}
self.titleEdgeInsets = titleInsets
self.imageEdgeInsets = imageInsets
}
}
(2)使用樣例
import UIKit
class ViewController: UIViewController {
override func viewDidLoad() {
super.viewDidLoad()
let btn1:UIButton = UIButton(frame: CGRect(x: 0, y: 0, width: 200, height: 32))
btn1.center = CGPointMake(view.frame.size.width/2, 60)
btn1.titleLabel?.font = UIFont.boldSystemFontOfSize(28) //文字大小
btn1.setTitleColor(UIColor.orangeColor(), forState: UIControlState.Normal) //文字顏色
btn1.set(image: UIImage(named: "alert"), title: "文字在左側", titlePosition: .Left,
additionalSpacing: 10.0, state: .Normal)
view.addSubview(btn1)
let btn2:UIButton = UIButton(frame: CGRect(x: 0, y: 0, width: 200, height: 32))
btn2.center = CGPointMake(view.frame.size.width/2, 120)
btn2.titleLabel?.font = UIFont.boldSystemFontOfSize(28) //文字大小
btn2.setTitleColor(UIColor.orangeColor(), forState: UIControlState.Normal) //文字顏色
btn2.set(image: UIImage(named: "alert"), title: "文字在右側", titlePosition: .Right,
additionalSpacing: 10.0, state: .Normal)
view.addSubview(btn2)
let btn3:UIButton = UIButton(frame: CGRect(x: 0, y: 0, width: 170, height: 70))
btn3.center = CGPointMake(view.frame.size.width/2, 230)
btn3.titleLabel?.font = UIFont.boldSystemFontOfSize(28) //文字大小
btn3.setTitleColor(UIColor.orangeColor(), forState: UIControlState.Normal) //文字顏色
btn3.set(image: UIImage(named: "alert"), title: "文字在上方", titlePosition: .Top,
additionalSpacing: 10.0, state: .Normal)
view.addSubview(btn3)
let btn4:UIButton = UIButton(frame: CGRect(x: 0, y: 0, width: 170, height: 70))
btn4.center = CGPointMake(view.frame.size.width/2, 290)
btn4.titleLabel?.font = UIFont.boldSystemFontOfSize(28) //文字大小
btn4.setTitleColor(UIColor.orangeColor(), forState: UIControlState.Normal) //文字顏色
btn4.set(image: UIImage(named: "alert"), title: "文字在下方", titlePosition: .Bottom,
additionalSpacing: 10.0, state: .Normal)
view.addSubview(btn4)
}
override func didReceiveMemoryWarning() {
super.didReceiveMemoryWarning()
}
}


- iOS10告訴框架UserNotification懂得與運用
- iOS Webview自順應現實內容高度的4種辦法詳解
- iOS10 App適配權限 Push Notifications 字體Frame 碰到的成績
- iOS獲得以後裝備WiFi信息的辦法
- iPhone/iPad開辟經由過程LocalNotification完成iOS准時當地推送功效
- iOS推送之當地告訴UILocalNotification
- iOS開辟之widget完成詳解
- iOS10添加當地推送(Local Notification)實例
- iOS Remote Notification長途新聞推送處置
- IOS上iframe的轉動條掉效的處理方法
- Swift 同享文件操作小結(iOS 8 +)
- Swift 2.1 為 UIView 添加點擊事宜和點擊後果
- 在Swift中應用JSONModel 實例代碼
- 應用Swift代碼完成iOS手勢解鎖、指紋解鎖實例詳解
- 詳解iOS App中UISwitch開關組件的根本創立及應用辦法
