UITableView 實現汽車品牌(demo)
看TableView的資料其實已經蠻久了,一直想寫點兒東西,卻總是因為各種原因拖延,今天晚上有時間靜下心來記錄一些最近學習的TableView的知識。下面進入正題,UITableView堪稱UIKit裡面最復雜的一個控件了,使用起來不算難,但是要用好並不容易。當使用的時候我們必須要考慮到後台數據的設計,tableViewCell的設計和重用以及tableView的效率等問題。
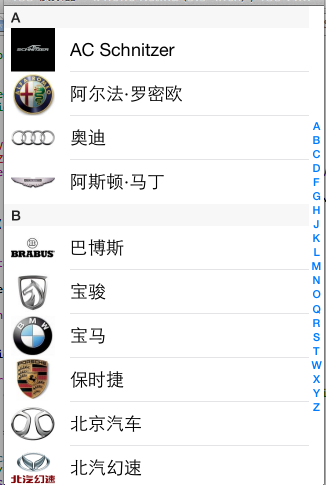
上次介紹的UITableView,這裡再做一個UITableView的小程序,汽車品牌,截圖如下:
1.1創建項目,這裡不多講。
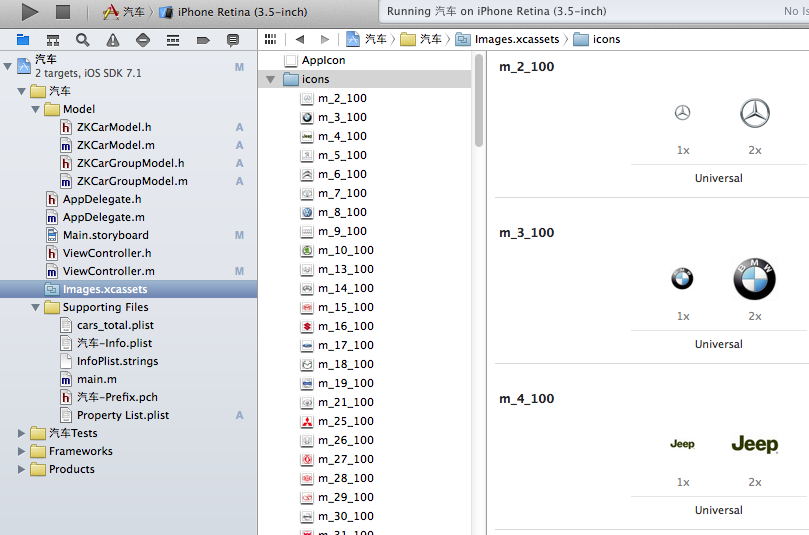
1.2 把所有汽車品牌的圖片放到images.xcassets中,如下圖:
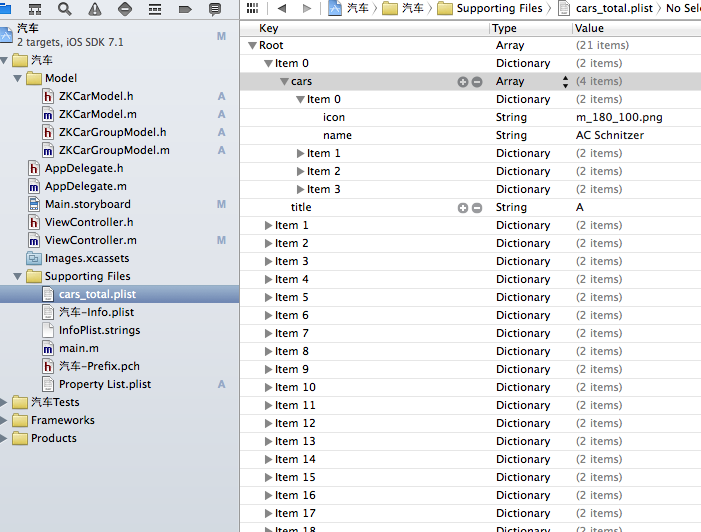
1.3創建 plist數據,plist數據裡面每個array為一個汽車品牌分組,每個array裡面又有一個array,這裡面存放每個分組下所有的品牌汽車數據,數據如下圖。
1.4數據創建完之後,然後設計頁面,頁面很簡單,直接放一個UItable View就可以了。
2.1後台代碼,第一步導入
<UITableViewDataSource,UITableViewDelegate,UIAlertViewDelegate>
只有導入這UItable View的這幾個代理,我們才能在後面的代碼中使用UItable View的一些相對應的方法。
2.2 創建UItable View控件的屬性,和創建一個存儲數據的數組,如下。
@property (weak, nonatomic) IBOutlet UITableView *tableView;
@property(nonatomic,strong)NSArray *carGroups;
2.3 加載數據,這邊先要創建兩個模型類來保存數據,國為我們這裡的數據都在本地的plist文化中,所以我們要把這個plist裡面的數據讀取出來保存在
創建的carGroups數組中,而本地的plist文件是一個array類型,而每個array裡面又有一個array數組,所以我們要創建兩個模型類來保存數據,一個模型類保存外面的array數據,一個模型類來保存array裡面的子array數據,然後在模型類裡面創建和plist裡面對應的數據的屬性和方法
代碼如下:
#import <Foundation/Foundation.h>
@interface ZKCarModel : NSObject
//頭像
@property(nonatomic,copy)NSString * icon;
//名字
@property(nonatomic,copy)NSString *name;
+(instancetype)CarWithDict:(NSDictionary *)dic;
-(instancetype)initWithDict:(NSDictionary *)dic;
@end

#import "ZKCarModel.h"
@implementation ZKCarModel
-(instancetype)initWithDict:(NSDictionary *)dic
{
 if(self=[super init])
 {
 [self setValuesForKeysWithDictionary:dic];
 }
 return self;
}
+(instancetype)CarWithDict:(NSDictionary *)dic
{
 return [[self alloc] initWithDict:dic];
}
@end
#import <Foundation/Foundation.h>
#import "ZKCarModel.h"
@interface ZKCarGroupModel : NSObject
//題目
@property(nonatomic,copy)NSString *title;
@property(nonatomic,strong)NSArray *cars;
+(instancetype)CarGroupWithDic:(NSDictionary *)dic;
-(instancetype)initWithDict:(NSDictionary *)dic;
@end

#import "ZKCarGroupModel.h"
@implementation ZKCarGroupModel
-(instancetype)initWithDict:(NSDictionary *)dic
{
 if(self=[super init])
 {
 self.title=dic[@"title"];
 NSMutableArray *Array=[NSMutableArray array];
 for (NSDictionary *dict in dic[@"cars"]) {
 ZKCarModel *Car=[ZKCarModel CarWithDict:dict];
 [Array addObject:Car];
 }
 self.cars=Array;
 }
 return self;
}
+(instancetype)CarGroupWithDic:(NSDictionary *)dic
{
 return [[self alloc] initWithDict:dic];
}
@end
2.4,對應數據的模型類創建好以後,開始創建數組懶加載
代碼如下:
#import <Foundation/Foundation.h>
@interface ZKCarModel : NSObject
//頭像
@property(nonatomic,copy)NSString * icon;
//名字
@property(nonatomic,copy)NSString *name;
+(instancetype)CarWithDict:(NSDictionary *)dic;
-(instancetype)initWithDict:(NSDictionary *)dic;
@end

#import "ZKCarModel.h"
@implementation ZKCarModel
-(instancetype)initWithDict:(NSDictionary *)dic
{
 if(self=[super init])
 {
 [self setValuesForKeysWithDictionary:dic];
 }
 return self;
}
+(instancetype)CarWithDict:(NSDictionary *)dic
{
 return [[self alloc] initWithDict:dic];
}
@end
#import <Foundation/Foundation.h>
#import "ZKCarModel.h"
@interface ZKCarGroupModel : NSObject
//題目
@property(nonatomic,copy)NSString *title;
@property(nonatomic,strong)NSArray *cars;
+(instancetype)CarGroupWithDic:(NSDictionary *)dic;
-(instancetype)initWithDict:(NSDictionary *)dic;
@end

#import "ZKCarGroupModel.h"
@implementation ZKCarGroupModel
-(instancetype)initWithDict:(NSDictionary *)dic
{
 if(self=[super init])
 {
 self.title=dic[@"title"];
 NSMutableArray *Array=[NSMutableArray array];
 for (NSDictionary *dict in dic[@"cars"]) {
 ZKCarModel *Car=[ZKCarModel CarWithDict:dict];
 [Array addObject:Car];
 }
 self.cars=Array;
 }
 return self;
}
+(instancetype)CarGroupWithDic:(NSDictionary *)dic
{
 return [[self alloc] initWithDict:dic];
}
@end
2.5,數據加載完以後,然後就要開始寫UItable View中相對應的代理方法了
代碼如下:
//設置分區
-(NSInteger)numberOfSectionsInTableView:(UITableView *)tableView
{
 return self.carGroups.count;
}
//設置每個分區顯示多少行數據
-(NSInteger)tableView:(UITableView *)tableView numberOfRowsInSection:(NSInteger)section
{
 ZKCarGroupModel *Model=self.carGroups[section];
 return Model.cars.count;
}
//每行顯示的數據
-(UITableViewCell *)tableView:(UITableView *)tableView cellForRowAtIndexPath:(NSIndexPath *)indexPath
{
 static NSString *ID=@"A";
 //從緩存中讀取cell
 UITableViewCell *cell=[tableView dequeueReusableCellWithIdentifier:ID];
 //如果緩存中沒有cell,創建一個新的cell
 if(cell==nil){
 cell=[[UITableViewCell alloc] initWithStyle:UITableViewCellStyleSubtitle reuseIdentifier:ID];
 }
 //找到當前分區的索引
 ZKCarGroupModel *GroupModel=self.carGroups[indexPath.section];
 //找到當前分區的行
 ZKCarModel *CarModel=GroupModel.cars[indexPath.row];
 //設置cell顯示的文字
 cell.textLabel.text=CarModel.name;
 //設置cell顯示的圖片
 cell.imageView.image=[UIImage imageNamed:CarModel.icon];
 return cell;
}
上面3個代理方法是UItable View中最常用的3個方法。寫完這3個方法運行xcode就可以看到數據了。
但這裡還有些小問題,這裡顯示的所有品牌都是從上往下排的,沒有一個分組,這樣我們想找哪個品牌的汽車並不太好找,所以,我們要把同一個數據的汽車品牌加一個字母表示,這怎麼做呢,這就要給UItable View的每個分區加一個頭了,使用titleForHeaderInSection代理方法
代碼如下:
//設置頭樣式
-(NSString *)tableView:(UITableView *)tableView titleForHeaderInSection:(NSInteger)section
{
 //找到當前分區在數組中的索引
 ZKCarGroupModel *Model=self.carGroups[section];

 //返回當前分區的數據中的title
 return Model.title;
}
2.6上面的程序中,在屏幕的最右邊還有一個索引,點這個索引就找找到相對應的分區數據,其實這個也很簡單,也是調用一個
sectionIndexTitlesForTableView的代理方法,這個方法返回一個array的數組。
代碼如下:
//設置索引
-(NSArray *)sectionIndexTitlesForTableView:(UITableView *)tableView
{
 return [self.carGroups valueForKeyPath:@"title"];
}
2.7,這個程序中還做了一個,當你點擊屏幕上每個汽車品牌的時候還會彈出一個對話框,為什麼要做這個呢,因為很多時候屏幕上的圖片和文字都是可以點擊的,所以光做一個靜態顯示好不是很好,雖然這個對話框好像並沒有什麼用,但這裡只是講下這個方法的使用
代碼如下:
//點擊cell時變化
-(void)tableView:(UITableView *)tableView didSelectRowAtIndexPath:(NSIndexPath *)indexPath
{
 //創建對話框
 UIAlertView *alertView=[[UIAlertView alloc] initWithTitle:@"汽車" message:@"取消" delegate:self cancelButtonTitle:@"確認" otherButtonTitles:@"取消", nil];
 //設置樣式
 alertView.tag=1;
 alertView.alertViewStyle=UITableViewCellStyleSubtitle;
 //[alertView ];

 [alertView show];
}
3.1 一個UITableView做的汽車品牌就這樣OK了,雖然這並不是一個APP但,這裡已經把UITableView的一些常用代理方法都寫到了,當然UITableView還有很多代表方法,這裡並沒有講,但會了這些以後,在以後的使用中我們可以再來查詢,重要的是思想。
以上是UITableView 實現汽車品牌的全部內容,希望對大家有所幫助。


- AppPay
- 越獄插件PreferenceTag3:iOS 9設置選項增強插件
- evasi0n 1.1linux版下載
- iPhone5C怎麼鑒別翻新機_iPhone5C翻新機鑒別
- iOS利用UIDocumentInteractionController和Quick Look打開或預覽文檔
- 在美國買的iphone4裸機、沒有合約、沒解鎖、怎樣才能弄到個能上彀的sim卡?
- Macbook如何登錄Facebook
- iOS開發中對於攝像頭的一些基本使用方法分享
- PDF哪種查看器好 最新PDF查看器官方下載
- 蘋果iPhone6/iPhone6 plus/iPhone6s/iPhone6s plus手機怎麼設置自定義鈴聲
- iOS開源一個簡略的訂餐app UI框架
- 在uiview 的tableView中點擊cell進入跳轉到另外一個界面的完成辦法
- iOS開辟之UIScrollView控件詳解
- 進修iOS自界說導航掌握器UINavigationController
- iOS仿熱點話題熱門輪播界面tableView
- IOS中UITableView轉動到指定地位
- iOS為UIView設置暗影後果
- iOS設置UIButton文字顯示地位和字體年夜小、色彩的辦法
- iOS開辟之UIPickerView完成城市選擇器的步調詳解
- iOS長按UIlabel完成可復制功效
- iOS開辟中UIWebView的加載當地數據的三種方法
- iOS中修正UITextField占位符字體色彩的辦法總結
- IOS 仿時間網選票UI實例代碼
- iOS推送之當地告訴UILocalNotification
- 應用UITextField限制只可輸出中,英文,數字的辦法