iOS App中數據管理框架Core Data的基本數據操作教程
NSEntityDescription是實體描述對象,它可以類比如數據庫中的表,NSEntityDescription存放的是表的結構信息。這些類都是一些抽象的結構類,並不存儲實際每條數據的信息,具體的數據由NSManagedObject類來描述,我們一般會將實體類化繼承於NSManagedObject。
Xocde工具提供了快捷的實體類化功能,還拿我們一開始創建的班級與學生實體來演示,點擊.xcdatamodeld文件,點擊Xcode工具上方導航欄的Editor標簽,選擇Creat NSManagedObject Subclass選項,在彈出的窗口中勾選要類化的實體,如下圖:
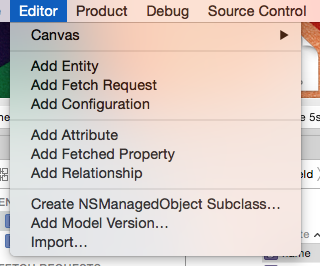

這時,Xcode會自動為我們創建一個文件,這些文件中有各個類中屬性的聲明。
一、創建一條數據
使用如下代碼進行數據的創建:
//讀取數據模型文件找到在打印出的路徑,會發現裡面多了一個sqlite文件,其中有一張表中添加進了一條數據。
NSURL *modelUrl = [[NSBundle mainBundle]URLForResource:@"Model" withExtension:@"momd"];
//創建數據模型
NSManagedObjectModel * mom = [[NSManagedObjectModel alloc]initWithContentsOfURL:modelUrl];
//創建持久化存儲協調者
NSPersistentStoreCoordinator * psc = [[NSPersistentStoreCoordinator alloc]initWithManagedObjectModel:mom];
//數據庫保存路徑
NSURL * path =[NSURL fileURLWithPath:[[NSSearchPathForDirectoriesInDomains(NSDocumentDirectory, NSUserDomainMask, YES)lastObject] stringByAppendingPathComponent:@"CoreDataExample.sqlite"]];
//為持久化協調者添加一個數據接收棧
/*
可以支持的類型如下:
NSString * const NSSQLiteStoreType;//sqlite
NSString * const NSXMLStoreType;//XML
NSString * const NSBinaryStoreType;//二進制
NSString * const NSInMemoryStoreType;//內存
*/
[psc addPersistentStoreWithType:NSSQLiteStoreType configuration:nil URL:path options:nil error:nil];
//創建數據管理上下文
NSManagedObjectContext * moc = [[NSManagedObjectContext alloc]initWithConcurrencyType:NSMainQueueConcurrencyType];
//關聯持久化協調者
[moc setPersistentStoreCoordinator:psc];
//創建數據對象
/*
數據對象的創建是通過實體名獲取到的
*/
SchoolClass * modelS = [NSEntityDescription insertNewObjectForEntityForName:@"SchoolClass" inManagedObjectContext:moc];
//對數據進行設置
modelS.name = @"第一班";
modelS.stuNum = @60;
//進行存儲
if ([moc save:nil]) {
NSLog(@"新增成功");
}
NSLog(@"%@",[[NSSearchPathForDirectoriesInDomains(NSDocumentDirectory, NSUserDomainMask, YES)lastObject] stringByAppendingPathComponent:@"CoreDataExample.sqlite"]);
二、查詢數據
CoreData中通過查詢請求來對數據進行查詢操作,查詢請求由NSFetchRequest來進行管理和維護。
NSFetchRequest主要提供兩個方面的查詢服務:
1.提供范圍查詢的相關功能
2.提供查詢結果返回類型與排序的相關功能
NSFetchRequest中常用方法如下:
//創建一個實體的查詢請求 可以理解為在某個表中進行查詢

+ (instancetype)fetchRequestWithEntityName:(NSString*)entityName;

//查詢條件

@property (nullable, nonatomic, strong) NSPredicate *predicate;

//數據排序

@property (nullable, nonatomic, strong) NSArray<NSSortDescriptor *> *sortDescriptors;

//每次查詢返回的數據條數

@property (nonatomic) NSUInteger fetchLimit;

//設置查詢到數據的返回類型

/*

typedef NS_OPTIONS(NSUInteger, NSFetchRequestResultType) {

    NSManagedObjectResultType  = 0x00,

    NSManagedObjectIDResultType  = 0x01,

    NSDictionaryResultType          NS_ENUM_AVAILABLE(10_6,3_0) = 0x02,

    NSCountResultType    NS_ENUM_AVAILABLE(10_6,3_0) = 0x04

};

*/

@property (nonatomic) NSFetchRequestResultType resultType;

//設置查詢結果是否包含子實體

@property (nonatomic) BOOL includesSubentities;

//設置要查詢的屬性值

@property (nullable, nonatomic, copy) NSArray *propertiesToFetch;

在SchoolClass實體中查詢數據,使用如下的代碼:
    //創建一條查詢請求

    NSFetchRequest * request = [NSFetchRequest fetchRequestWithEntityName:@"SchoolClass"];

    //設置條件為 stuNum=60的數據

    [request setPredicate:[NSPredicate predicateWithFormat:@"stuNum == 60"]];

    //進行查詢操作

    NSArray * res = [moc executeFetchRequest:request error:nil];

    NSLog(@"%@",[res.firstObject stuNum]);
進行數據初始化
NSFetchedResultsController的初始化需要一個查詢請求和一個數據操作上下文。代碼示例如下:
//遵守協議

@interface ViewController ()<NSFetchedResultsControllerDelegate>

{

    //數據橋接對象

    NSFetchedResultsController * _fecCon;

}

@end
@implementation ViewController
- (void)viewDidLoad {用於初始化NSFecthedResultsController的數據請求對象必須設置一個排序規則。在initWithFetchRequest:managedObjectContext:sectionNameKeyPath:cacheName:方法中,如果設置第三個參數,則會以第三個參數為鍵值進行數據的分區。當數據發生變化時,將通過代理進行方法的回調。
[super viewDidLoad];
//進行初始化操作
NSURL *modelUrl = [[NSBundle mainBundle]URLForResource:@"Model" withExtension:@"momd"];
NSManagedObjectModel * mom = [[NSManagedObjectModel alloc]initWithContentsOfURL:modelUrl];
NSPersistentStoreCoordinator * psc = [[NSPersistentStoreCoordinator alloc]initWithManagedObjectModel:mom];
NSURL * path =[NSURL fileURLWithPath:[[NSSearchPathForDirectoriesInDomains(NSDocumentDirectory, NSUserDomainMask, YES)lastObject] stringByAppendingPathComponent:@"CoreDataExample.sqlite"]];
[psc addPersistentStoreWithType:NSSQLiteStoreType configuration:nil URL:path options:nil error:nil];
NSManagedObjectContext * moc = [[NSManagedObjectContext alloc]initWithConcurrencyType:NSMainQueueConcurrencyType];
[moc setPersistentStoreCoordinator:psc];
NSFetchRequest * request = [NSFetchRequest fetchRequestWithEntityName:@"SchoolClass"];
//設置數據排序
[request setSortDescriptors:@[[NSSortDescriptor sortDescriptorWithKey:@"stuNum" ascending:YES]]];
//進行數據橋接對象的初始化
_fecCon = [[NSFetchedResultsController alloc]initWithFetchRequest:request managedObjectContext:moc sectionNameKeyPath:nil cacheName:nil];
//設置代理
_fecCon.delegate=self;
//進行數據查詢
[_fecCon performFetch:nil];
}
@end
三、與UITableView進行數據綁定
-(UITableViewCell *)tableView:(UITableView *)tableView cellForRowAtIndexPath:(NSIndexPath *)indexPath{效果如下:
UITableViewCell * cell = [tableView dequeueReusableCellWithIdentifier:@"cellid"];
if (!cell) {
cell = [[UITableViewCell alloc]initWithStyle:UITableViewCellStyleSubtitle reuseIdentifier:@"cellid"];
}
//獲取相應數據模型
SchoolClass * obj = [_fecCon objectAtIndexPath:indexPath];
cell.textLabel.text = obj.name;
cell.detailTextLabel.text = [NSString stringWithFormat:@"有%@人",obj.stuNum];
return cell;
}
-(NSInteger)numberOfSectionsInTableView:(UITableView *)tableView{
return [_fecCon sections].count;
}
-(NSInteger)tableView:(UITableView *)tableView numberOfRowsInSection:(NSInteger)section{
id<NSFetchedResultsSectionInfo> info = [_fecCon sections][section];
return [info numberOfObjects];
}

四、將數據變化映射到視圖
//數據將要改變時調用的方法

- (void)controllerWillChangeContent:(NSFetchedResultsController *)controller

{

    //開啟tableView更新預處理

    [[self tableView] beginUpdates];

}

//分區數據改變時調用的方法

- (void)controller:(NSFetchedResultsController *)controller didChangeSection:(id <NSFetchedResultsSectionInfo>)sectionInfo atIndex:(NSUInteger)sectionIndex forChangeType:(NSFetchedResultsChangeType)type

{

    //判斷行為類型

    switch(type) {

        //插入新分區

        case NSFetchedResultsChangeInsert:

            [[self tableView] insertSections:[NSIndexSet indexSetWithIndex:sectionIndex] withRowAnimation:UITableViewRowAnimationFade];

            break;

        //刪除分區

        case NSFetchedResultsChangeDelete:

            [[self tableView] deleteSections:[NSIndexSet indexSetWithIndex:sectionIndex] withRowAnimation:UITableViewRowAnimationFade];

            break;

        //移動分區

        case NSFetchedResultsChangeMove:

        //更新分區

        case NSFetchedResultsChangeUpdate:

            break;

    }

}

//數據改變時回調的代理

- (void)controller:(NSFetchedResultsController *)controller didChangeObject:(id)anObject atIndexPath:(NSIndexPath *)indexPath forChangeType:(NSFetchedResultsChangeType)type newIndexPath:(NSIndexPath *)newIndexPath

{

    switch(type) {

        //插入數據

        case NSFetchedResultsChangeInsert:

            [[self tableView] insertRowsAtIndexPaths:@[newIndexPath] withRowAnimation:UITableViewRowAnimationFade];

            break;

        //刪除數據

        case NSFetchedResultsChangeDelete:

            [[self tableView] deleteRowsAtIndexPaths:@[indexPath] withRowAnimation:UITableViewRowAnimationFade];

            break;

        //更新數據

        case NSFetchedResultsChangeUpdate:

            [self reloadData];

            break;

        //移動數據

        case NSFetchedResultsChangeMove:

            [[self tableView] deleteRowsAtIndexPaths:@[indexPath] withRowAnimation:UITableViewRowAnimationFade];

            [[self tableView] insertRowsAtIndexPaths:@[newIndexPath] withRowAnimation:UITableViewRowAnimationFade];

            break;

    }

}

//數據更新結束調用的代理

- (void)controllerDidChangeContent:(NSFetchedResultsController *)controller

{

    [[self tableView] endUpdates];

}