iOS 8 Auto Layout界面自動布局系列3
本系列的第一篇文章介紹了自動布局的基本原理,第二篇文章通過一個簡單的例子演示了如何使用Xcode的Interface Builder(簡稱IB)以可視化方式添加約束。本篇為該系列的第三篇文章,主要介紹如何通過代碼來添加布局約束。
其實,我個人認為本篇才應該是系列的第二篇,因為通過代碼構建自動布局約束是最基礎的,也是最靈活的方式。而IB只不過是把復雜的過程以直觀簡單的方式呈現出來,而且並非所有的情況都能用IB來解決,所以學習並掌握通過代碼來添加自動布局約束是非常必要的。但是為了降低學習的難度,提高讀者理解和接受的程度,最終還是把本編放在第三的位置。閒言少敘,我們進入正題。
第一篇文章中講到,每一個布局約束就是一個明確的線性變化規則,在數學上是以一次函數的形式表示,即:
y = m * x + c (公式3.1)
在UIKit中,每一個布局約束是一個NSLayoutConstraint實例,NSLayoutConstraint類的主要屬性定義如下:
NS_CLASS_AVAILABLE_IOS(6_0)
@interface NSLayoutConstraint : NSObject
...
@property (readonly, assign) id firstItem;
@property (readonly) NSLayoutAttribute firstAttribute;
@property (readonly) NSLayoutRelation relation;
@property (readonly, assign) id secondItem;
@property (readonly) NSLayoutAttribute secondAttribute;
@property (readonly) CGFloat multiplier;
@property CGFloat constant;
...
+(instancetype)constraintWithItem:(id)firstItem attribute:(NSLayoutAttribute)firstAttribute
 relatedBy:(NSLayoutRelation)relation
 toItem:(id)secondItem attribute:(NSLayoutAttribute)secondAttribute
 multiplier:(CGFloat)multiplier constant:(CGFloat)constant;
其中的firstItem與secondItem分別是界面中受約束的視圖與被參照的視圖。他們不一定非得是兄弟關系或者父子關系,只要是他們有著共同的祖先視圖即可,這一點是autoresizingMask無法做到的。
firstAttribute與secondAttribute分別是firstItem與secondItem的某個布局屬性(NSLayoutAttribute):
typedef NS_ENUM(NSInteger, NSLayoutAttribute)
{
    NSLayoutAttributeLeft = 1,
    NSLayoutAttributeRight,
    NSLayoutAttributeTop,
    NSLayoutAttributeBottom,
    NSLayoutAttributeLeading,
    NSLayoutAttributeTrailing,
    NSLayoutAttributeWidth,
    NSLayoutAttributeHeight,
    NSLayoutAttributeCenterX,
    NSLayoutAttributeCenterY,
    NSLayoutAttributeBaseline,
    NSLayoutAttributeNotAnAttribute = 0,
    ......//省略剩余
};
每一個枚舉值代表了一個布局屬性,名字都很直觀就不一一解釋了。注意,firstItem與secondItem不一定非得是同樣的值,允許定義諸如某視圖的高度等於另一個視圖的寬度這樣的約束。NSLayoutAttributeNotAnAttribute這個額外解釋一下,當我們需要為某個視圖精確指定一個寬度或者高度值時,這時候secondItem為nil,secondAttribute為NSLayoutAttributeNotAnAttribute。
relation定義了布局關系(NSLayoutRelation):
typedef NS_ENUM(NSInteger, NSLayoutRelation)
{
    NSLayoutRelationLessThanOrEqual = -1,
    NSLayoutRelationEqual = 0,
    NSLayoutRelationGreaterThanOrEqual = 1,
};
布局關系可以是相等、大於等於或者小於等於。
multiplier即比例系數。constant即常量。
因此,每個約束就對應如下關系:
firstItem.firstAttribute {==,<=,>=} secondItem.secondAttribute * multiplier + constant (公式3.2)
我們可以調用NSLayoutConstraint類的constraintWithItem:…方法,傳入所有需要的參數構造一個新的約束。
理論就到此為止,下面我們還是以第二篇的例子來講解如何使用代碼添加約束。
打開Xcode,新建項目,選擇iOS -> Application -> Single View Application。項目命名為AutoLayoutByConstraint,語言任意選擇,設備選擇Universal。下載蘋果Logo圖片apple.jpg,並將其拖入項目中。文件下載地址:
http://yunpan.cn/cfmJB82dfSwf6(提取碼:4049)
首先在界面上方用來顯示蘋果Logo圖片的是一個UIImageView,ViewController類的viewDidLoad方法如下:
- (void)viewDidLoad
{
    [super viewDidLoad];

    UIImageView* logoImageView = [[UIImageView alloc] initWithImage:[UIImage imageNamed:@"apple.jpg"]];
    logoImageView.contentMode = UIViewContentModeScaleAspectFit;
    [self.view addSubview:logoImageView];
}
我們需要為logoImageView其添加4個約束:
- logoImageView左側與父視圖左側對齊
- logoImageView右側與父視圖右側對齊
- logoImageView頂部與父視圖頂部對齊
- logoImageView高度為父視圖高度一半
根據公式3.2,在ViewController類的viewDidLoad方法中構造上述4個約束,代碼如下:
    //logoImageView左側與父視圖左側對齊
    NSLayoutConstraint* leftConstraint = [NSLayoutConstraint constraintWithItem:logoImageView attribute:NSLayoutAttributeLeading relatedBy:NSLayoutRelationEqual toItem:self.view attribute:NSLayoutAttributeLeading multiplier:1.0f constant:0.0f];

    //logoImageView右側與父視圖右側對齊
    NSLayoutConstraint* rightConstraint = [NSLayoutConstraint constraintWithItem:logoImageView attribute:NSLayoutAttributeTrailing relatedBy:NSLayoutRelationEqual toItem:self.view attribute:NSLayoutAttributeTrailing multiplier:1.0f constant:0.0f];

    //logoImageView頂部與父視圖頂部對齊
    NSLayoutConstraint* topConstraint = [NSLayoutConstraint constraintWithItem:logoImageView attribute:NSLayoutAttributeTop relatedBy:NSLayoutRelationEqual toItem:self.view attribute:NSLayoutAttributeTop multiplier:1.0f constant:0.0f];

    //logoImageView高度為父視圖高度一半
    NSLayoutConstraint* heightConstraint = [NSLayoutConstraint constraintWithItem:logoImageView attribute:NSLayoutAttributeHeight relatedBy:NSLayoutRelationEqual toItem:self.view attribute:NSLayoutAttributeHeight multiplier:0.5f constant:0.0f];

    //iOS 6.0或者7.0調用addConstraints
    //[self.view addConstraints:@[leftConstraint, rightConstraint, topConstraint, heightConstraint]];

    //iOS 8.0以後設置active屬性值
    leftConstraint.active = YES;
    rightConstraint.active = YES;
    topConstraint.active = YES;
    heightConstraint.active = YES;
注意,我們需要將創建的約束添加到約束所涉及到的兩個視圖的最小公共祖先視圖上。例如,如果直接設置視圖的寬度和高度,則將約束添加到該視圖即可;如果約束建立在父視圖和子視圖上,則添加到父視圖上;如果約束建立在兩個兄弟視圖上,則添加到兩個兄弟視圖的父視圖上。
對於上面的4個約束而言,涉及到的兩個視圖分別是logoImageView與其父視圖self.view,這兩個視圖的最小公共祖先視圖為self.view。UIView類提供了若干方法和屬性,用於添加或者移除約束。對於iOS 6或者iOS 7可以調用addConstraint(s):和removeConstraint(s):方法;對於iOS 8及更新的版本,直接設置約束的active屬性或者調用activateConstraints:與deactivateConstraints:類方法。
就是這麼簡單!現在編譯並運行項目,
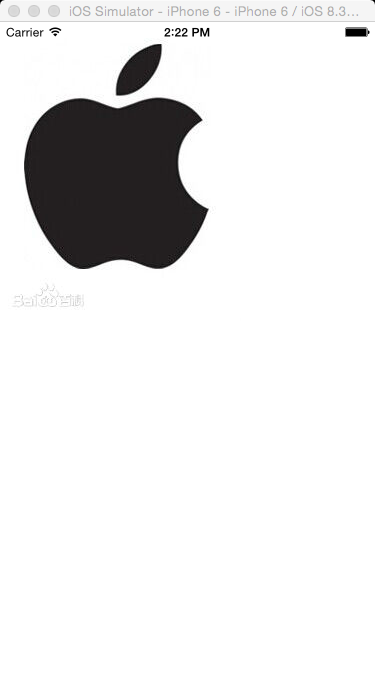
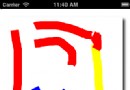
貌似logoImageView的尺寸不太對。如果在viewDidLoad方法中設置self.view的背景色為紅色,看得會更清楚:
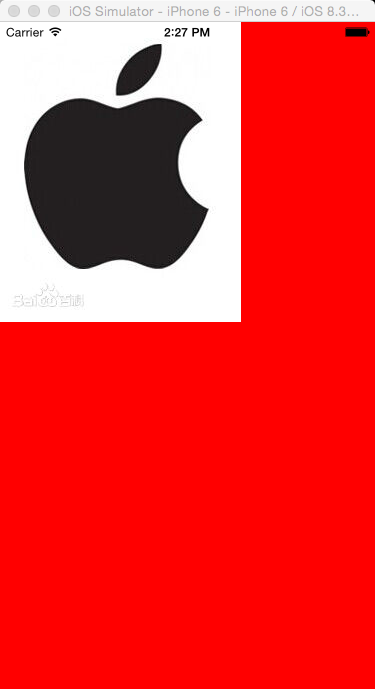
為什麼會這樣?這是由於蘋果在iOS 6當中引入了自動布局的新概念,但在那時仍然有很多舊的代碼使用autoresizingMask與setFrame:的方式構建界面。試想,如果將一個已經設置好frame並使用autoresizingMask的視圖添加到一個使用自動布局的視圖中時,運行時需要隱式地將前者的frame和autoresizingMask轉化為自動布局約束(這些隱式轉換的約束的類型為NSAutoresizingMaskLayoutConstraint),這樣才能明確其位置與尺寸而不會導致約束的缺失。這個隱式轉換的過程,是由UIView的translatesAutoresizingMaskIntoConstraints屬性的值決定的。默認情況下,該值為YES,表示需要運行時自動進行隱式轉換。這對於兼容舊的代碼當然是好的,然而當我們明確為視圖添加了約束後,我們就不希望再進行autoresizingMask的隱式轉換了,否則就會引起約束的沖突。因此,需要特別注意的是,當我們使用代碼創建視圖時,需要將translatesAutoresizingMaskIntoConstraints屬性的值設置為NO。在viewDidLoad方法中創建logoImageView的代碼之後,添加如下代碼:
    UIImageView* logoImageView = [[UIImageView alloc] initWithImage:[UIImage imageNamed:@"apple.jpg"]];
    logoImageView.translatesAutoresizingMaskIntoConstraints = NO;
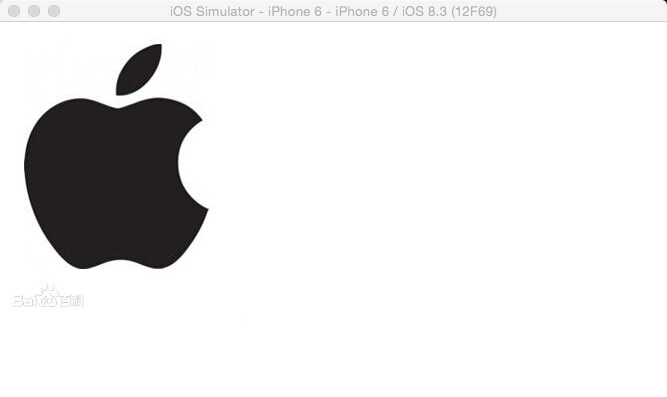
再次運行,這次就沒問題了。
到這裡,我想你應該可以把剩余的視圖和約束的代碼添加上了,全部代碼如下:
- (void)viewDidLoad
{
[super viewDidLoad];
// self.view.backgroundColor = [UIColor redColor];
UIImageView* logoImageView = [[UIImageView alloc] initWithImage:[UIImage imageNamed:@"apple.jpg"]];
logoImageView.translatesAutoresizingMaskIntoConstraints = NO;
logoImageView.contentMode = UIViewContentModeScaleAspectFit;
[self.view addSubview:logoImageView];
//logoImageView左側與父視圖左側對齊
NSLayoutConstraint* leftConstraint = [NSLayoutConstraint constraintWithItem:logoImageView attribute:NSLayoutAttributeLeading relatedBy:NSLayoutRelationEqual toItem:self.view attribute:NSLayoutAttributeLeading multiplier:1.0f constant:0.0f];
//logoImageView右側與父視圖右側對齊
NSLayoutConstraint* rightConstraint = [NSLayoutConstraint constraintWithItem:logoImageView attribute:NSLayoutAttributeTrailing relatedBy:NSLayoutRelationEqual toItem:self.view attribute:NSLayoutAttributeTrailing multiplier:1.0f constant:0.0f];
//logoImageView頂部與父視圖頂部對齊
NSLayoutConstraint* topConstraint = [NSLayoutConstraint constraintWithItem:logoImageView attribute:NSLayoutAttributeTop relatedBy:NSLayoutRelationEqual toItem:self.view attribute:NSLayoutAttributeTop multiplier:1.0f constant:0.0f];
//logoImageView高度為父視圖高度一半
NSLayoutConstraint* heightConstraint = [NSLayoutConstraint constraintWithItem:logoImageView attribute:NSLayoutAttributeHeight relatedBy:NSLayoutRelationEqual toItem:self.view attribute:NSLayoutAttributeHeight multiplier:0.5f constant:0.0f];
//iOS 6.0或者7.0調用addConstraints
// [self.view addConstraints:@[leftConstraint, rightConstraint, topConstraint, heightConstraint]];
//iOS 8.0以後設置active屬性值
leftConstraint.active = YES;
rightConstraint.active = YES;
topConstraint.active = YES;
heightConstraint.active = YES;
UIScrollView* scrollView = [UIScrollView new];
scrollView.translatesAutoresizingMaskIntoConstraints = NO;
[self.view addSubview:scrollView];
//scrollView左側與父視圖左側對齊
NSLayoutConstraint* scrollLeftConstraint = [NSLayoutConstraint constraintWithItem:scrollView attribute:NSLayoutAttributeLeading relatedBy:NSLayoutRelationEqual toItem:self.view attribute:NSLayoutAttributeLeading multiplier:1.0f constant:0.0f];
//scrollView右側與父視圖右側對齊
NSLayoutConstraint* scrollRightConstraint = [NSLayoutConstraint constraintWithItem:scrollView attribute:NSLayoutAttributeTrailing relatedBy:NSLayoutRelationEqual toItem:self.view attribute:NSLayoutAttributeTrailing multiplier:1.0f constant:0.0f];
//scrollView底部與父視圖底部對齊
NSLayoutConstraint* scrollBottomConstraint = [NSLayoutConstraint constraintWithItem:scrollView attribute:NSLayoutAttributeBottom relatedBy:NSLayoutRelationEqual toItem:self.view attribute:NSLayoutAttributeBottom multiplier:1.0f constant:0.0f];
//scrollView頂部與logoImageView底部對齊
NSLayoutConstraint* scrollTopConstraint = [NSLayoutConstraint constraintWithItem:scrollView attribute:NSLayoutAttributeTop relatedBy:NSLayoutRelationEqual toItem:logoImageView attribute:NSLayoutAttributeBottom multiplier:1.0f constant:0.0f];
scrollLeftConstraint.active = YES;
scrollRightConstraint.active = YES;
scrollBottomConstraint.active = YES;
scrollTopConstraint.active = YES;
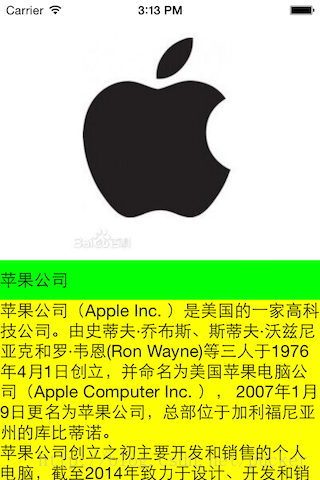
UILabel* nameLabel = [UILabel new];
nameLabel.translatesAutoresizingMaskIntoConstraints = NO;
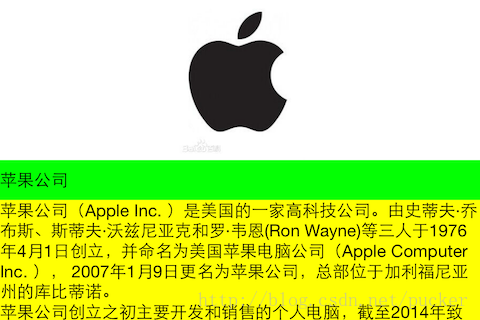
nameLabel.text = @"蘋果公司";
nameLabel.backgroundColor = [UIColor greenColor];
[scrollView addSubview:nameLabel];
UILabel* descriptionLabel = [UILabel new];
descriptionLabel.translatesAutoresizingMaskIntoConstraints = NO;
descriptionLabel.text = @"蘋果公司(Apple Inc. )是美國的一家高科技公司。由史蒂夫·喬布斯、斯蒂夫·沃茲尼亞克和羅·韋恩(Ron Wayne)等三人於1976年4月1日創立,並命名為美國蘋果電腦公司(Apple Computer Inc. ), 2007年1月9日更名為蘋果公司,總部位於加利福尼亞州的庫比蒂諾。n蘋果公司創立之初主要開發和銷售的個人電腦,截至2014年致力於設計、開發和銷售消費電子、計算機軟件、在線服務和個人計算機。蘋果的Apple II於1970年代助長了個人電腦革命,其後的Macintosh接力於1980年代持續發展。該公司硬件產品主要是Mac電腦系列、iPod媒體播放器、iPhone智能手機和iPad平板電腦;在線服務包括iCloud、iTunes Store和App Store;消費軟件包括OS X和iOS操作系統、iTunes多媒體浏覽器、Safari網絡浏覽器,還有iLife和iWork創意和生產力套件。蘋果公司在高科技企業中以創新而聞名世界。n蘋果公司1980年12月12日公開招股上市,2012年創下6235億美元的市值記錄,截至2014年6月,蘋果公司已經連續三年成為全球市值最大公司。蘋果公司在2014年世界500強排行榜中排名第15名。2013年9月30日,在宏盟集團的“全球最佳品牌”報告中,蘋果公司超過可口可樂成為世界最有價值品牌。2014年,蘋果品牌超越谷歌(Google),成為世界最具價值品牌 。";
descriptionLabel.numberOfLines = 0;
descriptionLabel.backgroundColor = [UIColor yellowColor];
[scrollView addSubview:descriptionLabel];
//nameLabel左側與父視圖左側對齊
NSLayoutConstraint* nameLabelLeftConstraint = [NSLayoutConstraint constraintWithItem:nameLabel attribute:NSLayoutAttributeLeading relatedBy:NSLayoutRelationEqual toItem:scrollView attribute:NSLayoutAttributeLeading multiplier:1.0f constant:0.0f];
//nameLabel右側與父視圖右側對齊
NSLayoutConstraint* nameLabelRightConstraint = [NSLayoutConstraint constraintWithItem:nameLabel attribute:NSLayoutAttributeTrailing relatedBy:NSLayoutRelationEqual toItem:scrollView attribute:NSLayoutAttributeTrailing multiplier:1.0f constant:0.0f];
//nameLabel底部與descriptionLabel頂部對齊
NSLayoutConstraint* nameLabelBottomConstraint = [NSLayoutConstraint constraintWithItem:nameLabel attribute:NSLayoutAttributeBottom relatedBy:NSLayoutRelationEqual toItem:descriptionLabel attribute:NSLayoutAttributeTop multiplier:1.0f constant:0.0f];
//nameLabel頂部與父視圖頂部對齊
NSLayoutConstraint* nameLabelTopConstraint = [NSLayoutConstraint constraintWithItem:nameLabel attribute:NSLayoutAttributeTop relatedBy:NSLayoutRelationEqual toItem:scrollView attribute:NSLayoutAttributeTop multiplier:1.0f constant:0.0f];
//nameLabel高度為20
NSLayoutConstraint* nameLabelHeightConstraint = [NSLayoutConstraint constraintWithItem:nameLabel attribute:NSLayoutAttributeHeight relatedBy:NSLayoutRelationEqual toItem:nil attribute:NSLayoutAttributeNotAnAttribute multiplier:1.0f constant:20.0f];
nameLabelLeftConstraint.active = YES;
nameLabelRightConstraint.active = YES;
nameLabelBottomConstraint.active = YES;
nameLabelTopConstraint.active = YES;
nameLabelHeightConstraint.active = YES;
//descriptionLabel左側與父視圖左側對齊
NSLayoutConstraint* descriptionLabelLeftConstraint = [NSLayoutConstraint constraintWithItem:descriptionLabel attribute:NSLayoutAttributeLeading relatedBy:NSLayoutRelationEqual toItem:scrollView attribute:NSLayoutAttributeLeading multiplier:1.0f constant:0.0f];
//descriptionLabel右側與父視圖右側對齊
NSLayoutConstraint* descriptionLabelRightConstraint = [NSLayoutConstraint constraintWithItem:descriptionLabel attribute:NSLayoutAttributeTrailing relatedBy:NSLayoutRelationEqual toItem:scrollView attribute:NSLayoutAttributeTrailing multiplier:1.0f constant:0.0f];
//descriptionLabel底部與父視圖底部對齊
NSLayoutConstraint* descriptionLabelBottomConstraint = [NSLayoutConstraint constraintWithItem:descriptionLabel attribute:NSLayoutAttributeBottom relatedBy:NSLayoutRelationEqual toItem:scrollView attribute:NSLayoutAttributeBottom multiplier:1.0f constant:0.0f];
descriptionLabelLeftConstraint.active = YES;
descriptionLabelRightConstraint.active = YES;
descriptionLabelBottomConstraint.active = YES;
//nameLabel寬度與logoImageView寬度相等
NSLayoutConstraint* nameLabelWidthConstraint = [NSLayoutConstraint constraintWithItem:nameLabel attribute:NSLayoutAttributeWidth relatedBy:NSLayoutRelationEqual toItem:logoImageView attribute:NSLayoutAttributeWidth multiplier:1.0f constant:0.0f];
//nameLabel寬度與logoImageView寬度相等
NSLayoutConstraint* descriptionLabelWidthConstraint = [NSLayoutConstraint constraintWithItem:descriptionLabel attribute:NSLayoutAttributeWidth relatedBy:NSLayoutRelationEqual toItem:logoImageView attribute:NSLayoutAttributeWidth multiplier:1.0f constant:0.0f];
nameLabelWidthConstraint.active = YES;
descriptionLabelWidthConstraint.active = YES;
}
最終項目文件鏈接:<a href="http://yunpan.cn/cV2cmtNMYz6UA">http://yunpan.cn/cV2cmtNMYz6UA</a> (提取碼:0f38)
自動布局約束是通過描述視圖間的關系而非強加坐標值來進行定位的,它更能滿足不同設備尺寸的界面布局,並且更容易讓人理解。雖然上面的代碼很冗長,但每一句所描述的事實都十分清楚。在此省略自動布局的好處10000字。。。
區區幾個簡單的視圖,就要寫這麼長的代碼。。。
估計你看得有點眼花缭亂了吧,其實我也是修改並檢查了好幾次,又調試了好幾次才完全寫對的。在下一篇文章中,我將介紹另一種更簡潔的方式,即使用VFL來添加約束,敬請期待吧。