
iOS粒子路徑移動效果 iOS實現QQ拖動效果
編輯:IOS開發綜合
粒子效果,QQ拖動效果,實現很簡單,具體代碼如下
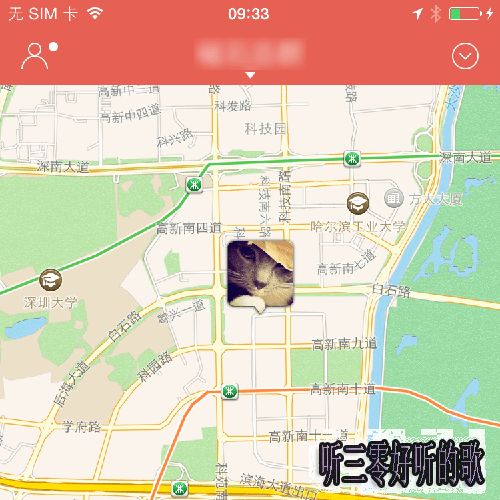
一、圖示
二、分析
我們要實現的如果如上面的圖示,那麼我們可以按照下面的步驟操作:
第一步:我們的紅點其實是一個UIButton。創建一個BageValueView繼承自UIButton
第二步:初始化的時候,初始化控件,設置圓角,修改背景、文字顏色
第三步:添加手勢。在手勢的處理中我們,我們需要讓當前控件隨著手指移動而移動。
第四步:控件一開始創建的時候,其實有兩個圓,一個就是我們能夠拖動的大圓,另外一個就是原始位置上會改變大小的圓。這一步驟中,主要就是創建這個小圓,它的初始參數和大圓一樣。
在手勢的處理中,根據兩圓的位置,來計算小圓半徑,當兩圓的位置大於最大位置時候,小圓隱藏掉。
//獲取兩個圓之間的距離
CGFloat distance = [self distanceWithSmallCircle:self.smallCircle bigCircle:self];
if(distance<=MAX_DIST){//只有距離不超過最大距離才計算小圓半徑
 //計算小圓的半徑
 //小圓半徑最小的時候是MIN_RADIUS,這個時候兩個圓達到最大距離MAX_DIST
 //小圓半徑最大的時候是原始半徑,這個時候兩圓距離是0
 //處於前面兩者之間的時候,小圓的半徑是:MIN_RADIUS + (原始半徑 - MIN_RADIUS)/MAX_DIST * (MAX_DIST - 當前的距離)
 CGFloat smallR = self.bounds.size.width * 0.5;
 smallR = MIN_RADIUS + (MAX_DIST-distance) * (smallR-MIN_RADIUS)/MAX_DIST;
 //重新設置小圓的尺寸
 self.smallCircle.bounds = CGRectMake(0, 0, smallR*2, smallR*2);
 //重新設置小圓的半徑
 self.smallCircle.layer.cornerRadius = smallR;
}else{//超過了最大距離
 self.smallCircle.hidden = YES;
}
第五步:創建大小圓之間的連接部分。連接部分我們需要創建一個形狀圖層(CAShapeLayer)——它可以根據一個路徑生成一個形狀。
路徑分析如下圖

根據上面我們需要創建一個 ABCDA 其中DA和BC是曲線,控制點分別為O和P。
第六步:當手勢結束的時候,我們需要判斷當前兩圓的位置,如果小圓最大距離,那麼復位。如果大於最大距離,那麼添加一個銷毀動畫。
三、代碼
2.1 BageValueView.m
//
// BageValueView.m
// 03_UIView78_粒子效果2
//
// Created by 杞文明 on 17/7/22.
// Copyright © 2017年 杞文明. All rights reserved.
//

#import "BageValueView.h"

#define MAX_DIST 80
#define MIN_RADIUS 5
@interface BageValueView()

@property (nonatomic, weak) UIView *smallCircle;
@property (nonatomic, weak) CAShapeLayer *shap;


@end

@implementation BageValueView

-(void)awakeFromNib{
 [self setUp];
}

-(instancetype)initWithFrame:(CGRect)frame{
 if ( self = [super initWithFrame:frame] ) {
  [self setUp];
 }
 return self;
}

//形狀圖層
-(CAShapeLayer*)shap{
 if(_shap == nil){
  //形狀圖層,它可以根據一個路徑生成一個形狀
  CAShapeLayer *shap = [CAShapeLayer layer];
  //設置形狀填充色
  shap.fillColor = [UIColor redColor].CGColor;
  _shap = shap;
  //添加到最底層
  [self.superview.layer insertSublayer:shap atIndex:0];
 }
 return _shap;
}

//初始化
-(void)setUp{
 //設置圓角
 self.layer.cornerRadius = self.bounds.size.width * 0.5;

 //設置背景文字顏色
 [self setBackgroundColor:[UIColor redColor]];
 [self setTitleColor:[UIColor whiteColor] forState:UIControlStateNormal];
 self.titleLabel.font = [UIFont systemFontOfSize:12];

 //添加手勢
 UIPanGestureRecognizer *pan = [[UIPanGestureRecognizer alloc]initWithTarget:self action:@selector(pan:)];
 [self addGestureRecognizer:pan];

 //添加小圓
 UIView *smallCircle = [[UIView alloc]initWithFrame:self.frame];
 smallCircle.backgroundColor = self.backgroundColor;
 smallCircle.layer.cornerRadius = self.layer.cornerRadius;
 self.smallCircle = smallCircle;
 //把小圓添加到父控件中,並且在大圓下面
 [self.superview insertSubview:smallCircle belowSubview:self];

}

-(void)pan:(UIPanGestureRecognizer*)pan{
 //獲取當前點
 CGPoint currentP = [pan translationInView:self];
 //移動
 CGPoint center = self.center;
 center.x += currentP.x;
 center.y += currentP.y;
 self.center = center;
 //復位
 [pan setTranslation:CGPointZero inView:self];

 //獲取兩個圓之間的距離
 CGFloat distance = [self distanceWithSmallCircle:self.smallCircle bigCircle:self];
 if(distance<=MAX_DIST){//只有距離不超過最大距離才計算小圓半徑
  //計算小圓的半徑
  //小圓半徑最小的時候是MIN_RADIUS,這個時候兩個圓達到最大距離MAX_DIST
  //小圓半徑最大的時候是原始半徑,這個時候兩圓距離是0
  //處於前面兩者之間的時候,小圓的半徑是:MIN_RADIUS + (原始半徑 - MIN_RADIUS)/MAX_DIST * (MAX_DIST - 當前的距離)
  CGFloat smallR = self.bounds.size.width * 0.5;
  smallR = MIN_RADIUS + (MAX_DIST-distance) * (smallR-MIN_RADIUS)/MAX_DIST;
  //重新設置小圓的尺寸
  self.smallCircle.bounds = CGRectMake(0, 0, smallR*2, smallR*2);
  //重新設置小圓的半徑
  self.smallCircle.layer.cornerRadius = smallR;
 }else{//超過了最大距離
  self.smallCircle.hidden = YES;
  [self.shap removeFromSuperlayer];
 }

 //創建不規則路徑,其實就是連個圓之間連接的部分
 //小圓不隱藏才創建
 if(self.smallCircle.hidden == NO){
  UIBezierPath *path = [self pathWithSmallCircle:self.smallCircle bigCircle:self];
  self.shap.path = path.CGPath;
 }

 //當手指松開的時候
 if (pan.state==UIGestureRecognizerStateEnded) {
  //如果兩圓之間的距離小於最大距離,大圓復位
  if (distance<MAX_DIST) {
   //移除形狀圖層
   [self.shap removeFromSuperlayer];
   //添加一個彈性動畫
   [UIView animateWithDuration:0.25 delay:0 usingSpringWithDamping:0.2 initialSpringVelocity:0 options:UIViewAnimationOptionCurveLinear animations:^{
    //大圓復位
    self.center = self.smallCircle.center;
   } completion:^(BOOL finished) {
    //小圓顯示
    self.smallCircle.hidden = NO;
   }];
  } else {
   //距離大於最大位置的時候,播放動畫,按鈕從父控件中刪除
   //添加一個UIImageView 用來播放動畫
   UIImageView *imageV = [[UIImageView alloc] initWithFrame:self.bounds];
   [self addSubview:imageV];

   //添加圖片
   NSMutableArray *imageArray = [NSMutableArray array];
   for (int i=1; i<=8; i++) {
    NSString *imageName = [NSString stringWithFormat:@"%d",i];
    UIImage *image = [UIImage imageNamed:imageName];
    [imageArray addObject:image];
   }
   imageV.animationImages = imageArray;
   //設置動畫時長
   [imageV setAnimationDuration:1];
   //開始動畫
   [imageV startAnimating];

   //一秒鐘後.把當前的按鈕從父控件當中移.
   dispatch_after(dispatch_time(DISPATCH_TIME_NOW, (int64_t)(1 * NSEC_PER_SEC)), dispatch_get_main_queue(), ^{
    [self removeFromSuperview];
   });
  }
 }
}

//計算兩個圓之間的距離 使用勾股定理:兩直角邊的平方和等於斜邊的平方
- (CGFloat)distanceWithSmallCircle:(UIView *)smallCircle bigCircle:(UIView *)bigCircle{
 //X軸上的偏移量(就是x1-x2的值)
 CGFloat offsetX = bigCircle.center.x - smallCircle.center.x;
 //y軸上的偏移量(就是y1-y2的值)
 CGFloat offsetY = bigCircle.center.y - smallCircle.center.y;

 return sqrt(offsetX*offsetX + offsetY*offsetY);
}

//根據兩個圓設置一個不規的路徑
- (UIBezierPath *)pathWithSmallCircle:(UIView *)smallCircle bigCircle:(UIView *)bigCircle{

 CGFloat x1 = smallCircle.center.x;
 CGFloat y1 = smallCircle.center.y;

 CGFloat x2 = bigCircle.center.x;
 CGFloat y2 = bigCircle.center.y;

 CGFloat d = [self distanceWithSmallCircle:smallCircle bigCircle:self];

 if (d <= 0) {
  return nil;
 }


 CGFloat cosθ = (y2 - y1) / d;
 CGFloat sinθ = (x2 - x1) / d;

 CGFloat r1 = smallCircle.bounds.size.width * 0.5;
 CGFloat r2 = bigCircle.bounds.size.width * 0.5;

 CGPoint pointA = CGPointMake(x1 - r1 * cosθ, y1 + r1 * sinθ);
 CGPoint pointB = CGPointMake(x1 + r1 * cosθ, y1 - r1 * sinθ);
 CGPoint pointC = CGPointMake(x2 + r2 * cosθ, y2 - r2 * sinθ);
 CGPoint pointD = CGPointMake(x2 - r2 * cosθ, y2 + r2 * sinθ);
 CGPoint pointO = CGPointMake(pointA.x + d * 0.5 * sinθ, pointA.y + d * 0.5 * cosθ);
 CGPoint pointP = CGPointMake(pointB.x + d * 0.5 * sinθ, pointB.y + d * 0.5 * cosθ);


 UIBezierPath *path = [UIBezierPath bezierPath];
 //AB
 [path moveToPoint:pointA];
 [path addLineToPoint:pointB];
 //BC(曲線)
 [path addQuadCurveToPoint:pointC controlPoint:pointP];
 //CD
 [path addLineToPoint:pointD];
 //DA(曲線)
 [path addQuadCurveToPoint:pointA controlPoint:pointO];

 return path;

}


//清空高亮狀態
-(void)setHighlighted:(BOOL)highlighted{}

@end
2.2 ViewController.m
//
// ViewController.m
// 03_UIView78_粒子效果2
//
// Created by 杞文明 on 17/7/22.
// Copyright © 2017年 杞文明. All rights reserved.
//

#import "ViewController.h"

@interface ViewController ()

@end

@implementation ViewController

- (void)viewDidLoad {
 [super viewDidLoad];
 //讓View在顯示時不要把Autoresizing轉成自動布局
 self.view.translatesAutoresizingMaskIntoConstraints = NO;
}


@end
以上就是本文的全部內容,希望對大家的學習有所幫助,也希望大家多多支持本站。
相關文章
+