iOS仿簡書、淘寶等App的View彈出效果
編輯:IOS開發綜合
用簡書App的時候覺得這個View的彈出效果特別好,而且非常平滑,所以我就嘗試寫了一個,和簡書App上的效果基本一致了:

下面開始講解:
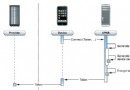
1.首先我們要知道這個頁面有幾個View?這個頁面其實有四個View,self.view , 圖中白色VC的View rootVC.view ,白色VC上的maskView maskView , 以及彈出的popView popView 。我們創建它們:
 self.view.backgroundColor = [UIColor blackColor];

 _popView = ({
  UIView * popView = [[UIView alloc]initWithFrame:CGRectMake(0, [UIScreen mainScreen].bounds.size.height, [UIScreen mainScreen].bounds.size.width, [UIScreen mainScreen].bounds.size.height /2.0)];

  popView.backgroundColor = [UIColor grayColor];

  //加個陰影
  popView.layer.shadowColor = [UIColor blackColor].CGColor;
  popView.layer.shadowOffset = CGSizeMake(0.5, 0.5);
  popView.layer.shadowOpacity = 0.8;
  popView.layer.shadowRadius = 5;

  //關閉btn
  UIButton * closeBtn = [UIButton buttonWithType:UIButtonTypeCustom];
  closeBtn.frame = CGRectMake(15, 0, 50, 40);
  [closeBtn setTitle:@"關閉" forState:UIControlStateNormal];
  [closeBtn setTitleColor:[UIColor colorWithRed:217/255.0 green:110/255.0 blue:90/255.0 alpha:1] forState:UIControlStateNormal];
  [closeBtn addTarget:self action:@selector(close) forControlEvents:UIControlEventTouchUpInside];
  [popView addSubview:closeBtn];
  popView;
});

 //添加VC的View的方法
 _rootVC.view.frame = self.view.bounds;
 _rootVC.view.backgroundColor = [UIColor whiteColor];
 _rootview = _rootVC.view;
 [self addChildViewController:_rootVC];
 [self.view addSubview:_rootview];

 //rootVC上的maskView
 _maskView = ({
  UIView * maskView = [[UIView alloc]initWithFrame:self.view.bounds];
  maskView.backgroundColor = [UIColor colorWithWhite:0 alpha:0.5];
  maskView.alpha = 0;
  maskView;
 });
  [_rootview addSubview:_maskView];
2.然後要添加點擊事件,這裡為了方便我的彈出事件直接用的touchesBegan
- (void)show
{
 [[UIApplication sharedApplication].windows[0] addSubview:_popView];

 CGRect frame = _popView.frame;
 frame.origin.y = self.view.frame.size.height/2.0;

 [UIView animateWithDuration:0.3 delay:0 options:UIViewAnimationOptionCurveEaseInOut animations:^{

  [_rootview.layer setTransform:[self firstTransform]];

 } completion:^(BOOL finished) {

  [UIView animateWithDuration:0.3 delay:0 options:UIViewAnimationOptionCurveEaseInOut animations:^{

   [_rootview.layer setTransform:[self secondTransform]];
   //顯示maskView
   [_maskView setAlpha:0.5f];
   //popView上升
   _popView.frame = frame;

  } completion:^(BOOL finished) {

  }];

 }];

}
這裡要注意一下的就是popview是添加到window上面的:[[UIApplication sharedApplication].windows[0] addSubview:_popView];
然後關鍵的layer形變方法來了
- (CATransform3D)firstTransform{
 CATransform3D t1 = CATransform3DIdentity;
 t1.m34 = 1.0/-900;
 //帶點縮小的效果
 t1 = CATransform3DScale(t1, 0.95, 0.95, 1);
 //繞x軸旋轉
 t1 = CATransform3DRotate(t1, 15.0 * M_PI/180.0, 1, 0, 0);
 return t1;

}

- (CATransform3D)secondTransform{

 CATransform3D t2 = CATransform3DIdentity;
 t2.m34 = [self firstTransform].m34;
 //向上移
 t2 = CATransform3DTranslate(t2, 0, self.view.frame.size.height * (-0.08), 0);
 //第二次縮小
 t2 = CATransform3DScale(t2, 0.8, 0.8, 1);
 return t2;
}
大家可以看到這,應該可以發現這裡其實有兩次形變
3.隱藏動畫
- (void)close
{
 _isShow = NO;

 CGRect frame = _popView.frame;
 frame.origin.y += self.view.frame.size.height/2.0;

 [UIView animateWithDuration:0.3 delay:0 options:UIViewAnimationOptionCurveEaseInOut animations:^{

  //maskView隱藏
  [_maskView setAlpha:0.f];
  //popView下降
  _popView.frame = frame;
  //同時進行 感覺更絲滑
  [_rootview.layer setTransform:[self firstTransform]];

 } completion:^(BOOL finished) {

  [UIView animateWithDuration:0.3 delay:0 options:UIViewAnimationOptionCurveEaseInOut animations:^{
   //變為初始值
   [_rootview.layer setTransform:CATransform3DIdentity];

  } completion:^(BOOL finished) {

   //移除
    [_popView removeFromSuperview];
  }];

 }];


}
最後,完整代碼,已經封裝好了,繼承之後使用創建方法就行了
GitHub:Wzxhaha
以上就是本文的全部內容,希望對大家的學習有所幫助,也希望大家多多支持本站。
- 上一頁:iOS省市二級聯動的數據組織PHP版
- 下一頁:詳解iOS本地推送與遠程推送


相關文章
+