
來開始用Touch Bar吧
前兩周住院用不了電腦,看到新的Touch Bar覺得還是很有趣的,一種新的交互方式,雖然暫時還沒有接觸到實物,but, why not?
於是今天就順手寫了個Touch Bar的小工具——CPUBar(雖然並沒有什麼用www
CPUBar可以讓你在Touch Bar上開/關任意slave CPU core(我相信沒人會想關掉master CPU core的)


下載CPUBar~
以下則是在Objective-C中使用Touch Bar的例子/
這裡就以CPUBar作為例子介紹,首先創建一個Cocoa Applictaion,然後讓AppDelegate繼承NSResponder,接下來在AppDelegate中聲明遵守NSTouchBarDelegate
#import @interface AppDelegate : NSResponder @end
這裡因為是很簡單的一個Touch Bar程序,所以我們直接在AppDelegate中實現的Touch Bar。在Apple的文檔中,系統查找Touch Bar的描述如下
Touch bars are discovered by searching certain well known components of the application for objects that conform to the NSTouchBarProvider protocol.
意譯,系統顯示的Touch bars是按照典型Cocoa程序裡, 遵循NSTouchBarProvider協議的構成組件, 來搜索的。
Some specific objects in a process are searched to discover NSTouchBar providers. In order, these objects are:
* the application delegate
* the application object itself
* the main window’s window controller
* the main window’s delegate
* the main window itself
* the main window’s first responder
* the key window’s window controller
* the key window’s delegate
* the key window itself
* the key window’s first responder
意譯,在Cocoa進程中一些明確被系統用來搜索並確定是NSTouchBar providers的實例順序如下。(這裡順便把獲取的代碼也對應貼上了,方便以後hook什麼的wwww)
* the application delegate
// Objective-C
[[NSApplication sharedApplication] delegate];

// Swift
NSApplication.shared().delegate
* the application object itself
// Objective-C
[NSApplication sharedApplication];

// Swift
NSApplication.shared()
* the main window’s window controller
// Objective-C
[[[NSApplication sharedApplication] mainWindow] windowController];

// Swift
NSApplication.shared().mainWindow?.windowController
* the main window’s delegate
// Objective-C
[[[NSApplication sharedApplication] mainWindow] delegate];

// Swift
NSApplication.shared().mainWindow?.delegate
* the main window itself
// Objective-C
[[NSApplication sharedApplication] mainWindow];

// Swift
NSApplication.shared().mainWindow
* the main window’s first responder
// Objective-C
[[[NSApplication sharedApplication] mainWindow] firstResponder];

// Swift
NSApplication.shared().mainWindow?.firstResponder
* the key window’s window controller
// Objective-C
[[[NSApplication sharedApplication] keyWindow] windowController];

// Swift
NSApplication.shared().keyWindow?.windowController
* the key window’s delegate
// Objective-C
[[[NSApplication sharedApplication] keyWindow] delegate];

// Swift
NSApplication.shared().keyWindow?.delegate
* the key window itself
// Objective-C
[[NSApplication sharedApplication] keyWindow];

// Swift
NSApplication.shared().keyWindow
* the key window’s first responder
// Objective-C
[[[NSApplication sharedApplication] keyWindow] firstResponder];

// Swift
NSApplication.shared().keyWindow?.firstResponder
If any of these objects are an NSResponder or a subclass of NSResponder, the responder chain anchored at that object is also searched.
意譯,如果這些被搜索的對象中是NSResponder的實例或者是繼承NSResponder的子類,那麼則會沿著responder chain搜索下去。
猜想的實現代碼如下,
NSResponder * next = [self nextResponder];

while (next) {
    // Is NSTouchBar provider?
    //  - YES, break
    //  - NO,
    next = [next nextResponder];
}
我們讓AppDelegate繼承NSResponder還有一個原因是在NSTouchBar.h中,有一個NSResponder的category
@interface NSResponder (NSTouchBarProvider) /*
    The touch bar object associated with this responder. If no touch bar is explicitly set, NSResponder will send -makeTouchBar to itself to create the default touch bar for this responder. This property is archived.
*/
@property (strong, readwrite, nullable) NSTouchBar *touchBar NS_AVAILABLE_MAC(10_12_1);
/*
    Subclasses should over-ride this method to create and configure the default touch bar for this responder.
*/
- (nullable NSTouchBar *)makeTouchBar NS_AVAILABLE_MAC(10_12_1);

@end
在這個category中,有一個 touchBar 的property,以及一個 -[NSResponder makeTouchBar]方法。在注釋中寫得很明白,當沒有顯式設置 touchBar 這個property時,則會調用-[NSResponder makeTouchBar]方法來生成一個。然後子類應當重寫-[NSResponder makeTouchBar]方法來創建自己的touchBar。
那麼接下來在AppDelegate的實現中重寫這個方法即可。
創建一個NSTouchBar比較簡單,alloc, init之後,設置customizationIdentifier和delegate。
self.touchBar = [[NSTouchBar alloc] init];

[self.touchBar setCustomizationIdentifier:@"com.0xBBC.CPUBar"];

[self.touchBar setDelegate:self];
customizationIdentifier雖然乍一看是NSTouchBarCustomizationIdentifier,不過實際上就是一個typedef,所以直接寫string就好。
typedef NSString * NSTouchBarCustomizationIdentifier NS_EXTENSIBLE_STRING_ENUM;
之後則是設置defaultItemIdentifiers。這個property是用於在初始化Touch Bar的item時,傳給- [NSTouchBarDelegate touchBar: makeItemForIdentifier:]的參數。
這裡省略掉如何獲取CPU信息過程,完成好的 -[NSResponder makeTouchBar] 方法如下。
- (NSTouchBar *)makeTouchBar {
    self.touchBar = [[NSTouchBar alloc] init];

    [self.touchBar setCustomizationIdentifier:@"com.0xBBC.CPUBar"];

    [self.touchBar setDelegate:self];

    if ([self retriveProcessorInfo]) {
        NSMutableArray * defaultItemIdentifiers = [[NSMutableArray alloc] init];

        for (int i = 0; i < processor_count; i++) {

            [defaultItemIdentifiers addObject:[[NSString alloc] initWithFormat:@"com.0xBBC.CPUBar.CPU%d", i]];

        }

        [self.touchBar setDefaultItemIdentifiers:defaultItemIdentifiers];

    } else {

        [self alertMessage:@"Oops, CPUBar needs root privilege to run/" informative:@"Try to run CPUBar with root privilege"];

        [NSApp terminate:nil];
    }

    return self.touchBar;
}
此時就應該實現剛才提到的- [NSTouchBarDelegate touchBar: makeItemForIdentifier:]
這裡我們選擇使用NSCustomTouchBarItem,然後創建一個NSButton,設置好button的title之後,將button賦給NSCustomTouchBarItem的view即可。
- (nullable NSTouchBarItem *)touchBar:(NSTouchBar *)touchBar makeItemForIdentifier:(NSTouchBarItemIdentifier)identifier {
    NSCustomTouchBarItem * item = [[NSCustomTouchBarItem alloc] initWithIdentifier:identifier];

    NSButton * button = [NSButton buttonWithTitle:@"" target:self action:@selector(setProcessor:)];

    button.tag = [[identifier substringFromIndex:@"com.0xBBC.CPUBar.CPU".length] integerValue];

    processor_basic_info_data_t basic_info;

    mach_msg_type_number_t info_count = PROCESSOR_BASIC_INFO_COUNT;

    processor_info(processor_list[button.tag], PROCESSOR_BASIC_INFO, &port, (processor_info_t)&basic_info, &info_count);
    if (basic_info.is_master) {

        // normally, it would be number 0
        // but just in case...
        masterCPU = button.tag;

    }

    button.attributedTitle = [self stringForCPU:button.tag status:basic_info.running];

    item.view = button;

    return item;
}
到這裡,實現一個Touch Bar就基本完成了~
cpubar-1
完整的AppDelegate.m如下,CPUBar的Xcode project在我的Github上,BlueCocoa/CPUBar
//
// AppDelegate.m
// CPUBar
//
// Created by BlueCocoa on 2016/11/8.
// Copyright ? 2016 BlueCocoa. All rights reserved.
//
#import "AppDelegate.h"
#import #define CPU_STATUS_MASK 0x1000
@implementation AppDelegate {
mach_port_t port;
host_priv_t priv_port;
processor_port_array_t processor_list;
mach_msg_type_number_t processor_count;
NSInteger masterCPU;
}
#pragma mark
#pragma mark - NSApplicationDelegate
- (void)applicationDidFinishLaunching:(NSNotification *)aNotification {
masterCPU = -1;
processor_count = 0;
processor_list = (processor_port_array_t)0;
[NSApp setActivationPolicy:NSApplicationActivationPolicyRegular];
}
#pragma mark
#pragma mark - NSTouchBarDelegate
- (NSTouchBar *)makeTouchBar {
[NSApplication sharedApplication];
[[[NSApplication sharedApplication] keyWindow] windowController];
self.touchBar = [[NSTouchBar alloc] init];
[self.touchBar setCustomizationIdentifier:@"com.0xBBC.CPUBar"];
[self.touchBar setDelegate:self];
if ([self retriveProcessorInfo]) {
NSMutableArray * defaultItemIdentifiers = [[NSMutableArray alloc] init];
for (int i = 0; i < processor_count; i++) {
[defaultItemIdentifiers addObject:[[NSString alloc] initWithFormat:@"com.0xBBC.CPUBar.CPU%d", i]];
}
[self.touchBar setDefaultItemIdentifiers:defaultItemIdentifiers];
} else {
[self alertMessage:@"Oops, CPUBar needs root privilege to run/" informative:@"Try to run CPUBar with root privilege"];
[NSApp terminate:nil];
}
return self.touchBar;
}
- (nullable NSTouchBarItem *)touchBar:(NSTouchBar *)touchBar makeItemForIdentifier:(NSTouchBarItemIdentifier)identifier {
NSCustomTouchBarItem * item = [[NSCustomTouchBarItem alloc] initWithIdentifier:identifier];
NSButton * button = [NSButton buttonWithTitle:@"" target:self action:@selector(setProcessor:)];
button.tag = [[identifier substringFromIndex:@"com.0xBBC.CPUBar.CPU".length] integerValue];
processor_basic_info_data_t basic_info;
mach_msg_type_number_t info_count = PROCESSOR_BASIC_INFO_COUNT;
processor_info(processor_list[button.tag], PROCESSOR_BASIC_INFO, &port, (processor_info_t)&basic_info, &info_count);
if (basic_info.is_master) {
// normally, it would be number 0
// but just in case...
masterCPU = button.tag;
}
button.attributedTitle = [self stringForCPU:button.tag status:basic_info.running];
item.view = button;
return item;
}
#pragma mark
#pragma mark - Private Methods
- (BOOL)retriveProcessorInfo {
port = mach_host_self();
kern_return_t rc;
rc = host_get_host_priv_port(port, &priv_port);
if (rc != KERN_SUCCESS) return NO;
rc = host_processors(priv_port, &processor_list, &processor_count);
if (rc != KERN_SUCCESS) return NO;
return YES;
}
- (void)alertMessage:(NSString *)msg informative:(NSString *)info {
NSAlert * alert = [[NSAlert alloc] init];
alert.alertStyle = NSAlertStyleWarning;
alert.messageText = msg;
alert.informativeText = info;
[alert runModal];
}
- (NSAttributedString *)stringForCPU:(NSInteger)index status:(BOOL)on {
NSMutableAttributedString * string = [[NSMutableAttributedString alloc] initWithString:@"●" attributes:@{NSForegroundColorAttributeName: on ? [NSColor greenColor] : [NSColor redColor]}];
[string appendAttributedString:[[NSAttributedString alloc] initWithString:[NSString stringWithFormat:@" CPU %ld ", index] attributes:@{NSForegroundColorAttributeName: [NSColor whiteColor]}]];
[string setAlignment:NSTextAlignmentCenter range:NSMakeRange(0, string.length)];
return string;
}
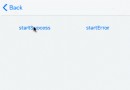
- (void)setProcessor:(NSButton *)button {
kern_return_t kr;
if (button.tag & CPU_STATUS_MASK) {
button.tag &= ~CPU_STATUS_MASK;
kr = processor_start(processor_list[button.tag]);
if (kr != KERN_SUCCESS) {
[self alertMessage:[NSString stringWithFormat:@"∑(?Д?) Cannot restart CPU %ld", button.tag] informative:@"Perhaps wait for a moment and retry it"];
button.tag |= CPU_STATUS_MASK;
} else {
button.attributedTitle = [self stringForCPU:button.tag status:YES];
}
} else {
if (button.tag == masterCPU) {
// trust me, no one really wants to stop the master CPU
return;
}
kr = processor_exit(processor_list[button.tag]);
if (kr != KERN_SUCCESS) {
[self alertMessage:[NSString stringWithFormat:@"∑(?Д?) Cannot stop CPU %ld", button.tag] informative:@"Perhaps wait for a moment and retry it"];
} else {
button.attributedTitle = [self stringForCPU:button.tag status:NO];
button.tag |= CPU_STATUS_MASK;
}
}
}
@end

- 應用設計形式中的Singleton單例形式來開辟iOS運用法式
- 蘋果iOS10公測版首個版本開始推送
- iOS10更易遭暴力破解,蘋果稱已開始修復
- WWDC2015場內橫幅開始布置:iOS9呢?
- 蘋果開始審核iOS9/El Capitan/watchOS 2應用
- 更好體驗:支持蘋果iOS9/watchOS 2正式版應用開始上架
- 蘋果iOS9.2開始內測,正式版或隨iPad Pro一同到來
- itunes無法備份 未能與iphone開始會話解決方法
- 蘋果iPhone6電信版開始預約
- 9.12可以開始預定iPhone 6和iPhone 6 Plus
- 國行iPhone6今日開始預售地址
- 國行iPhone6/iPhone6 Plus預訂用戶開始收貨
- 盤古越獄ios8.1越獄超時請重新點擊開始越獄怎麼辦?
- iOS9正式發布 將於7月份開始推送
- 從零開始學ios開發(十四):Navigation Controllers and Table Views(上)
- Cocoapods私有倉庫封裝過程中的思考
- 解決常見的masksToBounds離屏渲染帶來的性能損耗
- iOS小技巧:用runtime 解決UIButton 重復點擊問題
- 從源代碼看 ObjC 中消息的發送
- 源碼推薦(7.22):自動滾動的列表LQXAutoTableView,滑動返回,系統自帶地圖劃線功能
- 任性切換自定義轉場效果的XXTransition
- Xcode 6和swift中應用程序的國際化和本地化
- 源碼推薦(7.21):頂部滑動菜單FDSlideBar,Swift版無限循環輪播圖
- 如何使用Xcode Server進行持續集成並自動部署到iTunes Connect
- Tips:獲取 APP 的 Launch Image