Swift tableView的單元格多選功能的實現(獲取多選值、多選刪除)
有時候在我們應用中需要用到表格(tableView)的多選功能。其實 tableView 已自帶了多種多選功能,不用借助第三方組件也可以實現。下面分別進行介紹。
方法1,自定義一個數組保存選中項的索引(非編輯狀態)
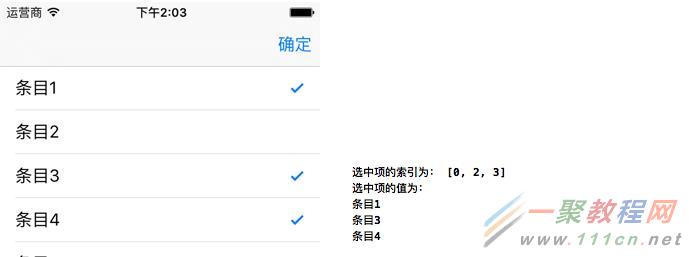
(1)我們先定義一個數組,表格在非編輯狀態時,點擊某個單元格便將其索引添加到這個數組中。同時將單元格尾部打勾表示選中狀態。再次點擊原來選中的單元格,則取消選中狀態,並將索引從數組中移除。
(2)點擊導航欄上的“確定”按鈕,即可獲取到所有選中項的索引以及對應的值,並打印出來。
import UIKit
class ViewController: UIViewController, UITableViewDelegate, UITableViewDataSource {
var items:[String] = ["條目1","條目2","條目3","條目4","條目5"]
//存儲選中單元格的索引
var selectedIndexs = [Int]()
var tableView:UITableView?
override func loadView() {
super.loadView()
}
override func viewDidLoad() {
super.viewDidLoad()
//創建表視圖
self.tableView = UITableView(frame: self.view.frame, style:UITableViewStyle.Plain)
self.tableView!.delegate = self
self.tableView!.dataSource = self
//創建一個重用的單元格
self.tableView!.registerClass(UITableViewCell.self,
forCellReuseIdentifier: "SwiftCell")
self.view.addSubview(self.tableView!)
}
//在本例中,只有一個分區
func numberOfSectionsInTableView(tableView: UITableView) -> Int {
return 1;
}
//返回表格行數(也就是返回控件數)
func tableView(tableView: UITableView, numberOfRowsInSection section: Int) -> Int {
return self.items.count
}
//創建各單元顯示內容(創建參數indexPath指定的單元)
func tableView(tableView: UITableView, cellForRowAtIndexPath indexPath: NSIndexPath)
-> UITableViewCell
{
//為了提供表格顯示性能,已創建完成的單元需重復使用
let identify:String = "SwiftCell"
//同一形式的單元格重復使用,在聲明時已注冊
let cell = tableView.dequeueReusableCellWithIdentifier(identify,
forIndexPath: indexPath) as UITableViewCell
cell.textLabel?.text = self.items[indexPath.row]
//判斷是否選中(選中單元格尾部打勾)
if selectedIndexs.contains(indexPath.row) {
cell.accessoryType = UITableViewCellAccessoryType.Checkmark
} else {
cell.accessoryType = UITableViewCellAccessoryType.None
}
return cell
}
// UITableViewDelegate 方法,處理列表項的選中事件
func tableView(tableView: UITableView, didSelectRowAtIndexPath indexPath: NSIndexPath){
//判斷該行原先是否選中
if let index = selectedIndexs.indexOf(indexPath.row){
selectedIndexs.removeAtIndex(index) //原來選中的取消選中
}else{
selectedIndexs.append(indexPath.row) //原來沒選中的就選中
}
////刷新該行
self.tableView?.reloadRowsAtIndexPaths([indexPath], withRowAnimation: .Automatic)
}
//確定按鈕點擊
@IBAction func btnClick(sender: AnyObject) {
print("選中項的索引為:", selectedIndexs)
print("選中項的值為:")
for index in selectedIndexs {
print(items[index])
}
}
override func didReceiveMemoryWarning() {
super.didReceiveMemoryWarning()
}
}
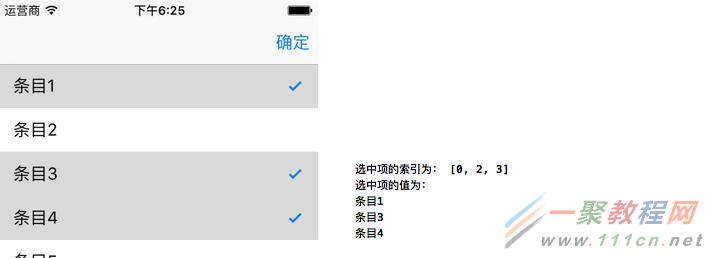
方法2,將allowsMultipleSelection設置為true(非編輯狀態)
前面的樣例,表格實際上還是單選的。只不過我們定義了一個數值來保存選中的單元格索引,從而實現多選的功能。
下面還是實現同樣的功能,只不過這次將表格設置成允許多選(allowsMultipleSelection 為 true),這樣我們也就不用再另外定義數組來存儲選中項索引了。
import UIKit
class ViewController: UIViewController, UITableViewDelegate, UITableViewDataSource {
var items:[String] = ["條目1","條目2","條目3","條目4","條目5"]
var tableView:UITableView?
override func loadView() {
super.loadView()
}
override func viewDidLoad() {
super.viewDidLoad()
//創建表視圖
self.tableView = UITableView(frame: self.view.frame, style:UITableViewStyle.Plain)
self.tableView!.delegate = self
self.tableView!.dataSource = self
//創建一個重用的單元格
self.tableView!.registerClass(UITableViewCell.self,
forCellReuseIdentifier: "SwiftCell")
self.view.addSubview(self.tableView!)
//設置允許單元格多選
self.tableView!.allowsMultipleSelection = true
}
//在本例中,只有一個分區
func numberOfSectionsInTableView(tableView: UITableView) -> Int {
return 1;
}
//返回表格行數(也就是返回控件數)
func tableView(tableView: UITableView, numberOfRowsInSection section: Int) -> Int {
return self.items.count
}
//創建各單元顯示內容(創建參數indexPath指定的單元)
func tableView(tableView: UITableView, cellForRowAtIndexPath indexPath: NSIndexPath)
-> UITableViewCell
{
//為了提供表格顯示性能,已創建完成的單元需重復使用
let identify:String = "SwiftCell"
//同一形式的單元格重復使用,在聲明時已注冊
let cell = tableView.dequeueReusableCellWithIdentifier(identify,
forIndexPath: indexPath) as UITableViewCell
cell.textLabel?.text = self.items[indexPath.row]
return cell
}
//處理列表項的選中事件
func tableView(tableView: UITableView, didSelectRowAtIndexPath indexPath: NSIndexPath){
let cell = self.tableView?.cellForRowAtIndexPath(indexPath)
cell?.accessoryType = .Checkmark
}
//處理列表項的取消選中事件
func tableView(tableView: UITableView,
didDeselectRowAtIndexPath indexPath: NSIndexPath) {
let cell = self.tableView?.cellForRowAtIndexPath(indexPath)
cell?.accessoryType = .None
}
//確定按鈕點擊
@IBAction func btnClick(sender: AnyObject) {
var selectedIndexs = [Int]()
if let selectedItems = tableView!.indexPathsForSelectedRows {
for indexPath in selectedItems {
selectedIndexs.append(indexPath.row)
}
}
print("選中項的索引為:", selectedIndexs)
print("選中項的值為:")
for index in selectedIndexs {
print(items[index])
}
}
override func didReceiveMemoryWarning() {
super.didReceiveMemoryWarning()
}
}
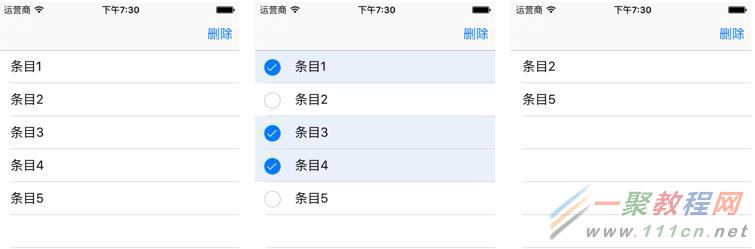
方法3,allowsMultipleSelectionDuringEditing設置為true(編輯狀態)
這個樣例同上面那個有點類似,只不過是表格進入編輯狀態下才可以多選。
(1)下面樣例表格默認情況下無法進行多選。
(2)長按表格進入編輯狀態,這時單元格前面會出現選擇框。點擊即可進行單元格的選擇與取消。
(3)點擊導航欄上的“刪除”按鈕,即可將選中的單元格都刪除。
import UIKit
class ViewController: UIViewController, UITableViewDelegate, UITableViewDataSource,
UIGestureRecognizerDelegate {
var items:[String] = ["條目1","條目2","條目3","條目4","條目5"]
var tableView:UITableView?
override func loadView() {
super.loadView()
}
override func viewDidLoad() {
super.viewDidLoad()
//創建表視圖
self.tableView = UITableView(frame: self.view.frame, style:UITableViewStyle.Plain)
self.tableView!.delegate = self
self.tableView!.dataSource = self
//創建一個重用的單元格
self.tableView!.registerClass(UITableViewCell.self,
forCellReuseIdentifier: "SwiftCell")
self.view.addSubview(self.tableView!)
//表格在編輯狀態下允許多選
self.tableView?.allowsMultipleSelectionDuringEditing = true
//綁定對長按的響應
let longPress = UILongPressGestureRecognizer(target:self,
action:#selector(ViewController.tableviewCellLongPressed(_:)))
//代理
longPress.delegate = self
longPress.minimumPressDuration = 1.0
//將長按手勢添加到需要實現長按操作的視圖裡
self.tableView!.addGestureRecognizer(longPress)
}
//單元格長按事件響應
func tableviewCellLongPressed(gestureRecognizer:UILongPressGestureRecognizer)
{
if (gestureRecognizer.state == UIGestureRecognizerState.Ended)
{
print("UIGestureRecognizerStateEnded");
//在正常狀態和編輯狀態之間切換
if(self.tableView!.editing == false) {
self.tableView!.setEditing(true, animated:true)
}
else {
self.tableView!.setEditing(false, animated:true)
}
}
}
//在本例中,只有一個分區
func numberOfSectionsInTableView(tableView: UITableView) -> Int {
return 1;
}
//返回表格行數(也就是返回控件數)
func tableView(tableView: UITableView, numberOfRowsInSection section: Int) -> Int {
return self.items.count
}
//創建各單元顯示內容(創建參數indexPath指定的單元)
func tableView(tableView: UITableView, cellForRowAtIndexPath indexPath: NSIndexPath)
-> UITableViewCell
{
//為了提供表格顯示性能,已創建完成的單元需重復使用
let identify:String = "SwiftCell"
//同一形式的單元格重復使用,在聲明時已注冊
let cell = tableView.dequeueReusableCellWithIdentifier(identify,
forIndexPath: indexPath) as UITableViewCell
cell.textLabel?.text = self.items[indexPath.row]
return cell
}
//刪除按鈕點擊
@IBAction func btnClick(sender: AnyObject) {
//獲取選中項索引
var selectedIndexs = [Int]()
if let selectedItems = tableView!.indexPathsForSelectedRows {
for indexPath in selectedItems {
selectedIndexs.append(indexPath.row)
}
}
//刪除選中的數據
items.removeAtIndexes(selectedIndexs)
//重新加載數據
self.tableView?.reloadData()
//退出編輯狀態
self.tableView!.setEditing(false, animated:true)
}
override func didReceiveMemoryWarning() {
super.didReceiveMemoryWarning()
}
}
extension Array {
//Array方法擴展,支持根據索引數組刪除
mutating func removeAtIndexes(ixs: [Int]) {
for i in ixs.sort(>) {
self.removeAtIndex(i)
}
}
}


- iOS10告訴框架UserNotification懂得與運用
- iOS Webview自順應現實內容高度的4種辦法詳解
- iOS10 App適配權限 Push Notifications 字體Frame 碰到的成績
- iOS獲得以後裝備WiFi信息的辦法
- iPhone/iPad開辟經由過程LocalNotification完成iOS准時當地推送功效
- iOS推送之當地告訴UILocalNotification
- iOS開辟之widget完成詳解
- iOS10添加當地推送(Local Notification)實例
- iOS Remote Notification長途新聞推送處置
- IOS上iframe的轉動條掉效的處理方法
- Swift 同享文件操作小結(iOS 8 +)
- Swift 2.1 為 UIView 添加點擊事宜和點擊後果
- 在Swift中應用JSONModel 實例代碼
- 應用Swift代碼完成iOS手勢解鎖、指紋解鎖實例詳解
- 詳解iOS App中UISwitch開關組件的根本創立及應用辦法