Swift 文本框textView圖文混排的例子
我們使用文本框(UITextView)時,除了輸入文字外,可能還會想在裡面插入一些圖片。或者有一些圖文混排的內容需要展示出來。 這個只需要通過 textView 的屬性化文本即可實現。j將圖片以附件的形式插入即可。
本文通過樣例演示如何實現 textView 的圖文混排,同時還可以選擇插入圖片的模式,是保持原圖大小,還是自適應尺寸(這些可以混合使用的。)
1,效果圖
(1)不改變插入圖片的大小

(2)讓圖片與行高保持一致。這樣圖片就不會撐大行高,同時會與文字的大小保持一致。適合用來插入表情圖標。
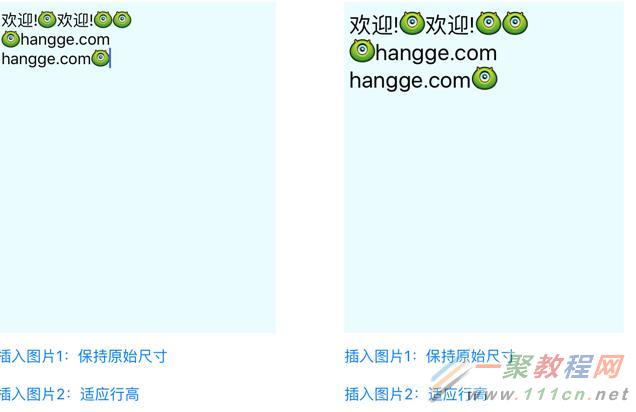
(3)讓圖片占滿一行。適合普通圖片或者大圖的插入。

2,樣例代碼
import UIKit
class ViewController: UIViewController {
//圖文混排顯示的文本區域
@IBOutlet weak var textView: UITextView!
//文字大小
let textViewFont = UIFont.systemFontOfSize(22)
override func viewDidLoad() {
super.viewDidLoad()
//初始化顯示默認內容
insertString("歡迎歡迎!")
insertPicture(UIImage(named: "icon")!, mode:.FitTextLine)
insertString("\n歡迎訪問:")
insertPicture(UIImage(named: "logo")!)
insertPicture(UIImage(named: "bg")!, mode:.FitTextView)
}
//插入文字
func insertString(text:String) {
//獲取textView的所有文本,轉成可變的文本
let mutableStr = NSMutableAttributedString(attributedString: textView.attributedText)
//獲得目前光標的位置
let selectedRange = textView.selectedRange
//插入文字
let attStr = NSAttributedString(string: text)
mutableStr.insertAttributedString(attStr, atIndex: selectedRange.location)
//設置可變文本的字體屬性
mutableStr.addAttribute(NSFontAttributeName, value: textViewFont,
range: NSMakeRange(0,mutableStr.length))
//再次記住新的光標的位置
let newSelectedRange = NSMakeRange(selectedRange.location + attStr.length, 0)
//重新給文本賦值
textView.attributedText = mutableStr
//恢復光標的位置(上面一句代碼執行之後,光標會移到最後面)
textView.selectedRange = newSelectedRange
}
//插入圖片
func insertPicture(image:UIImage, mode:ImageAttachmentMode = .Default){
//獲取textView的所有文本,轉成可變的文本
let mutableStr = NSMutableAttributedString(attributedString: textView.attributedText)
//創建圖片附件
let imgAttachment = NSTextAttachment(data: nil, ofType: nil)
var imgAttachmentString: NSAttributedString
imgAttachment.image = image
//設置圖片顯示方式
if mode == .FitTextLine {
//與文字一樣大小
imgAttachment.bounds = CGRectMake(0, -4, textView.font!.lineHeight,
textView.font!.lineHeight)
} else if mode == .FitTextView {
//撐滿一行
let imageWidth = textView.frame.width - 10
let imageHeight = image.size.height/image.size.width*imageWidth
imgAttachment.bounds = CGRectMake(0, 0, imageWidth, imageHeight)
}
imgAttachmentString = NSAttributedString(attachment: imgAttachment)
//獲得目前光標的位置
let selectedRange = textView.selectedRange
//插入文字
mutableStr.insertAttributedString(imgAttachmentString, atIndex: selectedRange.location)
//設置可變文本的字體屬性
mutableStr.addAttribute(NSFontAttributeName, value: textViewFont,
range: NSMakeRange(0,mutableStr.length))
//再次記住新的光標的位置
let newSelectedRange = NSMakeRange(selectedRange.location+1, 0)
//重新給文本賦值
textView.attributedText = mutableStr
//恢復光標的位置(上面一句代碼執行之後,光標會移到最後面)
textView.selectedRange = newSelectedRange
//移動滾動條(確保光標在可視區域內)
self.textView.scrollRangeToVisible(newSelectedRange)
}
//插入圖片1:保持原始尺寸
@IBAction func btnClick1(sender: AnyObject) {
insertPicture(UIImage(named: "logo")!)
}
//插入圖片2:適應行高
@IBAction func btnClick2(sender: AnyObject) {
insertPicture(UIImage(named: "icon")!, mode:.FitTextLine)
}
//插入圖片3:適應textView寬度
@IBAction func btnClick3(sender: AnyObject) {
insertPicture(UIImage(named: "bg")!, mode:.FitTextView)
}
override func didReceiveMemoryWarning() {
super.didReceiveMemoryWarning()
}
}
//插入的圖片附件的尺寸樣式
enum ImageAttachmentMode {
case Default //默認(不改變大小)
case FitTextLine //使尺寸適應行高
case FitTextView //使尺寸適應textView
}
- iOS10告訴框架UserNotification懂得與運用
- iOS Webview自順應現實內容高度的4種辦法詳解
- iOS10 App適配權限 Push Notifications 字體Frame 碰到的成績
- iOS獲得以後裝備WiFi信息的辦法
- iPhone/iPad開辟經由過程LocalNotification完成iOS准時當地推送功效
- iOS推送之當地告訴UILocalNotification
- iOS開辟之widget完成詳解
- iOS10添加當地推送(Local Notification)實例
- iOS Remote Notification長途新聞推送處置
- IOS上iframe的轉動條掉效的處理方法
- Swift 同享文件操作小結(iOS 8 +)
- Swift 2.1 為 UIView 添加點擊事宜和點擊後果
- 在Swift中應用JSONModel 實例代碼
- 應用Swift代碼完成iOS手勢解鎖、指紋解鎖實例詳解
- 詳解iOS App中UISwitch開關組件的根本創立及應用辦法