iOS 委托模式
編輯:關於IOS

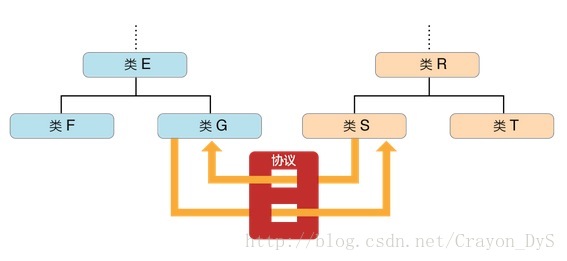
委托Delegate是協議的一種,通過一種@protocol的方式實現,顧名思義,就是委托他人幫自己去做什麼事。也就是當自己做什麼事情不方便的時候,就可以建立一個委托,這樣就可以委托他人幫自己去實現什麼方法。
簡單的總結了一下自己用到的委托的作用有兩個,一個是傳值,一個是傳事件。 1.所謂傳值經常用在B類要把自己的一個數據或者對象傳給A類,讓A類去展示或者處理。(這個作用在兩個View視圖之間傳遞參數的時候特別有用)(例子一) 2.所謂傳事件就是A類發生了什麼事,把這件事告訴關注自己的人,也就是委托的對象,由委托的對象去考慮發生這個事件後應該做出什麼反映。簡單的說,假如A類發生某個事件,它本身並不出來,而是通過委托delegate的形式,讓它的委托對象B類去處理(當然委托對象B就要實現委托中的方法)。(例子二) ----下面都會有例子展示。 實現委托的過程中還要注意一些問題: 1、委托過程中需要定義協議@protocol ,這個協議可以單獨New File成一個單獨的協議文件,也可以放在委托對象的頭文件中,一般的習慣是後者。 2、在協議中定義委托對象需要委托別人處理的一些方法,用於傳值或者傳事件。 3、委托類中需要定義一個協議的實例對象,注意屬性一般設置為assign而非retain(一般命名為delegate,但是注意假如給類中原本就又這個屬性,就要換一個名字),通過這個協議實例對象就可以調用協議中的方法(即委托方法)。 4、被委托類中需要在自身的interface中聲明協議:<XXXDelegate>,表示該類要實現XXXDelegate協議中的方法。 5、注意最後要把委托類對象的delegate設置為被委托類對象,一般的處理有兩種方法: ①委托類對象.delegate = 被委托類對象。 ②在被委托類裡定義一個委托類對象,並設置委托類對象.delegate = self (例子三) 下面通過三個例子demo就可以更生動的體會了。 一、通過委托傳值 下面簡要說明一下這個例子: 委托類是:Customer,其中委托協議中定義了一個方法,該方法表示customer要買一個iphone(會傳遞一個iphone型號參數),customer通過委托delegate調用這個方法表示customer要買iphone。 被委托類是:Businessman,其繼承這個協議,實現了協議中的方法,也即處理了委托類customer要買iphone的需要。 下面貼代碼: Customer.h [cpp] #import <Foundation/Foundation.h> @protocol MyDelegate <NSObject> -(void)buyIphone:(NSString*)iphoneType; @end @interface Customer : NSObject @property(nonatomic,assign)id<MyDelegate> delegate; -(void)willBuy; @end #import <Foundation/Foundation.h> @protocol MyDelegate <NSObject> -(void)buyIphone:(NSString*)iphoneType; @end @interface Customer : NSObject @property(nonatomic,assign)id<MyDelegate> delegate; -(void)willBuy; @end Customer.m [cpp] #import "Customer.h" @implementation Customer @synthesize delegate; -(void)willBuy { [delegate buyIphone:@"Iphone5"]; } @end #import "Customer.h" @implementation Customer @synthesize delegate; -(void)willBuy { [delegate buyIphone:@"Iphone5"]; } @end Businessman.h [cpp] #import <Foundation/Foundation.h> #import "Customer.h" @interface Businessman : NSObject<MyDelegate> @end #import <Foundation/Foundation.h> #import "Customer.h" @interface Businessman : NSObject<MyDelegate> @end Businessman.m [cpp] #import "Businessman.h" @implementation Businessman -(void)buyIphone:(NSString *)iphoneType { NSLog(@"There is an Iphone store,we have %@",iphoneType); } @end #import "Businessman.h" @implementation Businessman -(void)buyIphone:(NSString *)iphoneType { NSLog(@"There is an Iphone store,we have %@",iphoneType); } @end main.m [cpp] #import <Foundation/Foundation.h> #import "Customer.h" #import "Businessman.h" int main(int argc, const char * argv[]) { @autoreleasepool { // insert code here... Customer *customer = [[Customer alloc]init]; Businessman *businessman = [[Businessman alloc]init]; customer.delegate = businessman; [customer willBuy]; } return 0; } #import <Foundation/Foundation.h> #import "Customer.h" #import "Businessman.h" int main(int argc, const char * argv[]) { @autoreleasepool { // insert code here... Customer *customer = [[Customer alloc]init]; Businessman *businessman = [[Businessman alloc]init]; customer.delegate = businessman; [customer willBuy]; } return 0; } 二、通過委托傳事件 下面也是簡單說一下這個例子: 委托類:Boss 他要處理起草文件和接電話的任務,但是他本身並不實現這些事件響應的方法,而是通過委托讓他的被委托類來實現這些響應方法。 被委托類:Secretary 他受Boss的委托實現起草文件和接電話任務的方法。 下面貼代碼: Boss.h [cpp] #import <Foundation/Foundation.h> @protocol MissionDelegate <NSObject> -(void)draftDocuments; -(void)tellPhone; @end @interface Boss : NSObject @property(nonatomic, assign)id<MissionDelegate> delegate; -(void)manage; @end #import <Foundation/Foundation.h> @protocol MissionDelegate <NSObject> -(void)draftDocuments; -(void)tellPhone; @end @interface Boss : NSObject @property(nonatomic, assign)id<MissionDelegate> delegate; -(void)manage; @end Boss.m [cpp] #import "Boss.h" @implementation Boss @synthesize delegate = _delegate; -(void)manage { [_delegate draftDocuments]; [_delegate tellPhone]; } @end #import "Boss.h" @implementation Boss @synthesize delegate = _delegate; -(void)manage { [_delegate draftDocuments]; [_delegate tellPhone]; } @end Secretary.h [cpp] #import <Foundation/Foundation.h> #import "Boss.h" @interface Secretary : NSObject <MissionDelegate> @end #import <Foundation/Foundation.h> #import "Boss.h" @interface Secretary : NSObject <MissionDelegate> @end Secretary.m [cpp] #import "Secretary.h" @implementation Secretary -(void)draftDocuments { NSLog(@"Secretary draft documents"); } -(void)tellPhone { NSLog(@"Secretary tell phone"); } @end #import "Secretary.h" @implementation Secretary -(void)draftDocuments { NSLog(@"Secretary draft documents"); } -(void)tellPhone { NSLog(@"Secretary tell phone"); } @end main.m [cpp] #import <Foundation/Foundation.h> #import "Secretary.h" #import "Boss.h" int main(int argc, const char * argv[]) { @autoreleasepool { // insert code here... Boss *boss = [[Boss alloc] init]; Secretary *secretary = [[Secretary alloc] init]; boss.delegate = secretary; [boss manage]; } return 0; } #import <Foundation/Foundation.h> #import "Secretary.h" #import "Boss.h" int main(int argc, const char * argv[]) { @autoreleasepool { // insert code here... Boss *boss = [[Boss alloc] init]; Secretary *secretary = [[Secretary alloc] init]; boss.delegate = secretary; [boss manage]; } return 0; } 三、這個例子兩個view視圖之間傳遞參數 定義一個MyView類,在這個視圖中添加了一個button,button的事件響應他本身不處理,而讓被委托類去處理,所以它就是委托類。 在主視圖中,添加一個MyView類的實例對象,設置該實例對象的代理為self,所以它就是委托類了。 下面還是貼代碼,應該都是很容易看懂的。 MyView.h [cpp] #import <UIKit/UIKit.h> @protocol MyDelegate <NSObject> -(void)print:(NSString*)viewName; @end @interface MyView : UIView @property(nonatomic,assign)id<MyDelegate> mydelegate; @end #import <UIKit/UIKit.h> @protocol MyDelegate <NSObject> -(void)print:(NSString*)viewName; @end @interface MyView : UIView @property(nonatomic,assign)id<MyDelegate> mydelegate; @end MyView.m [cpp] #import "MyView.h" @implementation MyView @synthesize mydelegate = _mydelegate; - (id)initWithFrame:(CGRect)frame { self = [super initWithFrame:frame]; if (self) { //代碼創建一個button UIButton *button = [UIButton buttonWithType:UIButtonTypeRoundedRect]; ; ; ]; //Target-Action模式 為button指定事件處理對象target為self,事件處理方法為buttonPressed ; [self addSubview:button]; } return self; } //事件處理的響應方法 -(void)buttonPressed{ [_mydelegate print:@"this is a view"]; } @end #import "MyView.h" @implementation MyView @synthesize mydelegate = _mydelegate; - (id)initWithFrame:(CGRect)frame { self = [super initWithFrame:frame]; if (self) { //代碼創建一個button UIButton *button = [UIButton buttonWithType:UIButtonTypeRoundedRect]; ; ; ]; //Target-Action模式 為button指定事件處理對象target為self,事件處理方法為buttonPressed ; [self addSubview:button]; } return self; } //事件處理的響應方法 -(void)buttonPressed{ [_mydelegate print:@"this is a view"]; } @end DelegateViewController.h [cpp] #import <UIKit/UIKit.h> #import "MyView.h" @interface DelegateViewController : UIViewController<MyDelegate> @end #import <UIKit/UIKit.h> #import "MyView.h" @interface DelegateViewController : UIViewController<MyDelegate> @end DelegateViewController.m [cpp] #import "DelegateViewController.h" @interface DelegateViewController () @end @implementation DelegateViewController - (id)initWithNibName:(NSString *)nibNameOrNil bundle:(NSBundle *)nibBundleOrNil { self = [super initWithNibName:nibNameOrNil bundle:nibBundleOrNil]; if (self) { // Custom initialization } return self; } - (void)viewDidLoad { [super viewDidLoad]; // Do any additional setup after loading the view. MyView *myView = [[MyView alloc]initWithFrame:CGRectMake(50, 100, 200, 100)]; [myView setBackgroundColor:[UIColor yellowColor]]; myView.mydelegate = self; [self.view addSubview:myView]; } -(void)print:(NSString *)viewName { NSLog(@"%@",viewName); } - (void)didReceiveMemoryWarning { [super didReceiveMemoryWarning]; // Dispose of any resources that can be recreated. } @end相關文章
+


