IOS開發:UIAlertView使用
UIAlertView是什麼就不介紹了
1.基本用法
1 UIAlertView *view = [[UIAlertView alloc]initWithTitle:@"Test" //標題
2 message:@"this is a alert view " //顯示內容
3 delegate:nil //委托,可以點擊事件進行處理
4 cancelButtonTitle:@"取消"
5 otherButtonTitles:@"確定"
6 //,@"其他", //添加其他按鈕
7 nil];
8 [view show];效果圖:

2.多個按鈕
取消上面代碼@“其他”的注釋後,運行效果如下

可以以此類推,添加多個
3.一些系統樣式參數
UIAlertViewStyle這個枚舉提供了幾個樣式
1 typedef NS_ENUM(NSInteger, UIAlertViewStyle) {
2 UIAlertViewStyleDefault = 0, //缺省樣式
3 UIAlertViewStyleSecureTextInput, //密文輸入框
4 UIAlertViewStylePlainTextInput, //明文輸入框
5 UIAlertViewStyleLoginAndPasswordInput //登錄用輸入框,有明文用戶名,和密文密碼輸入二個輸入框
6 };
使用代碼如下:
1 UIAlertView *view = [[UIAlertView alloc]initWithTitle:@"請等待" //標題
2 message:@"this is a alert view " //顯示內容
3 delegate:nil //委托,可以點擊事件進行處理
4 cancelButtonTitle:@"取消"
5 otherButtonTitles:@"確定",
6 //,@"其他", //添加其他按鈕
7 nil];
8 [view setAlertViewStyle:UIAlertViewStyleLoginAndPasswordInput]; //控制樣式效果圖:

這是參數為:UIAlertViewStyleLoginAndPasswordInput 效果圖,其他的自行查看
不過這幾個類型,我個人覺得太丑了,不能接受,便自定義了個彈出框,用來接受輸入


實現也不難,有需要的朋友可以聯系我
4.判斷用戶點了哪個按鈕
UIAlertView的委托UIAlertViewDelegate ,實現該委托來實現點擊事件,如下:
.h文件
1 @interface ViewController : UIViewController<UIAlertViewDelegate> {
2
3 }
在.m實現委托的方法
1 - (void)alertView:(UIAlertView *)alertView clickedButtonAtIndex:(NSInteger)buttonIndex
2 {
3 NSString* msg = [[NSString alloc] initWithFormat:@"您按下的第%d個按鈕!",buttonIndex];
4 NSLog(@"%@",msg);
5 }在這個方法中的參數 buttonIndex,表示的是按鈕的索引,上圖的三按鍵 “取消”,“確定”,“其他”對應的索引分別為“0”,“1”,“2”.
用Delegate的方式處理點擊時候,會帶來一個問題比較麻煩,比如在一個頁面裡,有好幾個UIAlertView的時候,處理點擊的時候,會增加處理邏輯的復雜度,得做一些判斷
這種情況有一個解決辦法,就是用Block,添加Block的回調,代替Delegate,target和selector.(下次展開寫這個內容)
5.添加子視圖
這個用得也是比較多的,貼幾個使用實例
添加 UIActivityIndicatorView

實現代碼:
1 UIAlertView *view = [[UIAlertView alloc]initWithTitle:@"請等待"
2 message:nil
3 delegate:nil
4 cancelButtonTitle:nil
5 otherButtonTitles:nil,
6 nil];
7
8 UIActivityIndicatorView *activeView = [[UIActivityIndicatorView alloc]initWithActivityIndicatorStyle:UIActivityIndicatorViewStyleWhiteLarge];
9 activeView.center = CGPointMake(view.bounds.size.width/2.0f, view.bounds.size.height-40.0f);
10 [activeView startAnimating];
11 [view addSubview:activeView];
12
13 [view show];
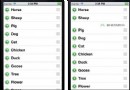
添加UITableView

這個列表的幾行代碼也說不清楚,就說下思路吧,UIAlertView之所以有這麼大的空間顯示UITableView,用了比較取巧的一個辦法
1 UIAlertView *view = [[UIAlertView alloc]initWithTitle:@"請選擇"
2 message:@"/n/n/n/n/n/n/n/n/n/n"
3 delegate:nil
4 cancelButtonTitle:nil
5 otherButtonTitles:nil,
6 nil];
7 //其中用了10個換行符來撐大UIAlertView的然後再來添加UITableView,可以自行實現,如果有需要,請留言
基本上這是一些比較常用且實用的東西了,然後還有一個比較重要的東西,就是自定義和美化UIAlertView,相信很多人關心這個,自定義和美化的內容放在下一篇來細說,分析幾個個人覺得不錯的Demo源碼