
iOS完成側滑欄後果
編輯:IOS開發綜合
後果
源碼:https://github.com/YouXianMing/IOS-Project-Examples 中的 SideViewController
//
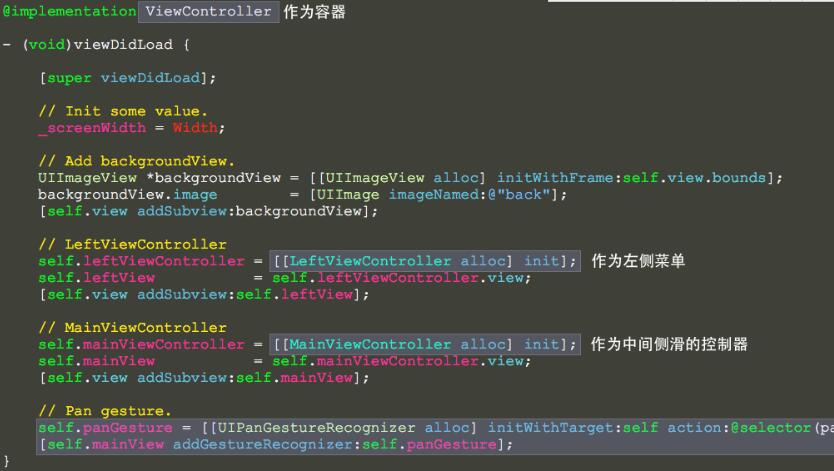
// ViewController.m
// SideViewController
//
// Created by YouXianMing on 16/6/6.
// Copyright © 2016年 YouXianMing. All rights reserved.
//
#import "ViewController.h"
#import "LeftViewController.h"
#import "MainViewController.h"
#import "UIView+SetRect.h"
@interface ViewController () {
CGFloat _screenWidth;
}
@property (nonatomic, strong) UIPanGestureRecognizer *panGesture;
@property (nonatomic) CGPoint panBeginPoint;
@property (nonatomic, strong) LeftViewController *leftViewController;
@property (nonatomic, strong) UIView *leftView;
@property (nonatomic, strong) MainViewController *mainViewController;
@property (nonatomic, strong) UIView *mainView;
@end
@implementation ViewController
- (void)viewDidLoad {
[super viewDidLoad];
// Init some value.
_screenWidth = Width;
// Add backgroundView.
UIImageView *backgroundView = [[UIImageView alloc] initWithFrame:self.view.bounds];
backgroundView.image = [UIImage imageNamed:@"back"];
[self.view addSubview:backgroundView];
// LeftViewController
self.leftViewController = [[LeftViewController alloc] init];
self.leftView = self.leftViewController.view;
[self.view addSubview:self.leftView];
// MainViewController
self.mainViewController = [[MainViewController alloc] init];
self.mainView = self.mainViewController.view;
[self.view addSubview:self.mainView];
// Pan gesture.
self.panGesture = [[UIPanGestureRecognizer alloc] initWithtarget:self action:@selector(panGestureEvent:)];
[self.mainView addGestureRecognizer:self.panGesture];
}
- (void)panGestureEvent:(UIPanGestureRecognizer *)gesture {
CGPoint translation = [gesture translationInView:gesture.view];
CGPoint velocity = [gesture velocityInView:gesture.view];
CGFloat gap = _screenWidth / 3.f * 2;
CGFloat sensitivePosition = _screenWidth / 2.f;
if (velocity.x < 0 && _mainView.x <= 0) {
// 過濾失落向左邊滑過火的情況
_mainView.x = 0.f;
} else {
if (gesture.state == UIGestureRecognizerStateBegan) {
// 開端
_panBeginPoint = translation;
if (_mainView.x >= sensitivePosition) {
_panBeginPoint.x -= gap;
}
} else if (gesture.state == UIGestureRecognizerStateChanged) {
// 值變更
_mainView.x = translation.x - _panBeginPoint.x;
if (_mainView.x <= 0) {
// 過濾失落向左邊滑過火的情況
_mainView.x = 0.f;
}
} else if (gesture.state == UIGestureRecognizerStateEnded) {
// 停止
[UIView animateWithDuration:0.20f animations:^{
_mainView.x >= sensitivePosition ? (_mainView.x = gap) : (_mainView.x = 0);
}];
}
}
}
@end
以上就是本文的全體內容,願望對年夜家的進修有所贊助,也願望年夜家多多支撐本站。
【iOS完成側滑欄後果】的相關資料介紹到這裡,希望對您有所幫助! 提示:不會對讀者因本文所帶來的任何損失負責。如果您支持就請把本站添加至收藏夾哦!
- 上一頁:IOS完成簡略單純版的QQ下拉列表
- 下一頁:iOS及時監控收集狀況的轉變

相關文章
+