詳解iOS App中UITableView的創立與內容刷新
UITableView簡直是IOS開辟頂用處最廣的一個控件,固然也是要記相當多器械的一個控件。
創立
起首創立一個新的項目,並添加一個MainViewController的Class文件

翻開MainViewController.h文件
@interface MainViewController : UIViewController<UITableViewDataSource,UITableViewDelegate>

@property (nonatomic, retain) NSArray *dataList;
@property (nonatomic, retain) UITableView *myTableView;

@end
TableView的數據源UITableViewDataSource。
TableView的拜托UITableViewDelegate。
假如以後類是繼續自UIViewController,須要添加下面的代碼,假如直接繼續自UITableViewController則不須要添加
然後打MainViewController.m文件,初始化UItableView並顯示在以後窗口
- (void)viewDidLoad
{
[super viewDidLoad];
// 初始化tableView的數據
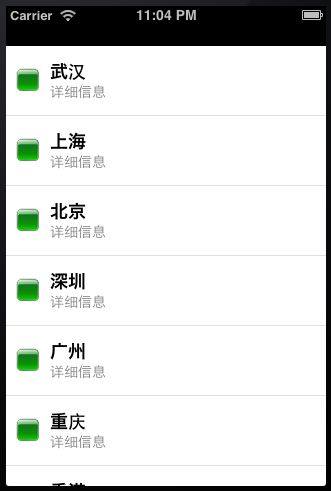
NSArray *list = [NSArray arrayWithObjects:@"武漢",@"上海",@"北京",@"深圳",@"廣州",@"重慶",@"噴鼻港",@"台海",@"天津", nil];
self.dataList = list;
UITableView *tableView = [[[UITableView alloc] initWithFrame:self.view.frame style:UITableViewStylePlain] autorelease];
// 設置tableView的數據源
tableView.dataSource = self;
// 設置tableView的拜托
tableView.delegate = self;
// 設置tableView的配景圖
tableView.backgroundView = [[UIImageView alloc] initWithImage:[UIImage imageNamed:@"Background.png"]];
self.myTableView = tableView;
[self.view addSubview:myTableView];
}
在初始化的時刻,可認為TableView設置款式
第一種:列表 UITableViewStylePlain

第二種:分組UITableViewStyleGrouped

創立並設置每行顯示的內容
- (UITableViewCell *)tableView:(UITableView *)tableView cellForRowAtIndexPath:(NSIndexPath *)indexPath
{
 static NSString *CellWithIdentifier = @"Cell";
 UITableViewCell *cell = [tableView dequeueReusableCellWithIdentifier:CellWithIdentifier];
 if (cell == nil) {
  cell = [[UITableViewCell alloc] initWithStyle:UITableViewCellStyleValue2 reuseIdentifier:CellWithIdentifier];
 }
 NSUInteger row = [indexPath row];
 cell.textLabel.text = [self.dataList objectAtIndex:row];
 cell.imageView.image = [UIImage imageNamed:@"green.png"];
 cell.detailTextLabel.text = @"具體信息";
 return cell;
}
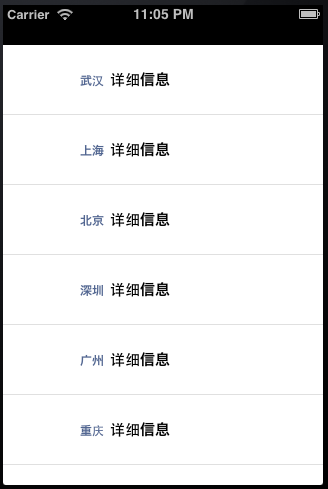
UITableViewCell的款式也是可以停止設置的,假如不克不及知足項目標須要,可以本身界說UITableViewCell的款式
UITableViewCellStyleDefault

UITableViewCellStyleSubtitle
UITableViewCellStyleValue1

UITableViewCellStyleValue2
分組的TableView還可以停止內容的分段,是經由過程上面的辦法完成,前往的數字1代表分為1段
- (NSInteger)numberOfSectionsInTableView:(UITableView *)tableView
{
 return 1;
}
設置內容縮進
- (NSInteger)tableView:(UITableView *)tableView indentationLevelForRowAtIndexPath:(NSIndexPath *)indexPath
{
 return [indexPath row];
}
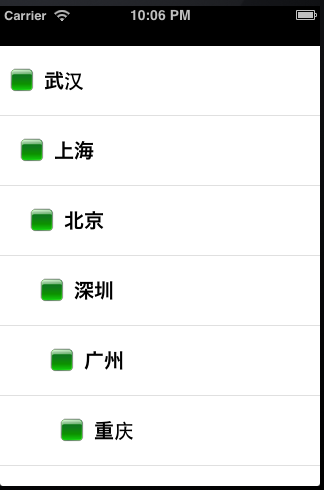
設置cell的行高
- (CGFloat)tableView:(UITableView *)tableView heightForRowAtIndexPath:(NSIndexPath *)indexPath
{
 return 70;
}
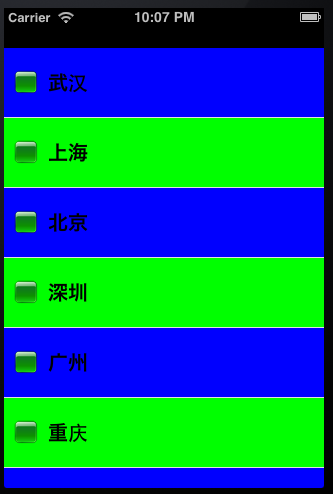
設置cell的隔行換色
- (void)tableView:(UITableView *)tableView willDisplayCell:(UITableViewCell *)cell forRowAtIndexPath:(NSIndexPath *)indexPath
{
 if ([indexPath row] % 2 == 0) {
  cell.backgroundColor = [UIColor blueColor];
 } else {
  cell.backgroundColor = [UIColor greenColor];
 }
}
被選擇指定的cell時,彈出UIAlertView顯示選擇的內容
- (void)tableView:(UITableView *)tableView didSelectRowAtIndexPath:(NSIndexPath *)indexPath
{

 NSString *msg = [[NSString alloc] initWithFormat:@"你選擇的是:%@",[self.dataList objectAtIndex:[indexPath row]]];
 UIAlertView *alert = [[UIAlertView alloc] initWithTitle:@"提醒" message:msg delegate:self cancelButtonTitle:@"肯定" otherButtonTitles:nil, nil];
 [msg release];
 [alert show];
}

滑動選擇的行後刪除
- (void)tableView:(UITableView *)tableView commitEditingStyle:(UITableViewCellEditingStyle)editingStyle forRowAtIndexPath:(NSIndexPath *)indexPath
{
 NSLog(@"履行刪除操作");
}

UITableView的刷新:
[self.tableView reloadData];
reloadData是刷新全部UITableView,有時刻,我們能夠須要部分刷新。好比:只刷新一個cell、只刷新一個section等等。這個時刻在挪用reloadData辦法,固然用戶看不出來,然則有些糟蹋資本。
刷新部分cell:
NSIndexPath *indexPath = [NSIndexPath indexPathForRow:0 inSection:0];
[self.tableView reloadRowsAtIndexPaths:[NSArray arrayWithObjects:indexPath,nil] withRowAnimation:UITableViewRowAnimationFade];
部分刷新section:
NSIndexSet *indexSet = [[NSIndexSet alloc] initWithIndex:0];
[self.tableView reloadSections:indexSet withRowAnimation:UITableViewRowAnimationFade];
下面這段代碼是刷新第0個section。
刷新動畫:
刷新UITableView還有幾個動畫:
typedef NS_ENUM(NSInteger, UITableViewRowAnimation) {
 UITableViewRowAnimationFade, //淡入淡出
 UITableViewRowAnimationRight, //從右滑入   // slide in from right (or out to right)
 UITableViewRowAnimationLeft, //從左滑入
 UITableViewRowAnimationTop,  //從上滑入
 UITableViewRowAnimationBottom, //從下滑入
 UITableViewRowAnimationNone,   // available in IOS 3.0
 UITableViewRowAnimationMiddle,   // available in IOS 3.2. attempts to keep cell centered in the space it will/did occupy
 UITableViewRowAnimationAutomatic = 100 // available in iOS 5.0. chooses an appropriate animation style for you
};
【詳解iOS App中UITableView的創立與內容刷新】的相關資料介紹到這裡,希望對您有所幫助! 提示:不會對讀者因本文所帶來的任何損失負責。如果您支持就請把本站添加至收藏夾哦!