深刻進修iOS7自界說導航轉場動畫
在IOS7之前,開辟者假如願望定制導航掌握器推入推出視圖時的轉場動畫,普通都只能經由過程子類化UINavigationController或許本身編寫動畫代碼去籠罩響應的辦法,如今IOS7為開辟者帶來了福音,蘋果公司引入了年夜量新API,賜與了開辟者很高的自在度,在處置由UIViewController治理的UIView動畫時,這些API應用便利,可擴大性也很強,定制起來異常輕松:
- 全新的針對UIView的動畫block辦法
- 全新的UIViewControllerAnimatedTransitioning協定和動畫掌握器的概念
- Interaction Controllers和Transition Coordinators
- 全新的針對動畫的助手API(輕便辦法)
全新的針對UIView的動畫block辦法
IOS4的宣布帶來了壯大的block辦法,在編寫UIView動畫時應用block可以輕松地獲得滿足的後果,但是有些情形下,我們照樣不能不直接應用Core Animation。榮幸的是,蘋果公司在iOS7中增長了2個新的基於block的辦法,如許我們就很少再須要直接應用Core Animation了。
1、症結幀動畫
iOS7為UIView封裝了一組API,讓我們很輕易的獲得與Core Animation框架中的CAKeyframeAnimation一樣的後果。
 [UIView animateKeyframesWithDuration:duration delay:delay
options:options animations:^{
[UIView addKeyframeWithRelativeStartTime:0.0
relativeDuration:0.5 animations:^{
//第一幀要履行的動畫
}];
[UIView addKeyframeWithRelativeStartTime:0.5
relativeDuration:0.5 animations:^{
//第二幀要履行的動畫
}];
} completion:^(BOOL finished) {
//動畫停止後履行的代碼塊
}];
新引入的animateKeyframesWithDuration與CAKeyframeAnimation的關系,可以比對animateWithDuration和CABasicAnimation,我們只須要將每幀動畫參加到block辦法中,並傳入此段動畫在全進程中的絕對開端時光和履行時光(duration詳細是指此段動畫的履行時光占全進程的百分比)。同時,你可以在一次動畫中應用多個症結幀,只需應用addKeyframe順次將一切症結幀參加動畫履行棧中。
上面是一個簡略的例子:在示例運用中,我應用症結幀block來加入模態視圖掌握器。
[UIView addKeyframeWithRelativeStartTime:0.0
relativeDuration:0.15 animations:^{
//順時針扭轉90度
snapshot.transform = CGAff.netransformMakeRotation(M_PI *
-1.5);
}];
[UIView addKeyframeWithRelativeStartTime:0.15
relativeDuration:0.10 animations:^{
//180度
snapshot.transform = CGAff.netransformMakeRotation(M_PI *
1.0);
}];
[UIView addKeyframeWithRelativeStartTime:0.25
relativeDuration:0.20 animations:^{
//擺過中點,225度
snapshot.transform = CGAff.netransformMakeRotation(M_PI *
1.3);
}];
[UIView addKeyframeWithRelativeStartTime:0.45
relativeDuration:0.20 animations:^{
//再擺回來,140度
snapshot.transform = CGAffineTransformMakeRotation(M_PI *
0.8);
}];
[UIView addKeyframeWithRelativeStartTime:0.65
relativeDuration:0.35 animations:^{
//扭轉後失落落
//最初一步,視圖淡出並消逝
CGAffineTransform shift =
CGAffineTransformMakeTranslation(180.0, 0.0);
CGAffineTransform rotate =
CGAffineTransformMakeRotation(M_PI * 0.3);
snapshot.transform = CGAffineTransformConcat(shift,
rotate);
_coverView.alpha = 0.0;
}];
視圖似乎在重力的牽引下繞左下角順時針扭轉,並在最低點擺動了一下,最初零落。
2、彈簧動畫
iOS7新引入的另外一個block辦法可讓你輕松將真什物理世界中的彈性後果集成進視圖動畫中。蘋果公司一向建議開辟者盡量將動畫後果做的跟真什物理世界一樣——在視圖滑動時,可以像彈簧一樣,略微拉伸一些,再彈回准確地位。應用新的彈簧動畫API來完成此後果相較以往要簡略許多。
[UIView animateWithDuration:duration delay:delay
usingSpringWithDamping:damping initialSpringVelocity:velocity
options:options animations:^{
//這裡書寫動畫相干代碼
} completion:^(BOOL finished) {
//動畫停止後履行的代碼塊
}];
這裡用到了一些物理上的概念:damping參數代表彈性阻尼,跟著阻尼值愈來愈接近0.0,動畫的彈性後果會愈來愈顯著,而假如設置阻尼值為1.0,則視圖動畫不會有彈性後果——視圖滑動時會直接加速到0並連忙停滯,不會有彈簧類的拉伸後果。
velocity參數代表彈性修改速度,它表現視圖在彈跳時恢回復復興位的速度,例如,假如在動畫中視圖被拉伸的最年夜間隔是200像素,你想讓視圖以100像素每秒的速度恢回復復興位,那末就設置velocity的值為0.5。(譯者:建議年夜家看看源代碼,代碼中damping設置為0.8不敷顯著,你可以將damping調為0.1,然後漸漸調劑velocity看看後果)
在示例運用法式中,我用彈簧動畫讓模態視圖掌握器從屏幕底部滑下去,設置彈性阻尼為0.8,彈性修改速度為1.0,運轉後可以看到,視圖將沖出15像素的間隔,然後漸漸降回原位。假如我設置彈性阻尼為0.6或許更小,那末視圖會沖得更高,並且降回原位前還會持續向下反彈。(也就是停滯前往返彈的次數愈來愈多,彈性後果愈來愈顯著)須要留意的是,不要將彈性動畫與UIKit的靜態殊效引擎相混雜。彈性動畫是一個尺度的UIView動畫API,僅僅供給了無限的幾種真什物理後果。
自界說UIViewController的轉場動畫
如今讓我們來看一個好器械。蘋果公司不只為開辟者引入了新的動畫API,並且還擴展了其運用規模。在應用UIViewController治理視圖的推入推出時,可以很輕易地自界說以下轉場動畫:
• UIViewController
• presentViewController
• UITabBarController
• setSelectedViewController
• setSelectedIndex
• UINavigationController
• pushViewController
• popViewController
• setViewControllers
在示例運用法式中,我創立了一系列轉場動畫,在動畫中應用了之前講授過的新引入的彈簧動畫和症結幀block辦法,如今讓我們來看看若何應用新API來自界說上述的轉場動畫。
1、焦點概念:動畫掌握器
那末,若何在應用自界說動畫的同時不影響視圖的其他屬性?對此蘋果公司供給了一個新的協定:UIViewControllerAnimatedTransitioning,我們可以在協定辦法中編寫自界說的動畫代碼。蘋果開辟者文檔中稱完成了此協定的對象為動畫掌握器。
因為我們應用了協定這一語法特征,自界說動畫的代碼可以靈巧的放在本身想要的地位。你可以創立一個專門用於治理動畫的類, 也能夠讓UIViewController完成UIViewControllerAnimatedTransitioning接口。因為須要完成一系列分歧的動畫,是以選擇為每一個動畫創立一個類。接上去創立這些動畫類的通用父類——BaseAnimation,它界說了一些通用的屬性和助手辦法。
讓我們來看第一個動畫,應用UINavigationController推入推出視圖時,會有一個簡略的縮放後果。
-(void)animateTransition:
(id)transitionContext {
//獲得容器視圖援用
UIView *containerView = [transitionContext
containerView];
UIViewController *fromViewController = [transitionContext
viewControllerForKey:UITransitionContextFromViewControllerKey
];
UIViewController *toViewController = [transitionContext
viewControllerForKey:UITransitionContextToViewControllerKey];
if (self.type == AnimationTypePresent) {
//拔出“to”視圖,初始縮放值為0.0
toViewController.view.transform =
CGAffineTransformMakeScale(0.0, 0.0);
[containerView insertSubview:toViewController.view
aboveSubview:fromViewController.view];
//縮放“to”視圖為想要的後果
[UIView animateWithDuration:[self
transitionDuration:transitionContext] animations:^{
toViewController.view.transform =
CGAffineTransformMakeScale(1.0, 1.0);
} completion:^(BOOL finished) {
[transitionContext completeTransition:YES];
}];
} else if (self.type == AnimationTypeDismiss) {
//拔出“to”視圖
[containerView insertSubview:toViewController.view
belowSubview:fromViewController.view];
//減少“from”視圖,直到其消逝
[UIView animateWithDuration:[self
transitionDuration:transitionContext] animations:^{
fromViewController.view.transform =
CGAffineTransformMakeScale(0.0, 0.0);
} completion:^(BOOL finished) {
[transitionContext completeTransition:YES];
}];
}
}
-(NSTimeInterval)transitionDuration:
(id)transitionContext {
return 0.4;
}
相符UIViewControllerAnimatedTransitioning協定的任何對象都須要完成animateTransition:和transitionDuration:兩個辦法。你也能夠選擇完成@optional辦法animationEnded:,它在動畫完成後由體系主動挪用,相當於completion block,異常便利。
在animateTransition:中你須要處置以下進程:
1. 將“to”視圖拔出容器視圖
2. 將“to”和“from”視圖分離挪動到本身想要的地位
3. 最初,在動畫完成時萬萬別忘了挪用completeTransition: 辦法
UIViewControllerAnimatedTransitioning協定中的辦法都帶有一個參數:transitionContext,這是一個體系級的對象,它相符 UIView-ControllerContextTransitioning協定,我們可以從該對象中獲得用於掌握轉場動畫的需要信息,重要包含以下內容:
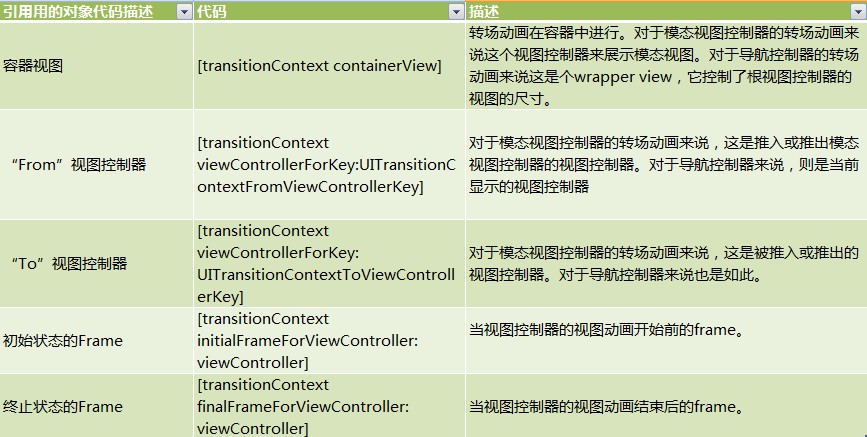
明顯,蘋果公司贊助開辟者完成了年夜部門讓人憎惡的細節任務,僅僅須要我們本身完成的任務就是界說動畫的初始狀況和終止狀況,並調劑到本身滿足的後果。最初我再煩瑣兩句有關transitionContext的主要留意事項:
1.獲得frame的辦法能夠會前往CGRectZero——假如體系沒法肯定該frame的值詳細是甚麼。例如,假如你應用自界說的模態視圖掌握器
推出動畫,在停止時體系沒法肯定其finalFrame。
2.假如視圖掌握器曾經從屏幕上移除,那末獲得frame的辦法也會前往CGRectZero。例如在導航掌握器的轉場動畫停止後,試圖獲得“from”視圖的finalFrame。
你不消手動去移除“from”視圖,transitionContext將主動幫你完成。
3.假如你在運用的其他處所須要應用transitionContext,你可以寧神地應用動畫掌握器保存一個transitionContext的援用。
將動畫掌握器運用到轉場動畫中。
如今,我們曾經開辟好了動畫掌握器,那末最初須要做的就是,將它們運用到轉場動畫中:我們須要對治理轉場動畫的UIViewController做一些操作。
普通來講,我們只須要讓UIViewController相符UIViewController-TransitioningDelegate 協定, 編寫animationController-ForPresentedController和animationControllerForDismissedController辦法。在我的示例運用法式中,我設置了一個屬性,用來讓動畫掌握器曉得今朝正在推入照樣推出視圖:
 -(id)
animationControllerForPresentedController:(UIViewController
*)presented presentingController:(UIViewController
*)presenting sourceController:(UIViewController *)source {
modalAnimationController.type = AnimationTypePresent;
return modalAnimationController;
}
-(id)
animationControllerForDismissedController:(UIViewController
*)dismissed {
modalAnimationController.type = AnimationTypeDismiss;
return modalAnimationController;
}
然後,在推入模態視圖掌握器時,我們設置modalPresentationStyle為UIModalPresentationFullScreen或UIModalPresentationCustom。我們還必需將一個相符UIViewControllerTransitioningDelegate協定的對象設置為它的transitioningDelegate,普通來講都是推入該模態視圖掌握器的UIViewController。
OptionsViewController *modal = [[OptionsViewController alloc]
initWithNibName:@"OptionsViewController" bundle:[NSBundle
mainBundle]];
modal.transitioningDelegate = self;
modal.modalPresentationStyle = UIModalPresentationCustom;
[self presentViewController:modal animated:YES
completion:nil];
假如須要將動畫掌握器運用到UINavigationController的轉場動畫中,我們須要應用UINavigationControllerDelegate協定中的一個新辦法:animationControllerForOperation。關於任何自界說的導航轉場動畫,導航欄都邑有一個淡入淡出的動畫進程。異樣,關於UITabBarController,應用UITabBarControllerDelegate協定的新辦法——animationController-ForTransitionFromViewController。
為轉場動畫界說交互方法
在iOS7中,蘋果隨處都在應用交互式彈出手勢,同時,蘋果也給開辟者們供給了一系列對象,只需簡略幾步就可以將交互手勢運用在視圖切換進程中。我們可以經由過程響應的拜托辦法前往一個交互掌握器:
- UINavigationController
- interactionControllerForAnimationController
- UITabBarController
- interactionControllerForAnimationController
- UIViewController
- interactionControllerForPresentation
- interactionControllerForDismissal
這裡獨一須要留意的是,假如沒有自界說轉場動畫,這些辦法就不會起感化。例如,你必需從animationControllerForOperation獲得一個有用的動畫掌握器,UINavigationController才會挪用interactionController-
ForAnimationController——即便你在轉場交互中沒有應用動畫掌握器。
其次,交互掌握器異常靈巧,有很強的可擴大性。固然在示例運用法式中我應用手勢檢測來掌握交互,然則你也能夠用手勢之外的其他方法來完成。你可以設計隨意率性你想要的後果用以轉場交互。
交互掌握器:最簡略的完成方法有兩種方法可以創立交互掌握器。第一個也是最簡略的一個,就是應用UIPercentDrivenInteractiveTransition。
 @interface UIPercentDrivenInteractiveTransition : NSObject

@property (readonly) CGFloat duration;
@property (readonly) CGFloat percentComplete;
@property (nonatomic,assign) CGFloat completionSpeed;
@property (nonatomic,assign) UIViewAnimationCurve
completionCurve;
- (void)updateInteractiveTransition:(CGFloat)percentComplete;
- (void)cancelInteractiveTransition;
- (void)finishInteractiveTransition;
這個類詳細完成了UIViewControllerInteractiveTransitioning協定,我們可使用它輕松為動畫掌握器添加自界說的交互方法。只需為目的視圖參加手勢(或許其他交互方法)並挪用updateInteractiveTransition:,傳入動畫時光占全部進程的百分比便可。同時, 記住在交互完成後挪用finishInteractiveTransition: , 交互被撤消時挪用cancel-InteractiveTransition:。上面的例子展現了若何將捏合手勢運用到轉場動畫中:
-(void)handlePinch:(UIPinchGestureRecognizer *)pinch {
CGFloat scale = pinch.scale;
switch (pinch.state) {
case UIGestureRecognizerStateBegan: {
_startScale = scale;
self.interactive = YES;
[self.navigationController
popViewControllerAnimated:YES];
break;
}
case UIGestureRecognizerStateChanged: {
CGFloat percent = (1.0 - scale/_startScale);
[self updateInteractiveTransition:(percent < 0.0) ?
0.0 : percent];
break;
}
case UIGestureRecognizerStateEnded: {
CGFloat percent = (1.0 - scale/_startScale);
BOOL cancelled = ([pinch velocity] < 5.0 && percent
<= 0.3);
if (cancelled) [self cancelInteractiveTransition];
else [self finishInteractiveTransition];
break;
}
case UIGestureRecognizerStateCancelled: {
CGFloat percent = (1.0 - scale/_startScale);
BOOL cancelled = ([pinch velocity] < 5.0 && percent
<= 0.3);
if (cancelled) [self cancelInteractiveTransition];
else [self finishInteractiveTransition];
break;
}
}
}
當你繼續了UIPercentDrivenInteractiveTransition類,交互進程中體系會主動挪用動畫掌握器的animateTransition:辦法,依照你傳遞的percentComplete參數及時地展示動畫後果。在交互完成後,它還主動挪用animateTransition:辦法恢復到正常狀況,一旦交互完成,我們便可以轉變completionSpeed和completionCurve屬性來修正其他的一些款式。
交互掌握器:經由過程自界說的方法
假如你須要深刻掌握UIPercentDrivenInteractiveTransition處置轉場動畫的細節,那末就不消去繼續該類,而是應用UIViewController-InteractiveTransitioning協定。此協定與UIViewController-AnimatedTransitioning相似,我們可以經由過程該協定掌握一切關於轉場動畫的細節。在該協定中我們須要完成以下步調:
1. 完成startInteractiveTransition:辦法,用於初始化專場動畫。
2. 獲得transitionContext 對象的援用(假如繼續了UIPercentDrivenInteractiveTransition,可以看到它主動幫我們完成了這一步調,是以這裡我們必需手動獲得該對象)。
3. 和之前一樣,在恰當的情形下挪用updateInteractiveTransition:,cancelInteractiveTransition和finishInteractiveTransition(關於導航掌握器來講,完成辦法中還須要顯示或隱蔽導航欄)。
4. 完成後依然請記住挪用transitionCompleted:。
上面是我經由過程自界說的交互掌握器來完成與之前雷同的動畫,依然是應用捏合手勢掌握轉場動畫。
 -(void)startInteractiveTransition:
(id)transitionContext {
//獲得transitionContext對象的援用
_context = transitionContext;
//獲得容器視圖援用
UIView *containerView = [transitionContext
containerView];
UIViewController *fromViewController = [transitionContext
viewControllerForKey:UITransitionContextFromViewControllerKey
];
UIViewController *toViewController = [transitionContext
viewControllerForKey:UITransitionContextToViewControllerKey];
//拔出“to”視圖
toViewController.view.frame = [transitionContext
finalFrameForViewController:toViewController];
[containerView insertSubview:toViewController.view
belowSubview:fromViewController.view];
//保存須要縮?小的視圖的援用
_transitioningView = fromViewController.view;
}
-(void)updateWithPercent:(CGFloat)percent {
CGFloat scale = fabsf(percent-1.0);
_transitioningView.transform =
CGAffineTransformMakeScale(scale, scale);
[_context updateInteractiveTransition:percent];
}
-(void)end:(BOOL)cancelled {
if (cancelled) {
[UIView animateWithDuration:_completionSpeed
animations:^{
_transitioningView.transform =
CGAffineTransformMakeScale(1.0, 1.0);
} completion:^(BOOL finished) {
[_context cancelInteractiveTransition];
[_context completeTransition:NO];
}];
} else {
[UIView animateWithDuration:_completionSpeed
animations:^{
_transitioningView.transform =
CGAffineTransformMakeScale(0.0, 0.0);
} completion:^(BOOL finished) {
[_context finishInteractiveTransition];
[_context completeTransition:YES];
}];
}
}
你可讓動畫掌握器同時完成UIViewControllerInteractive-Transitioning和 UIViewControllerAnimatedTransitioning(像示例法式中那樣),從而把一切代碼都放在一個類中。你也能夠將交互掌握器和動畫掌握器分紅兩個類——協定這一語法特征的妙處在於,你可以輕松完成相符需求的最好處理計劃。
更多小技能
在block當選擇能否停止動畫
開辟者也許會碰到如許一種情形:在一串精巧的動畫後果中,我們須要讓某些視圖不停止動畫,從而營建一種動態適宜的後果。在動畫block辦法推出之前,我們可以在[UIView beginAnimations]和[UIView commitAnimations]之間應用setAnimationsEnabled辦法來設置哪些動畫不須要履行。而在iOS7SDK中,蘋果公司為開辟者供給了新辦法,只需把不須要履行的動畫寫在block中便可:
 [UIView performWithoutAnimation:^{
//確保不履行動畫
}];
你可以隨時履行這段代碼來掌握不須要履行的動畫。
聚集視圖的導航轉場動畫
你能夠對UICollectionView的setLayout:animated:辦法異常熟習了。在iOS7中,當導航掌握器推入推出聚集視圖掌握器時,假如開啟了 useLayout-ToLayoutNavigationTransitions屬性,體系將主動挪用setLayout:animated:辦法。是以,在你推入聚集視圖掌握器時,只須要設置該屬性,導航掌握器便可以主動履行動畫,和你手動對聚集視圖挪用setLayout:animated辦法的後果一樣。
 CollectionViewController *VC = [[CollectionViewController
alloc] initWithCollectionViewLayout:flowLayout];
VC.title = @"Mini Apples";
VC.useLayoutToLayoutNavigationTransitions = YES;
[self.navigationController pushViewController:VC
animated:YES];
轉場動畫調劑器
還有一個異常有效的API, 它可以贊助視圖掌握器治理轉場動畫:UIViewControllerTransitionCoordinator協定。在iOS7中,每個視圖掌握器(固然也包含UINavigationController和UITabBarController)都有一個transitionCoordinator屬性,該屬性供給了一系列用於轉場動畫的壯大對象,起首我們來看看animateAlongsideTransition:辦法。
 [self.transitionCoordinator
animateAlongsideTransition:^(id
rdinatorContext> context) {
//要履行的動畫
}
completion:^(id
context) {
//動畫停止後履行的代碼塊
}];
我們可以經由過程這個辦法在停止轉場動畫時並行履行一些其他動畫,context參數和之條件到的相符UIViewControllerContextTransitioning協定的transitionContext參數相相似,從該參數中我們可以獲得有關轉場進程的一些主要信息,包含container view和轉場後果。蘋果公司乃至許可開辟者不傳入context參數,只傳入完成後履行的block。所以請年夜膽測驗考試應用它吧。
關於交互轉場來講, 視圖在轉場進程中狀況能夠產生轉變, 因而notifyWhenInteractionEndsUsingBlock:辦法特殊有效——它可以用來治理視圖狀況。在交互轉場中,viewWillAppear:辦法也許會在某個視圖掌握器推入時被挪用,然則依照常理隨後應當會被挪用的viewDidAppear:則紛歧定,由於用戶隨時能夠撤消該交互(例如在之前的例子中,捏到一半又恢回復復興狀)。
由此,假如我們不願望在這類情形下修正視圖狀況,我們可使用該辦法,恢復對視圖的更改(應用UIViewControllerTransitionCoordinatorContext的isCancelled屬性)。
 [self.transitionCoordinator
notifyWhenInteractionEndsUsingBlock:^(id
sitionCoordinatorContext> context) {
//動畫停止後執?行的代碼塊
}];
屏幕快照
在iOS7 之前, 獲得一個UIView的快照有以下步調: 起首創立一個UIGraphics的圖象高低文,然後將視圖的layer襯著到該高低文中,從而獲得一個圖象,最初封閉圖象高低文,並將圖象顯示在UIImageView中。如今我們只須要一行代碼便可以完成上述步調了:
[view snapshotViewAfterScreenUpdates:NO];
這個辦法制造了一個UIView的正本,假如我們願望視圖在履行動畫之前保留如今的外不雅,以備以後應用(動畫中視圖能夠會被子視圖隱瞞或許產生其他一些變更),該辦法就特殊便利。
afterUpdates參數表現能否在一切後果運用在視圖上了今後再獲得快照。例如,假如該參數為NO,則立馬獲得該視圖如今狀況的快照,反之,以下代碼只能獲得一個空白快照:
[view snapshotViewAfterScreenUpdates:YES];
[view setAlpha:0.0];
因為我們設置afterUpdates參數為YES,而視圖的通明度值被設置成了0,所以辦法將在該設置運用在視圖上了以後才停止快照,因而乎屏幕一無所有。別的就是……你可以對快照再停止快照……持續快照……
蘋果公司在iOS7中為開辟者添加了新的用於創立和自界說動畫的API。iOS7 SDK不只引入了壯大的動畫block和很多易於應用的辦法,並且完全轉變了為視圖自界說動畫的方法。
以上就是本文的全體內容,願望對年夜家的進修有所贊助。
【深刻進修iOS7自界說導航轉場動畫】的相關資料介紹到這裡,希望對您有所幫助! 提示:不會對讀者因本文所帶來的任何損失負責。如果您支持就請把本站添加至收藏夾哦!

- 進修iOS全局賽馬燈
- 進修iOS自界說導航掌握器UINavigationController
- 深刻懂得iOS的狀況欄
- Objective-C的入門進修筆記
- IOS UI進修教程之辨別NSBundle和NSURL(讀取文件、寫入文件)
- IOS UI進修教程之設置UITextField各類屬性
- IOS UI進修教程之應用UIImageView控件制造動畫
- 深刻剖析iOS運用中關於圖片緩存的治理和應用
- IOS UI進修教程之應用代碼創立button
- 深刻解析設計形式中的裝潢器形式在iOS運用開辟中的完成
- 深刻解析iOS運用開辟中對設計形式中的橋接形式的應用
- 深刻解析iOS運用開辟中九宮格視圖結構的相干盤算辦法
- 深刻講授iOS開辟中運用數據的存儲方法
- 深刻淺析IOS中UIControl
- 深刻懂得iOS開辟中UIWindow的相干應用