iOS仿微博客戶端一條微博的展示效果
前言
做一個微博客戶端的第三方是自學的第一個實踐的項目,自從從事IOS工作之後,就把這個項目給擱置了。趁現在過年回來有些空閒時間,再次修改(總覺得項目就是不停地修改)。並且記錄一點東西,以後可再回頭看看從前走過的路,挖過的坑。這是一條微博的展示,不是整個項目。
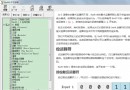
廢話不多說,先上效果圖:

拆分控件
在開始動手寫代碼之前,我們得先確定怎麼去實現這樣子的布局,也就是分析需要用到哪些控件。
觀察微博客戶端,整體是可滑動的,而且界面展示比較規律的,所以應該是使用UITableView實現的。那麼一條微博應該是用UITableViewCell 來實現的,這個由點擊時,整條微博都變色可以肯定。
一條微博與其他的微博之間是有大約10PX的間距,可以認為每個Section就只有一個Cell。
每條微博的共同部分包括:頭像,用戶名稱,發布時間與發布來源,微博正文,底部的轉發,評論,贊。不同的部分有:配圖,非原創微博的正文。(視頻,文章等在這個項目中不做考慮)所以共同部分可以直接在xib上固定,不同部分則需要在.m文件用代碼來寫。
控件的確定:頭像和配圖使用UIImageView,用戶名稱,發布時間與來源,微博正文,非原創微博的正文都是使用UILabel,而底部的轉發,評論,贊使用UIButton。
當一條微博是非原創微博(轉發微博),根據點擊被轉發的微博的變色情況,可以確定轉發微博是一個整體,可以確定轉發微博是放在一個UIView上再添加到Cell上面的。
布局
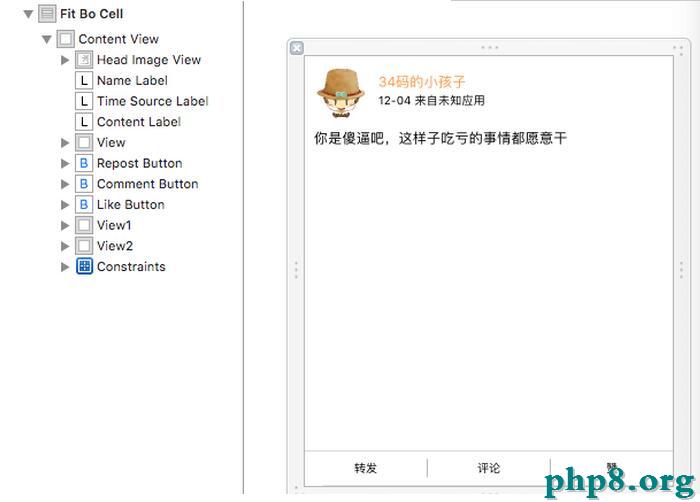
放上一張xib的布局圖:(button是與底部進行約束的)
共同的部分,先設置一些參數。
- (void)awakeFromNib {
[super awakeFromNib];
_contentLabel.numberOfLines = 0;//正文多行

//圓形頭像
_headImageView.layer.masksToBounds = YES;
_headImageView.layer.cornerRadius = HeadImageHeight / 2;

//設置tag,為了後面識別點擊哪個按鈕
_repostButton.tag = RepostButtonTag;
_commentButton.tag = CommentButtonTag;
_likeButton.tag = LikeButtonTag;
}
先說配圖,微博的配圖最多9張。首先先根據配圖的張數和屏幕的寬度確定圖片的大小imageWidth,然後再確定行數和列數。
1、只有一張配圖時,imageWidth = 屏幕寬度 * 0.55;
2、配圖超過一張時,imageWidth = (屏幕寬度 - 間隙) / 3;
3、配圖是2張或者4張時,分為兩列布局,而配圖3張或者大於4張時,則分為三列布局。
LeadingSpace 是圖片與兩側屏幕的間隙,為8PX, ImageSpace是圖片之間的間隙為4PX。UI_SCREEN_WIDTH是屏幕寬度。
 //根據圖片數量獲得列數
 if (_imageArray.count == 1) {
 //一列
 column = 1;
 imageWidth = UI_SCREEN_WIDTH * 0.55;
 }
 else if (_imageArray.count == 2 || _imageArray.count == 4) {
 //兩列
 column = 2;
 imageWidth = (UI_SCREEN_WIDTH - (LeadingSpace + ImageSpace) * 2) / 3;
 }
 else {
 //三列
 column = 3;
 imageWidth = (UI_SCREEN_WIDTH - (LeadingSpace + ImageSpace) * 2) / 3;
 }

 //根據圖片的數量和列數獲得行數
 if (_imageArray.count % column == 0) {
 row = _imageArray.count / column;
 }
 else {
 row = _imageArray.count / column + 1;
 }
確定了配圖的大小,再根據位置,就可以創建UIImageView。 配圖的位置則在正文起始位置 + 正文的高度 + 間隙,而獲取正文的高度由以下方法來完成:
 * 計算label的高度
 *
 * @param text 文字
 * @param width label寬度
 * @param font 字體
 *
 * @return label高度
+ (CGFloat)getLabelHeightWithText:(NSString *)text width:(CGFloat)width font:(UIFont *)font {
CGSize size = CGSizeMake(width, MAXFLOAT);//設置一個行高的上限
CGSize returnSize;

NSDictionary *attribute = @{ NSFontAttributeName : font };
returnSize = [text boundingRectWithSize:size
                options:NSStringDraWingUsesLineFragmentOrigin | NSStringDraWingUsesFontLeading
               attributes:attribute
                context:nil].size;

return returnSize.height;
}
對於原創微博正文的起始位置可以由xib看出來,頭像的高度固定為48,而上下的間隙為8, 則起始位置Y坐標為 48 + 16 = 64;而對於非原創微博,正文的起始位置Y坐標為8 (此處的8是相對於配圖的父容器UIView的位置,對於非原創微博而言,更重要的是計算出父容器UIView在Cell中的位置);
然後根據配圖的位置和大小創建UIImageView,如下圖,其中originY為第一張配圖的起始位置的Y坐標。
//根據位置創建imageView
for (int i = 0; i < row; i++) {
  for (int j = 0; j < column; j++) {
    //用來判斷數據是否越界
    if (i * column + j < _imageArray.count) {
      imageUrl = _imageArray[i * column + j];

      if (imageUrl) {
        TapImageView *imageView = [[TapImageView alloc] initWithFrame:CGRectMake(LeadingSpace + j * (ImageSpace + imageWidth), originY + LeadingSpace + i * (ImageSpace + imageWidth), imageWidth, imageWidth)];
        imageView.tag = ImageViewTag + i * column + j;

        //block通知,點擊了圖片,展示大圖
        __weak typeof(self) weakSelf = self;
        imageView.didTouchImage = ^(NSInteger index) {
          [weakSelf showFullScreenImage:index];
        };

        [imageView setImageUrl:imageUrl index:i * column + j];

        //原創微博直接添加的cell中,非原創則加入一個容器中UIView,再將容器加入cell中
        if (isForward) {
          [_forwardedContainerView addSubview:imageView];
        }
        else {
          [self addSubview:imageView];
        }
      }
    }
    else {
      //越界後跳出for循環
      break;
    }
  }
}
TapImageView是UIImageView的子類,主要是添加了手勢,實現點擊圖片展開大圖的效果,後面再做詳細介紹。
非原創微博有兩個正文,分別用“上文”和“下文”來區分吧。上文已經在xib中,而下文和配圖是放在_forwardedContainerView(UIView)中,然後再添加到Cell中的,所以要計算它的起始位置Y坐標。上文的Y坐標已經確定為64了,而_forwardedContainerView與上文之間的間隙為8,所以下文的Y坐標 = 64 + 上文的高度 + 8。其中ContentLabelOriginY = 64
CGFloat contentHeight = [FitBoUI getLabelHeightWithText:_weibo.text width:UI_SCREEN_WIDTH - LeadingSpace * 2 font:FontSize12];
CGFloat originY = ContentLabelOriginY + contentHeight;
originY += LeadingSpace;
_forwardedContainerView = [[UIView alloc] initWithFrame:CGRectMake(0, originY, UI_SCREEN_WIDTH, 40)];
_forwardedContainerView.tag = ForwardedContainerViewTag;
_forwardedContainerView.backgroundColor = [UIColor colorWithWhite:0.75 alpha:0.35];

//添加單擊手勢,點擊原創微博,進入該微博的詳情頁面
[self forwardedContainerViewAddGesture];
[self addSubview:_forwardedContainerView];
_forwardedContainerView的高度是隨便給的,需要在計算實際高度之後再重新賦值。
//下文是用戶名稱和文字拼湊而來。
NSString *forwardText = [NSString stringWithFormat:@"@%@:%@", forwardWeibo.user.name, forwardWeibo.text];
CGFloat forwardContentHeight = [FitBoUI getLabelHeightWithText:forwardText width:UI_SCREEN_WIDTH - LeadingSpace * 2 font:FontSize12];
UILabel *forwardedContentLabel = [[UILabel alloc] initWithFrame:CGRectMake(LeadingSpace, LeadingSpace, UI_SCREEN_WIDTH - LeadingSpace * 2, forwardContentHeight)];
forwardedContentLabel.font = FontSize12;
forwardedContentLabel.numberOfLines = 0;
forwardedContentLabel.text = forwardText;

[_forwardedContainerView addSubview:forwardedContentLabel];

//創建imageview,並根據修改實際高度,pic_urls是圖片的網址數組。得到的imageHeight為所有圖片以及圖片之間的間隙總和。
CGFloat imageHeight = [self initImageView:forwardWeibo.pic_urls originY:forwardContentHeight + LeadingSpace isForward:YES];
//此處無論有沒有配圖,都預留了配圖上下兩個間隙的高度。所以,如果沒有配圖,上面返回的imageHeight = - LeadingSpace才合適。
_forwardedContainerView.frame = CGRectMake(0, originY, UI_SCREEN_WIDTH, forwardContentHeight + imageHeight + LeadingSpace * 3);
TapImageView是UIImageView的子類,主要是添加了手勢,實現點擊圖片展開大圖的效果
TapImageView.h文件:
#import <UIKit/UIKit.h>
@interface TapImageView : UIImageView
@property (copy, nonatomic) void (^didTouchImage)(NSInteger index);

- (instancetype)initWithFrame:(CGRect)frame;

/**
 設置圖片地址

 @param url  圖片地址
 @param index 圖片下標
 */
- (void)setImageUrl:(NSString *)url index:(NSInteger)index;
@end
TapImageView.m文件
#import "TapImageView.h"
#import "UIImageView+WebCache.h"

@interface TapImageView ()
@property (assign, nonatomic) NSInteger index;
@end

@implementation TapImageView

- (instancetype)initWithFrame:(CGRect)frame {
self = [super initWithFrame:frame];

if (self) {
  [self initView];
}

return self;
}

- (void)initView {
//添加單擊手勢
UITapGestureRecognizer *gesture = [[UITapGestureRecognizer alloc] initWithtarget:self action:@selector(imageViewTapAction:)];
gesture.numberOfTapsRequired = 1;
self.userInteractionEnabled = YES;

[self addGestureRecognizer:gesture];
}

//發送點擊圖片的通知,並傳回下標
- (void)imageViewTapAction:(UITapGestureRecognizer *)gesture {
if (_didTouchImage) {
  _didTouchImage(_index);
}
}

/**
 設置圖片地址

 @param url  圖片地址
 @param index 圖片下標
 */
- (void)setImageUrl:(NSString *)url index:(NSInteger)index {
if (url) {
  [self sd_setImageWithURL:[NSURL URLWithString:url]];
}

_index = index;
}
在Cell中,會根據傳回的點擊圖片下標展示相應圖片的大圖。
注意:
因為下文和配圖等是運行時動態添加上去的,而cell是復用的,則每次使用cell的時候,需要將它們先移除。如果沒有移除,則復用cell的時候就會發生cell位置錯亂的情況。
- (void)removeView {
//移除轉發微博
for (UIView *view in self.subviews) {
if (view.tag == ForwardedContainerViewTag) {
[view removeFromSuperview];

break;
}
}

//移除圖片
for (UIView *view in self.subviews) {
if ([view isKindOfClass:[TapImageView class]]) {
[view removeFromSuperview];
}
}
}
在控制器中的實現
在控制器的xib中只有一個UITableView,可以直接在xib中指定UITableView的dataSource 和delegate,也可以在.m文件中再指定。
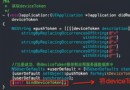
//注冊cell,WeiboCellIdentifier是cell復用時用到的
UINib *weiboNib = [UINib nibWithNibName:@"FitBoCell" bundle:nil];
[_mainTableView registerNib:weiboNib forCellReuseIdentifier:WeiboCellIdentifier];

//移除分割線
_mainTableView.separatorStyle = UITableViewCellSeparatorStyleNone;
_mainTableView.delegate = self;
_mainTableView.dataSource = self;
接著實現UITableViewDataSource, UITableViewDelegate裡面的方法。
//返回section的個數
 - (NSInteger)numberOfSectionsInTableView:(UITableView *)tableView {
return _weiboArray.count;
}

//返回每個section裡面的行數
- (NSInteger)tableView:(UITableView *)tableView numberOfRowsInSection:(NSInteger)section {
return 1;
}
//返回每個section底部的高度,默認為20PX, 就是如果不實現該方法或者return 0,實際都是返回20PX
- (CGFloat)tableView:(UITableView *)tableView heightForFooterInSection:(NSInteger)section {
return 0.001;
}
//返回每個section頭部的高度,默認為20PX, 就是如果不實現該方法或者return 0,實際都是返回20PX
- (CGFloat)tableView:(UITableView *)tableView heightForHeaderInSection:(NSInteger)section {
return 10;
}
//返回每一行的高度
- (CGFloat)tableView:(UITableView *)tableView heightForRowAtIndexPath:(NSIndexPath *)indexPath {
NSInteger section = indexPath.section;
WeiboModel *weibo = _weiboArray[section];

return [FitBoCell getCellHeight:weibo];
}

//在這個方法裡面設置cell的內容
- (UITableViewCell *)tableView:(UITableView *)tableView cellForRowAtIndexPath:(NSIndexPath *)indexPath {
NSInteger section = indexPath.section;
//這個辦法是模型轉化,利用MJExtension框架
 WeiboModel *weibo = [WeiboModel mj_objectWithKeyValues:_weiboArray[section]];
FitBoCell *cell = [tableView dequeueReusableCellWithIdentifier:WeiboCellIdentifier];

if (cell == nil) {
  cell = [[FitBoCell alloc] initWithStyle:UITableViewCellStyleDefault reuseIdentifier:WeiboCellIdentifier];
}

//這裡是點擊非原創微博裡面的原創微博的回調,也就是_forwardedContainerView的點擊回調
__weak typeof(self) weakSelf = self;
cell.didTouchForwardedWeibo = ^(WeiboModel *weibo) {
  //跳轉到微博的詳情頁面
  [weakSelf forwardedWeiboTouch:weibo];
};

[cell setWeiboInfo:weibo];

return cell;
}

//cell的點擊響應事件,跳轉到微博的詳情頁面
- (void)tableView:(UITableView *)tableView didSelectRowAtIndexPath:(NSIndexPath *)indexPath {
[tableView deselectRowAtIndexPath:indexPath animated:YES];

NSInteger section = indexPath.section;
WeiboModel *weibo = [WeiboModel mj_objectWithKeyValues:_weiboArray[section]];

CommentOrRepostListViewController *listVC = [CommentOrRepostListViewController new];
[listVC setWeibo:weibo offset:NO];

[self.navigationController pushViewController:listVC animated:YES];
}
其中,因為cell的高度是根據實際情況不定的,所以使用了類方法來獲取。[FitBoCell getCellHeight:weibo]
/**
 * 獲取cell的高度
 *
 * @param weibo weibo
 *
 * @return height
 */
+ (CGFloat)getCellHeight:(WeiboModel *)weibo {
CGFloat contentHeight = [FitBoUI getLabelHeightWithText:weibo.text width:UI_SCREEN_WIDTH - LeadingSpace * 2 font:FontSize12];
CGFloat originY = ContentLabelOriginY + contentHeight + LeadingSpace;

if (weibo.retweeted_status == nil) {
  //原創微博
  CGFloat imageHeight = [self getImageHeight:weibo.pic_urls.count];
  return originY + imageHeight + LeadingSpace + ButtonHeight;
}
else {
  //非原創微博
  WeiboModel *forwardWeibo = weibo.retweeted_status;
  NSString *forwardText = [NSString stringWithFormat:@"@%@:%@", forwardWeibo.user.name, forwardWeibo.text];
  CGFloat imageHeight = [self getImageHeight:forwardWeibo.pic_urls.count];
  CGFloat forwardContentHeight = [FitBoUI getLabelHeightWithText:forwardText width:UI_SCREEN_WIDTH - LeadingSpace * 2 font:FontSize12];

  return originY + LeadingSpace + forwardContentHeight + imageHeight + LeadingSpace * 2 + ButtonHeight;
}
}

//獲取圖片的整體高度
+ (CGFloat)getImageHeight:(NSInteger)count {
if (count < 1) {
  //上面計算高度的時候預留了配圖上下兩個間隙的高度。所以,如果沒有配圖,返回 - LeadingSpace才合適。
  return - LeadingSpace;
}
else if (count == 1) {
  return UI_SCREEN_WIDTH * 0.55;
}
else if (count / 3 < 1 || count == 3) {
  //一行
  return (UI_SCREEN_WIDTH - (LeadingSpace + ImageSpace) * 2) / 3;
}
else if (count > 3 && count <= 6) {
  //兩行
  return (UI_SCREEN_WIDTH - (LeadingSpace + ImageSpace) * 2) / 3 * 2 + ImageSpace;
}
else {
  //三行
  return (UI_SCREEN_WIDTH - (LeadingSpace + ImageSpace) * 2) + ImageSpace * 2;
}
}
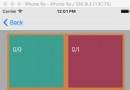
其他的點擊事件的響應方法等,就不累贅了。最後再放一張非原創微博的效果圖:

以上就是本文的全部內容,希望對大家的學習有所幫助,也希望大家多多支持本站。
[db:作者簡介][db:原文翻譯及解析]【iOS仿微博客戶端一條微博的展示效果】的相關資料介紹到這裡,希望對您有所幫助! 提示:不會對讀者因本文所帶來的任何損失負責。如果您支持就請把本站添加至收藏夾哦!