帶你了解UIKit動力學
本文為您介紹帶你了解UIKit動力學的說明,具體操作請看面的內容
一、簡單介紹1.什麼是UIDynamic UIDynamic是從IOS 7開始引入的一種新技術,隸屬於UIKit框架可以認為是一種物理引擎,能模擬和仿真現實生活中的物理現象如:重力、彈性碰撞等現象
2.物理引擎的價值 廣泛用於游戲開發,經典成功案例是“憤怒的小鳥”,讓開發人員可以在遠離物理學公式的情況下,實現炫酷的物理仿真效果提高了游戲開發效率,產生更多優秀好玩的物理仿真游戲
3.知名的2D物理引擎 Box2d Chipmunk
二、使用步驟要想使用UIDynamic來實現物理仿真效果,大致的步驟如下:
1.創建一個物理仿真器(順便設置仿真范圍) 2.創建相應的物理仿真行為(順便添加物理仿真元素) 3.將物理仿真行為添加到物理仿真器中開始仿真
三、相關說明1.三個概念
誰要進行物理仿真? 物理仿真元素(Dynamic Item) 執行怎樣的物理仿真效果?怎樣的動畫效果? 物理仿真行為(Dynamic Behavior) 讓物理仿真元素執行具體的物理仿真行為 物理仿真器(Dynamic Animator)2.物理仿真元素 注意: 不是任何對象都能做物理仿真元素 不是任何對象都能進行物理仿真
物理仿真元素要素: 任何遵守了UIDynamicItem協議的對象 UIView默認已經遵守了UIDynamicItem協議,因此任何UI控件都能做物理仿真
UICollectionViewLayoutAttributes類默認也遵守UIDynamicItem協議
3.物理仿真行為
(1)UIDynamic提供了以下幾種物理仿真行為
UIGravityBehavior:重力行為
UICollisionBehavior:碰撞行為
UISnapBehavior:捕捉行為
UIPushBehavior:推動行為
UIAttachmentBehavior:附著行為
UIDynamicItemBehavior:動力元素行為
(2)物理仿真行為須知 上述所有物理仿真行為都繼承自UIDynamicBehavior,所有的UIDynamicBehavior都可以獨立進行組合使用多種行為時,可以實現一些比較復雜的效果
4.物理仿真器
(1)物理仿真器須知 它可以讓物理仿真元素執行物理仿真行為 它是UIDynamicAnimator類型的對象 (2)UIDynamicAnimator的初始化
- (instancetype)initWithReferenceView:(UIView *)view;view參數:是一個參照視圖,表示物理仿真的范圍
5.物理仿真器的說明
(1)UIDynamicAnimator的常見方法
//移除之前添加過的所有物理仿真行為
- (void)addBehavior:(UIDynamicBehavior *)behavior;
//移除之前添加過的所有物理仿真行為
- (void)removeBehavior:(UIDynamicBehavior *)behavior;
//添加1個物理仿真行為
- (void)removeAllBehaviors;
(2)UIDynamicAnimator的常見屬性
 //參照視圖
@property (nonatomic, readonly) UIView* referenceView;
//添加到物理仿真器中的所有物理仿真行為
@property (nonatomic, readonly, copy) NSArray* behaviors;
//是否正在進行物理仿真
@property (nonatomic, readonly, getter = isRunning) BOOL running;
//代理對象(能監聽物理仿真器的仿真過程,比如開始和結束)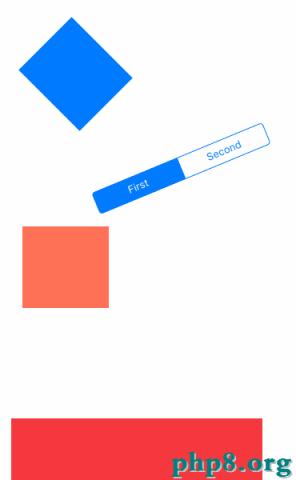
@property (nonatomic, assign) id 先看效果吧
UIGravityBehavior:重力行為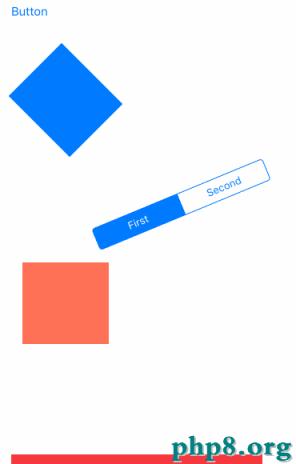
#import <UIKit/UIKit.h>
@interface SecondViewController : UIViewController
@property (weak, nonatomic) IBOutlet UIView *blueView;
@property (weak, nonatomic) IBOutlet UIView *orangeView;
@property (weak, nonatomic) IBOutlet UISegmentedControl *segmented;
@property (weak, nonatomic) IBOutlet UIView *redView;
@property (nonatomic,strong) UIDynamicAnimator *animator;
@end
#import "SecondViewController.h"
@interface SecondViewController ()
@property (nonatomic,strong)UISnapBehavior *snapBehavior;
@property (nonatomic,strong)UIPushBehavior *pushBehavior;
@property (nonatomic,strong)UIAttachmentBehavior *attachmentBehavior;
@end
@implementation SecondViewController
- (void)viewDidLoad {
[super viewDidLoad];
self.blueView.transform = CGAff.netransformMakeRotation(M_PI_4);
self.segmented.transform = CGAff.netransformMakeRotation(-M_PI / 8);
if (!_pushBehavior) {
_pushBehavior = [[UIPushBehavior alloc]initWithItems:@[_blueView] mode:UIPushBehaviorModeContinuous];
}
_pushBehavior.active = YES;
_pushBehavior.pushDirection = CGVectorMake(10.0f, 10.0f);
_pushBehavior.magnitude = 1.0f;
[self.animator addBehavior:_pushBehavior];
}
- (void)touchesBegan:(NSSet<UITouch *> *)touches withEvent: (UIEvent *)event {
_pushBehavior.active = NO;
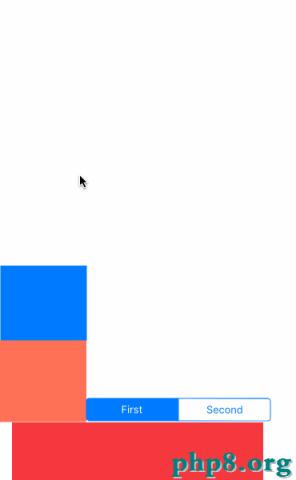
//創建重力行為
UIGravityBehavior *gravityBehavior = [[UIGravityBehavior alloc]init];
[gravityBehavior addItem:self.blueView];
[gravityBehavior addItem:self.orangeView];
[gravityBehavior addItem:self.segmented];
gravityBehavior.gravityDirection = CGVectorMake(-0.3f, 1.0f);
//加速度
gravityBehavior.magnitude = 3;
//創建碰撞行為
UICollisionBehavior *collisionBehavior = [[UICollisionBehavior alloc]init];
//碰撞類型為元素和邊界
collisionBehavior.collisionMode = UICollisionBehaviorModeEverything;
CGFloat Y = self.view.frame.size.height - CGRectGetHeight(self.redView.frame);
CGFloat X = self.view.frame.size.width;
CGFloat height = self.view.frame.size.height;
//設置紅色的View為底邊界,左邊框跟右邊框作為邊界
[collisionBehavior addBoundaryWithIdentifier:@"collision1" fromPoint:CGPointMake(0,Y) toPoint:CGPointMake(X, Y)];
[collisionBehavior addBoundaryWithIdentifier:@"collision2" fromPoint:CGPointMake(0, 0) toPoint:CGPointMake(0, height)];
[collisionBehavior addBoundaryWithIdentifier:@"collision3" fromPoint:CGPointMake(X,0) toPoint:CGPointMake(X, height)];
[collisionBehavior addItem:self.blueView];
[collisionBehavior addItem:self.segmented];
[collisionBehavior addItem:self.orangeView];
[self.animator addBehavior:collisionBehavior];
[self.animator addBehavior:gravityBehavior];
UIDynamicItemBehavior *itemBehavior = [[UIDynamicItemBehavior alloc] initWithItems:@[self.blueView]];
[itemBehavior setElasticity:0.5];
[self.animator addBehavior:itemBehavior];
UITapGestureRecognizer *tap = [[UITapGestureRecognizer alloc]initWithtarget:self action:@selector(tapGesture:)];
[self.view addGestureRecognizer:tap];
}
- (void)tapGesture:(UITapGestureRecognizer *)gesture
{
CGPoint tapPoint = [gesture locationInView:self.view];
if (_snapBehavior) {
[self.animator removeBehavior:_snapBehavior];
_snapBehavior = nil;
}
_snapBehavior = [[UISnapBehavior alloc]initWithItem:self.blueView snapToPoint:tapPoint];
_snapBehavior.action = ^(){
NSLog(@"UISnapBehavior 在執行");
};
_snapBehavior.damping = 0.9;
[self.animator addBehavior:_snapBehavior];
}
- (UIDynamicAnimator *)animator{
if (_animator == nil) {
_animator = [[UIDynamicAnimator alloc]init];
}
return _animator;
}
- (void)panGestureRecognizer:(UIPanGestureRecognizer *)gesture
{
CGPoint location = [gesture locationInView:self.view];
CGPoint imageLocation = [gesture locationInView:self.orangeView];
switch (gesture.state) {
case UIGestureRecognizerStateBegan:
{
NSLog(@"touch position %@",NSStringFromCGPoint(location));
NSLog(@"loction in image %@",NSStringFromCGPoint(imageLocation));
[self.animator removeAllBehaviors];
UIOffset centerOffset = UIOffsetMake(imageLocation.x - CGRectGetMidX(self.orangeView.bounds), imageLocation.y - CGRectGetMidY(self.orangeView.bounds));
_attachmentBehavior = [[UIAttachmentBehavior alloc]initWithItem:self.orangeView offsetFromCenter:centerOffset attachedToAnchor:location];
_attachmentBehavior.damping = 0.5;
_attachmentBehavior.frequency = 0.8;
[self.animator addBehavior:_attachmentBehavior];
}
break;
case UIGestureRecognizerStateEnded:
{
[self.animator removeBehavior:_attachmentBehavior];
}
break;
default:
{
[_attachmentBehavior setAnchorPoint:[gesture locationInView:self.view]];
}
break;
}
}
- (void)didReceiveMemoryWarning {
[super didReceiveMemoryWarning];
// Dispose of any resources that can be recreated.
}
/*
#pragma mark - Navigation
// In a storyboard-based application, you will often want to do a little preparation before navigation
- (void)prepareForSegue:(UIStoryboardSegue *)segue sender:(id)sender {
// Get the new view controller using [segue destinationViewController].
// Pass the selected object to the new view controller.
}
*/
@end
UIKit動力學的部分介紹完了. 最開始項目中只是用到了重力跟碰撞行為,參考學習了:UIDynamic 詳細用法 中的案例.然後自己又展開了解了下UIKit動力學的知識,把捕捉行為,推動行為加了進去,做個完善.整理了一下.就是這樣.
多多關注本站,我們將為您收集更多的Android開發相關文章.
[db:作者簡介][db:原文翻譯及解析]【帶你了解UIKit動力學】的相關資料介紹到這裡,希望對您有所幫助! 提示:不會對讀者因本文所帶來的任何損失負責。如果您支持就請把本站添加至收藏夾哦!
- 上一頁:CoreAnimation 開篇
- 下一頁:NSLog()輸出函數集格式字符