iOS中的應用啟動原理以及嵌套模型開發示例詳解
程序啟動原理和UIApplication
一、UIApplication
1.簡單介紹
(1)UIApplication對象是應用程序的象征,一個UIApplication對象就代表一個應用程序。
(2)每一個應用都有自己的UIApplication對象,而且是單例的,如果試圖在程序中新建一個UIApplication對象,那麼將報錯提示。
(3)通過[UIApplicationsharedApplication]可以獲得這個單例對象
(4) 一個iOS程序啟動後創建的第一個對象就是UIApplication對象,且只有一個(通過代碼獲取兩個UIApplication對象,打印地址可以看出地址是相同的)。
(5)利用UIApplication對象,能進行一些應用級別的操作
2.應用級別的操作示例:
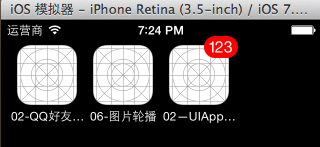
1)設置應用程序圖標右上角的紅色提醒數字(如QQ消息的時候,圖標上面會顯示1,2,3條新信息等。)
復制代碼 代碼如下:
@property(nonatomic) NSInteger applicationIconBadgeNumber;
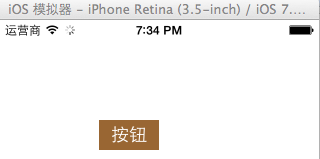
代碼實現和效果:
復制代碼 代碼如下:
- (void)viewDidLoad
{
[super viewDidLoad];
//創建並添加一個按鈕
UIButton *btn=[[UIButton alloc]initWithFrame:CGRectMake(100, 100, 60, 30)];
[btn setTitle:@"按鈕" forState:UIControlStateNormal];
[btn setBackgroundColor:[UIColor brownColor]];
[btn addTarget:self action:@selector(onClick) forControlEvents:UIControlEventTouchUpInside];
[self.view addSubview:btn];
}
-(void)onClick
{
NSLog(@"按鈕點擊事件");
//錯誤,只能有一個唯一的UIApplication對象,不能再進行創建
// UIApplication *app=[[UIApplication alloc]init];
//通過sharedApplication獲取該程序的UIApplication對象
UIApplication *app=[UIApplication sharedApplication];
app.applicationIconBadgeNumber=123;
}
2)設置聯網指示器的可見性
復制代碼 代碼如下:
@property(nonatomic,getter=isNetworkActivityIndicatorVisible) BOOL networkActivityIndicatorVisible;
代碼和效果:
復制代碼 代碼如下:
//設置指示器的聯網動畫
app.networkActivityIndicatorVisible=YES;
3)管理狀態欄
從iOS7開始,系統提供了2種管理狀態欄的方式
a.通過UIViewController管理(每一個UIViewController都可以擁有自己不同的狀態欄).
在iOS7中,默認情況下,狀態欄都是由UIViewController管理的,UIViewController實現下列方法就可以輕松管理狀態欄的可見性和樣式
狀態欄的樣式 復制代碼 代碼如下: - (UIStatusBarStyle)preferredStatusBarStyle;
狀態欄的可見性 復制代碼 代碼如下: -(BOOL)prefersStatusBarHidden;
復制代碼 代碼如下:
#pragma mark-設置狀態欄的樣式
-(UIStatusBarStyle)preferredStatusBarStyle
{
//設置為白色
//return UIStatusBarStyleLightContent;
//默認為黑色
return UIStatusBarStyleDefault;
}
#pragma mark-設置狀態欄是否隱藏(否)
-(BOOL)prefersStatusBarHidden
{
return NO;
}
b.通過UIApplication管理(一個應用程序的狀態欄都由它統一管理)
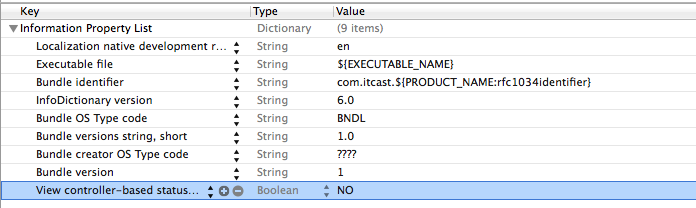
如果想利用UIApplication來管理狀態欄,首先得修改Info.plist的設置
代碼:
代碼:
復制代碼 代碼如下:
//通過sharedApplication獲取該程序的UIApplication對象
UIApplication *app=[UIApplication sharedApplication];
app.applicationIconBadgeNumber=123;
//設置指示器的聯網動畫
app.networkActivityIndicatorVisible=YES;
//設置狀態欄的樣式
//app.statusBarStyle=UIStatusBarStyleDefault;//默認(黑色)
//設置為白色+動畫效果
[app setStatusBarStyle:UIStatusBarStyleLightContent animated:YES];
//設置狀態欄是否隱藏
app.statusBarHidden=YES;
//設置狀態欄是否隱藏+動畫效果
[app setStatusBarHidden:YES withAnimation:UIStatusBarAnimationFade];
c.補充
既然兩種都可以對狀態欄進行管理,那麼什麼時候該用什麼呢?
如果狀態欄的樣式只設置一次,那就用UIApplication來進行管理;
如果狀態欄是否隱藏,樣式不一樣那就用控制器進行管理。
UIApplication來進行管理有額外的好處,可以提供動畫效果。
4)openURL:方法
UIApplication有個功能十分強大的openURL:方法
復制代碼 代碼如下:
- (BOOL)openURL:(NSURL*)url;
openURL:方法的部分功能有
打電話 復制代碼 代碼如下: UIApplication *app = [UIApplicationsharedApplication]; [app openURL:[NSURLURLWithString:@"tel://10086"]];
發短信 復制代碼 代碼如下: [app openURL:[NSURLURLWithString:@"sms://10086"]];
發郵件 復制代碼 代碼如下: [app openURL:[NSURLURLWithString:@"mailto://[email protected]"]];
打開一個網頁資源 復制代碼 代碼如下:[app openURL:[NSURLURLWithString:@"http://ios.itcast.cn"]];
打開其他app程序 openURL方法,可以打開其他APP。
URL補充:
URL:統一資源定位符,用來唯一的表示一個資源。
URL格式:協議頭://主機地址/資源路徑
網絡資源:http/ ftp等 表示百度上一張圖片的地址 http://www.baidu.com/images/20140603/abc.png
本地資源:file:///users/apple/desktop/abc.png(主機地址省略)
二、UIApplication Delegate
1.簡單說明
所有的移動操作系統都有個致命的缺點:app很容易受到打擾。比如一個來電或者鎖屏會導致app進入後台甚至被終止。
還有很多其它類似的情況會導致app受到干擾,在app受到干擾時,會產生一些系統事件,這時UIApplication會通知它的delegate對象,讓delegate代理來處理這些系統事件。
作用:當被打斷的時候,通知代理進入到後台。
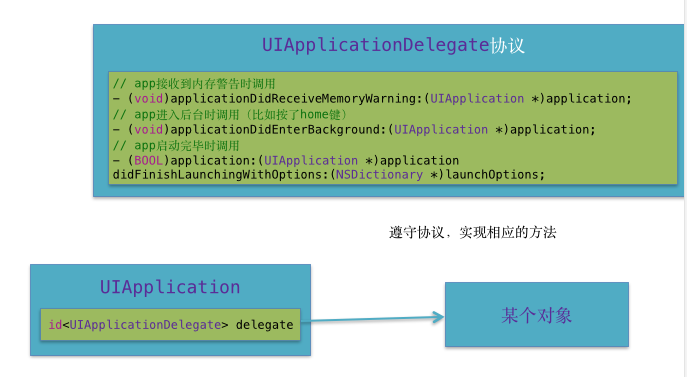
每次新建完項目,都有個帶有“AppDelegate”字眼的類,它就是UIApplication的代理,NJAppDelegate默認已經遵守了UIApplicationDelegate協議,已經是UIApplication的代理。
2.代理方法
復制代碼 代碼如下:
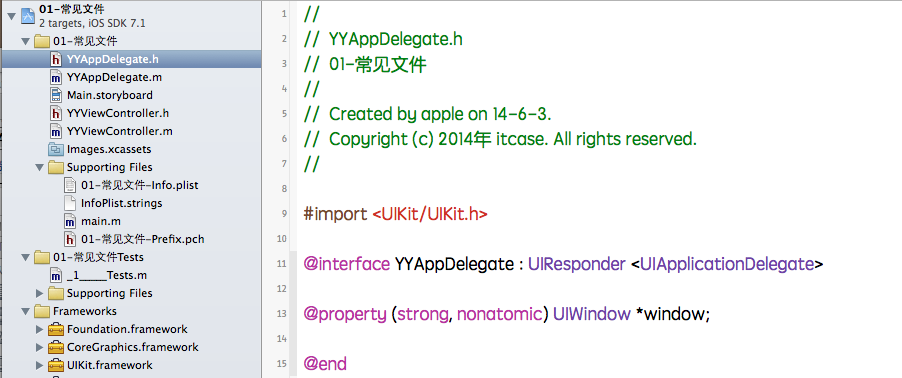
#import "YYAppDelegate.h"
@implementation YYAppDelegate
// 當應用程序啟動完畢的時候就會調用(系統自動調用)
- (BOOL)application:(UIApplication *)application didFinishLaunchingWithOptions:(NSDictionary *)launchOptions
{
NSLog(@"didFinishLaunchingWithOptions");
return YES;
}
// 即將失去活動狀態的時候調用(失去焦點, 不可交互)
- (void)applicationWillResignActive:(UIApplication *)application
{
NSLog(@"ResignActive");
}
// 重新獲取焦點(能夠和用戶交互)
- (void)applicationDidBecomeActive:(UIApplication *)application
{
NSLog(@"BecomeActive");
}
// 應用程序進入後台的時候調用
// 一般在該方法中保存應用程序的數據, 以及狀態
- (void)applicationDidEnterBackground:(UIApplication *)application
{
NSLog(@"Background");
}
// 應用程序即將進入前台的時候調用
// 一般在該方法中恢復應用程序的數據,以及狀態
- (void)applicationWillEnterForeground:(UIApplication *)application
{
NSLog(@"Foreground");
}
// 應用程序即將被銷毀的時候會調用該方法
// 注意:如果應用程序處於掛起狀態的時候無法調用該方法
- (void)applicationWillTerminate:(UIApplication *)application
{
}
// 應用程序接收到內存警告的時候就會調用
// 一般在該方法中釋放掉不需要的內存
- (void)applicationDidReceiveMemoryWarning:(UIApplication *)application
{
NSLog(@"MemoryWarning");
}
@end
應用程序一般有五個狀態:官方文檔app.states
三、程序啟動原理
UIApplicationMain
main函數中執行了一個UIApplicationMain這個函數
intUIApplicationMain(int argc, char *argv[], NSString *principalClassName, NSString *delegateClassName);
argc、argv:直接傳遞給UIApplicationMain進行相關處理即可
principalClassName:指定應用程序類名(app的象征),該類必須是UIApplication(或子類)。如果為nil,則用UIApplication類作為默認值
delegateClassName:指定應用程序的代理類,該類必須遵守UIApplicationDelegate協議
UIApplicationMain函數會根據principalClassName創建UIApplication對象,根據delegateClassName創建一個delegate對象,並將該delegate對象賦值給UIApplication對象中的delegate屬性
接著會建立應用程序的Main Runloop(事件循環),進行事件的處理(首先會在程序完畢後調用delegate對象的application:didFinishLaunchingWithOptions:方法)
程序正常退出時UIApplicationMain函數才返回
復制代碼 代碼如下:
#import <UIKit/UIKit.h>
#import "YYAppDelegate.h"
int main(int argc, char * argv[])
{
@autoreleasepool {
// return UIApplicationMain(argc, argv, nil, NSStringFromClass([YYAppDelegate class]));
// return UIApplicationMain(argc, argv, @"UIApplication", NSStringFromClass([YYAppDelegate class]));
/*
argc: 系統或者用戶傳入的參數個數
argv: 系統或者用戶傳入的實際參數
1.根據傳入的第三個參數創建UIApplication對象
2.根據傳入的第四個產生創建UIApplication對象的代理
3.設置剛剛創建出來的代理對象為UIApplication的代理
4.開啟一個事件循環
*/
return UIApplicationMain(argc, argv, @"UIApplication", @"YYAppDelegate");
}
}
系統入口的代碼和參數說明:
argc:系統或者用戶傳入的參數
argv:系統或用戶傳入的實際參數
1.根據傳入的第三個參數,創建UIApplication對象
2.根據傳入的第四個產生創建UIApplication對象的代理
3.設置剛剛創建出來的代理對象為UIApplication的代理
4.開啟一個事件循環(可以理解為裡面是一個死循環)這個時間循環是一個隊列(先進先出)先添加進去的先處理
ios程序啟動原理
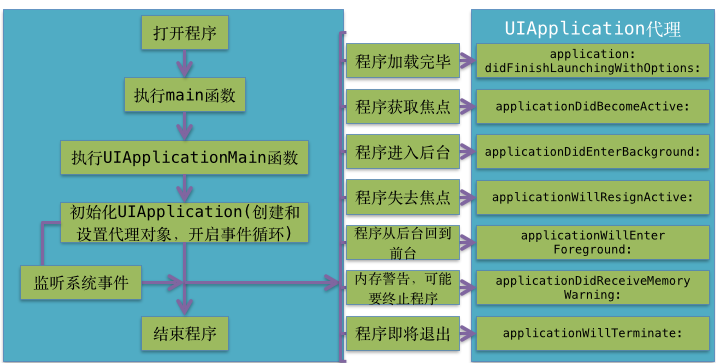
四、程序啟動的完整過程
1.main函數
2.UIApplicationMain
* 創建UIApplication對象
* 創建UIApplication的delegate對象
3.delegate對象開始處理(監聽)系統事件(沒有storyboard)
* 程序啟動完畢的時候, 就會調用代理的application:didFinishLaunchingWithOptions:方法
* 在application:didFinishLaunchingWithOptions:中創建UIWindow
* 創建和設置UIWindow的rootViewController
* 顯示窗口
3.根據Info.plist獲得最主要storyboard的文件名,加載最主要的storyboard(有storyboard)
* 創建UIWindow
* 創建和設置UIWindow的rootViewController
* 顯示窗口
使用嵌套模型完成的一個簡單汽車圖標展示程序
一、plist文件和項目結構圖
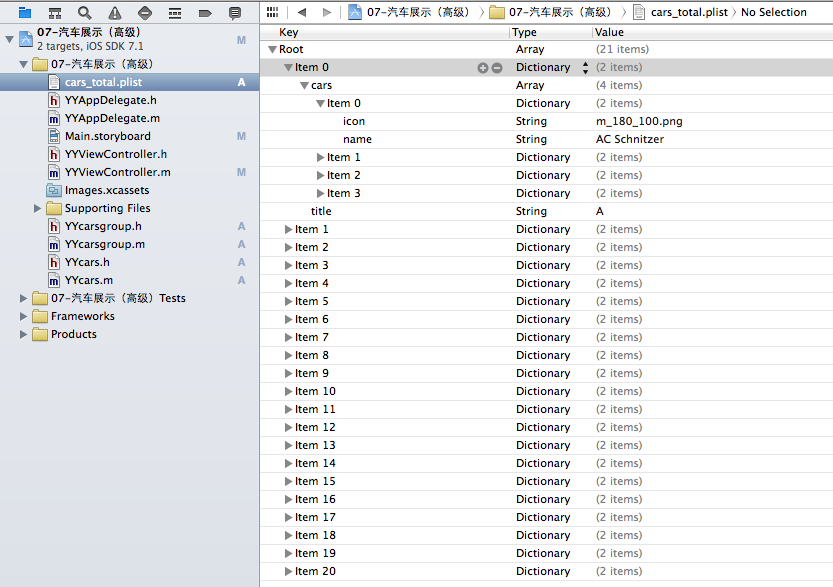
說明:這是一個嵌套模型的示例
二、代碼示例:
復制代碼 代碼如下:
YYcarsgroup.h文件代碼:
//
// YYcarsgroup.h
// 07-汽車展示(高級)
//
// Created by apple on 14-5-28.
// Copyright (c) 2014年 itcase. All rights reserved.
//
#import <Foundation/Foundation.h>
@interface YYcarsgroup : NSObject
@property(nonatomic,copy)NSString *title;
@property(nonatomic,strong)NSArray *cars;
-(instancetype)initWithDict:(NSDictionary *)dict;
+(instancetype)carsgroupWithDict:(NSDictionary *)dict;
@end
YYcarsgroup.m文件代碼:
復制代碼 代碼如下:
//
// YYcarsgroup.m
// 07-汽車展示(高級)
//
// Created by apple on 14-5-28.
// Copyright (c) 2014年 itcase. All rights reserved.
//
#import "YYcarsgroup.h"
#import "YYcars.h"
@implementation YYcarsgroup
-(instancetype)initWithDict:(NSDictionary *)dict
{
if (self=[super init]) {
//嵌套的字典轉模型
self.title=dict[@"title"];
//注意
NSArray *dictcars=dict[@"cars"];
//像下面這樣寫可以提高性能
NSMutableArray *arrayM=[NSMutableArray arrayWithCapacity:dictcars.count];
for (NSDictionary *dict in dictcars) {
YYcars *yycars=[[YYcars alloc]initWithDict:dict];
[arrayM addObject:yycars];
}
// 賦值存儲模型的數組給屬性
self.cars=arrayM;
}
return self;
}
+(instancetype)carsgroupWithDict:(NSDictionary *)dict
{
return [[self alloc]initWithDict:dict];
}
@end
YYcars.h文件
復制代碼 代碼如下:
//
// YYcars.h
// 07-汽車展示(高級)
//
// Created by apple on 14-5-28.
// Copyright (c) 2014年 itcase. All rights reserved.
//
#import <Foundation/Foundation.h>
@interface YYcars : NSObject
@property(nonatomic,copy)NSString *name;
@property(nonatomic,copy)NSString *icon;
-(instancetype)initWithDict:(NSDictionary *)dict;
+(instancetype)carsWithDict:(NSDictionary *)dict;
@end
YYcars.m文件
復制代碼 代碼如下:
//
// YYcars.m
// 07-汽車展示(高級)
//
// Created by apple on 14-5-28.
// Copyright (c) 2014年 itcase. All rights reserved.
//
#import "YYcars.h"
@implementation YYcars
-(instancetype)initWithDict:(NSDictionary *)dict
{
if (self=[super init]) {
self.name=dict[@"name"];
self.icon=dict[@"icon"];
}
return self;
}
+(instancetype)carsWithDict:(NSDictionary *)dict
{
return [[self alloc]initWithDict:dict];
}
@end
YYViewController.m文件
復制代碼 代碼如下:
//
// YYViewController.m
// 07-汽車展示(高級)
//
// Created by apple on 14-5-28.
// Copyright (c) 2014年 itcase. All rights reserved.
//
#import "YYViewController.h"
#import "YYcarsgroup.h"
#import "YYcars.h"
@interface YYViewController ()<UITableViewDataSource>
@property (strong, nonatomic) IBOutlet UITableView *tableview;
@property(nonatomic,strong) NSArray *car;
@end
復制代碼 代碼如下:
@implementation YYViewController
- (void)viewDidLoad
{
[super viewDidLoad];
self.tableview.rowHeight=60.f;
self.tableview.dataSource=self;
NSLog(@"%d",self.car.count);
}
#pragma mark- 實現懶加載
//1.從包中讀取數據
//2.字典轉模型
//3.返回cars
-(NSArray *)car
{
if (_car==nil) {
NSString *fullpath= [[NSBundle mainBundle]pathForResource:@"cars_total.plist" ofType:nil];
NSArray *arrayM=[NSArray arrayWithContentsOfFile:fullpath];
NSMutableArray *carsarray=[NSMutableArray array];
for (NSDictionary *dict in arrayM) {
YYcarsgroup *carsgroup=[YYcarsgroup carsgroupWithDict:dict];
[carsarray addObject:carsgroup];
}
_car=[carsarray copy];
}
return _car;
}
#pragma mark- 實現tableview的數據展示
//1.設置數據源,遵守協議
//2.返回組
//3.返回行
//4.每組每行對應的數據
//4.1去緩存中去取cell
//4.2若沒有,則創建cell,並蓋章
//4.3設置cell的數據
//4.4返回cell
-(NSInteger)numberOfSectionsInTableView:(UITableView *)tableView
{
return self.car.count;
}
-(NSInteger)tableView:(UITableView *)tableView numberOfRowsInSection:(NSInteger)section
{
YYcarsgroup *carsgroup=self.car[section];
return carsgroup.cars.count;
}
-(UITableViewCell *)tableView:(UITableView *)tableView cellForRowAtIndexPath:(NSIndexPath *)indexPath
{
static NSString *identifier=@"car";
//4.1去緩存中去取cell
UITableViewCell *cell=[tableView dequeueReusableCellWithIdentifier:identifier];
//4.2若沒有,則創建cell,並蓋章
if (cell==nil) {
cell=[[UITableViewCell alloc]initWithStyle:UITableViewCellStyleDefault reuseIdentifier:identifier];
}
//4.3設置cell的數據
//設置對應的組
YYcarsgroup *carsgroup=self.car[indexPath.section];
//設置對應的行
YYcars *yycars=carsgroup.cars[indexPath.row];
cell.imageView.image=[UIImage imageNamed:yycars.icon];
cell.textLabel.text=yycars.name;
//4.4返回cell
return cell;
}
//設置每組的標題
-(NSString *)tableView:(UITableView *)tableView titleForHeaderInSection:(NSInteger)section
{
YYcarsgroup *carsgroup=self.car[section];
return carsgroup.title;
}
//設置索引
-(NSArray *)sectionIndexTitlesForTableView:(UITableView *)tableView
{
//利用kvc取出所有的標題
NSArray *title=[self.car valueForKeyPath:@"title"];
return title;
}
//隱藏狀態欄
-(BOOL)prefersStatusBarHidden
{
return YES;
}
@end
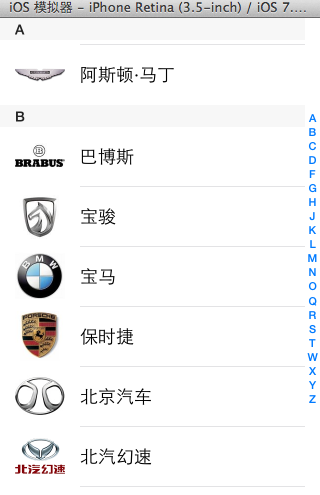
實現效果:
三、注意點
1.設置索引
代碼如下:
復制代碼 代碼如下:
//設置索引
-(NSArray *)sectionIndexTitlesForTableView:(UITableView *)tableView
{
//利用kvc取出所有的標題
NSArray *title=[self.car valueForKeyPath:@"title"];
return title;
}
2.cell的性能優化
代碼如下:
復制代碼 代碼如下:
static NSString *identifier=@"car";
//4.1去緩存中去取cell
UITableViewCell *cell=[tableView dequeueReusableCellWithIdentifier:identifier];
//4.2若沒有,則創建cell,並蓋章
if (cell==nil) {
cell=[[UITableViewCell alloc]initWithStyle:UITableViewCellStyleDefault reuseIdentifier:identifier];
}