講解iOS開發中UITableView列表設計的基本要點
一、UITableView簡單介紹
1.tableView是一個用戶可以滾動的多行單列列表,在表視圖中,每一行都是一個UITableViewCell對象,表視圖有兩種風格可選
復制代碼 代碼如下:
typedef NS_ENUM(NSInteger, UITableViewStyle) {
UITableViewStylePlain, // regular table view
UITableViewStyleGrouped // preferences style table view
};
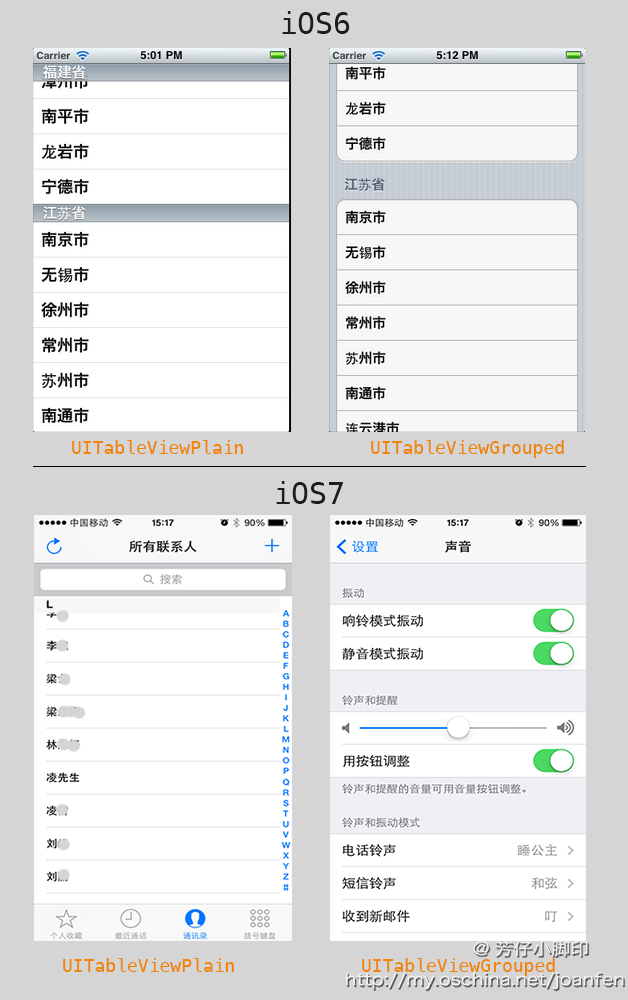
2.表視圖還可為其添加索引值,比如通訊錄中右側索引列表,每一個索引項對應其節頭標題
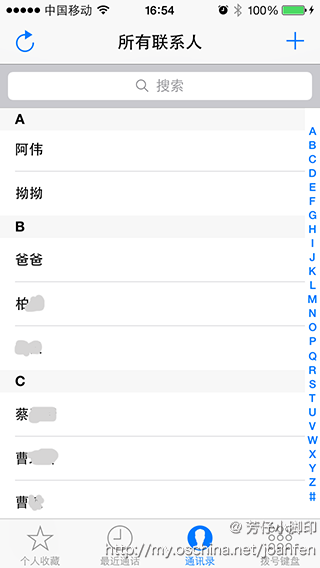

這兩種形式的列表下面還會介紹到。
3.最簡單的一種表視圖是一個選擇列表,可以限制選擇一列或多列,如上圖右邊。
4.頁眉和頁腳,可以根據自己的需要,對tableView設置頁眉和頁腳的內容

二、UITableViewCell
1. UITableViewCell是表視圖的單元格,系統會緩存可見的行。通過完成UITableViewDataSource協議中必須完成的代理方法CellForRowAtIndexPath方法來填充表視圖上單元格數據。
2. UITableViewCell有四種樣式可選
復制代碼 代碼如下:
UITableViewCellStyleDefault, // 簡單包含一個可選的imageView和一個label顯示文本
UITableViewCellStyleValue1, // 包含可選的imageView,一個textLabel和一個detailLabel,其中detailLabel位置在最左,右對齊,文本顏色為藍色
UITableViewCellStyleValue2, //包含一個textLabel和一個detailLabel,textLabel默認為藍色文本,右對齊,detailLabel的位置緊挨著textLabel右邊,默認文本左對齊,顏色為黑色
UITableViewCellStyleSubtitle // 包含可選的imageView,一個textLabel,一個detailLabel,其中detailLabel在textLabel下方,字體較小,默認顏色為黑色,左對齊
三、創建簡單TableView
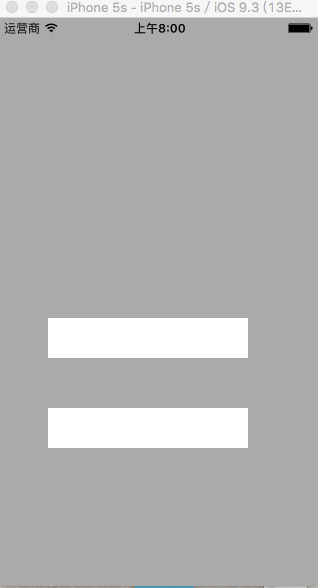
1. 先給出效果圖

2. 創建方式及代碼(本文只講述代碼創建)
a) 創建一個Single View Application,命名為"tableView"
b) 新建一個繼承自UITableView的類,關於tableView的實現將全部寫在這個類中(當然也可直接在對 應所需要用得ViewController中創建,分離出來的好處是可以在將tableView的方法單獨放在一個類中,當ViewController的代碼量比較大或者這個table需要在多個地方使用時推薦使用),命名為general_table_view.
c) 代碼
①在general_table_view.h文件中,添加幾個屬性
復制代碼 代碼如下:
@interface general_table_view : UITableView
// tableView的坐標
@property (nonatomic, assign) CGRect tableViewFrame;
// 存放Cell上各行textLabel值
@property (nonatomic, copy)NSMutableArray * textLabel_MArray;
// 存放Cell上各行imageView上圖片
@property (nonatomic, copy)NSMutableArray * images_MArray;
// 存放Cell上各行detailLabel值
@property (nonatomic, copy)NSMutableArray * subtitle_MArray;
@end
②在general_table_view.m的interface中聲明代理
復制代碼 代碼如下:
@interface general_table_view ()<UITableViewDataSource,UITableViewDelegate>
@end
③在.m中的initWithFrame方法內部設置table的代理
復制代碼 代碼如下:
// Initialization code
self.delegate = self;
self.dataSource = self;
以及添加tableViewFrame的set方法
復制代碼 代碼如下:
-(void)setTableViewFrame:(CGRect)tableViewFrame
{
self.frame = tableViewFrame;// 設置tableView的frame為所傳值
}
④接下來實現tableView的dataSource和delegate方法
必須實現的方法有兩個
復制代碼 代碼如下:
// tableView每個分區的行數,可以為各個分區設置不同的行數,根據section的值判斷即可
-(NSInteger)tableView:(UITableView *)tableView numberOfRowsInSection:(NSInteger)section
{
return [_textLabel_MArray count];
}
// 實現每一行Cell的內容,tableView重用機制
-(UITableViewCell *)tableView:(UITableView *)tableView cellForRowAtIndexPath:(NSIndexPath *)indexPath
{
// 為其定義一個標識符,在重用機制中,標識符非常重要,這是系統用來匹配table各行cell的判斷標准,在以後的學習中會體會到
static NSString *cellIdentifier = @"cellIdentifier";
// 從緩存隊列中取出復用的cell
UITableViewCell *cell = [tableView dequeueReusableCellWithIdentifier:cellIdentifier];
// 如果隊列中cell為空,即無復用的cell,則對其進行初始化
if (cell==nil) {
// 初始化
cell = [[UITableViewCell alloc] initWithStyle:UITableViewCellStyleDefault reuseIdentifier:cellIdentifier];
// 定義其輔助樣式
cell.accessoryType = UITableViewCellAccessoryNone;
}
// 設置cell上文本內容
cell.textLabel.text = [_textLabel_MArray objectAtIndex:indexPath.row];
return cell;
}
⑤還有其他輔助方法,根據需要添加
復制代碼 代碼如下:
// tableView分區數量,默認為1,可為其設置為多個分區
-(NSInteger)numberOfSectionsInTableView:(UITableView *)tableView
{
return 1;
}
// tableView頁眉的值,同理,可為不同的分區設置不同的頁眉,也可不寫此方法
-(NSString *)tableView:(UITableView *)tableView titleForHeaderInSection:(NSInteger)section
{
return @"頁眉";
}
// 頁腳
-(NSString *)tableView:(UITableView *)tableView titleForFooterInSection:(NSInteger)section
{
return @"頁腳";
}
⑥在所需要添加的ViewController中添加tableView,在ViewController.m方法中
復制代碼 代碼如下:
#import "general_table_view.h"
@interface ViewController ()
{
general_table_view *table;// 聲明table
}
@end
並在ViewDidLoad方法中對其進行初始化
復制代碼 代碼如下:
// 初始化
table = [[general_table_view alloc] initWithFrame:CGRectMake(0, 20, 320, self.view.frame.size.height-20) style:UITableViewStylePlain];
// 設置數據源
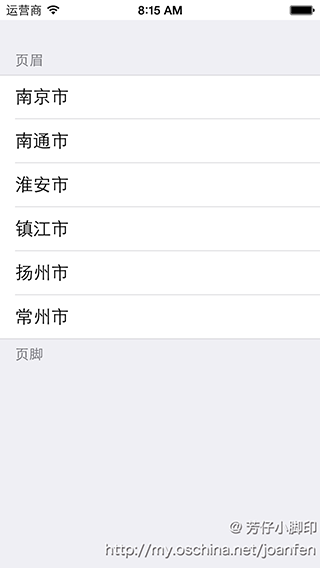
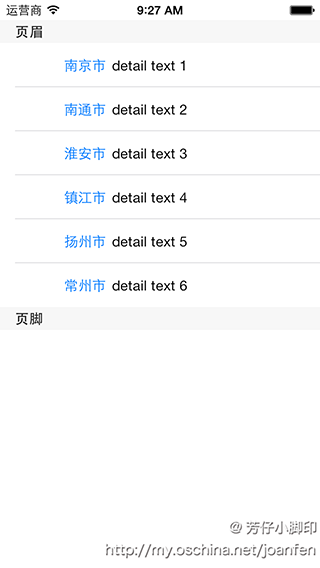
table.textLabel_MArray = [[NSMutableArray alloc] initWithObjects:@"南京市",@"南通市",@"淮安市",@"鎮江市",@"揚州市",@"常州市", nil];
[self.view addSubview:table];// 添加到當前View
⑦運行即可得到圖5的效果,將初始化時的style改為UITableViewStyleGrouped即可得到圖6的效果
復制代碼 代碼如下:
// 初始化
table = [[general_table_view alloc] initWithFrame:CGRectMake(0, 20, 320, self.view.frame.size.height-20) style:UITableViewStyleGrouped];
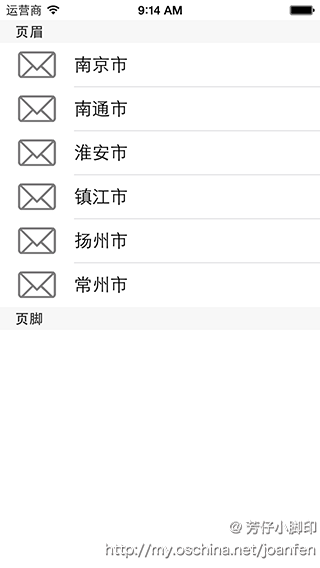
四、為每一行添加圖片
在ViewController.m的ViewDidLoad方法中設置數據源時,在addSubview之前,初始化一個存放圖片的數組,這裡我添加的是同一張圖片,如果想為每一行設置不同的圖片,添加不同的圖片到數組中即可
復制代碼 代碼如下:
NSMutableArray *images = [NSMutableArray array];
for(NSInteger index = 0;index<[table.textLabel_MArray count];index++){
UIImage *image = [UIImage imageNamed:@"2"];
[images addObject:image];
}
table.images_MArray = [[NSMutableArray alloc] initWithArray:images];
在CellForRowAtIndexPath方法中設置textLabel值部分添加
復制代碼 代碼如下:
// 設置cell上文本內容
cell.textLabel.text = [_textLabel_MArray objectAtIndex:indexPath.row];
// 設置每一行的圖片
cell.imageView.image = [_images_MArray objectAtIndex:indexPath.row];
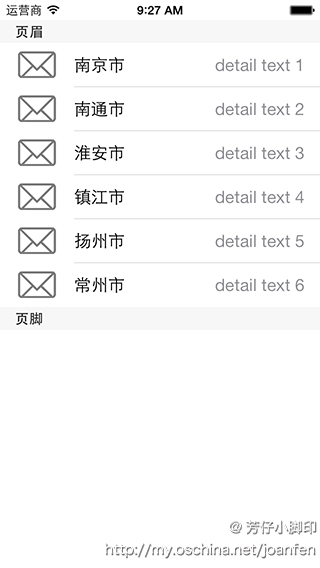
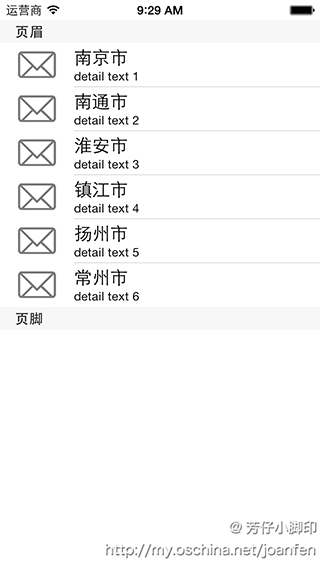
五、列表的其他樣式
在CellForRowAtIndexPath方法中,初始化Cell時改變cell的style和accessoryType,style,style默認有四種可選。
在ViewController的ViewDidLoad方法中添加圖片的for循環中為數組添加值
復制代碼 代碼如下:
NSMutableArray *subtitle= [NSMutableArray array];
for(NSInteger index = 0;index<[table.textLabel_MArray count];index++){
UIImage *image = [UIImage imageNamed:@"2"];
NSString *detail = [NSString stringWithFormat:@"detail text %d",index+1];
[images addObject:image];
[subtitle addObject:detail];
}
table.subtitle_MArray = [[NSMutableArray alloc] initWithArray:subtitle];
並在CellForRowAtIndexPath方法初始化時將
復制代碼 代碼如下:
UITableViewCellStyleDefault改變成其他三種樣式,並添加代碼
// 設置小標題
cell.detailTextLabel.text = [_subtitle_MArray objectAtIndex:indexPath.row];
效果圖如下:
六、列表中行的操作
1.選中行
實現代理方法
復制代碼 代碼如下:
// 選中行
-(void)tableView:(UITableView *)tableView didSelectRowAtIndexPath:(NSIndexPath *)indexPath
{
NSLog(@"您點擊了第%d分區第%d行",indexPath.section, indexPath.row);
// 取消選中狀態
// [tableView deselectRowAtIndexPath:indexPath animated:YES];
}
2.刪除行
要對行進行操作,首先要實現代理方法
復制代碼 代碼如下:
- (BOOL)tableView:(UITableView *)tableView canEditRowAtIndexPath:(NSIndexPath *)indexPath
{
return YES;
}
先講述單獨刪除一行數據,即左滑出現刪除按鈕,並刪除行的操作,後文會介紹多選批量刪除
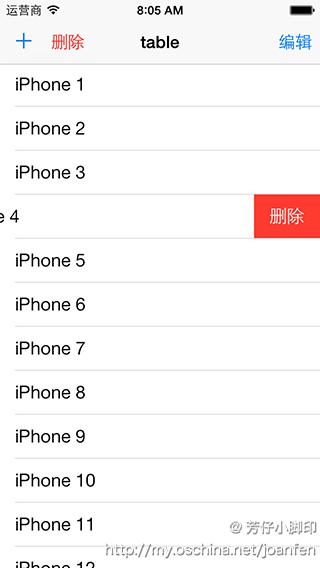
可重置刪除按鈕的標題,默認為"delete"
復制代碼 代碼如下:
// 設置刪除按鈕標題
- (NSString *)tableView:(UITableView *)tableView titleForDeleteConfirmationButtonForRowAtIndexPath:(NSIndexPath *)indexPath
{
return @"刪除";
}
點擊刪除後
- (void)tableView:(UITableView *)tableView commitEditingStyle:(UITableViewCellEditingStyle)editingStyle forRowAtIndexPath:(NSIndexPath *)indexPath
{
// 從數據源中刪除
[self.dataArray removeObjectAtIndex:indexPath.row];
// 從列表中刪除
[tableView deleteRowsAtIndexPaths:@[indexPath] withRowAnimation:UITableViewRowAnimationFade];
}
3.插入行
①這時我將插入行和刪除行都以一個按鈕動作來觸發,點擊後tableView進入編輯模式,先上效果圖
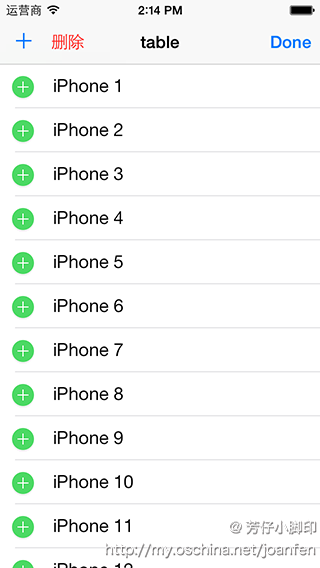
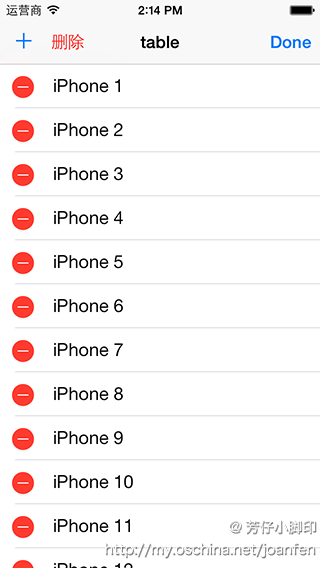
②在ViewDidLoad中添加代碼,其中self.addButton和self.deleteBarButtonItem均在storyBoard中創建,下文中的按鈕也是這種情況
復制代碼 代碼如下:
NSArray *leftBarButtons = [NSArray arrayWithObjects:self.addButton,self.deleteBarButtonItem, nil];
self.navigationItem.leftBarButtonItems = leftBarButtons;//設置導航欄左邊按鈕為添加和刪除按鈕
③在@interface中聲明一個變量
復制代碼 代碼如下:
UITableViewCellEditingStyle selectEditingStyle;
④兩個按鈕的點擊事件
復制代碼 代碼如下:
// 更新導航欄按鈕
-(void) updateBarButtons
{
if (self.tableView.editing==YES) {
self.navigationItem.rightBarButtonItem = self.doneBarButtonItem;
}
}
// 點擊添加按鈕
- (IBAction)addButtonClicked:(id)sender {
selectEditingStyle = UITableViewCellEditingStyleInsert;
[self.tableView setEditing:YES animated:YES];
[self updateBarButtons];
}
// 點擊刪除按鈕
- (IBAction)deleteButtonClicked:(id)sender {
selectEditingStyle = UITableViewCellEditingStyleDelete;
[self.tableView setEditing:YES animated:YES];
[self updateBarButtons];
}
⑤實現相應的代理方法
復制代碼 代碼如下:
// 是否可編輯
- (BOOL)tableView:(UITableView *)tableView canEditRowAtIndexPath:(NSIndexPath *)indexPath
{
return YES;
}
// 編輯模式
-(UITableViewCellEditingStyle)tableView:(UITableView *)tableView editingStyleForRowAtIndexPath:(NSIndexPath *)indexPath
{
return selectEditingStyle;
}
- (void)tableView:(UITableView *)tableView commitEditingStyle:(UITableViewCellEditingStyle)editingStyle forRowAtIndexPath:(NSIndexPath *)indexPath
{
// 刪除模式
if (editingStyle==UITableViewCellEditingStyleDelete) {
// 從數據源中刪除
[self.dataArray removeObjectAtIndex:indexPath.row];
// 刪除行
[tableView deleteRowsAtIndexPaths:@[indexPath] withRowAnimation:UITableViewRowAnimationFade];
}
// 添加模式
else if(editingStyle == UITableViewCellEditingStyleInsert){
// 從數據源中添加
[self.dataArray insertObject:@"new iPhone" atIndex:indexPath.row];
// 添加行
[self.tableView insertRowsAtIndexPaths:@[indexPath] withRowAnimation:UITableViewRowAnimationAutomatic ];
}
}
// 點擊完成按鈕
- (IBAction)doneButtonClicked:(id)sender {
[self.tableView setEditing:NO animated:YES];
[self updateBarButtons];
}
4.移動行
①效果圖
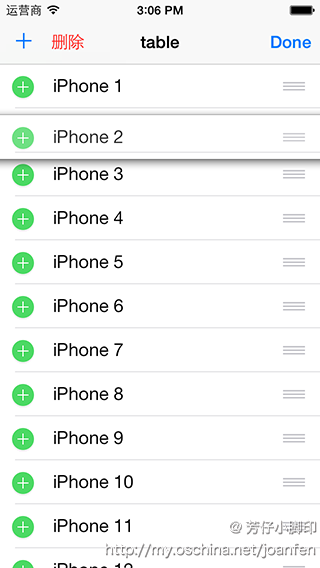
②在tableView進入編輯模式時,可以對行進行移動操作,通過方法
復制代碼 代碼如下:
// 是否支持移動
- (BOOL)tableView:(UITableView *)tableView canMoveRowAtIndexPath:(NSIndexPath *)indexPath
{
return YES;
}
③設置行可移動,並完成移動行方法,改變數據源
// 移動行操作-(void)tableView:(UITableView *)tableView moveRowAtIndexPath:(NSIndexPath *)sourceIndexPath toIndexPath:(NSIndexPath *)destinationIndexPath{// 這裡其實就是數組中兩個變量交換位置的過程 id object = [self.dataArray objectAtIndex:fromIndexPath.row];
[self.dataArray removeObjectAtIndex:fromIndexPath.row];
[self.dataArray insertObject:object atIndex:toIndexPath.row];
}
5、批量刪除行
①即完成可以選擇多個行之後批量刪除,如圖
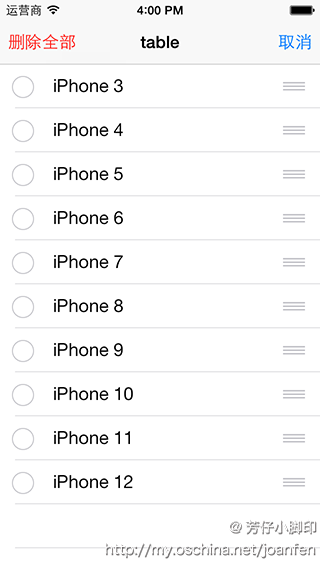
②在ViewDidLoad中添加代碼
self.navigationItem.rightBarButtonItem = self.editBarButtonItem;// 在右導航欄中添加編輯按鈕
③現在需要達到,點擊編輯按鈕在右上角出現取消按鈕,左上角出現刪除按鈕。並在選擇時,能出現刪除行的數量,修改updateBarButtons方法,並添加一個方法來根據條件修改刪除按鈕的標題
復制代碼 代碼如下:
// 更新導航欄按鈕
-(void) updateBarButtons
{
// 如果是允許多選的狀態,即進入批量刪除模式
if (self.tableView.allowsSelectionDuringEditing == YES) {
//更新刪除按鈕
[self updateDeleteButtonTitle];
// 導航欄左邊按鈕設置為空
self.navigationItem.leftBarButtonItems = nil;
// 將左邊按鈕設置為'批量刪除'按鈕
self.navigationItem.leftBarButtonItem = self.multiDeleteBarButton;
// 導航欄右鍵設置為'取消'鍵
self.navigationItem.rightBarButtonItem = self.cancelBarButtonItem;
return;
}
if (self.tableView.editing==YES) {// 如果是編輯狀態,且不屬於批量刪除狀態
// 導航欄右鍵設置為'取消'鍵
self.navigationItem.rightBarButtonItem = self.doneBarButtonItem;
}
else {// 如果不是編輯狀態,將導航欄設置為初始狀態的樣式,即左欄為'添加','刪除'按鈕,右欄為'編輯'按鈕
NSArray *leftBarButtons = [NSArray arrayWithObjects:self.addButton,self.deleteBarButtonItem, nil];
self.navigationItem.leftBarButtonItems = leftBarButtons;
self.navigationItem.rightBarButtonItem = self.editBarButtonItem;
}
}
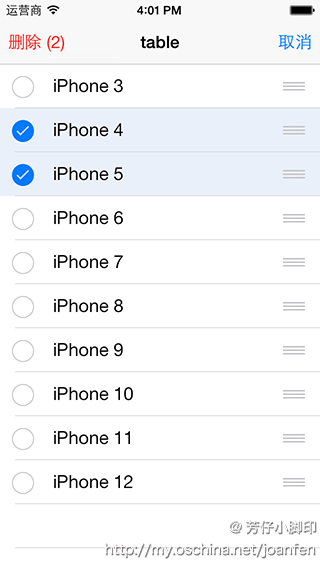
// 更新刪除按鈕的標題
-(void)updateDeleteButtonTitle
{
NSArray *selectedRows = [self.tableView indexPathsForSelectedRows];//得到選中行
BOOL allItemsAreSelected = selectedRows.count == self.dataArray.count;// 是否全選
BOOL noItemsAreSelected = selectedRows.count == 0;// 選中行數是否為零
if (allItemsAreSelected || noItemsAreSelected)
{// 如果是全選或者未選,則刪除鍵為刪除全部
self.multiDeleteBarButton.title = @"刪除全部";
}
else
{// 否則 刪除鍵為刪除(選中行數量)
self.multiDeleteBarButton.title = [NSString stringWithFormat:@"刪除 (%d)", selectedRows.count];
}
}
④在
復制代碼 代碼如下:
-(void)tableView:(UITableView *)tableView didSelectRowAtIndexPath:(NSIndexPath *)indexPath
- (void)tableView:(UITableView *)tableView didDeselectRowAtIndexPath:(NSIndexPath *)indexPath
兩個方法中調用updateDeleteButtonTitle方法
⑤點擊編輯按鈕時
復制代碼 代碼如下:
// 編輯按鈕
- (IBAction)editButtonClicked:(id)sender {
self.tableView.allowsMultipleSelectionDuringEditing = YES;// 進入可多選刪除狀態
[self.tableView setEditing:YES animated:YES];// 將table設置為可編輯
[self updateBarButtons]; //更改導航欄的導航按鈕
}
⑥點擊刪除多個按鈕時
復制代碼 代碼如下:
- (IBAction)multiDeleteClicked:(id)sender {
// 選中的行
NSArray *selectedRows = [self.tableView indexPathsForSelectedRows];
// 是否刪除特定的行
BOOL deleteSpecificRows = selectedRows.count > 0;
// 刪除特定的行
if (deleteSpecificRows)
{
// 將所選的行的索引值放在一個集合中進行批量刪除
NSMutableIndexSet *indicesOfItemsToDelete = [NSMutableIndexSet new];
for (NSIndexPath *selectionIndex in selectedRows)
{
[indicesOfItemsToDelete addIndex:selectionIndex.row];
}
// 從數據源中刪除所選行對應的值
[self.dataArray removeObjectsAtIndexes:indicesOfItemsToDelete];
//刪除所選的行
[self.tableView deleteRowsAtIndexPaths:selectedRows withRowAnimation:UITableViewRowAnimationAutomatic];
}
else
{
// 刪除全部
[self.dataArray removeAllObjects];
[self.tableView reloadSections:[NSIndexSet indexSetWithIndex:0] withRowAnimation:UITableViewRowAnimationAutomatic];
}
// 刪除完成,退出編輯狀態,並退出多選狀態,同時更新導航欄的按鈕
[self.tableView setEditing:NO animated:YES];
self.tableView.allowsMultipleSelectionDuringEditing = NO;
[self updateBarButtons];
}