iOS App中UIPickerView選擇欄控件的使用實例解析
UIPickerView控件是比UIDatePicker控件更普通的Picker控件,UIDatePicker控件可以理解成是從UIPickerView控件加工出來的專門進行日期選擇的控件。
UIPickerView控件的用法比UIDatePicker復雜一點。本文中的小例子將用UIPickerView控件做出兩種效果,第一個只有一個轉盤,第二個有兩個轉盤,但這兩個轉盤之間沒有依賴關系,也就是說改變其中一個轉盤中的選擇,不會對第二個轉盤產生影響。在下一篇文章會做一個轉盤之間有依賴關系的例子。
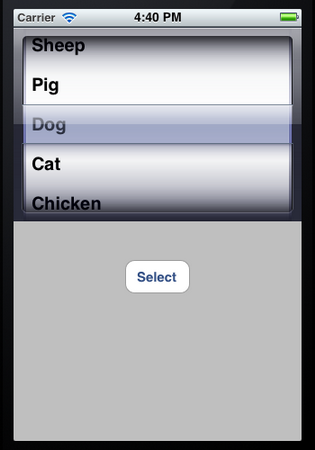
下圖是我們的效果圖:

第一個UIPickerView控件可以用來選擇Horse,Sheep,Pig,Dog,Cat,Chicken,Duck,Goose;第二個UIPickerView在第一個基礎上增加了一個轉盤。
閒話少說,接下來就開始。
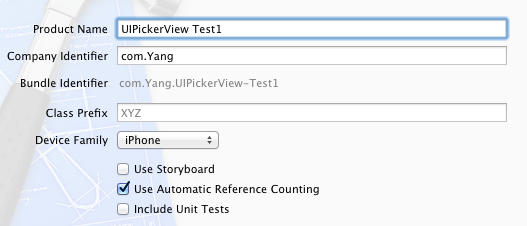
1、運行Xcode,新建一個Single View Application,名稱為UIPickerView Test1,其他設置如下圖:
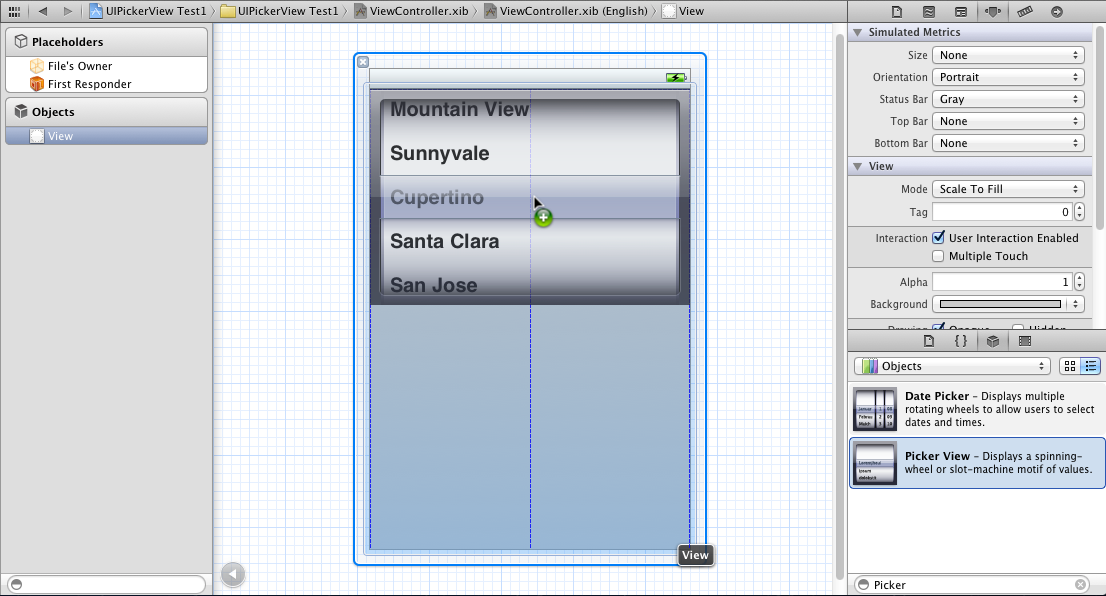
2、單擊ViewController.xib,然後拖一個Picker View控件到視圖上:
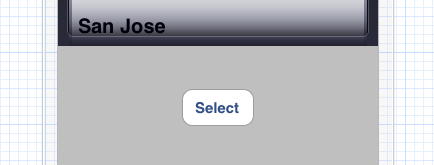
然後再拖一個Button到Picker View下方,並修改名稱為Select:
3、在ViewController.h中為Picker View控件創建Outlet映射,名稱為myPickerView,然後為Select按鈕創建Action映射,名稱為buttonPressed,具體方法不說了,可以參照上一篇文章。
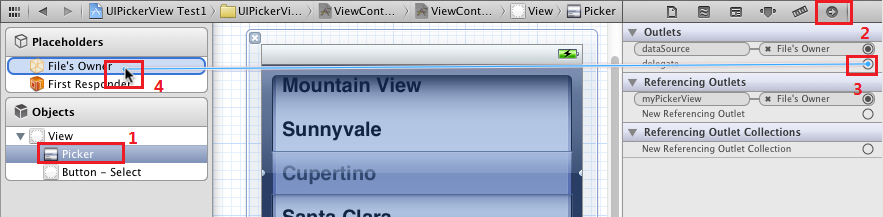
4、選中Picker View控件,打開Connections Inspector,找到delegate和datasource,從它們右邊的圓圈拉線到File's Owner:
5、單擊ViewController.h,在其中添加代碼:
復制代碼 代碼如下:
#import <UIKit/UIKit.h>
@interface ViewController : UIViewController<UIPickerViewDelegate, UIPickerViewDataSource>
@property (weak, nonatomic) IBOutlet UIPickerView *myPickerView;
@property (strong, nonatomic) NSArray *myPickerData;
- (IBAction)buttonPressed:(id)sender;
@end
注意在@interface後面添加尖括號及其中內容,我們將ViewController作為Picker View的Delegate以及DataSource。
6、代碼添加:
6.1 單擊ViewController.m,在@implementation的下一行添加代碼:
復制代碼 代碼如下:
@synthesize myPickerData;
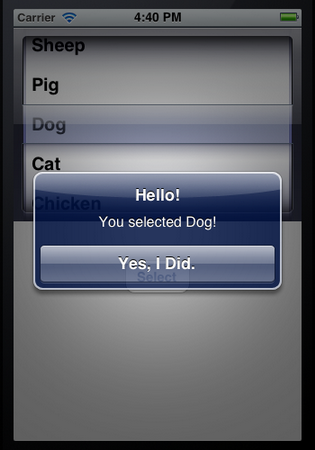
6.2 找到buttonPressed方法,添加代碼如下:
復制代碼 代碼如下:
- (IBAction)buttonPressed:(id)sender {
NSInteger row = [myPickerView selectedRowInComponent:0];
NSString *selected = [myPickerData objectAtIndex:row];
NSString *msg = [[NSString alloc] initWithFormat:
@"You selected %@!", selected];
UIAlertView *alert = [[UIAlertView alloc] initWithTitle:@"Hello!"
message:msg
delegate:nil
cancelButtonTitle:@"Yes, I Did."
otherButtonTitles:nil];
[alert show];
}
6.3 找到viewDidLoad方法,在其中添加代碼:
復制代碼 代碼如下:
- (void)viewDidLoad
{
[super viewDidLoad];
// Do any additional setup after loading the view, typically from a nib.
NSArray *array = [[NSArray alloc] initWithObjects:@"Horse", @"Sheep", @"Pig", @"Dog", @"Cat", @"Chicken", @"Duck", @"Goose", nil];
self.myPickerData = array;
}
6.4 找到viewDidUnload方法,在其中添加代碼:
復制代碼 代碼如下:
- (void)viewDidUnload
{
[self setMyPickerView:nil];
[super viewDidUnload];
// Release any retained subviews of the main view.
// e.g. self.myOutlet = nil;
self.myPickerView = nil;
self.myPickerData = nil;
}
6.5 在@end前面添加代碼:
復制代碼 代碼如下:
#pragma mark -
#pragma mark Picker Data Source Methods
- (NSInteger)numberOfComponentsInPickerView:(UIPickerView *)pickerView {
return 1;
}
- (NSInteger)pickerView:(UIPickerView *)pickerView numberOfRowsInComponent:(NSInteger)component {
return [myPickerData count];
}
#pragma mark Picker Delegate Methods
- (NSString *)pickerView:(UIPickerView *)pickerView titleForRow:(NSInteger)row forComponent:(NSInteger)component {
return [myPickerData objectAtIndex:row];
}
7、運行:
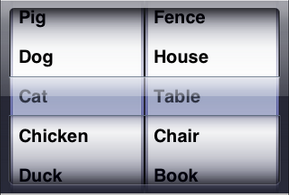
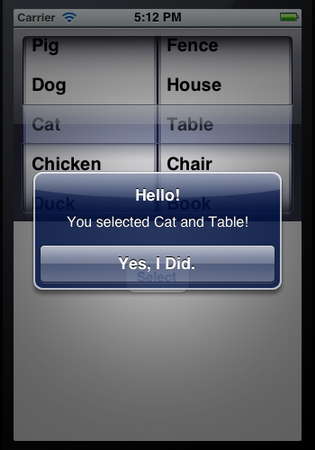
上面的例子只有一個轉盤,接下來我們在此基礎上增加一個轉盤,第一個轉盤不變,第二個轉盤可以選擇Tree,Flower,Grass,Fence,House,Table,Chair,Book,Swing。只要添加代碼就行了。
8、單擊ViewController.h,在@interface下一行添加代碼:
復制代碼 代碼如下:
@property (strong, nonatomic) NSArray *myPickerData_2;
9、單擊ViewController.m,在其中添加代碼:
9.1 在@implementation的下一行添加代碼:
復制代碼 代碼如下:
@synthesize myPickerData_2;
9.2 找到viewDidLoad方法,在其中添加代碼:
復制代碼 代碼如下:
- (void)viewDidLoad
{
[super viewDidLoad];
// Do any additional setup after loading the view, typically from a nib.
NSArray *array = [[NSArray alloc] initWithObjects:@"Horse", @"Sheep", @"Pig", @"Dog", @"Cat", @"Chicken", @"Duck", @"Goose", nil];
self.myPickerData = array;
NSArray *array_2 = [[NSArray alloc] initWithObjects:@"Tree", @"Flower", @"Grass", @"Fence", @"House", @"Table", @"Chair", @"Book",@"Swing" , nil];
self.myPickerData_2 = array_2;
}
9.3 找到viewDidUnload方法,在其中追加代碼:
復制代碼 代碼如下:
- (void)viewDidUnload
{
[self setMyPickerView:nil];
[super viewDidUnload];
// Release any retained subviews of the main view.
// e.g. self.myOutlet = nil;
self.myPickerView = nil;
self.myPickerData = nil;
self.myPickerData_2 = nil;
}
9.4 找到buttonPressed方法,修改代碼:
復制代碼 代碼如下:
- (IBAction)buttonPressed:(id)sender {
NSInteger row = [myPickerView selectedRowInComponent:0];
NSInteger row_2 = [myPickerView selectedRowInComponent:1];
NSString *selected = [myPickerData objectAtIndex:row];
NSString *selected_2 = [myPickerData_2 objectAtIndex:row_2];
NSString *msg = [[NSString alloc] initWithFormat:
@"You selected %@ and %@!", selected, selected_2];
UIAlertView *alert = [[UIAlertView alloc] initWithTitle:@"Hello!"
message:msg
delegate:nil
cancelButtonTitle:@"Yes, I Did."
otherButtonTitles:nil];
[alert show];
}
9.5 找到numberOfComponentsInPickerView方法,修改其返回值為2:
復制代碼 代碼如下:
- (NSInteger)numberOfComponentsInPickerView:(UIPickerView *)pickerView {
return 2;
}
9.6 找到numberOfRowsInComponent方法,修改其中代碼:
復制代碼 代碼如下:
- (NSInteger)pickerView:(UIPickerView *)pickerView numberOfRowsInComponent:(NSInteger)component {
if (component == 0) {
return [myPickerData count];
}
return [myPickerData_2 count];
}
9.7 找到下面的方法,修改代碼:
復制代碼 代碼如下:
- (NSString *)pickerView:(UIPickerView *)pickerView titleForRow:(NSInteger)row forComponent:(NSInteger)component {
if (component == 0) {
return [myPickerData objectAtIndex:row];
}
return [myPickerData_2 objectAtIndex:row];
}
10、運行:

進階實例
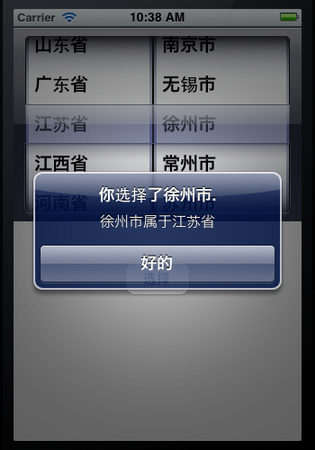
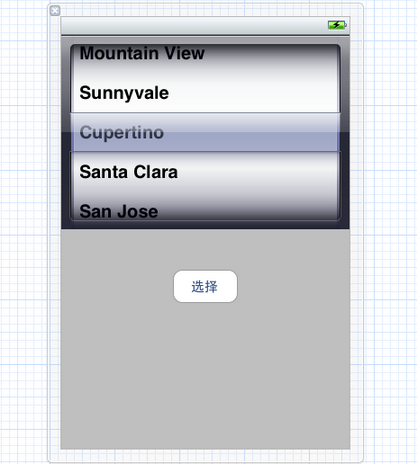
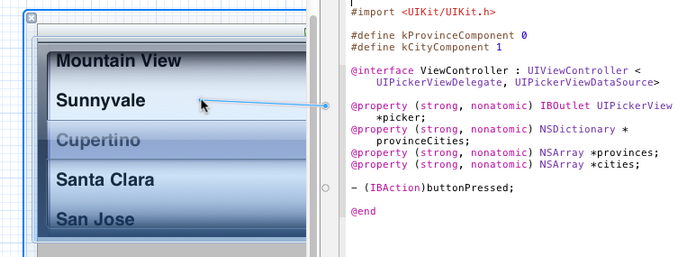
下面要用UIPickerView控件做出這樣的效果:它有兩個轉盤(Component),當左邊的轉盤改變了選擇值,右邊轉盤所有的選項都改變。如下圖所示:
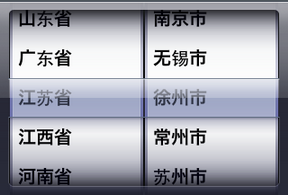
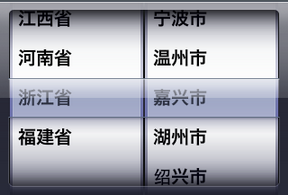
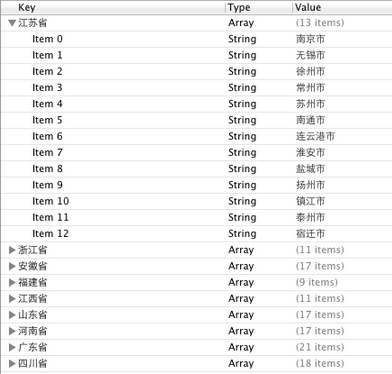
為了達到這樣的效果,還是先要創建兩個NSArray對象,每個轉盤對應一個。然後創建一個NSDictionary對象。我們可以想象出數據是樹形的,NSDictionary可以看成是一個有兩列的表格,第一列存儲的是關鍵字,每個關鍵字對應一個NSArray對象,這些NSArray數組中存儲的是一系列的NSString對象。
在這個例子中,第一例存儲的是一些省份,第二列存儲的是省份對應的地級市。
其實實現的方法跟上篇文章中的差不多,唯一不同的是要實現:改變左邊轉盤的選項,右邊轉盤內容發生相應的變化。這個功能要用到的函數我們上次也使用到了。
這次,我們先把要用到的代碼寫好,然後再用Interface Builder創建控件、實現映射等。
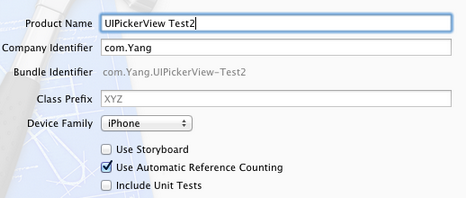
1、運行Xcode 4.2,新建一個Single View Application,名稱為UIPickerView Test2:
2、創建數據。我們用到的數據如下:
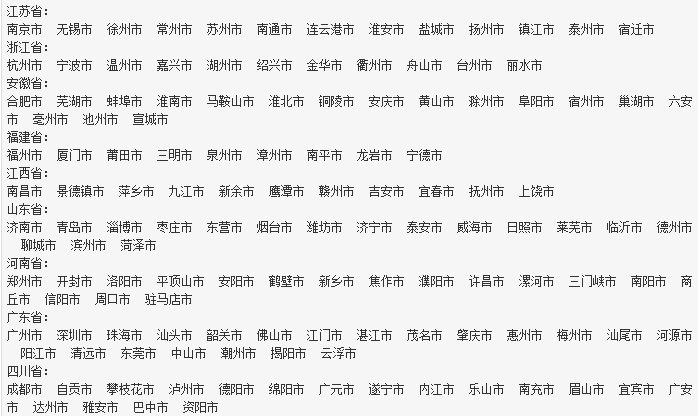
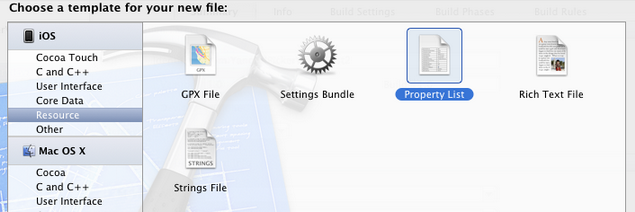
在前邊的文章中曾經提到過plist文件,現在,我們就要用plist文件存儲以上數據。為此,選擇File — New — New File,在打開的窗口中,左邊選擇iOS中的Resource,右邊選擇Property List:
單擊Next,在打開的窗口中,Save As中輸入名稱provinceCities,Group選擇Supporting Files:
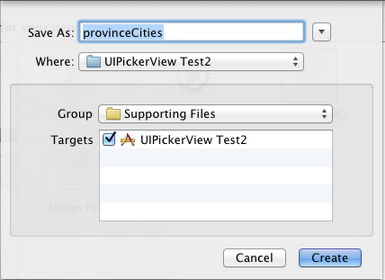
單擊Create,就創建了provinceCities.plist。然後往其中添加數據,如下圖所示:
3、單擊ViewController.h,向其中添加代碼:
復制代碼 代碼如下:
#import <UIKit/UIKit.h>
#define kProvinceComponent 0
#define kCityComponent 1
@interface ViewController : UIViewController <UIPickerViewDelegate, UIPickerViewDataSource>
@property (strong, nonatomic) IBOutlet UIPickerView *picker;
@property (strong, nonatomic) NSDictionary *provinceCities;
@property (strong, nonatomic) NSArray *provinces;
@property (strong, nonatomic) NSArray *cities;
- (IBAction)buttonPressed;
@end
4、單擊ViewController.m,向其中添加代碼:
4.1 在@implementation下一行添加代碼:
復制代碼 代碼如下:
@synthesize picker;
@synthesize provinceCities;
@synthesize provinces;
@synthesize cities;
4.2 在ViewDidLoad方法中添加代碼:
復制代碼 代碼如下:
- (void)viewDidLoad
{
[super viewDidLoad];
// Do any additional setup after loading the view, typically from a nib.
NSBundle *bundle = [NSBundle mainBundle];
NSURL *plistURL = [bundle URLForResource:@"provinceCities" withExtension:@"plist"];
NSDictionary *dictionary = [NSDictionary dictionaryWithContentsOfURL:plistURL];
self.provinceCities = dictionary;
NSArray *components = [self.provinceCities allKeys];
NSArray *sorted = [components sortedArrayUsingSelector:@selector(compare:)];
self.provinces = sorted;
NSString *selectedState = [self.provinces objectAtIndex:0];
NSArray *array = [provinceCities objectForKey:selectedState];
self.cities = array;
}
代碼中
復制代碼 代碼如下:
NSBundle *bundle = [NSBundle mainBundle];
用於獲得當前程序的Main Bundle,這個Bundle可以看成是一個文件夾,其中的內容遵循特定的框架。Main Bundle的一種主要用途是使用程序中的資源,如圖片、聲音等,本例中使用的是plist文件。下面的一行
復制代碼 代碼如下:
NSURL *plistURL = [bundle URLForResource:@"provinceCities" withExtension:@"plist"];
用來獲取provinceCities.plist的路徑,之後將這個文件中的內容都放在一個NSDictionary對象中,用的是
復制代碼 代碼如下:
NSDictionary *dictionary = [NSDictionary dictionaryWithContentsOfURL:plistURL];
4.3 找到viewDidUnload方法,添加代碼:
復制代碼 代碼如下:
- (void)viewDidUnload
{
[super viewDidUnload];
// Release any retained subviews of the main view.
// e.g. self.myOutlet = nil;
self.picker = nil;
self.provinceCities = nil;
self.provinces = nil;
self.cities = nil;
}
4.4 在@end之前添加代碼,實現buttonPressed方法:
復制代碼 代碼如下:
- (IBAction)buttonPressed:(id)sender {
NSInteger provinceRow = [picker selectedRowInComponent:kProvinceComponent];
NSInteger cityRow = [picker selectedRowInComponent:kCityComponent];
NSString *province = [self.provinces objectAtIndex:provinceRow];
NSString *city = [self.cities objectAtIndex:cityRow];
NSString *title = [[NSString alloc] initWithFormat:@"你選擇了%@.", city];
NSString *message = [[NSString alloc] initWithFormat:@"%@屬於%@", city, province];
UIAlertView *alert = [[UIAlertView alloc] initWithTitle:title message:message delegate:nil cancelButtonTitle:@"好的" otherButtonTitles: nil];
[alert show];
}
4.5 在@end之前添加代碼:
復制代碼 代碼如下:
#pragma mark -
#pragma mark Picker Date Source Methods
- (NSInteger)numberOfComponentsInPickerView:(UIPickerView *)pickerView {
return 2;
}
- (NSInteger)pickerView:(UIPickerView *)pickerView numberOfRowsInComponent:(NSInteger)component {
if (component == kProvinceComponent) {
return [self.provinces count];
}
return [self.cities count];
}
#pragma mark Picker Delegate Methods
- (NSString *)pickerView:(UIPickerView *)pickerView titleForRow:(NSInteger)row forComponent:(NSInteger)component {
if (component == kProvinceComponent) {
return [self.provinces objectAtIndex:row];
}
return [self.cities objectAtIndex:row];
}
- (void)pickerView:(UIPickerView *)pickerView didSelectRow:(NSInteger)row inComponent:(NSInteger)component {
if (component == kProvinceComponent) {
NSString *selectedState = [self.provinces objectAtIndex:row];
NSArray *array = [provinceCities objectForKey:selectedState];
self.cities = array;
[picker selectRow:0 inComponent:kCityComponent animated:YES];
[picker reloadComponent:kCityComponent];
}
}
- (CGFloat)pickerView:(UIPickerView *)pickerView widthForComponent:(NSInteger)component {
if (component == kCityComponent) {
return 150;
}
return 140;
}
可以看到,跟上篇文章的例子相比,大部分代碼是一樣的,不同的是增加了pickerView:(UIPickerView *)pickerView didSelectRow:(NSInteger)row inComponent:(NSInteger)component這個方法。這個方法中,當檢測到修改的是左邊轉盤的值,則將self.cities中的內容替換成相應的數組,並執行[picker reloadComponent:kCityComponent];這個語句。
最後一個方法
復制代碼 代碼如下:
(CGFloat)pickerView:(UIPickerView *)pickerView widthForComponent:(NSInteger)component
可以用來修改每個轉盤的寬度,雖然在這個例子中不必要,但是我們得知道是怎麼做的。
代碼部分結束,接下來是使用Interface Builder添加控件、創建映射。
5、單擊ViewController.xib,往其中添加一個UIPickerView控件和一個Button,按鈕的名稱改為“選擇”,具體方法參照前面一
接下來要做的就是拉幾條線。
6、選中新添加的UIPickerView控件,按住Control,拖到File's Owner圖標,在彈出菜單選擇delegate和dataSource:
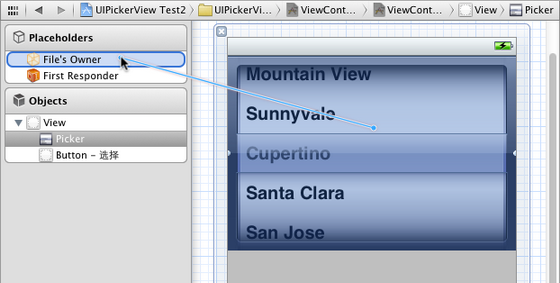
打開Assistant Editor,確保其中打開的是ViewController.h,然後從picker屬性前邊的小圓圈拉線到UIPickerView控件:
同樣,從buttonPressed方法前邊的小圓圈拉線到“選擇”按鈕。
7、運行: