
iOS組件封裝與自動布局自定義表情鍵盤
下面的東西是編寫自定義的表情鍵盤,話不多說,開門見山吧!下面主要用到的知識有MVC, iOS開發中的自動布局,自定義組件的封裝與使用,Block回調,CoreData的使用。有的小伙伴可能會問寫一個自定義表情鍵盤腫麼這麼麻煩?下面 將會介紹我們如何用上面提到的東西來定義我們的表情鍵盤的。下面的內容會比較多,這篇文章還是比較有料的。
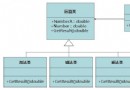
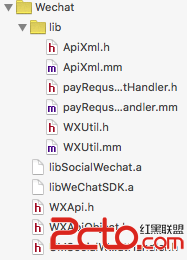
還是那句話寫技術博客是少不了代碼的,下面會結合代碼來回顧一下iOS的知識,本篇博文中用到的知識點在前面的博客中都能找到相應的內容,本篇 算是一個小小的功能整合。先來張圖看一下本app的目錄結構。我是根據自己對MVC的理解來構建的目錄結構,希望起到拋磚引玉的作用,有好的解決方案歡迎 評論或者留言指出。Face文件中存放的時我們的表情圖片,Model文件封裝的是從sqlite中讀取歷史頭像的組件,View文件中封裝的時我們自定義的組件,也就是自定義鍵盤相關的視圖,Controller負責將我們的各個組件組裝到一起完成我們想要的功能。下面會一一介紹。

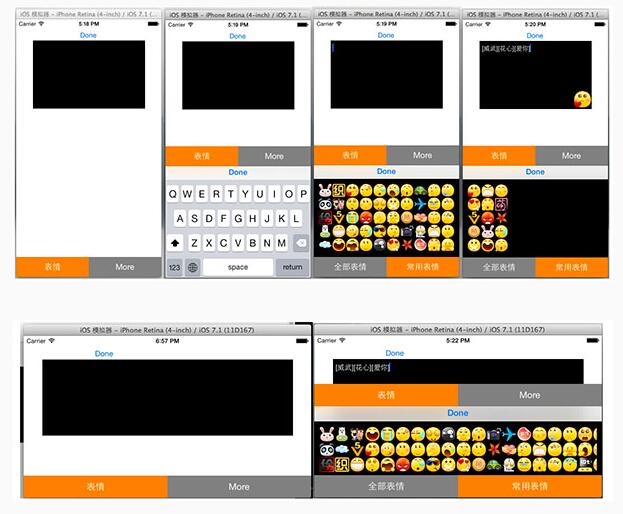
上面是文件的組織結構,下面為了更為直觀的了解我們想要的效果,下面先看幾張截圖,來直觀的感受一下運行效果,上面是豎屏的顯示效果,下面是橫 屏的顯示效果。因為在封裝自定義鍵盤中用到了自動布局所以橫屏顯示或者在更大的屏幕上顯示是沒問題的,常用表情是用戶用過的表情,然後存在Sqlite 中,顯示時並按時間降序排列。more是用來擴展功能用的接口。話不多說,來的代碼才是實在的。
一.View(自定義視圖)
View文件夾下存放的時我們自定義的視圖組件,因為是自定義的組件所以storyboard我們就用不了啦,所有的代碼都必須手寫,這樣 才能保證組件使用的靈活性和減少各個組件之間的耦合性,更利於團隊之間的合作。在封裝組件時要預留好外界可能使用到的接口,和返回該返回的數據。好啦,廢話少說,來點干貨吧!
1、FaceView組件的封裝:FaceView即負責顯示一個個的頭像。在使用該組件時要傳入要顯示的圖片和圖片對應的文字(如【哈 哈】),當點擊圖片的時候,會通過block回調的形式把該圖片的image以及圖片文字返回到使用的組件中去,下面是關鍵代碼:
FaceView.h中的代碼如下(下面代碼是定義啦相應的Block類型和對外的接口):
#import //聲明表情對應的block,用於把點擊的表情的圖片和圖片信息傳到上層視圖
typedef void (^FaceBlock) (UIImage *image, NSString *imageText);

@interface FaceView : UIView

//圖片對應的文字
@property (nonatomic, strong) NSString *imageText;
//表情圖片
@property (nonatomic, strong) UIImage *headerImage;

//設置block回調
-(void)setFaceBlock:(FaceBlock)block;

//設置圖片,文字
-(void)setImage:(UIImage *) image ImageText:(NSString *) text;

@end
FaceView.m中的代碼如下
// FaceView.m
// MyKeyBoard
//
// Created by 青玉伏案 on 14-9-16.
// Copyright (c) 2014年 Mrli. All rights reserved.
//

#import "FaceView.h"

@interface FaceView ()
@property(strong, nonatomic) FaceBlock block;
@property (strong, nonatomic) UIImageView *imageView;
@end

@implementation FaceView

//初始化圖片
- (id)initWithFrame:(CGRect)frame
{
 //face的大小
 frame.size.height = 30;
 frame.size.width = 30;
 self = [super initWithFrame:frame];
 if (self) {
 self.imageView = [[UIImageView alloc] initWithFrame:CGRectMake(0, 0, 30, 30)];
 [self addSubview:self.imageView];
 }
 return self;
}

-(void) setFaceBlock:(FaceBlock)block
{
 self.block = block;
}


-(void) setImage:(UIImage *)image ImageText:(NSString *)text
{
 //顯示圖片
 [self.imageView setImage:image];

 //把圖片存儲起來
 self.headerImage = image;

 self.imageText = text;
}

//點擊時回調
-(void)touchesEnded:(NSSet *)touches withEvent:(UIEvent *)event
{
 UITouch *touch = [touches anyObject];
 CGPoint point = [touch locationInView:self];
 //判斷觸摸的結束點是否在圖片中
 if (CGRectContainsPoint(self.bounds, point))
 {
 //回調,把該頭像的信息傳到相應的controller中
 self.block(self.headerImage, self.imageText);
 }
}

@end
代碼說明:
主要就是block回調的使用,就是封裝了一個自定義的button
2、FunctionView組件的封裝,FunctionView就是使用FaceView組件和ScrollView組件把表情加載進來,在實例化FunctionView組件時,我們用到了自動布局來設置ScrollView和下面的Button.
FunctionView.h的代碼如下,在.h中留有組件的接口和回調用的Block, plistFileName用於加載我們的資源文件時使用。
// FunctionView.h
// MyKeyBoard
//
// Created by 青玉伏案 on 14-9-16.
// Copyright (c) 2014年 Mrli. All rights reserved.
//

#import //定義對應的block類型,用於數據的交互
typedef void (^FunctionBlock) (UIImage *image, NSString *imageText);

@interface FunctionView : UIView
//資源文件名
@property (nonatomic, strong) NSString *plistFileName;
//接受block塊
-(void)setFunctionBlock:(FunctionBlock) block;

@end
FunctionView.m中的代碼如下,常用表情是在sqlite中獲取的,而全部表情是通過plist文件的信息在Face文件中加載的:
// FunctionView.m
// MyKeyBoard
//
// Created by 青玉伏案 on 14-9-16.
// Copyright (c) 2014年 Mrli. All rights reserved.
//

#import "FunctionView.h"
#import "FaceView.h"
#import "ImageModelClass.h"
#import "HistoryImage.h"

@interface FunctionView()

@property (strong, nonatomic) FunctionBlock block;
//暫存表情組件回調的表情和表情文字
@property (strong, nonatomic) UIImage *headerImage;
@property (strong, nonatomic) NSString *imageText;

//display我們的表情圖片
@property (strong, nonatomic) UIScrollView *headerScrollView;

//定義數據模型用於獲取歷史表情
@property (strong, nonatomic) ImageModelClass *imageModel;

@end


@implementation FunctionView
- (id)initWithFrame:(CGRect)frame
{
 self = [super initWithFrame:frame];
 if (self) {

 //實例化數據模型
 self.imageModel =[[ImageModelClass alloc] init];

 //實例化下面的button
 UIButton *faceButton = [[UIButton alloc] initWithFrame:CGRectZero];
 faceButton.backgroundColor = [UIColor grayColor];

 [faceButton setTitle:@"全部表情" forState:UIControlStateNormal];
 [faceButton setShowsTouchWhenHighlighted:YES];
 [faceButton addTarget:self action:@selector(tapButton1:) forControlEvents:UIControlEventTouchUpInside];
 [self addSubview:faceButton];


 //實例化常用表情按鈕
 UIButton *moreButton = [[UIButton alloc] initWithFrame:CGRectZero];
 moreButton.backgroundColor = [UIColor orangeColor];
 [moreButton setTitle:@"常用表情" forState:UIControlStateNormal];
 [moreButton setShowsTouchWhenHighlighted:YES];
 [moreButton addTarget:self action:@selector(tapButton2:) forControlEvents:UIControlEventTouchUpInside];
 [self addSubview:moreButton];

 //給按鈕添加約束
 faceButton.translatesAutoresizingMaskIntoConstraints = NO;
 moreButton.translatesAutoresizingMaskIntoConstraints = NO;
 //水平約束
 NSArray *buttonH = [NSLayoutConstraint constraintsWithVisualFormat:@"H:|[faceButton][moreButton(==faceButton)]|" options:0 metrics:0 views:NSDictionaryOfVariableBindings(faceButton,moreButton)];
 [self addConstraints:buttonH];

 //垂直約束
 NSArray *button1V = [NSLayoutConstraint constraintsWithVisualFormat:@"V:[faceButton(44)]|" options:0 metrics:0 views:NSDictionaryOfVariableBindings(faceButton)];
 [self addConstraints:button1V];

 NSArray *button2V = [NSLayoutConstraint constraintsWithVisualFormat:@"V:[moreButton(44)]|" options:0 metrics:0 views:NSDictionaryOfVariableBindings(moreButton)];
 [self addConstraints:button2V];

 //默認顯示表情圖片
 [self tapButton1:nil];

 }
 return self;
}

//接受回調
-(void)setFunctionBlock:(FunctionBlock)block
{
 self.block = block;
}

//點擊全部表情按鈕回調方法
-(void)tapButton1: (id) sender
{
 // 從plist文件載入資源
 NSBundle *bundle = [NSBundle mainBundle];
 NSString *path = [bundle pathForResource:self.plistFileName ofType:@"plist"];
 NSArray *headers = [NSArray arrayWithContentsOfFile:path];

 if (headers.count == 0) {
 NSLog(@"訪問的plist文件不存在");
 }
 else
 {
 //調用headers方法顯示表情
 [self header:headers];
 }
}

//點擊歷史表情的回調方法
-(void) tapButton2: (id) sender
{
 //從數據庫中查詢所有的圖片
 NSArray *imageData = [self.imageModel queryAll];
 //解析請求到的數據
 NSMutableArray *headers = [NSMutableArray arrayWithCapacity:imageData.count];

 //數據實體,相當於javaBean的東西
 HistoryImage *tempData;

 for (int i = 0; i < imageData.count; i ++) {
 tempData = imageData[i];

 //解析數據,轉換成函數headers要用的數據格式
 NSMutableDictionary *dic = [NSMutableDictionary dictionaryWithCapacity:2];
 [dic setObject:tempData.imageText forKey:@"chs"];
 UIImage *image = [UIImage imageWithData:tempData.headerImage];
 [dic setObject:image forKey:@"png"];

 [headers addObject:dic];
 }

 [self header:headers];

}


//負責把查出來的圖片顯示
-(void) header:(NSArray *)headers
{
 [self.headerScrollView removeFromSuperview];
 self.headerScrollView = [[UIScrollView alloc] initWithFrame:CGRectZero];
 [self addSubview:self.headerScrollView];

 //給scrollView添加約束
 self.headerScrollView.translatesAutoresizingMaskIntoConstraints = NO;
 //水平約束
 NSArray *scrollH = [NSLayoutConstraint constraintsWithVisualFormat:@"H:|-10-[_headerScrollView]-10-|" options:0 metrics:0 views:NSDictionaryOfVariableBindings(_headerScrollView)];
 [self addConstraints:scrollH];

 //垂直約束
 NSArray *scrolV = [NSLayoutConstraint constraintsWithVisualFormat:@"V:|-10-[_headerScrollView]-50-|" options:0 metrics:0 views:NSDictionaryOfVariableBindings(_headerScrollView)];
 [self addConstraints:scrolV];


 CGFloat scrollHeight = (self.frame).size.height-60;

 //根據圖片量來計算scrollView的Contain的寬度
 CGFloat width = (headers.count/(scrollHeight/30))*30;
 self.headerScrollView.contentSize = CGSizeMake(width, scrollHeight);
 self.headerScrollView.pagingEnabled = YES;


 //圖片坐標
 CGFloat x = 0;
 CGFloat y = 0;

 //往scroll上貼圖片
 for (int i = 0; i < headers.count; i ++) {
 //獲取圖片信息
 UIImage *image;
 if ([headers[i][@"png"] isKindOfClass:[NSString class]])
 {
 image = [UIImage imageNamed:headers[i][@"png"]];
 }
 else
 {
 image = headers[i][@"png"];
 }

 NSString *imageText = headers[i][@"chs"];

 //計算圖片位置
 y = (i%(int)(scrollHeight/30)) * 30;
 x = (i/(int)(scrollHeight/30)) * 30;

 FaceView *face = [[FaceView alloc] initWithFrame:CGRectMake(x, y, 0, 0)];
 [face setImage:image ImageText:imageText];

 //face的回調,當face點擊時獲取face的圖片
 __weak __block FunctionView *copy_self = self;
 [face setFaceBlock:^(UIImage *image, NSString *imageText)
 {
 copy_self.block(image, imageText);
 }];

 [self.headerScrollView addSubview:face];
 }

 [self.headerScrollView setNeedsDisplay];

}

@end
代碼說明:
1、主要是通過對資源文件或者對從數據庫中查詢的資源進行遍歷然後添加到ScrollView中
2.為了適應不同的屏幕給相應的組件添加了約束
3.ToolView組件的封裝: ToolView就是在主屏幕上下面的類似於TabBar的東西,當鍵盤出來的時候,ToolView會運動到鍵盤上面的位置。為了使用不同的屏幕,也需要用自動布局來實現。
ToolView.h的代碼如下:預留組件接口和聲明block類型
// ToolView.h
// MyKeyBoard
//
// Created by 青玉伏案 on 14-9-16.
// Copyright (c) 2014年 Mrli. All rights reserved.
//

/*****************
 封裝下面的工具條組件
 *****************/
#import //定義block塊變量類型,用於回調,把本View上的按鈕的index傳到Controller中
typedef void (^ToolIndex) (NSInteger index);

@interface ToolView : UIView

//塊變量類型的setter方法
-(void)setToolIndex:(ToolIndex) toolBlock;

@end
ToolView.m的代碼實現:
// ToolView.m
// MyKeyBoard
//
// Created by 青玉伏案 on 14-9-16.
// Copyright (c) 2014年 Mrli. All rights reserved.
//

#import "ToolView.h"

@interface ToolView ()

//定義ToolIndex類型的block,用於接受外界傳過來的block
@property (nonatomic, strong) ToolIndex myBlock;

@end


@implementation ToolView

- (id)initWithFrame:(CGRect)frame
{
 self = [super initWithFrame:frame];
 if (self) {

 //1初始化表情按鈕
 UIButton *faceButton = [[UIButton alloc] initWithFrame:CGRectZero];
 faceButton.backgroundColor = [UIColor orangeColor];
 [faceButton setTitle:@"表情" forState:UIControlStateNormal];
 [faceButton setShowsTouchWhenHighlighted:YES];
 [faceButton addTarget:self action:@selector(tapFaceButton:) forControlEvents:UIControlEventTouchUpInside];
 [self addSubview:faceButton];


 //初始化更多按鈕
 UIButton *moreButton = [[UIButton alloc] initWithFrame:CGRectZero];
 moreButton.backgroundColor = [UIColor grayColor];
 [moreButton setTitle:@"More" forState:UIControlStateNormal];
 [moreButton setShowsTouchWhenHighlighted:YES];
 [moreButton addTarget:self action:@selector(tapMoreButton:) forControlEvents:UIControlEventTouchUpInside];
 [self addSubview:moreButton];


 //給我們的按鈕添加約束來讓按鈕來占滿toolView;
 faceButton.translatesAutoresizingMaskIntoConstraints = NO;
 moreButton.translatesAutoresizingMaskIntoConstraints = NO;

 //添加水平約束
 NSArray *buttonH = [NSLayoutConstraint constraintsWithVisualFormat:@"H:|[faceButton][moreButton(==faceButton)]|" options:0 metrics:0 views:NSDictionaryOfVariableBindings(faceButton,moreButton)];
 [self addConstraints:buttonH];

 //添加垂直約束
 NSArray *button1V = [NSLayoutConstraint constraintsWithVisualFormat:@"V:|[faceButton]|" options:0 metrics:0 views:NSDictionaryOfVariableBindings(faceButton)];
 [self addConstraints:button1V];

 NSArray *button2V = [NSLayoutConstraint constraintsWithVisualFormat:@"V:|[moreButton]|" options:0 metrics:0 views:NSDictionaryOfVariableBindings(moreButton)];
 [self addConstraints:button2V];

 }
 return self;
}

//接受傳入的回調
-(void) setToolIndex:(ToolIndex)toolBlock
{
 self.myBlock = toolBlock;
}

//點擊表情按鈕要回調的方法
-(void) tapFaceButton: (id) sender
{
 self.myBlock(1);
}

//點擊more要回調的方法
-(void) tapMoreButton: (id) sender
{
 self.myBlock(2);
}

@end
代碼說明:
主要是對block回調的應用和給相應的組件添加相應的約束。
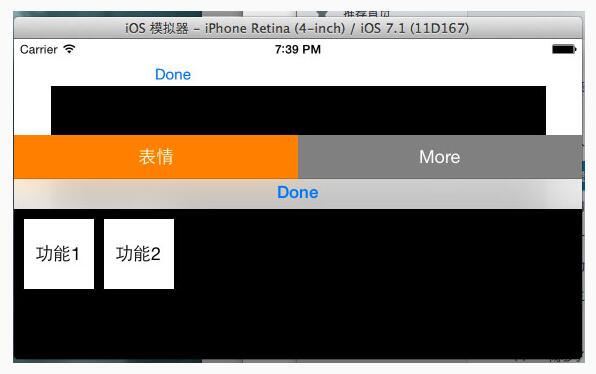
4.MoreView組件的封裝代碼就不往上貼啦,和上面的類似,下面是調用MoreView組件的運行效果,有興趣的讀者請自行編寫,以上就是視圖部分的代碼了
二. Mode部分的內容
1.先定義我們要使用的數據模型,數據模型如下,time是使用表情的時間,用於排序。

2.下面編寫我們的ImageModelClass類,裡面封裝了我們操作數據要用的方法
ImageModelClass.h的代碼如下,主要是預留的對外的接口:
//
// ImageModelClass.h
// MyKeyBoard
//
// Created by 青玉伏案 on 14-9-16.
// Copyright (c) 2014年 Mrli. All rights reserved.
//

#import #import #import "HistoryImage.h"

@interface ImageModelClass : NSObject
//保存數據
-(void)save:(NSData *) image ImageText:(NSString *) imageText;
//查詢所有的圖片
-(NSArray *) queryAll;
@end
ImageModelClass.m的代碼如下,主要是用CoreData對sqlite的操作:
// ImageModelClass.m
// MyKeyBoard
//
// Created by 青玉伏案 on 14-9-16.
// Copyright (c) 2014年 Mrli. All rights reserved.
//

#import "ImageModelClass.h"

@interface ImageModelClass ()

@property (nonatomic, strong) NSManagedObjectContext *manager;

@end

@implementation ImageModelClass
- (instancetype)init
{
 self = [super init];
 if (self) {
 //通過上下文獲取manager
 UIApplication *application = [UIApplication sharedApplication];
 id delegate = application.delegate;
 self.manager = [delegate managedObjectContext];
 }
 return self;
}

-(void)save:(NSData *)image ImageText:(NSString *)imageText
{
 if (image != nil) {
 NSArray *result = [self search:imageText];

 HistoryImage *myImage;

 if (result.count == 0)
 {
 myImage = [NSEntityDescription insertNewObjectForEntityForName:NSStringFromClass([HistoryImage class]) inManagedObjectContext:self.manager];
 myImage.imageText = imageText;
 myImage.headerImage = image;
 myImage.time = [NSDate date];
 }
 else
 {
 myImage = result[0];
 myImage.time = [NSDate date];
 }

 //存儲實體
 NSError *error = nil;
 if (![self.manager save:&error]) {
 NSLog(@"保存出錯%@", [error localizedDescription]);
 }

 }

}


//查找
-(NSArray *)search:(NSString *) image
{
 NSArray *result;

 //新建查詢條件
 NSFetchRequest *fetchRequest = [[NSFetchRequest alloc] initWithEntityName:NSStringFromClass([HistoryImage class])];

 //添加謂詞
 NSPredicate *predicate = [NSPredicate predicateWithFormat:@"imageText=%@",image];

 //把謂詞給request
 [fetchRequest setPredicate:predicate];

 //執行查詢
 NSError *error = nil;
 result = [self.manager executeFetchRequest:fetchRequest error:&error];
 if (error) {
 NSLog(@"查詢錯誤:%@", [error localizedDescription]);
 }
 return result;
}


//查詢所有的
-(NSArray *) queryAll
{
 //新建查詢條件
 NSFetchRequest *fetchRequest = [[NSFetchRequest alloc] initWithEntityName:NSStringFromClass([HistoryImage class])];

 //添加排序規則
 //定義排序規則
 NSSortDescriptor *sortDescriptor = [[NSSortDescriptor alloc] initWithKey:@"time" ascending:NO];

 //添加排序規則
 [fetchRequest setSortDescriptors:@[sortDescriptor]];


 //執行查詢
 NSError *error = nil;
 NSArray *result = [self.manager executeFetchRequest:fetchRequest error:&error];
 if (error) {
 NSLog(@"查詢錯誤:%@", [error localizedDescription]);
 }

 return result;
}

@end
代碼說明:
1.保存圖片時先查找圖片是否存在,如果存在則更新時間,如果不存在則插入數據(寫到這感覺想在用Hibernate寫東西)。
三.Controller部分,把上面的組件進行組裝
1.MainViewController.m中的延展部分的代碼如下:
@interface MainViewController ()

//自定義組件
@property (nonatomic, strong) ToolView *toolView;

@property (nonatomic, strong) FunctionView *functionView;

@property (nonatomic, strong) MoreView *moreView;

//系統組件
@property (strong, nonatomic) IBOutlet UITextView *myTextView;

@property (strong, nonatomic) NSDictionary *keyBoardDic;

@property (strong, nonatomic) IBOutlet UIImageView *imageView;

@property (strong, nonatomic) NSString *sendString;

//數據model
@property (strong, nonatomic) ImageModelClass *imageMode;

@property (strong, nonatomic)HistoryImage *tempImage;

@end
2.在viewDidLoad中進行組件的初始化和實現組件的Block回調,代碼如下
- (void)viewDidLoad
{
 [super viewDidLoad];

 //從sqlite中讀取數據
 self.imageMode = [[ImageModelClass alloc] init];


 //實例化FunctionView
 self.functionView = [[FunctionView alloc] initWithFrame:CGRectMake(0, 0, 320, 216)];
 self.functionView.backgroundColor = [UIColor blackColor];

 //設置資源加載的文件名
 self.functionView.plistFileName = @"emoticons";

 __weak __block MainViewController *copy_self = self;
 //獲取圖片並顯示
 [self.functionView setFunctionBlock:^(UIImage *image, NSString *imageText)
 {
 NSString *str = [NSString stringWithFormat:@"%@%@",copy_self.myTextView.text, imageText];

 copy_self.myTextView.text = str;
 copy_self.imageView.image = image;

 //把使用過的圖片存入sqlite
 NSData *imageData = UIImagePNGRepresentation(image);
 [copy_self.imageMode save:imageData ImageText:imageText];
 }];


 //實例化MoreView
 self.moreView = [[MoreView alloc] initWithFrame:CGRectMake(0, 0, 0, 0)];
 self.moreView.backgroundColor = [UIColor blackColor];
 [self.moreView setMoreBlock:^(NSInteger index) {
 NSLog(@"MoreIndex = %d",index);
 }];


 //進行ToolView的實例化
 self.toolView = [[ToolView alloc] initWithFrame:CGRectZero];
 self.toolView.backgroundColor = [UIColor blackColor];
 [self.view addSubview:self.toolView];

 //給ToolView添加約束
 //開啟自動布局
 self.toolView.translatesAutoresizingMaskIntoConstraints = NO;

 //水平約束
 NSArray *toolHConstraint = [NSLayoutConstraint constraintsWithVisualFormat:@"H:|[_toolView]|" options:0 metrics:0 views:NSDictionaryOfVariableBindings(_toolView)];
 [self.view addConstraints:toolHConstraint];

 //垂直約束
 NSArray *toolVConstraint = [NSLayoutConstraint constraintsWithVisualFormat:@"V:[_toolView(44)]|" options:0 metrics:0 views:NSDictionaryOfVariableBindings(_toolView)];
 [self.view addConstraints:toolVConstraint];


 //回調toolView中的方法
 [self.toolView setToolIndex:^(NSInteger index)
 {
 NSLog(@"%d", index);

 switch (index) {
 case 1:
 [copy_self changeKeyboardToFunction];
 break;

 case 2:
 [copy_self changeKeyboardToMore];
 break;

 default:
 break;
 }

 }];


 //當鍵盤出來的時候通過通知來獲取鍵盤的信息
 //注冊為鍵盤的監聽著
 NSNotificationCenter *center = [NSNotificationCenter defaultCenter];
 [center addObserver:self selector:@selector(keyNotification:) name:UIKeyboardWillChangeFrameNotification object:nil];


 //給鍵盤添加dan
 //TextView的鍵盤定制回收按鈕
 UIToolbar * toolBar = [[UIToolbar alloc]initWithFrame:CGRectMake(0, 0, 320, 30)];

 UIBarButtonItem * item1 = [[UIBarButtonItem alloc]initWithBarButtonSystemItem:UIBarButtonSystemItemDone target:self action:@selector(tapDone:)];
 UIBarButtonItem * item2 = [[UIBarButtonItem alloc]initWithBarButtonSystemItem:UIBarButtonSystemItemFlexibleSpace target:nil action:nil];
 UIBarButtonItem * item3 = [[UIBarButtonItem alloc]initWithBarButtonSystemItem:UIBarButtonSystemItemFlexibleSpace target:nil action:nil];
 toolBar.items = @[item2,item1,item3];

 self.myTextView.inputAccessoryView =toolBar;

}
3.當橫豎屏幕切換時設置自定義鍵盤的高度
-(void)willAnimateRotationToInterfaceOrientation:(UIInterfaceOrientation)toInterfaceOrientation duration:(NSTimeInterval)duration
{
 //縱屏
 if (UIInterfaceOrientationIsPortrait(toInterfaceOrientation)) {
 CGRect frame = self.functionView.frame;
 frame.size.height = 216;
 self.functionView.frame = frame;
 self.moreView.frame = frame;

 }
 //橫屏
 if (UIInterfaceOrientationIsLandscape(toInterfaceOrientation)) {
 CGRect frame = self.functionView.frame;
 frame.size.height = 150;
 self.functionView.frame = frame;
 self.moreView.frame = frame;
 }
}
4.當鍵盤出來的時候,改變toolView的位置,通過鍵盤的通知來實現。當橫屏的時候鍵盤的坐標系和我們當前的Frame的坐標系不一樣所以當橫屏時得做一坐標系的轉換,代碼如下:
//當鍵盤出來的時候改變toolView的位置(接到鍵盤出來的通知要做的方法)
-(void) keyNotification : (NSNotification *) notification
{
 NSLog(@"%@", notification.userInfo);

 self.keyBoardDic = notification.userInfo;
 //獲取鍵盤移動後的坐標點的坐標點
 CGRect rect = [self.keyBoardDic[@"UIKeyboardFrameEndUserInfoKey"] CGRectValue];

 //把鍵盤的坐標系改成當前我們window的坐標系
 CGRect r1 = [self.view convertRect:rect fromView:self.view.window];

 [UIView animateWithDuration:[self.keyBoardDic[UIKeyboardAnimationDurationUserInfoKey] floatValue] animations:^{

 //動畫曲線
 [UIView setAnimationCurve:[self.keyBoardDic[UIKeyboardAnimationCurveUserInfoKey] doubleValue]];

 CGRect frame = self.toolView.frame;

 frame.origin.y = r1.origin.y - frame.size.height;

 //根據鍵盤的高度來改變toolView的高度
 self.toolView.frame = frame;
 }];
}
5.系統鍵盤和自定義鍵盤切換的代碼如下:
//切換鍵盤的方法
-(void) changeKeyboardToFunction
{
 if ([self.myTextView.inputView isEqual:self.functionView])
 {
 self.myTextView.inputView = nil;
 [self.myTextView reloadInputViews];
 }
 else
 {
 self.myTextView.inputView = self.functionView;
 [self.myTextView reloadInputViews];
 }

 if (![self.myTextView isFirstResponder])
 {
 [self.myTextView becomeFirstResponder];
 }
}
以上就是上面展示效果的核心代碼了,在做的時候感覺難點在於如何進行屏幕適配,尤其是當屏幕橫過來的時候鍵盤的坐標系和我們frame的坐標系不同,得做 一個轉換。發表文章的目的是想起到拋磚引玉的左右,有好的東西希望大家相互交流一下。
- NSInternalInconsistencyException attempt to delete row 2 from section 4 which only contains 0 rows b
- iPad Pro多大?重量及尺寸詳解
- iphone6 plus怎麼關閉3g網絡?
- iPhone5S信號數字變回小圓點方法
- iOS8自動刪除信息功能
- iOS8.1.3對比iOS8.3 究竟哪個更加流暢好用
- 蘋果iPhone6 Plus彎了怎麼辦? 蘋果iPhone6 Plus彎了解決辦法
- App Store更新顯示空白怎麼辦
- iMessage怎麼更換登錄賬號
- 不用等iOS 10:Emojiant能讓你發送的emoji變大
- Swift 2.1 為 UIView 添加點擊事件和點擊效果
- iOS滑動解鎖、滑動獲取驗證碼效果的完成代碼
- IOS UITableViewCell詳解及按鈕點擊事件處理實例
- iOS 6 Secure密碼UITextField造成非密碼UITextField退格清空Bug
- iphone開發之繪制地圖線路
- IOS之同步請求、異步請求、GET請求、POST請求
- 在Swift中使用JSONModel 實例代碼
- 解析iOS運用開辟中對設計形式中的籠統工場形式的完成
- 《從零開始學Swift》學習筆記(Day 40)——析構函數
- IOS開發---菜鳥學習之路--(十二)-利用ASIHTTPRequest進行異步獲取數據